Let’s Make Beaded Snowflakes

January is here and so are cold temperatures and snow for some of us! Let’s make some snowflakes today that won’t make us any colder! These are easy to make and so pretty! (And they are great for practicing some fine motor skills.)

You’ll need 3 pipe cleaners (or chenille stems), a pair of scissors or wire cutters and some colored pony beads.

Cut the 3 pipe cleaners in half.

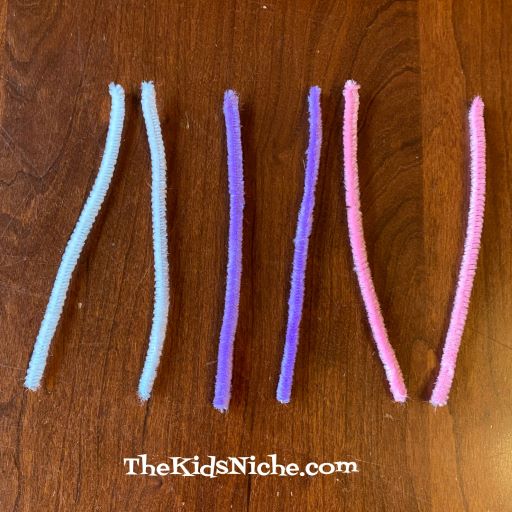
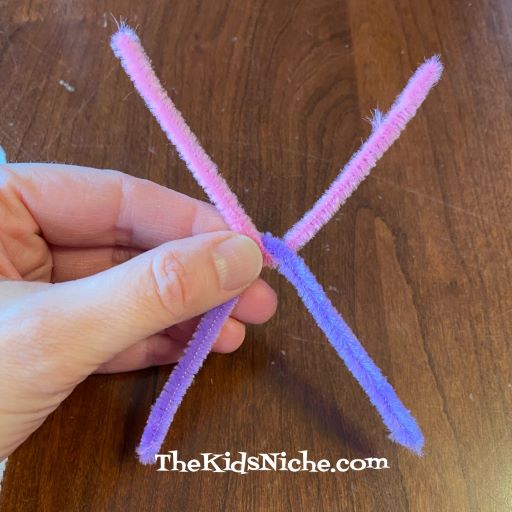
3 half pieces will make 1 snowflake so you now have enough pipe cleaner pieces for 2 snowflakes. Here are 2 different ways to wrap the pipe cleaners into the snowflake shape: #1.) Fold 2 pieces into a “v” shape.

Put the 2 pieces together at the bends.

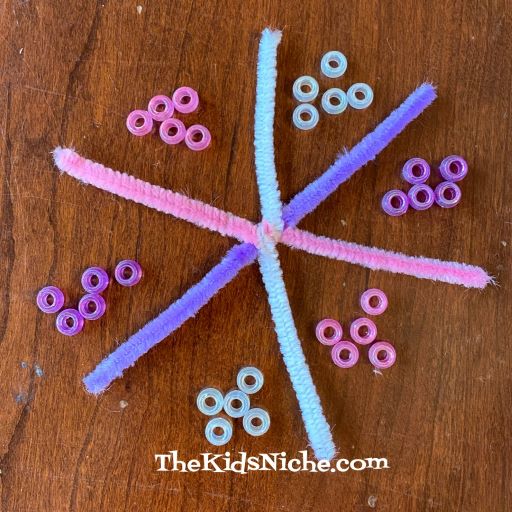
Wrap the 3rd pipe cleaner around the center of the other 2.

OR way #2.) Hold the 3 pieces of pipe cleaner together…

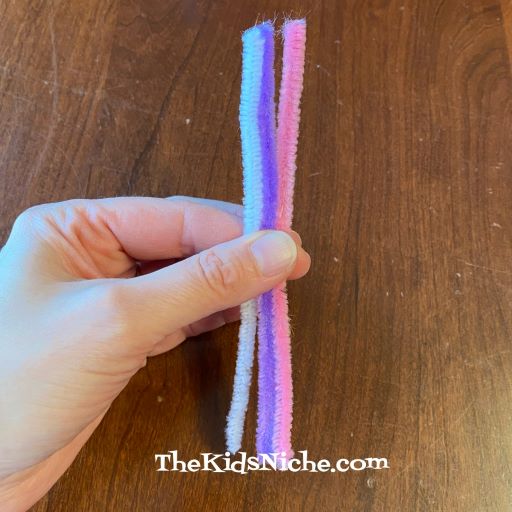
And give them a twist or two in the center.

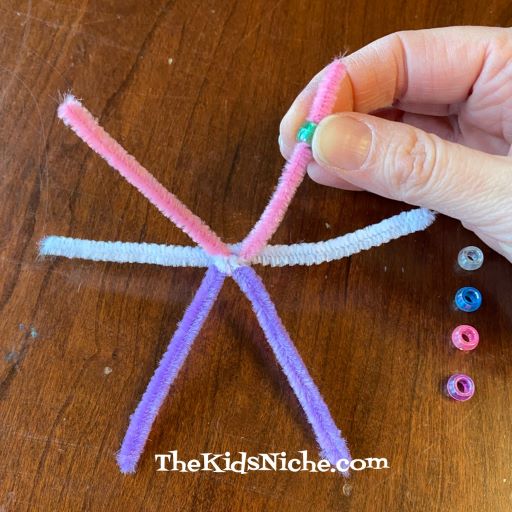
Now it’s time to use the pony beads. You will need 5 beads for each “spoke” of the snowflake for a total of 30 beads. The colored beads can be in whatever order you decide to use. You can make a pattern of colors for your child to duplicate like the following pattern: green, white, blue, pink and purple.

When they have enough beads laid out in the right order, it might look something like this:

Slide the beads onto the piper cleaner spokes in the same order.

After the 5 beads are on the pipe cleaner, bend the rest of the pipe cleaner spoke into a circle and push the end back into the last bead.

Continue sliding the beads onto each pipe cleaner spoke and bending the end in until all 6 spokes have been done. Isn’t it pretty?!

You could also have your child find 5 beads of the same color for each spoke. These beads match the color of the pipe cleaner spoke they will be placed on.

This way is also quite pretty!

Or you can let your child put the beads on in any order that they like. If you would like to hang your snowflakes up, simply add a piece of thread or string through one of the circles. I hope you will have fun making these beaded snowflakes! 🙂

Family Friendly New Year’s Eve Card Games

Are you looking for some fun family-friendly games for New Year’s Eve but all you have is a deck of playing cards? No worries, we’ve got you covered! Grab your cards and let’s get started!

This image has an empty alt attribute; its file name is 11-small-2.jpg

#1.) Spoons. This game is great fun and can get a little wild! (It’s best played with people with short fingernails.) 😉 Set up the game by placing spoons in the middle of the table, one less spoon than the number of players. Make sure there are spoons within reach of each player. Deal 4 cards to each player.

This image has an empty alt attribute; its file name is 1-small-9.jpg

The dealer places the remaining cards face down on his/her right side. Play begins with the dealer drawing one card from the pile. The idea is to get 4 cards with the same number. The dealer looks at the card and decides to keep it in his hand and discard one card from his hand OR he passes the card to the next person. Everyone plays at the same time, once the cards reach your spot in the circle. Each person does the same thing, either swapping the card for one in his hand or passing it on to the next person. You should always have 4 (and only 4) cards in your hand. When a player has 4 cards with the same number, he takes a spoon from the middle of the table. All other players then try to get a spoon too. The person that doesn’t get a spoon loses that round and loses a life. If you lose 3 lives, you are out of the game. Some people will sneak a spoon quietly and keep playing while others will yell and swoop in to grab one. Either way, you’ll be laughing and having fun!

#2.) Cuckoo. This is a game I haven’t played yet but it sounds like fun. It’s very simple to learn. Each player begins the game with 3 lives. The dealer gives 1 card to each player. The remaining cards are set aside and not needed.

This image has an empty alt attribute; its file name is 12-small-2.jpg

The idea is to avoid being the player with the lowest numbered card at the end of that round. When it’s your turn, you can choose to keep your card or swap it with the player on your left. After each player has taken their turn, everyone shows their card and the player with the lowest number loses that round and loses a life. You continue to play rounds until there is only one player left in the game. The last player in the game is the winner.

#3.) Crazy Eights. This game can be played by fairly young children, perhaps with a bit of help or prompting from a parent. Set the game up by dealing 5 cards to each player. (Deal 7 cards to each player if there are only 2 players.) Place the remaining deck in the center of the playing area for the draw pile and turn one card over to begin the discard pile. If the card is an 8, place that card back into the middle of the draw pile and draw another card. The goal is to be the first player to get rid of all your cards.

This image has an empty alt attribute; its file name is 4-small-9.jpg

The player to the dealer’s left goes first. They play a card from their hand that matches either the number or the suit (heart, club, diamond, spade). In my example, they could play a 2 or a card with hearts.

This image has an empty alt attribute; its file name is 5-small-8.jpg

In this example hand, the player would play the 9 of hearts on the discard pile then play continues to the next player. If the player has no matching card, he draws one card from the draw pile. If it matches he can play that card. The player continues to draw 1 card at a time until he gets a card that matches. This game is called Crazy Eights because all 8 cards are considered WILD! You can play an 8 as a wild card on any other card and then you decide what the suit will change to. Example: if the card to play on is a 2 of Hearts, a player can play an 8 card on it and then say the play will now go to Clubs and the next player must play a Clubs card. Play ends with the first player to play all of his cards. If you want to keep score after each round, the cards that are left in the other players hands are added up and the points are given to the player winning that round. Kings, Queens and Jacks are worth 10 points each, 8’s are worth 50 points each and all other cards are at face value.

I hope you find these games fun and entertaining for your family! And if you are reading this on New Year’s Eve, I hope you have a wonderful time welcoming the new year in! 🙂

Do You Have the After Christmas Blues?

When all the hustle and bustle and excitement leading up to Christmas has passed, do the After-Christmas Blues show up at your house? Sometimes taking a break from all the “new” toys and kits that arrived on Christmas Day, can be a help. Try going back to some of the “old” crafts they’ve done before but haven’t thought about in a while. New toys and things will seem more fun again after the kids have had a little break from them. There is comfort to be found in the tried-and-true. Here are a couple of suggestions of things we’ve done on here before but might be fun to pop out for the kids again.

#1.) Making paper snowflakes. It’s still obviously winter and cold outside so how about doing a craft with snowflakes that don’t make your fingers cold when you play with them. Follow the link to this project:

Do You Want to Make Snowflakes?

This image has an empty alt attribute; its file name is 9-small-4.jpg

#2.) You can even make a snowman with your paper snowflakes.

Do You Wanna Build a Snowman from Paper Snowflakes?

This image has an empty alt attribute; its file name is 9-small-5.jpg

#3.) Hide and Seek Snacks. Try making up a fun snack in little cups and hiding the cups for the kids to find. Look for that post here:

Hide and Seek Snacks

This image has an empty alt attribute; its file name is 4-small-6.jpg

#4.) Make some craft stick snowflakes. These are easy and fun! Follow the link to see how they’re made:

https://wordpress.com/post/thekidsniche.com/3254

This image has an empty alt attribute; its file name is 2-small-5.jpg

There are over 450 posts here on my blog so I hope you can find some fun things to do with your kids to help everyone get back on an even keel again. Those new gifts will look even better afterwards! Have fun! Hugs to all of you! 🙂

Taste Testing Tuesday With Christmas Cookies

Things are a bit crazy around our house this year with a lot of things going on. So here is a repeat of a special Taste Testing Tuesday from last year. 🙂 And if you are worried about someone stealing your Christmas cookies, I’ve heard that certain elves can be bribed to guard them for you. 😉

It’s time to rev up your taste buds! Yep, it’s Taste Testing Tuesday once again. And I’m betting today’s taste test will be your all time favorite! What are we testing? Christmas Cookies!!! A special thank you goes out to my daughter, Megan, for sharing some pictures with me of some of the Christmas cookies they made at their house this week. 🙂 Here are some suggestions for yummy cookies you can make and test out:

#1.) Peanut Butter Blossoms. Oohh these are soooo yummy! A peanut butter cookie with a chocolate kiss added on top. Drooooooling…

This image has an empty alt attribute; its file name is 1-small-4.jpg

#2.) Rice Krispies Treats Christmas Trees. These are made just like the original Rice Krispies Treats recipe on the cereal box plus some green sugar and sprinkles added. Then cut them into triangles and you’re done!

#3.) Molasses Crinkles – This is one of my favorite cookies. I remember making them with my mom when I was a little girl. 🙂

#4.) Sour Cream Cookies – I was looking for the recipe that my Grandma used to make for us and these are similar but not quite the same. The recipe calls for adding a frosting glaze to these while they are still hot but I went with sprinkles instead to cut down on the amount of sugar.

#5.) Cut-Out Butter Cookies – Ok, this has to be my all-time favorite cookie! (Molasses Crinkles are a close 2nd.) This is another recipe I made with my mom when I was little. Well, and even after I got “big”. And then I made them with our kids and now our daughter made this batch with her kids. 🙂

I have to admit that decorated cut-out cookies get my vote for at least LOOKING the best! 😉

#6.) Russian Teacakes – This cookie is one of my hubby’s favorite cookies. They rank pretty high with me too. I make them with finely ground pecans but you can use other nuts instead. They are rolled in powdered sugar which helps to make them especially tasty.

#7.) Peanut Butter Cookies – Another one of our favorites! Ok, yes, there seems to be a pattern developing here, doesn’t there? I have a lot of favorite cookies! Haha! One of my jobs when I was little and helping my mom make these was to make the criss-cross pattern on each cookie. I always thought that was pretty cool. 😉

So what is your favorite Christmas cookie? Do you make Christmas cookies at your house? Maybe you buy some from a store? What is your all-time favorite cookie that you would ask for if you could have any cookie in the world? I hope you have a great Christmas cookie Taste Testing Tuesday at your house! 🙂

Christmas Sticker Garland

Today I want to share with you a Christmas garland that I made using puffy stickers. It’s simple to make but does require using a hot glue gun. Regular school glue might work but I wasn’t sure it would hold the weight of the stickers so I used a glue gun.

You’ll need some ribbon in the color/design of your choice and some puffy stickers. You could use regular stickers too, but leave the backing on them for this project. Begin by picking your ribbon.

Get your stickers out and ready. I found these at Hobby Lobby for 50% off. Except for the burlap bows…those are some I had leftover from another project.

Decide how long you want your garland to be and cut the ribbon a few inches longer to allow for making a slip knot on each end for hanging.

I folded my ribbon in half and made a tiny mark on the center. I picked which sticker I wanted to be in the center of my garland. Then I put some glue on the mark.

Don’t remove the backing on the sticker. Just place it on the glue dot and hold it in place for a few seconds.

I used a ruler to measure from the center of the sticker to 4 inches in each direction. I made a small dot on the ribbon with a pen and that’s where I placed the next dot of glue from the glue gun.

I followed the same pattern on both sides of my center sticker.

Just keep marking the ribbon every 4″ and gluing on stickers until you run out of room on your ribbon.

The weight of the puffy stickers made the stickers want to lean forward when I tried to hang the garland up. So I used some of these little dot adhesives to help hold my garland to our fireplace mantel. Depending on what type of stickers you use if you will need to do this step. (The pop-adhesive dots might not work well on painted walls so be careful where you use them.)

So here you are! I think my garland is cute and I’m sure yours will be too!

I hope you will have fun making a Christmas sticker garland for your home! 🙂

Candy Bar Snowman Craft

Hello again! Hope this finds you all doing well and having fun preparing for Christmas! Here’s a cute craft to add to your holiday fun! I’ll show you a basic way to make it, but then the sky is the limit on how you decide to decorate your candy bar snowman. 🙂 You’ll need a candy bar, some white paper, tape, scissors and some markers for a basic snowman. I’ll be showing you how to use some foil also, but it’s up to you if you use it or not.

We’ll start by taping down the extra wrapper on the 2 ends of the candy bar.

As I mentioned already, I wrapped foil around the candy bar to make it look fancier, but if you don’t want to use foil on yours, you can skip ahead to the step using the white paper. To use the foil, tear off a piece a little bigger than the candy bar. This piece is bigger than I needed and I cut in down to a smaller size. You need enough foil to completely cover the candy bar.

Wrap the first side up and hold in place with a piece of tape.

Then wrap the second side up so it crosses over the first edge. I used double-sided tape to secure this side of foil.

Neatly fold the foil in on both ends of the candy bar.

The size of the candy bar you are using will determine what size you cut the white paper into. If you used foil, you will want to cut the white paper so that the foil shows a little on both ends of the candy bar after you wrap the white paper around it. If you didn’t use the foil, you can make the white paper go all the way to both ends of the candy bar.

Also cut the length of the paper so it will wrap around the candy bar and cross over a little on the back side.

Wrap the paper around the candy bar, but don’t tape/glue it in place just yet. Run your fingers down the sides of the candy bar so you leave creases in the paper. Then remove the paper from the candy bar. It’s time to start drawing our snowman. 🙂

You need to draw your snowman in between the middle creases on your paper. This will be the front of the snowman. I added eyes, a nose, a mouth and buttons using markers. I suggest doing all of your drawing before putting the paper around the candy bar.

Wrap the paper around the candy bar and tape it together on the back.

You can draw on a hat and scarf or use bits of colored paper to make them.

Your candy bar snowman can be finished now and shared with that someone special! 🙂 Or here are a few more suggestions you might want to try. You can use a pair of the small stretchy gloves for a hat. And tie or glue on some ribbon for a scarf.

You can use wiggly eyes instead of just drawing eyes or use tiny pom poms. Maybe you’d like to add sequins, snowflakes or real buttons to your snowman. A piece of fleece can be made into a hat or scarf. Let your imagination go wild or just use things that you have on hand. There’s no right or wrong way to make your snowman. 🙂 And each one you make can be different.

I hope you can take this basic candy bar snowman idea and turn it into some special snowmen all your own! Have fun! 🙂

Dollar Tree Felt Craft Kits

I found a couple of felt craft kits at the Dollar Tree store and wanted to share this idea with you. At just $1.00 for each kit, you can craft with up to 5 kids! Pretty good price, right?! So here’s the 2 kits I found:

Let’s look at the penguin felt ornament kit first.

This little guy is so cute!

When you open the package, you will find 5 individually packaged kits.

In each individual package, you will find this:

The felt pieces for making the penguin have been punched and for the most part you can gently pull them apart to get the pieces ready to use. Have a pair of small scissors handy in case any pieces need a little help getting free.

Once all the pieces are separated, you are ready to put your penguin together. I would recommend using a craft glue like Tacky Glue instead of Elmer’s glue. I used the Elmer’s glue when making my penguin and I had some trouble getting the pieces to stay together. I switched to the Tacky Glue.

There weren’t any instructions included in the package, but you can figure out how to put the penguin together by looking at the picture on the front of the package. (Remember, this kit only cost $1.) 😉 And here is my finished penguin! I think he’s a cutie!

Now let’s look at the second kit I bought. This kit is for making animal finger puppets.

They are cute too!

I had more difficulty getting these felt pieces separated and I did resort to using a pair of scissors at times. Also this package did not have the kits divided into separate kits already, so you will have to figure out which felt pieces go with each finger puppet. It’s rather like making a puzzle. 😉

Here they are separated into the pieces for each animal. I didn’t go ahead and make the puppets because I wanted to save them for a fun project for some kids I know. 😉

These kits might be a little too difficult for really young children but I’m sure ages 7 or 8 and up will enjoy making them. I’m not sure if the felt pieces will stick together well enough to be used as finger puppets, but they would definitely make some very cute ornaments to hang around your house. 🙂 Mark these down as 2 more fun projects from Dollar Tree! 🙂