2 Super Simple Ghost Treats for Halloween

Are you looking for a last minute addition to your treat line-up for Halloween? You and the kids can have these super easy ghosts made in no time! All you need for the first project is a banana and some miniature chocolate chips. If you’d like to add an “O” for a mouth, you’ll need a few Cheerios cereal pieces.

Cut the banana in half and add 2 miniature chocolate chips for eyes. I pushed the pointed side of the chocolate chip into the banana. And there you are! 2 ghosts ready for spooking your guests!

Or if you want to give your ghosts a mouth, press in 1 piece of Cheerios cereal.

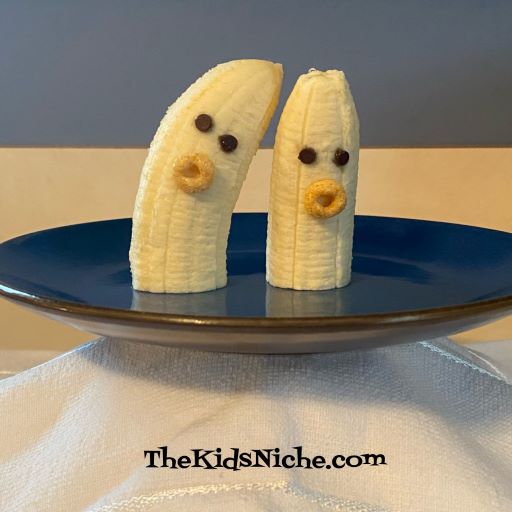
I can almost hear the eerie “OOOoooo!” these ghosts are making! 😉

Are you ready for the second ghost treat? This one is easy too! You’ll need some lollipops or suckers, (I used Tootsie Roll Pops because the sucker part is nicely round), 1 paper tissue for each ghost, 1 small rubber band or a piece of string for each and a black marker or pen.

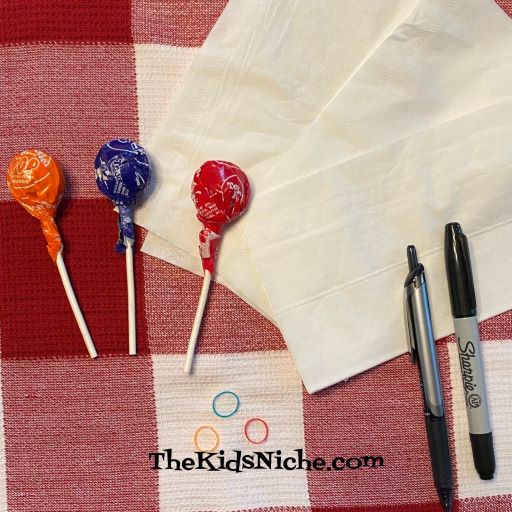
Ready? Let’s do this! First open up a tissue and lay it flat. Lay one lollipop on the tissue with the round part in the center and the stick pointing to one corner.

Fold the tissue over the lollipop to make a triangle.

Gather the 2 sides down around the lollipop to form a “head”.

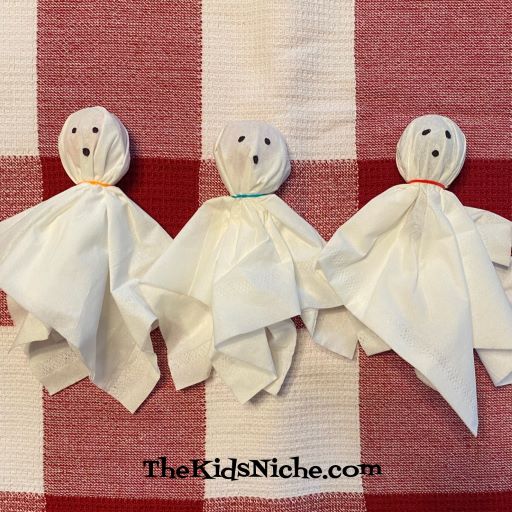
Put the little rubber band or string around the “neck” of the ghost.

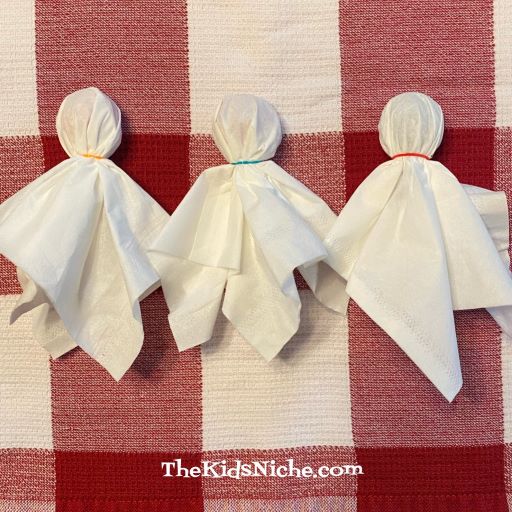
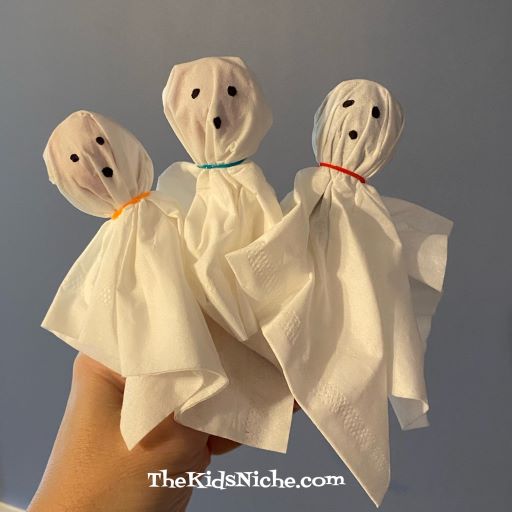
You can use the ghosts like they are or you can add some black dots for eyes and a mouth.

That was pretty easy, wasn’t it? Now you have 2 kinds of ghosts for your Halloween celebration!

I hope you have a great Halloween! 🙂

A Handy Trick When Someone’s Sick

Hey, there! I just wanted to share a quick tip that might help you the next time someone at your house isn’t feeling their best. Sometimes while recovering from being sick, your child may have time when he or she feels like doing a little something while still laying in bed or on the couch. But how do you contain the pieces of say, Lego? My suggestion is use a cookie sheet that has sides on it. 🙂

A cookie sheet will give a flat space for playing and can keep the pieces from falling onto the floor.

It works well for putting together a small puzzle. A second cookie sheet would be great for holding the extra puzzle pieces too.

A small craft project can be nicely contained on a cookie sheet. Markers or crayons can only roll as far as the edge! 😉

A cookie sheet is a convenient place for playing a game of cards. This deck is a miniature set, but a regular size set will work too. Solitaire or Go Fish, anyone?

If you lay a towel down on the cookie sheet, it could work well for serving a meal or a snack. I’m guessing you will come up with even more ways to use a cookie sheet! Hope this helps you! 🙂

Scary Face Pancakes Are Back at iHop!

It was a night a lot like the night of Oct. 29, the last time it happened. Something strange came over our pancakes. The toppings sprung to life, rearranging themselves. Candy corn curved into evil eyebrows, whipped cream twisted into a devilish smile. The transformation had begun! Oh no, what’s that?! It can’t be, it’s happening again, they’re aliiiiive!

Scary Face Pancakes are back and kids 12 and under get one for freeee on October 29th from 7am to 10pm! Create your own this Halloween Season!

Sickness

I’m sorry to tell you that I tested positive for the Covid-19 virus yesterday morning. I will need some time to fight this off and to recover. Therefore my posts may not be as often for a while. I hope to still share some things with you but I don’t feel up to making crafts or food projects at the moment. I hope each of you can stay well and that you’re enjoying our Fall days!

Let’s Draw Monsters!

October is the month for witches and goblins and ghosts aaaand….MONSTERS! So let’s look at one easy way to draw funny or scary monsters! There is no right or wrong way when drawing a monster because, well, monsters come in every shape and size and design, right?! They can be any color you want them to be and have as many (or few) eyes and arms and legs. This is YOUR monster! You’ll need just a few things…a piece of paper and some markers. Oh, and some wiggly eyes make them even cooler!

First, draw some shapes or blobs with your markers. Remember, any shape is A-OK! Yep, even a flower is great.

Next place some wiggly eyes on your monster shapes. You don’t need to glue them down yet unless you want to, then that’s ok. I didn’t glue mine down yet, just in case I wanted to move them as I continued designing my monsters.

Now add more details like noses, mouths, arms, legs, hair, etc.

When you’re finished adding details, glue the wiggly eyes down, if you haven’t already done so. And you did it! You are a MONSTER MAKER!! Great job! I’ll show you my monsters in closer detail to give you some ideas.

This one looks like a person…maybe he or she is making friends with the monsters?

This monster has 3 eyes, 4 arms and 3 legs. Wow!

This orange guy has short arms and legs, funny hair and 3 eyes.

Here’s a one-eyed flower monster running away from something.

Whoa, this monster’s eyes go up and down instead of across! And look how big his ears are!

This guy might have been scared by someone…is it YOU? Maybe the monsters are scared of people?

I hope this will give you some fun ideas about how you can draw some monsters. You can even make up a story about your monster. Or draw them a house…or a pet…some trees…you get the idea! Have fun! 🙂

Great Price on Lego BrickHeadz Nutcracker!

Are you or your kids into Lego BrickHeadz? Are you looking for one to help decorate for the holiday season? If so, ZOOM over to Walmart.com where you can buy the Lego BrickHeadz Nutcracker for only $5.99! It’s normally $9.99 but if you check the prices of other Lego BrickHeadz listed online at Walmart.com, you’ll see this is a crazy cheap price!

LEGO BrickHeadz Nutcracker 40425

I don’t know how long the sale will last or if they will run out so if you want one, HURRY!!! 🙂

Make a Halloween Spider!

Are you looking for something fun to help decorate your house for Halloween? You might enjoy making some Halloween pom pom spiders with your kids. They are more cute than scary, but they could be scary in the right situation. 😉

Here’s what you’ll need for this project: a black pom pom (I used a 2 inch size), 2 black pipe cleaners or chenille stems, some glue and 2 wiggly eyes. You will need to cut the pipe cleaners so a pair of wire cutters or a sturdy pair of scissors is helpful.

Begin by bending 1 pipe cleaner in half.

Then cut it on the crease so you have 2 halves.

Fold each of those pieces in half again and cut them on the crease also.

Do the same with the second pipe cleaner so you have 8 pieces.

Bend each of these pieces into a letter V shape. These will be the spider’s legs. I know that spiders actually have 8 legs, but that is a lot of legs to glue onto 1 pom pom so you may want to do like I did and let your spider have just 6 legs. 😉

Now switch to working on the pom pom and glue the 2 wiggly eyes onto it.

Make sure the eyes will stay in place before moving to the next step. Apply glue all around one end of a “leg”.

Stick the leg into the side of the pom pom, leaving space for the other 2 or 3 legs to be added to that side.

I found it helpful to sit the spider’s body (the pom pom) on an upside down Dixie cup.

Hold each leg in place for a little bit so the leg doesn’t just fall back off. After putting 3 or 4 legs on one side, turn the spider so you can add the 3 or 4 legs to the opposite side.

You might want to let your spider sit and dry for a little bit before you move him around much. Once he is dry enough, that’s when the fun begins! 🙂

Where can you put your spider to make people laugh or even to give them a little Halloween scare? If you are careful and move the legs gently, you can reposition the spider’s legs to make him sit in different locations.

Want to give Mom a surprise? Hide him somewhere in the kitchen. 😉

Or maybe in the bathroom so Dad finds him?

On someone’s computer keyboard? (Yes, it’s rather dusty, isn’t it? But since the owner is sick right now, we won’t mention it.) 😉

On a lamp in the living room?

In the refrigerator??!

Or maybe you should just keep him in with the Fall decorations. 😉 Wherever you put him, just be sure the person who will find him has a good sense of humor and they won’t mind!

I hope making this little Halloween spider will help bring some Halloween fun to your house! 🙂

Taste Testing Tuesday #60 Rum Tum Ditty

Today’s Taste Testing Tuesday takes me back to when I was a little girl and my mom would make us a special treat for lunch. It was called Rum Tum Ditty. The younger ones of us 6 kids decided it sounded much cooler to call it Rum Tum Ditty Dum! It just had a cooler ring to it! In fact, I remember marching around the kitchen and dining room saying “Rum Tum Ditty Dum!” over and over in time to our marching. (It’s a wonder Mom ever made it for us again after that! Lol)

Here is the recipe, straight from our family cookbook:

For our taste test today, I want to encourage you to use whatever kind of tomato soup you normally buy. When I was little, we used Campbell’s tomato soup and it does need a soup can of milk (or water) added to it. Many soups today don’t need any additional liquid, like the one in this picture.

Also, you can use whatever kind of crackers you have on hand. We used saltine crackers, or as we called them “soda crackers”. But I prefer to use Ritz crackers now. Cheez-its would be awesome and so would most any other cracker.

You can use different kinds of cheese. We don’t often have Velveeta cheese on hand now, but my next favorite for this dish is American. But be open to trying whatever kind of cheese your family likes. Just know that some kinds of cheese are more “stringy” than others. Velveeta and American melt nicely into the soup and crackers.

This recipe is super simple! Break up some crackers into individual bowls. Maybe your family will like different kinds of crackers. No need for everyone to be the same. 🙂

Next, make the cheese into small pieces and add it on top of the crackers.

Pour the soup into a container safe for heating in the microwave OR pour it into a pan and heat it on the stovetop. The soup needs to be warm enough to melt the cheese.

When the soup is hot, pour it carefully into each bowl.

It will be smelling delicious by now!

Gently stir the mixture with a spoon. Look how yummy the melted cheese looks!

I like to eat it as soon as it is cool enough to eat safely, while the crackers are still a bit crunchy. And that’s all there is to it! Rum Tum Ditty! (Or Rum Tum Ditty Dum!) I hope you will give this recipe a try and make some new warm memories of your own! 🙂