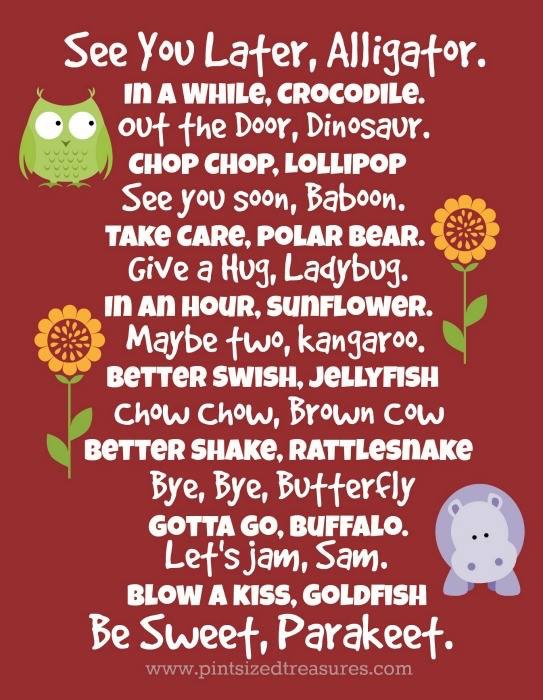
No, I’m not leaving! Just thinking about the fun sayings there are that can help ease the pain of leaving a child or grandchild when you would much rather stay together longer. “See ya later, alligator!” is probably one of the most well known sayings but I found the following picture with a lot more and just had to share it with you.
Try some of these funny sayings the next time you must part from your special kids and I hope they will help everyone part with a silly grin on their face. Teach a few to the kids so you can take turns saying them to each other. Now…I’m out the door, dinosaur! 😁😃🥰
Hey, there! We’re back for another Taste Testing Tuesday! Today’s yummy food is…..waffles! Ooo, are you drooling along with me? We’ll look at 5 suggestions of tasty ways to eat a waffle.
Waffles come in different shapes and sizes. You can buy them frozen from the grocery store or if you have a waffle iron, you can make your own. For today’s test, I made waffles “from scratch” and cooked them in our waffle iron. In case you’ve never seen a waffle iron, here’s what they look like.
You can mix up your favorite waffle batter…I used the recipe in my Betty Crocker cookbook.
A handy-dandy tip is to pour the waffle batter into a container that has a lip for pouring.
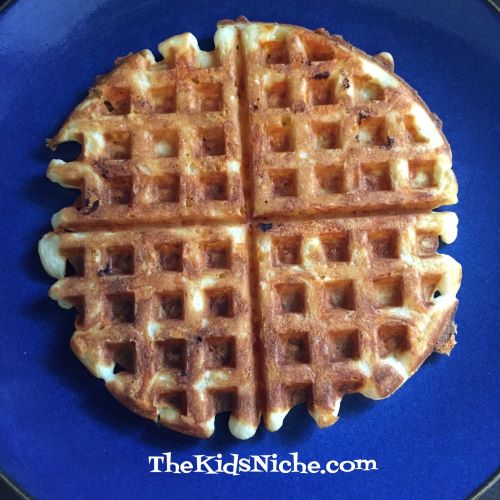
Once your waffle iron is hot, pour some batter in and close the lid. 4-5 minutes is how long it took my waffle iron to cook 1 waffle but be sure to check the instructions that came with your waffle iron. Our first suggestion today uses a plain waffle with nothing cooked into it. But there are so many tasty things you can put on TOP of your waffle! Like butter, maple syrup, molasses, honey, jelly, fruit syrups, etc, etc. I love them with butter and maple syrup. Mmmm!
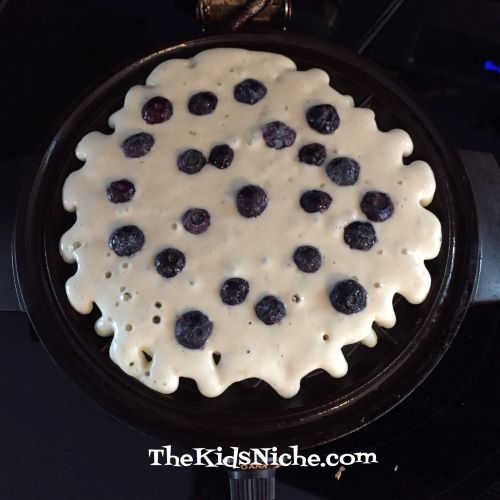
Suggestion #2…sprinkle a few blueberries on top of the batter in the waffle iron before you close it to cook your waffle.
Here’s a picture of the cooked version.
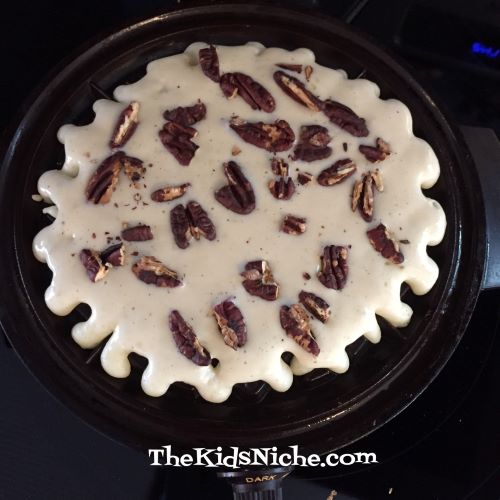
Suggestion #3…sprinkle some roasted pecans on top of the batter before cooking.
It might be hard to see the pecans, but they are there and taste sooo good!
Suggestion #4…sprinkle some grated cheddar cheese on top before cooking.
Again, it might be hard to see the cheese after the waffle has been cooked but it tastes pretty yummy!
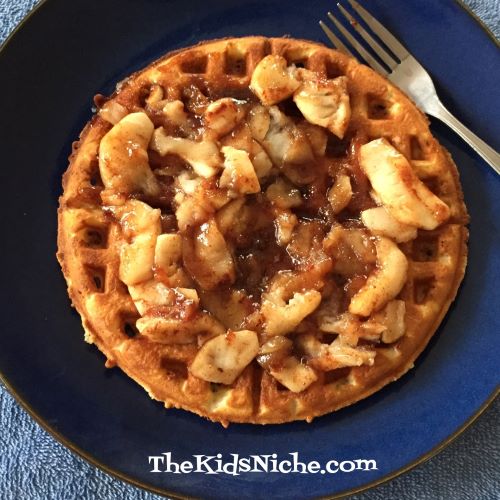
Suggestion #5…cooked up apples spread on top. I put some butter in a skillet and peeled and sliced an apple. After the apple slices started to get soft, I sprinkled in some cinnamon and brown sugar. Then cooked it just a little longer till the brown sugar melted and everything was mixed together. OH YUM! This was delicious!!
I’m sure you can think of many more ways to eat a waffle. Maybe 2 pieces of waffle with some scrambled eggs and cheese inside? How about some peanut butter? Are you hungry now? 😉 Did you make a chart so you can remember your favorite way to eat a waffle? I hope you have fun with your Waffle Taste Testing Tuesday! 🙂
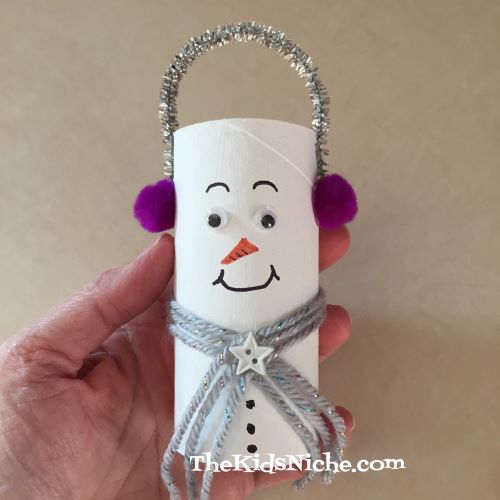
How do you feel about snowmen? I love them!! Especially the crafty kind that you can make in your house and they never melt! 😉 We had some cold days recently that felt like winter and we even had a light dusting of snow, so I got to thinking about snowmen and decided to make some. (Now it’s warmed back up and the temperature has been in the 60’s.) This is an easy craft for kids and takes just some “normal” kind of things you might have around your house. Let’s take a look at my snowmen…
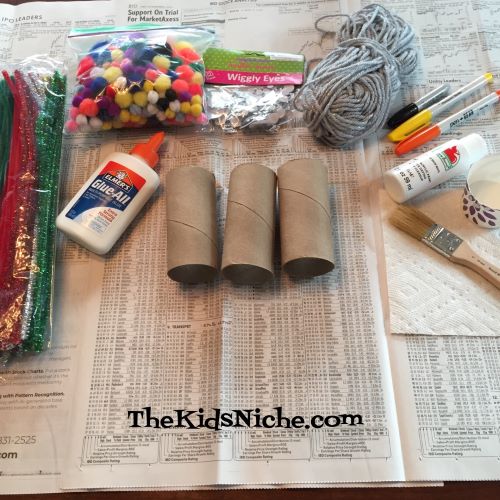
I thought they turned out to be pretty cute! Some things that you’ll need to make these snowmen are empty toilet paper rolls, white paint, paint brush, pipe cleaners, small pom poms, ribbon or yarn or felt, maybe a button or two, wiggly eyes, orange and black markers and either a bottle of glue or a glue gun. (I used the glue gun.)
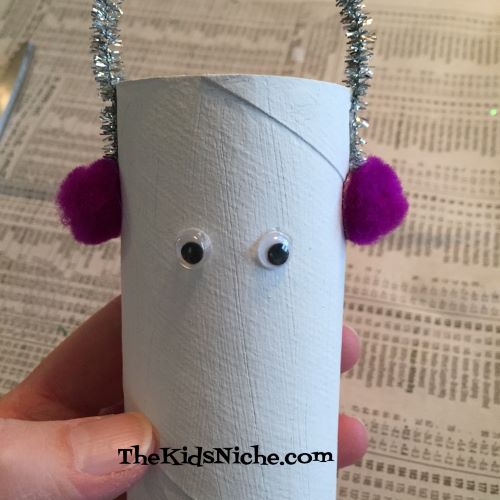
The first step is to paint the empty toilet paper rolls with white paint. Let them dry however long your type of paint requires.
Glue on 2 wiggly eyes. It doesn’t really matter what size the wiggly eyes are. I used 3 different sizes for my snowmen.
Cut a pipe cleaner in half…or even smaller…to use for the top part of the snowman’s ear muffs. Glue the 2 ends to opposite sides of the toilet paper roll. Place the ends on either side of the eyes in a place where the snowman’s ears might be if he had some. 😉
Next glue a pom pom over each end of the pipe cleaner to finish making the ear muffs.
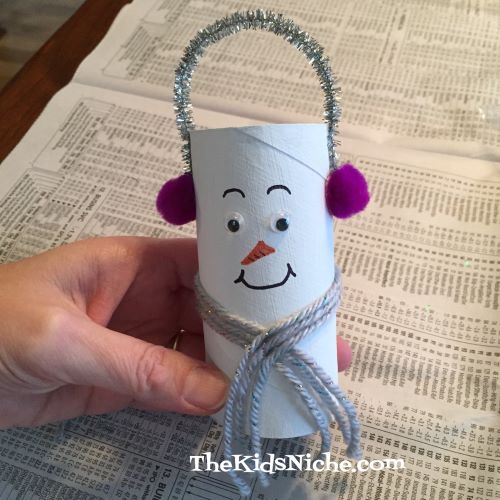
Use the orange marker to draw a triangle below the wiggly eyes to be the snowman’s carrot nose. Use the black marker to draw on a mouth and eyebrows. (I drew the eyebrows on after I took the next picture. Oops!)
For the snowman’s scarf you can use pieces of yarn or ribbon or felt or fabric…you get the idea. 😉 For this snowman, I put 3 pieces of yarn together. Glue the scarf in one spot on the back of the snowman. Then wrap each side around to the front and cross one side over the other and glue in place.
I glued a little star button on top of where the 2 sides cross in the front. You can add 3 black dots for the stones or buttons on the snowman’s tummy, if you like.
And there you are! Great job! You’ve made a snowman! 🙂
For my second snowman, I followed the same steps, but for his/her scarf I took 3 pieces of yarn and braided them together. I tucked one end around the other in front, like you do when you are beginning to tie your shoes. Then I glued it in place.
For my third snowman, I again followed the same steps, except this time I made his/her scarf out of a piece of ribbon. And I glued on a matching button.
You can make your snowman look however you like. He/she might look different because you have different materials to use than what I had. You can shape his/her mouth in different ways to make him/her look happy or sad or silly. I’m sure he or she will look great! The important thing is to have fun making your snowmen! 🙂
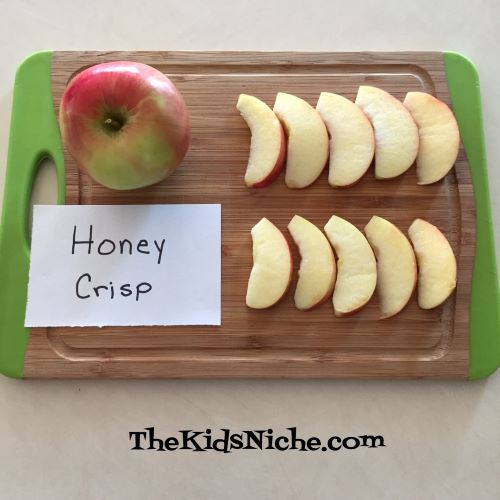
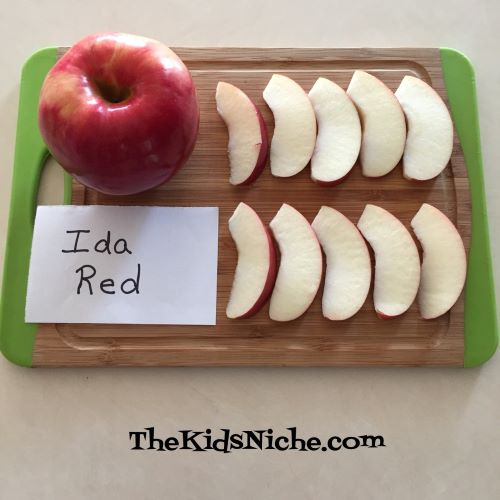
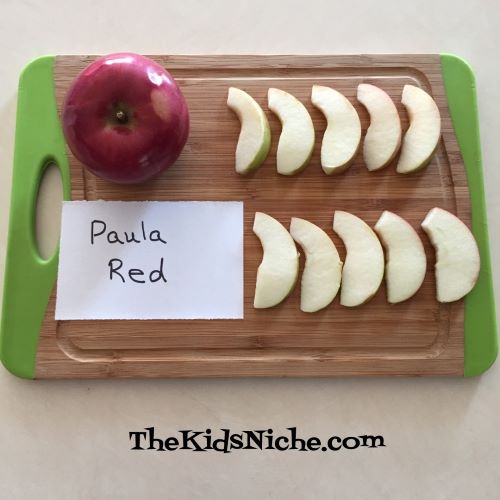
Welcome back for another round of Taste Testing Tuesday! What fruit is plentiful this time of year in the United States? Apples! Now is the time to get your favorite apple from your local orchard or grocery store. Wait, you don’t know what your favorite apple is? Then you are in the right place! Today we’ll taste test 6 apples that are available here locally. Make yourself a little chart so you can keep track of who likes what in your family.
As you can see, I made a little sign to keep beside each type of apple. I bought 2 of each apple so one could be cut into slices to taste test and one to look at and see the differences between the apples I chose. Some differences you can talk about with the kids are the color, shape, size, if the flesh of the apple is soft or crunchy and is it sweet or tart? Here are the ones I used:
Gala
Honey Crisp
McIntosh
Ida Red
Paula Red
And last but not least, Golden Delicious.
I like apples that are a little sweet or a little tart and I especially like the softer flesh. What are your favorites? Now I’m hungry for an apple pie or apple crisp! haha! Hope you have fun tasting apples and you discover some new favorites. 🙂 Thanks for stopping by!
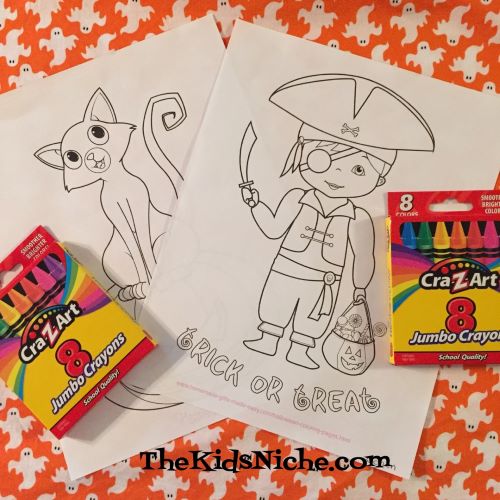
Halloween 2020 is looking a bit different from other years, isn’t it? Here in Ohio we’re being discouraged from having Halloween parties or getting together with people we aren’t around much and it’s all because of the Covid-19 virus. Should you take a chance on taking your family to a party? What about trick or treating? Is it safe? For those of you looking for a way to stay home with your kiddos but still let them have a fun time, I created Halloween-Party-in-a-Box. We don’t live close to our grandkids and in the interest of keeping everyone healthy, we won’t be seeing them this year at Halloween. But I wanted to do something to help them still enjoy this crazy holiday. Maybe you can use some of these ideas for your own celebration.
Let’s start off with coloring pages. There are quite a few free coloring pages that you can find on the internet. I just “Googled” “coloring pages” and found some cute free ones that I printed out for the grandkids. I added some new crayons or colored pencils and ta dah, there’s one activity.
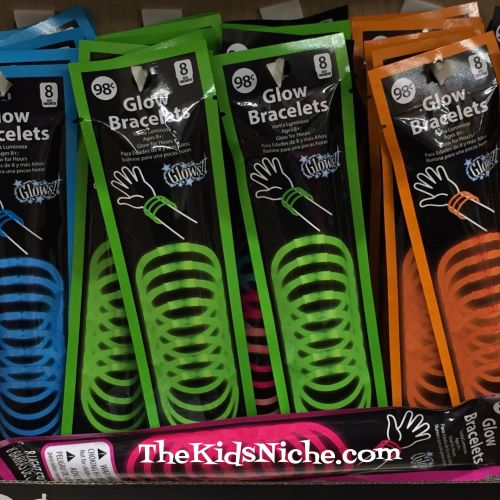
Walmart had lots of odds and ends of Halloween fun for a low price so I found it fairly easy to come up with things for a party. Glow bracelets, for example. Halloween is all about being spooky and doing things in the dark so glow bracelets fit right in. You can get 8 glow bracelets for $.98.
Decorating a small paper bag with Halloween stickers and anything else they’d like to draw on, makes up activity #2. I found a pack of Halloween pencils so I threw some of those in too.
In order to keep the items for each activity all together in the same place, I used quart and gallon sized zip plastic bags.
Activity #3 is decorating pumpkin cookies. Yum! I found a box of 16 cookies with icing and sprinkles which I shared between 2 sets of grandkids.
I divided the sprinkles into 2 small containers and purchased 2 extra small tubes of icing gel so that each group had 3 colors to decorate with…orange, green and black. Again, I put everything for this project in a zip plastic bag and wrote on the bag what the project is.
If you’re having cookies to eat, you need something Halloween-y to eat them on, right?
Halloween colored crazy straws will make drinking more fun too. 😉
Some tiny Halloween puzzles will be fun to put together for activity #4.
If you want to make it more interesting, have the kids race to see who can get their puzzle together first. I think they are cute!
I found tiny pumpkins in a clearance sale and decided to add in some markers for a drawing faces on a pumpkin activity. (#5)
Activity #6 is the grand finale with a “Wrap a Mummy” game. All you need is some toilet paper. 🙂 There are different ways to play this game so pick the one that fits your family best. If you have enough people, divide into 2 teams and divide the toilet paper rolls between the 2 teams. Pick someone to be the mummy and the rest of the team wraps them in the toilet paper. The winning team is the one with the best looking mummy. (Remember to leave eyes and mouths uncovered for breathing and seeing where they are walking!) This could be extra fun if the mummies are mom and dad and the kids are doing the wrapping. Another version could be if all the kids become mummies. After they are all wrapped up, they could have fun walking around with their arms out in front of them, making spooky noises! 😉 (And probably chasing their siblings or parents!)
I included a little note to the grandkids that is on the top of everything when they open the box.
One little tip I have is if you are sending the Halloween-party-in-a-box to kids that you don’t see often or are young little munchkins, you might include a picture of yourself to help them know who sent them their box of fun. Grandma and Grandpa, this would be a great thing to do if mom or dad is feeling stressed out and out of time before Halloween…you could offer to take care of the Halloween party this year and show up with your Halloween-Party-in-a-Box all ready to go. 🙂 (Depending on your situation, of course.) I hope these suggestions will help you still have a great Halloween 2020!
This cool deal showed up in my email and I wanted to share it with you. In case you haven’t heard, you can get a FREE Mr. Mummy pancake at your favorite IHOP restaurant, now through October 30th! Here’s the details:
Celebrate Halloween With A Freaky Freebie From IHOP®!
Happy Halloween from IHOP®! Halloween from home & snag a FREE Mr. Mummy Pancake between October 26-30 when you spend $20 on your online order – no tricks! Use code FREEMUMMY at checkout.
Come On In For Seasonal Treats You can also head to your local IHOP® to treat yourself to some delicious seasonal bites and kids 12 & under to a FREE Mr. Mummy Pancake!
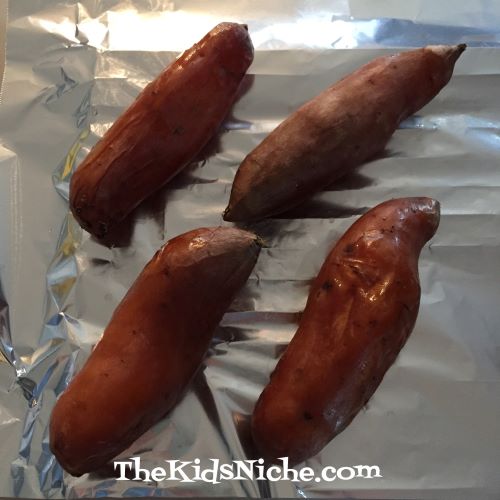
It’s Tuesday again and you know what that means – it’s time for another Taste Testing Tuesday! This week we’re looking at some ideas for eating sweet potatoes. Let’s talk about ways to use baked sweet potatoes. I usually wash the potato and wrap it in foil, then bake it for 1 hour at 350 degrees. The sweet potato is ready to eat when it feels soft when squeezed gently. (Use a hot pad or pot holder when squeezing!)
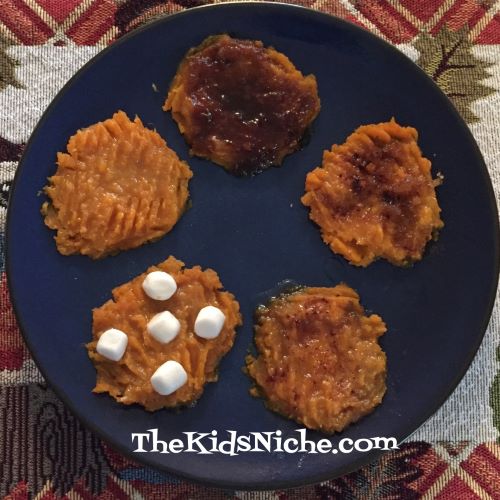
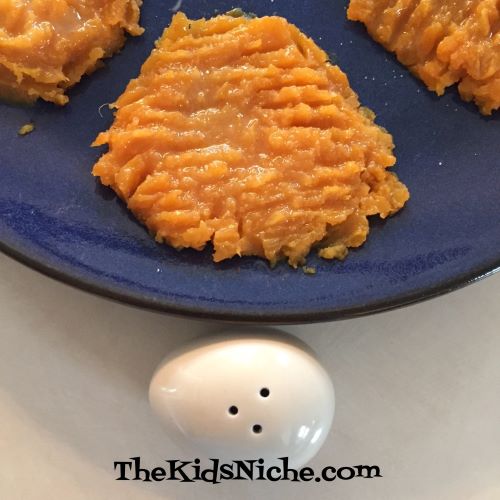
Although there are many ways to eat sweet potatoes, we’ll look at 5 suggestions today. You can eat the peel of a sweet potato but if you are trying to convince someone that sweet potatoes really DO taste good, I suggest taking the peel off. Some people like the peel and some don’t…I’m in the “don’t like the peel” camp. 😉 For our taste test I took 1 baked sweet potato and made 5 small servings on one plate. I put butter on all the servings because I think it adds a great flavor but also helps the potato be less sticky when trying to eat it.
Suggestion #1: Butter and salt. (Isn’t that a cute salt shaker?)
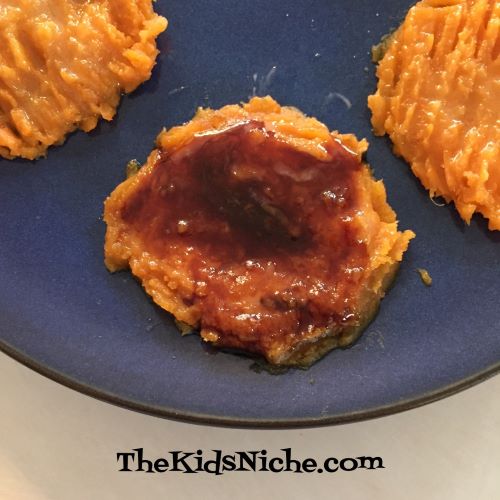
Suggestion #2: Butter and molasses. This is the way my husband like to eat them. I got a little too much molasses on this small serving…oops! My molasses didn’t want to “turn off”. 😉
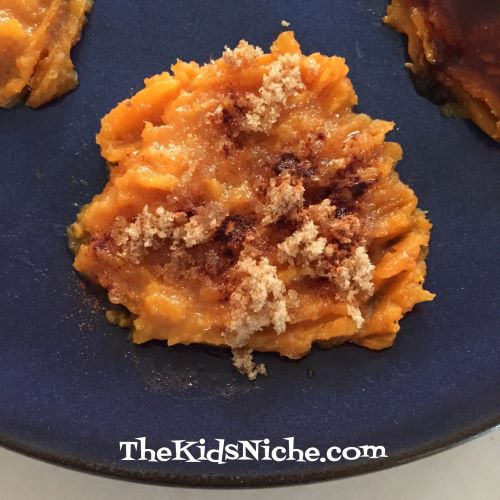
Suggestion #3: Butter, brown sugar and cinnamon. (Mmmm!)
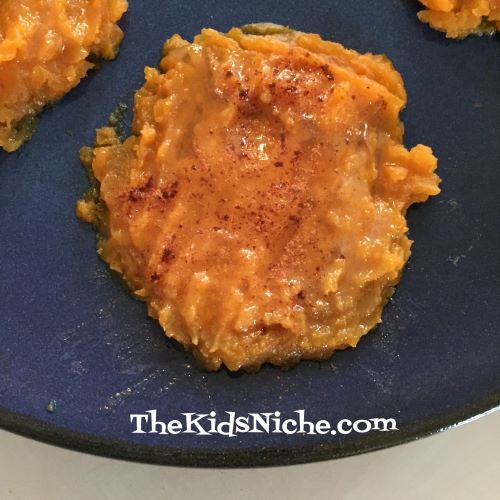
Suggestion #4: Honey and cinnamon. (Very yummy!)
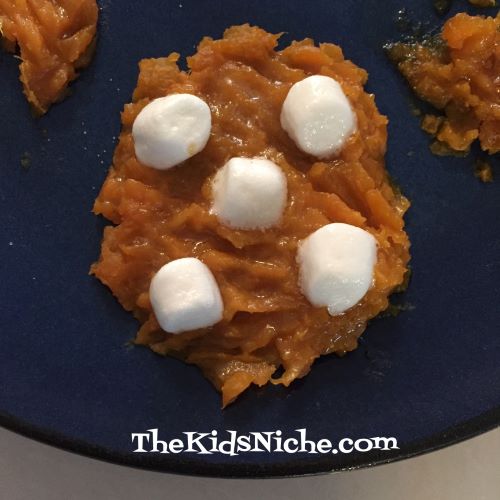
Suggestion #5: Butter and miniature marshmallows. (Oooo!) Heating the marshmallows on top of the sweet potato until they are nice and soft or even browned a little, makes it even tastier!
A reminder to make your chart so the kids can have fun drawing in the faces to show what they think of each variation of the sweet potato samples. A smiling face for “Yummy!”, a straight face for “It’s ok.” and a frowning face for “Umm, no thanks!”
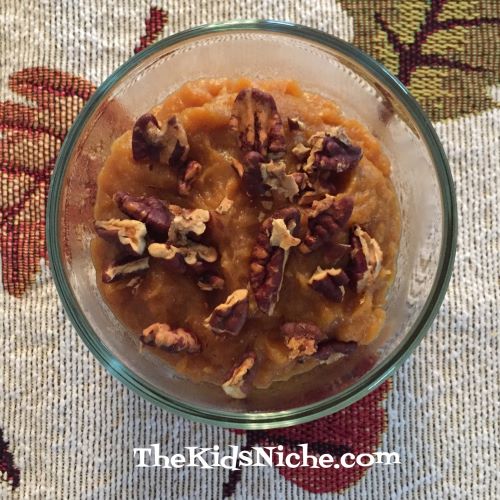
If your sweet potatoes seem particularly sticky, adding some milk can help with that and make them more palatable. One more tip for you…after I tasted each sample of sweet potato, I put the leftovers in one bowl, added a little milk and some vanilla and sprinkled a few pecans on top. Delicious!!
Thanksgiving is next month and sweet potatoes are often on the menu. Maybe this year, more of the people in your family will enjoy eating them. 🙂 Thanks for stopping by and good luck with your Tuesday Taste Test!
Halloween will soon be here! And we are still in the midst of Covid-19 with a lot of places seeing the number of people affected climbing steadily each day. Are you debating on how to celebrate Halloween this year? Should you take your kids trick-or-treating or keep them at home? What about parties? I would like to offer you some options this year to make your Halloween a little safer. I will be sharing some ideas of things you can do at home so that even though this year might be different, it can still be fun. For today, let’s make some easy Spider Cupcakes! Start by making your favorite flavor of cupcakes and frosting…or purchase some from your local grocery store or bakery. I decided to make chocolate cupcakes.
And some vanilla frosting. Mmmm!
I chose Whopper Malted Milk Balls for the spider’s body. You could also use a small donut hole or something else round.
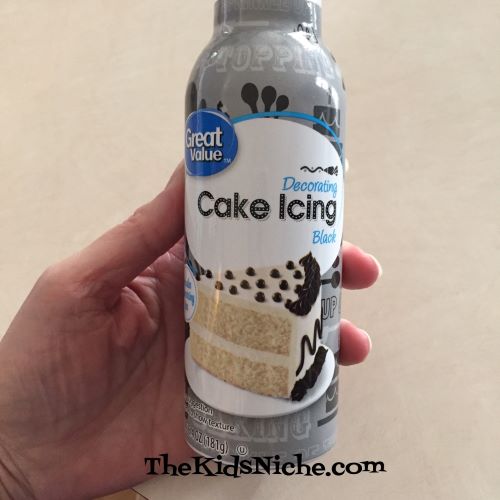
I bought a can of black frosting to use for making the spider’s legs.
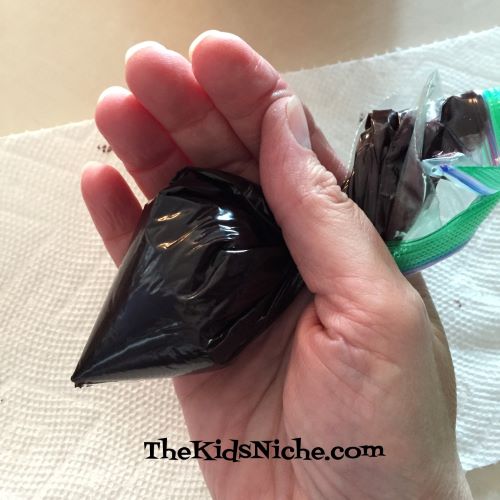
But I found it difficult to control the stream of frosting that came out of the can. It was like nothing was coming out and then suddenly, WHOOSH and there was a huge blob of frosting. 😦 Lucky for me, my daughter suggested putting the black frosting into a ziploc bag and cutting a very tiny hole in one corner of the bag. This worked great! It was much easier to get a smooth steady amount of frosting coming out this way.
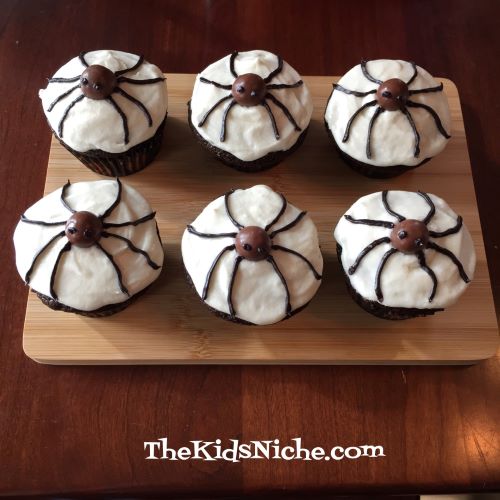
Place a Whopper candy in the center of a frosted cupcake. Then using the black frosting, draw 8 legs. (Yes, spiders have 8 legs.)
I also added 2 tiny dots of frosting on the candy to give the spider some eyes.
Cute, isn’t he? (Well if spiders can ever be called cute, I guess it would have to be this kind!) I experimented a bit with different ideas of where to draw the spider’s legs and I decided I liked this way better. Feel free to draw the legs on however you like best.
And that’s all there is to it! Ta dah! You have spider cupcakes for Halloween!
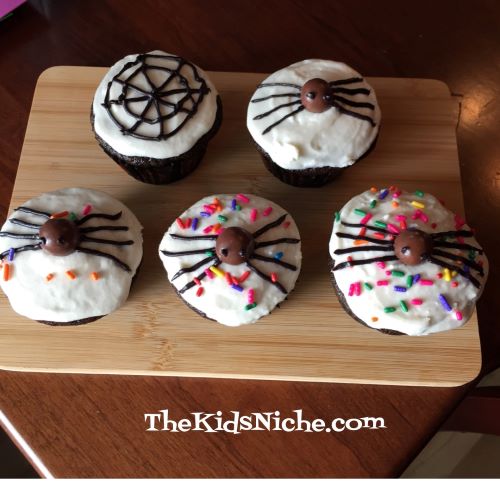
Now, just for some added amusement, here are some other ideas that I tried that may or may not have turned out quite so nicely. Haha! I tried adding some sprinkles AFTER I made the spider but the first time, the frosting had already dried enough that the sprinkles mostly bounced off the cupcake. The next time I made the spider and while the frosting was still wet I added sprinkles but then the sprinkles stuck to the spider’s eyes and legs and looked kinda weird. So I tried putting the sprinkles on first and then making the spider, but I thought it made the cupcake look too busy. It’s your call…kids love sprinkles! My daughter also suggested I try making a spider web and you can see how that turned out…a little bit wonky but kinda cute.
Maybe using orange frosting would be neat? Or maybe orange and green sprinkles? The moral of the story is, make the cupcakes in the way you think is fun and they will be great! (And taste good too!) You could make these for your kids or you could make them together for a fun Halloween project. Even if they turn out a bit wonky like some of mine, you can still spend time together and giggle over your masterpieces. 😉 Have fun! I’ll be back next week with some more safe-at-home-Halloween ideas!
We’re back with another Taste Testing Tuesday! Today let’s see if we can figure out what your kids’ favorite type of salad is! A salad can be fixed in sooooo many ways that I can’t begin to list all the options, but here’s a few suggestions. Let’s start off with the main ingredient – lettuce!
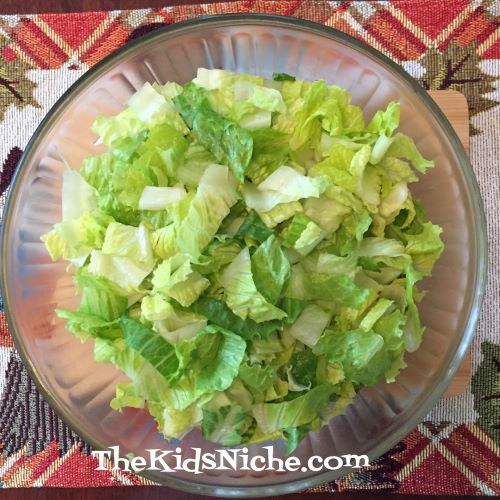
We like to eat romaine lettuce but there are so many types of greens and lettuce you can try. Like fresh spinach, kale, iceberg lettuce, arugula, boston lettuce, swiss chard, green and red leaf lettuce and the list goes on!
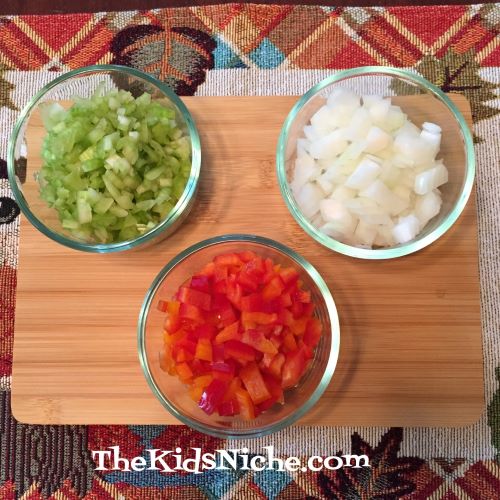
Now let’s talk about “toppings” to include in your salad. Here’s some chopped onions, chopped celery and chopped red and orange (or green) bell peppers.
Next we have chopped fresh mushrooms, chopped apples and grated carrots.
More ingredients you might try could be chopped avocado, crumbled cooked bacon and dried cranberries.
More goodies might include croutons, chopped hard-boiled eggs, roasted cashews and roasted pecans.
Some grated cheese sprinkled on top adds a great touch. Here we have grated mild cheddar and finely grated Italian cheese mixture.
Set all the ingredients you’ve chosen for this salad out on the countertop or table. It’s nice to set it out like it’s a salad bar at your local restaurant. Start out with the lettuce and greens. If your child thinks they aren’t a fan of the greens, try to get a few small pieces in on the bottom layer that can be mixed in with the toppings and not noticed as much. 😉 Then let them heap on the toppings! Having toppings of various colors can help make the salad more appealing to the eye. Last but not least, have a little variety of salad dressings to top off the salad. Here we have Country French, Ranch and a make-it-yourself Italian.
Perhaps make your child’s salad in small amounts in case they don’t like some of the ingredients they pick. That way the whole salad isn’t ruined because of one unpleasant ingredient.
Look how nice and appetizing a salad can be!
The things you can put on a salad are almost endless! Think about things you see on a salad bar at a restaurant. Google salad ingredients. Add some chopped meat to up the amount of protein. Another fun part to eating a salad could be letting your child help shop for the ingredients. Ask them what they think would be good to include. Then let them help prepare the ingredients. The more they are included and the more praise they get for helping, the better the salad will look to them. 🙂 It’s ok if they don’t like every item, but compliment them on the ones they do try. Adding a comment on how much bigger and stronger their muscles will grow, might help too! Lol 😉 Have fun on your salad adventure!!
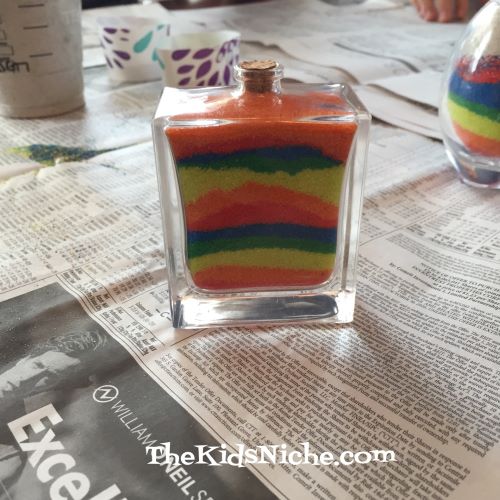
Hi, everyone! Hope you are having a good day! Let’s talk about having fun with Sand Art! When some of our grandkids stayed with us a couple weeks ago, we had fun making Sand Art with a Sand Art kit. The kit contained 3 bottles, 3 corks, 5 different bags of differently colored sand, one tool and 2 tiny funnels. Each person chose a bottle for their project. It’s a good idea to spread some old newspaper on the table before you begin in order to make cleaning up afterwards easier. We poured the sand into paper cups that we had cut to make them shorter and easier to handle. Each color of sand was poured into a separate paper cup in order to keep all the colors apart.
The idea of the Sand Art kit is to place a small funnel in the opening of a bottle and slowly add a little bit of sand. You can add different colors of sand and make the bottle have different layers and make your own unique design.
The tool that was included in the kit can be used to move the sand around some after its inside the bottle or to help you make indentations in the sand.
The more layers of sand you use, the more colorful your bottle will be.
Or you can do it like our Little Miss did and use the tool to stir the sand together and you’ll have one bottle with a mixture of colors. 😉
We also had some “real” sand that we brought home from a beach vacation a few years ago and some of the kids added some of it to their bottle. It’s the top layer in this container.
After your bottle is filled up, you can place the cork in the opening to keep your sand from spilling out. If you fill your bottle all the way to the top, with just enough room left for the cork, the cork will also help preserve your design should your bottle get tipped over. Tapping your bottle gently on the table as you work adding layers of sand, will help it to settle nicely too.
Since we had some sand left over after filling the bottles, we got out some Elmer’s glue and some small flat wooden circles and we made some great designs with the sand. Just put a little bit of glue on the wood circle in the shape you desire, and sprinkle some sand over top. Gently pick up the wooden circle and let the pieces of sand that aren’t stuck in the glue to fall back onto the newspaper under your project. Or if you are using just one color of sand, you can let it fall back into the sand cup. Its a good idea to let the glue dry in between colors, if your kids have the patience to wait that long. Haha! Here are some designs we came up with:
(The circle of the left is from another craft that she did.)
The artist of the last design also used some colored markers to add to the details of his picture.
Sand Art makes a fun project and helped us have a good afternoon together. I hope you’ll give it a try too! 🙂 If you already have your own containers you would like to use, you can purchase colored sand on Amazon.com and maybe some other places too.