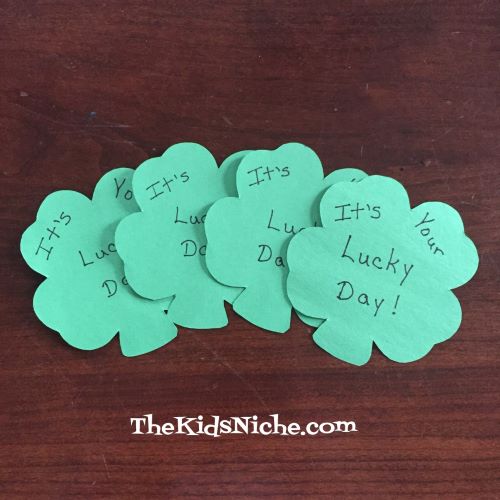
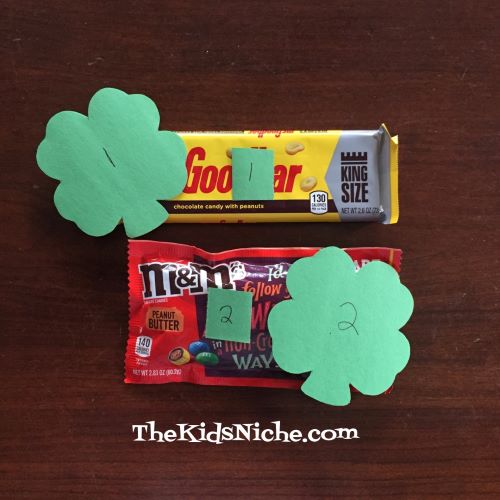
Happy Monday, everyone! It’s only 2 days until St. Patrick’s Day! Do you celebrate at your house? If you’re looking for another fun activity to do, here’s one I posted last year that’s simple and yet brings a lot of fun to your kids. It’s all about searching for hidden shamrocks and getting a prize from the end of the rainbow. Here’s a link to the fun!
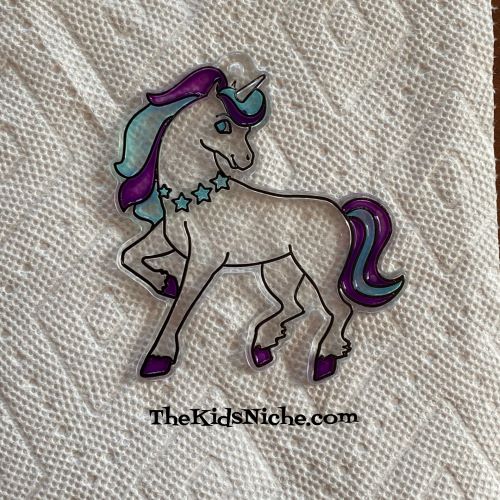
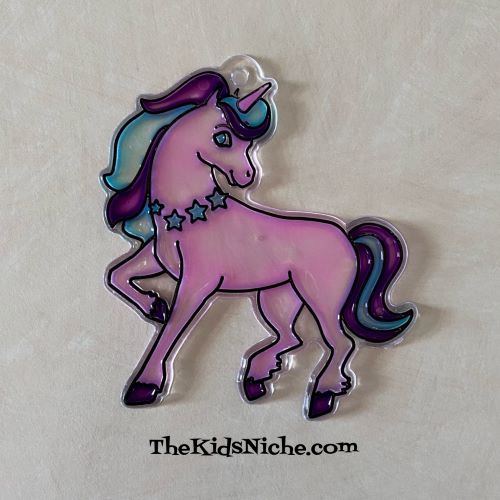
It’s Monday Funday and I have a nice inexpensive craft to tell you about today. I found a cute unicorn suncatcher at Walmart the other day…only $0.97!! (My guess is that some other craft stores likely have them too.) That is the regular price, not a sale price. 🙂
One thing to note is the picture shows 4 colors on the unicorn while there are actually only 3 paints. But it looks cute anyways, so I didn’t find that to be a problem. I suggest laying out some newspaper or paper towels before letting the kiddos start painting. The paint is fairly thin but I think that is because this is a suncatcher and you want the light to be able to shine through.
There weren’t any instructions but here’s what I did: the suncatcher is smooth on one side and has ridges on the other. I painted on the side with ridges. I stirred each paint with a toothpick when I was ready to use it. I also used the toothpick to paint the really small areas. I started with the blue/teal paint.
You can paint the unicorn any way you like. I’m just showing you how I chose to do it. Next I painted with the purple paint.
And finally I used the pink paint.
Here it is against a better background.
And here it is with the light behind it.
I thought it was a rather fun project for kids for only $0.97! And there was some paint leftover. I’m pretty sure you can also buy the unpainted suncatchers at Walmart (not in a kit). So you might be able to make 2 suncatchers for $0.97! 😉
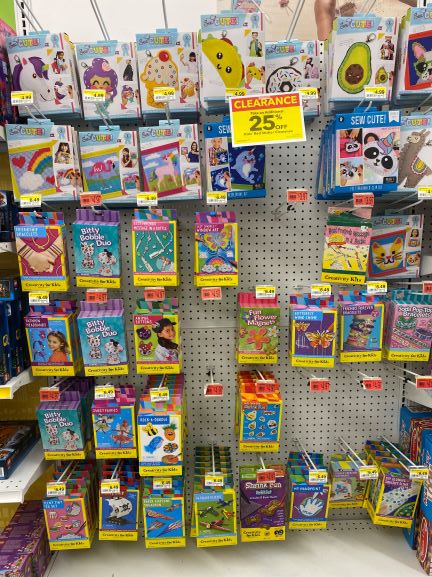
Are you looking for some small craft kits to add to your kids Easter baskets? If you are, head to your nearest Joann Fabric and Craft Store and check out their clearance items! They have a great assortment of little craft kits at some nice discounted prices. I’m guessing each store may have different things on clearance, but here are a few things on sale at my Joann Fabric and Craft Store.
Little Makers Wood Painting Kit. This cute little wooden kitty kit comes with a little paintbrush and 3 colors of paint. Clearance price is $1.97.
Little Makers Paint and Stitch Kit. This one is cute as it requires painting the heart but also has some string crafting to add a nice extra touch. Clearance price is $2.97.
Some items are take an additional 25% off the red sticker clearance price! There are plaster painting kits, shrink art kits, bead art kits, string art kits, pom pom kits, wooden ornaments to color with markers kits and suncatcher kits. Wow! Not all of each kind of kit was on sale.
Another section has canvas coloring kits and canvas painting kits, foam kits, foam mosaic kits, felt kits and toilet paper roll kits.
Also close by are more assorted craft kits, but be careful which ones you grab because not everything is on clearance. The clearance items will have a red clearance sticker on their hook.
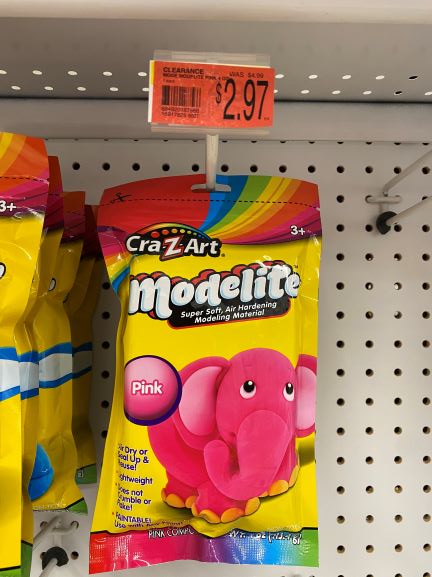
One more nicely priced item for kids that I saw is the CraZArt Modelife modeling material. (Similar to Playdough) There was about 5 colors to choose from. These were on clearance for $2.97.
So there were lots of fun products at great prices! Grab them up before they are gone! 🙂 Happy shopping!
It’s cold and snowing some more here! I’m trying not to complain but I could use a break from snow! So let’s see if we can tickle your funny bones with some riddles!
#1.) What do you call it when a snowman has a temper tantrum?
Answer: A meltdown! 🙂
#2.) What does a snowman eat for breakfast?
Answer: Frosted Flakes!
#3.) What does a Snowshark give you?
Answer: Frost bites!
#4.) What’s the biggest problem with snow boots?
Answer: They melt!
#5.) What do you call young dogs that play in the snow?
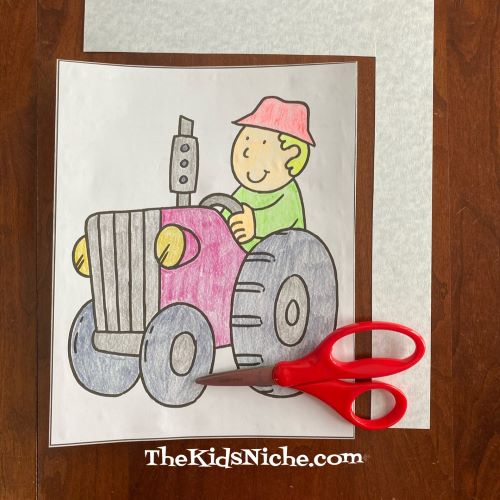
A lot of people in the United States are buried under snow along with frigid temperatures outside. I’m guessing there are a few moms that are going a bit bonkers with their kids running out of things to do in the house. So here is a fun project you can do at home that doesn’t take any fancy supplies to make. Let’s try your hand at making a handmade/homemade puzzle! You’ll need a picture (can be cut from a magazine or a coloring book, for example), a piece of cardstock or thin cardboard, pencil, ruler, scissors and glue.
First trim your picture to give it a smooth edge.
Spread glue over the entire back side of the picture. You need to cover all of it with glue so that when you cut it into pieces, your picture will be glued on each piece. Place your glued picture on the cardstock or thin cardboard.
Cut the cardstock around the outside edge of the picture.
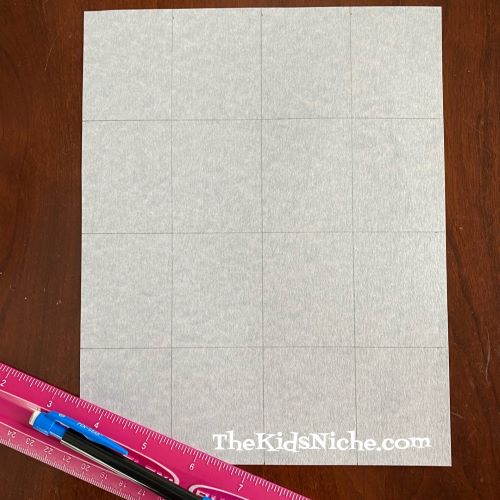
My picture wanted to curl up so I placed it under a heavy book for a little while. The next step is to turn the picture over. Decide how many pieces you want the puzzle to be and using your pencil and ruler, draw lines for cutting on the back of the puzzle. I made my puzzle into 16 pieces.
Cut the puzzle pieces apart by following the lines you just drew on the back.
Turn the pieces over and your puzzle is complete!
I made a second puzzle so I’ll share those pictures here too. Cut the picture to give it a smooth edge.
Apply glue to the entire back of the picture.
Place the glued picture on the cardstock or thin cardboard.
Cut the cardstock around the outside edge of the picture.
Draw lines on the back of the puzzle for where you want the puzzle pieces to be cut.
Cut the pieces apart with your scissors. Turn the pieces over and you’re done!
You can store your puzzle in an envelope or small box. Depending on the age of the child you are making this for, you can cut it into fewer or more pieces. Kids can have fun making these puzzles for other kids. Let the kids color a picture for making into a puzzle. If more than one child makes a puzzle, they can swap their puzzles back and forth for more fun. I hope you’ve had fun making your own puzzle! 🙂
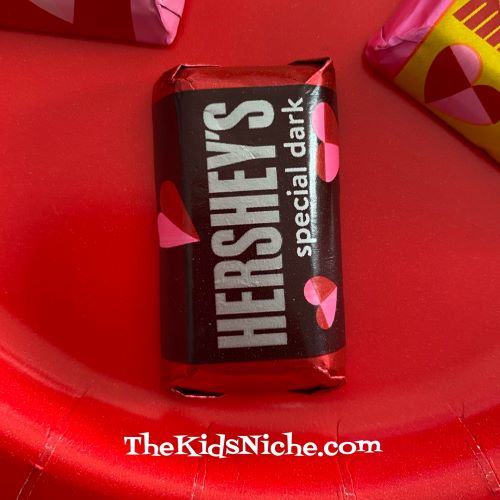
It’s Taste Testing Tuesday again and what’s the one thing that a lot of us probably have on hand right now, right after Valentine’s Day? Valentine’s candy, I bet! Today let’s be silly and have some fun taste testing our candy stash! I’m guessing you have a favorite and a not so favorite, so let’s see what you think! We’re going to take a look at 2 little plates of candy. Here’s the first one:
Oh yum! It’s chocolate! I love chocolate! But there are many, many kinds of chocolate and many things that can be mixed with chocolate. First off we have…
#1.) Hershey’s Special Dark Chocolate. I know I said I love chocolate, but this first one is a “no thanks, not so much!” for me. My husband loves dark chocolate, but I am more of a milk chocolate fan. What about you?
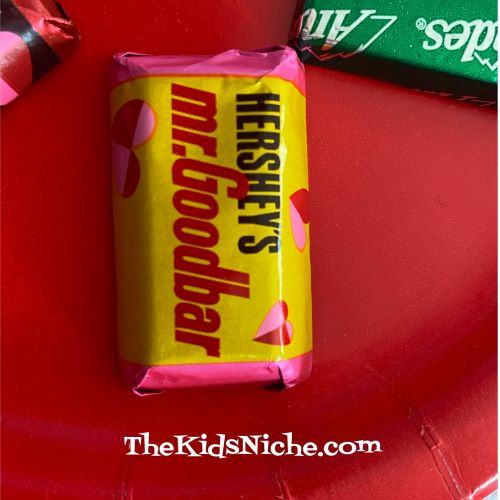
#2.) Hershey’s Mr. Goodbar. NOW you’re talking! This one is one of my favorite kinds of chocolate. I like the peanuts that are mixed in a Mr. Goodbar.
#3.) Hershey’s Milk Chocolate. Yep, this is a good one too! 🙂
#4.) Hershey’s Krackel bar. Another yes, for me! I love the little rice krispies inside.
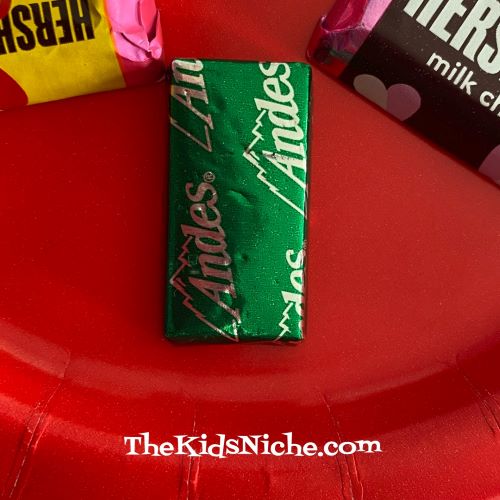
#5.) Andes Mint Candy. Maybe you don’t think of Andes Mints being available for Valentine’s Day, but we found a small bag of them. Mmmm! Chocolate and mint definitely go together!
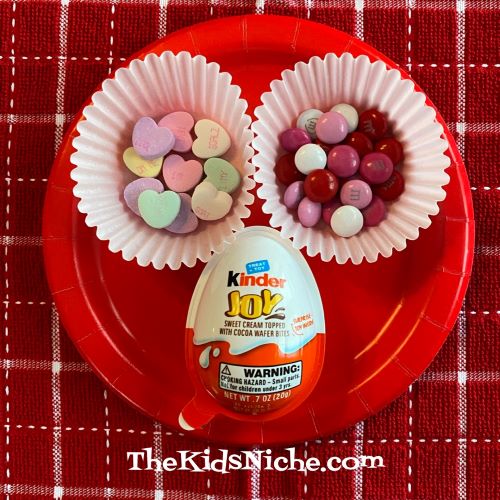
On our 2nd little plate of Valentine’s candy, we’ll sample 3 kinds of candy.
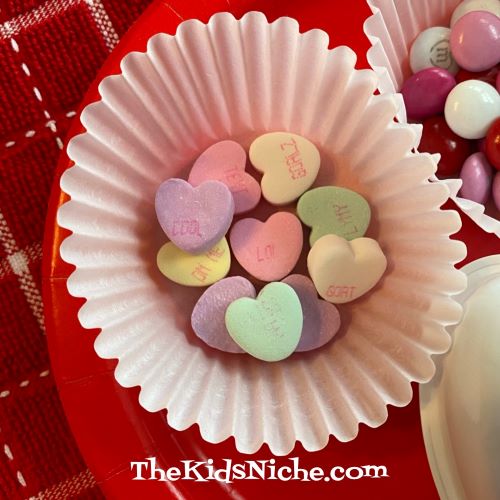
#6.) Conversation Hearts candy. I think these are the kind of candy you either really like a lot or you really can’t stand them. I am not too fond of these, though I do think its alot of fun to read the little message on each piece.
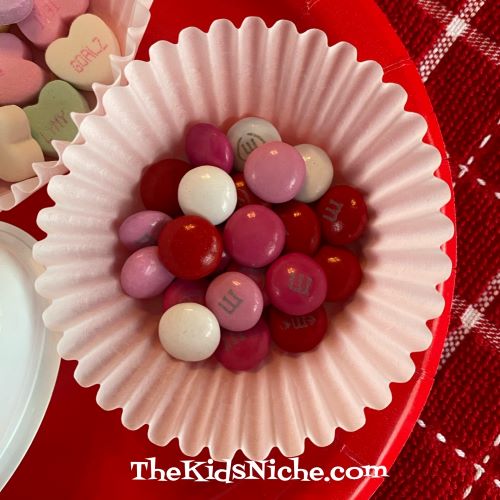
#7.) Valentine M&M’s candy. Oooohhhh yea! M&M’s are great! My favorite kind is the peanut M&M’s. This batch is just the plain milk chocolate M&M’s.
#8.) Kinder Joy. These are relatively new to me, but I suspect they are pretty popular with kids.
The egg shaped container splits into 2 halves. One half contains 2 little balls of cocoa wafer bits nestled in layers of a light creamy soft candy and soft chocolate.
The other half contains a toy surprise that you can put together. Which is the reason I think kids probably like these. 😉
This one makes a bird. (An eagle maybe?)
But back to taste testing our Valentine’s candy. I think my favorite would be the Mr. Goodbar candy bar. What kind of fun candy did you get for Valentine’s Day? Which one is your favorite and which one is your least favorite? I hope whatever kind of candy you use for your Taste Testing Tuesday, you have fun sampling each one! 🙂
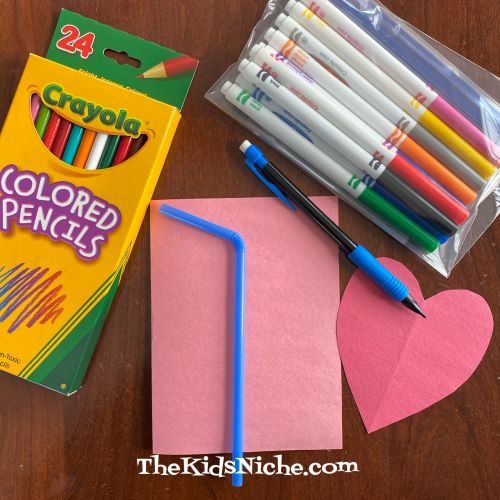
Are you still looking for Valentine cards that are simple enough for your kids to make? Here’s another suggestion for you! We’ll call this one the Soda Pop Valentine card. 😉 You’ll need a piece of paper, glue, a black marker, colored pencils or crayons, a pencil, scissors, a cut out paper heart and a straw.
I used half a sheet of pink construction paper for my card. I folded it in half to make a nice size for a card. On the front, using a pencil, draw a soda pop bottle.
With a thin line marker or black pen, trace over the bottle you just drew so that it stands out more plainly.
Color in the bottom 2/3 of the bottle whatever color you’d like your pop (soda) to be. I used brown for Root Beer. I wrote the words Root Beer on my bottle but you can write whatever kind of pop you like to drink and color it the same color as the drink you chose.
(Sorry I’m not sure why this picture looks purple!) Now imagine that the straw you have is inside this bottle of pop. (soda) Cut your straw to fit the bottle. Have the bottom of the straw just touching the top of the pop (soda) in your bottle. The top of the straw should stick out above the bottle opening.
Add a line of glue down the length of the straw and hold it in place on your card for just a little bit till the glue can start to set up.
If you have a permanent black marker, you can draw the rim of the bottle on your straw too so it looks more like it is inside the bottle.
Now with a pen or marker write the words, “I “soda” love you!” (I sorta love you!)
Next, you should write on the cut out heart these words…”I love you so much I think my heart might “pop”! 😉
Then glue the heart to the inside right hand side of your card.
If you like, you can add some little lines around the outside of the heart to help make the heart look like it’s ready to pop!
And there you are! All finished! Great job! Who will you share your Valentine card with? Remember to sign your name so the person will know you are the one that made this great card for them. 🙂
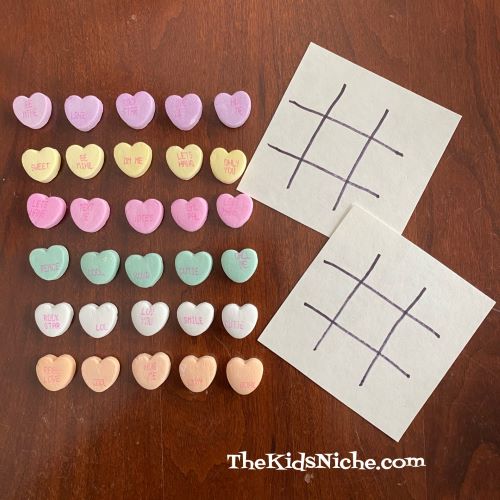
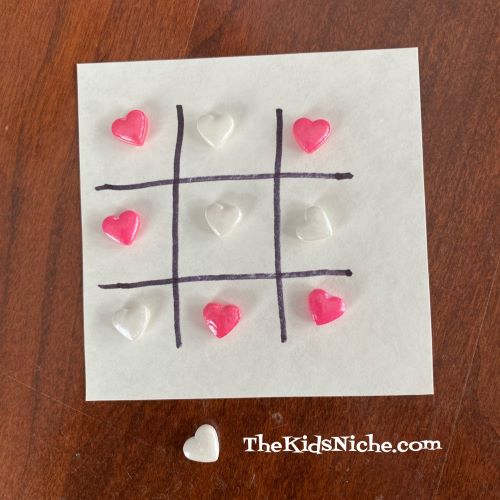
Are you looking for a super fast and easy game to play with your kiddos on Valentine’s Day? They don’t come any easier than Valentine Tic Tac Toe! Grab your Valentine’s Day candy and a piece of paper and a marker and let’s play!
Draw a tic tac toe board with 4 lines. You need two players for each game. Each player takes 5 pieces of the same color of candy. For example, 5 pink hearts for one player and 5 green hearts for the other. Taking turns, each player will lay 1 of their pieces of candy on a square on the game board. The winner is the first one to get 3 of their hearts in a row. In the following picture, the player with the green hearts won.
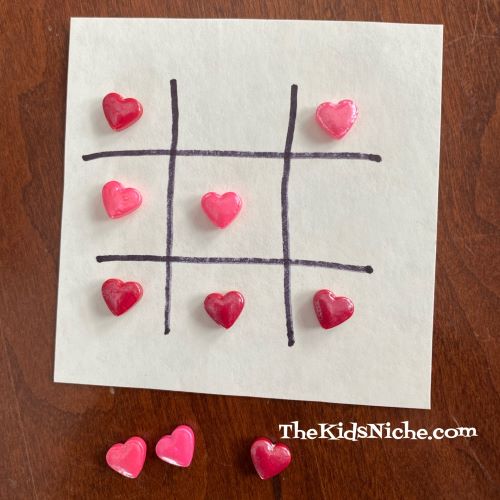
If nobody gets 3 in a row, its a tie game, as you can see in the following picture.
Since we can’t be with our grandkids this year, I’ve sent them a package of goodies for Valentine’s Day. This game is one of the things I included. Here’s enough colored hearts to play 3 separate games. 🙂
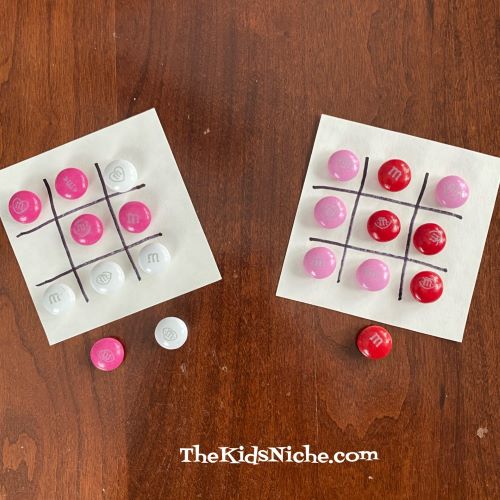
Can’t stand conversation hearts candy? (Me either!) You can play the same game using Valentine M&M candies! Yum! I guess they are called Cupid’s Mix M&M’s. (Chocolate! NOW we’re talking!)
Looks like white won!
And pink won this game! 😉
OR you can use the candy heart decorations made for topping treats!
It’s a tie! Play another round.
Red’s the winner this time!
No matter if you win or lose the game of Valentine Tic Tac Toe, everyone is a winner because after you are done playing…you can EAT the candy! (That’s the best part!) Have fun! 🙂
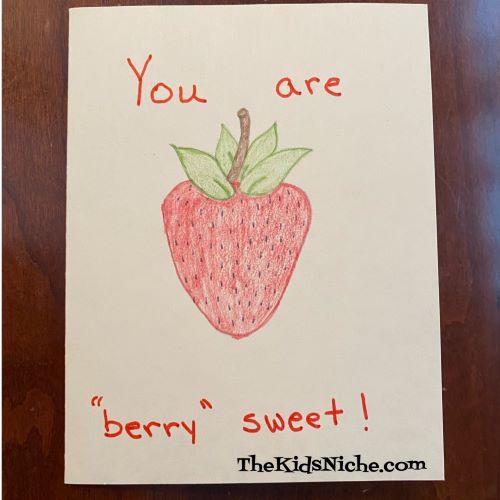
We’re back with another idea for a Valentine card kids can make. This one involves strawberries and blueberries. Ready? Grab a piece of paper or a blank card, a pencil and colored pencils or crayons and some markers. Start with a half a sheet of paper, cardstock or construction paper.
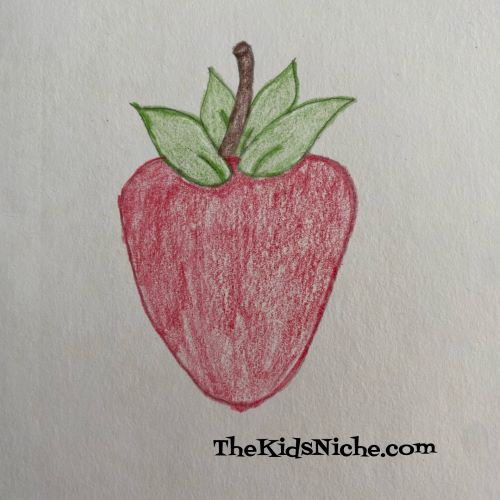
Fold it in half to make it card-sized. On the front of the card, we’re going to draw a strawberry. Start out by drawing this shape.
Next, add some leaves and a stem.
Use your colored pencils, markers or crayons and color the strawberry. I used colored pencils.
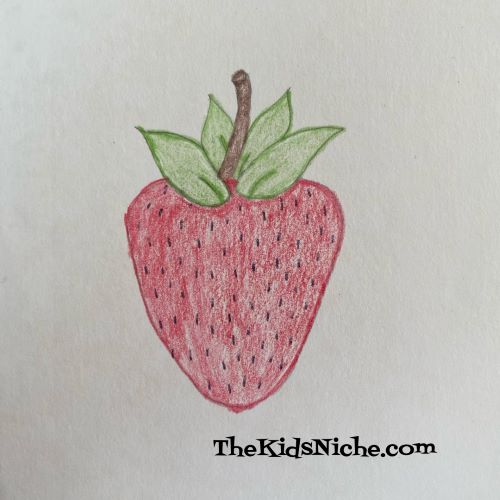
Looking good! Now make some tiny little lines for the seeds on a strawberry. I used a black pen to draw mine.
Your strawberry is finished! Now add the words, “You are “berry” sweet!” to the front of the card.
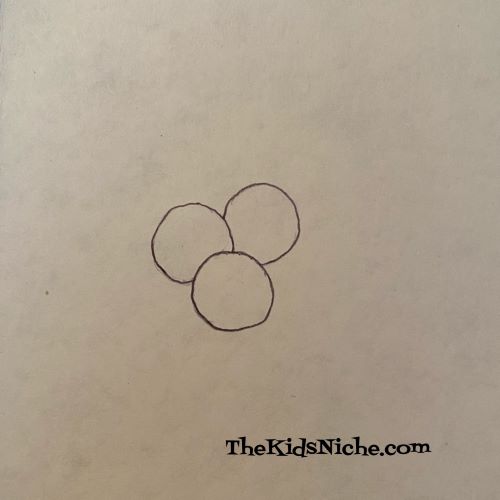
Open the card and on the inside right hand side, let’s draw some blueberries. I drew 3 but you can draw however many you like. Start with a circle and then add 2 more circles that are partially hidden behind the first one.
Add one small circle inside each of these circles. Then add 5-6 almost triangles to the little circle.
Color the blueberries. You’re almost done! Add the words, “Have a “berry” Happy Valentine’s Day!”
Great job! Who will you give your handmade Valentine to? Remember to sign your name. I hope you’ve had fun making this “berry” nice Valentine’s Day card! 🙂
We’re coming at you today with another fun card that kids can make for Valentine’s Day. All you need is a piece of paper, colored pencils or crayons and a black marker.
My paper is construction paper so I cut it in half.
Take 1 of the pieces and fold it in half to make a nice size for a card.
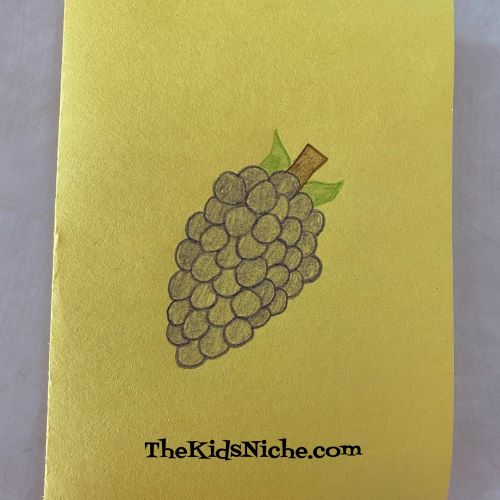
Now draw a bunch of grapes on the front of the card. Draw circles and partial circles to make the grapes. I used a purple colored pencil but grapes can be other colors too.
Keep drawing and coloring in the grapes until you like how big your bunch is.
Add a brown stem at the top of the grapes.
Use green to draw in a couple of leaves.
Now add a simple face. I used a black marker to draw 2 dots for eyes and a curved line for a mouth.
Add the words “I love you a “bunch”! ” at the bottom of the card.
Open the card and on the right hand side, draw another bunch of grapes like you did on the front of the card. Write the words at the bottom…”Have a “grape” Valentine’s Day!”
Remember to sign your name. Give it to someone special on Valentine’s Day! I hope you enjoyed today’s craft! Have a “grape” weekend! 😉