Are you ready for another fun Valentine’s Day project? Let’s make a really pretty 3-D heart!
You will need some construction paper, red tissue paper (or the color of your choice), scissors, glue, a piece of string and a pencil with an eraser.
You will need to cut approximately 75 little squares of the red tissue paper. I cut mine about 1 1/2″ square. They don’t need to be perfect because the paper will be “scrunched up”. Any smaller than that could be difficult to work with. If you have a cutting mat and a rotary cutter, this part will go much quicker, but scissors work fine. 🙂
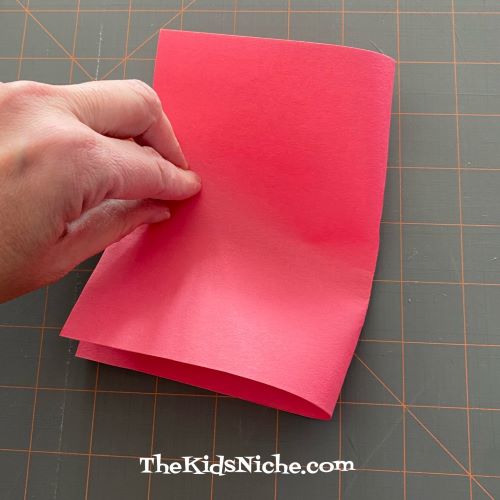
Take HALF of a sheet of construction paper and fold it in half.
Drawing on the folded edge, draw half of a heart shape.
Sorry, that’s rather hard to see. Cut out the half -heart shape and you will have a whole heart when you unfold it.
Set aside but save the piece that looks like a heart stencil for a project we will do another day. 🙂
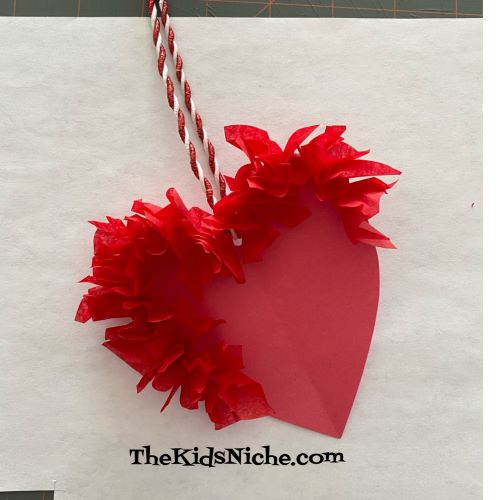
Your finished heart can be added to a card, have a magnet attached to the back or be made to hang up like an ornament. If you would like your heart to hang as an ornament, now is the time to add a hole at the top. Go ahead and put your string through the hole because it will be harder to do later. (I found that out the hard way!)
You are now ready to start using the tissue paper squares. Take 1 square and your pencil with an eraser.
Place the pencil eraser in the middle of the square of tissue paper.
Wrap the tissue paper down around the pencil end.
Apply a very small amount of glue to the tissue paper at the end of the pencil eraser.
While holding the tissue paper onto the pencil end, place the tissue paper onto the heart you cut out. Start out close to the outside edge of the heart.
Hold in place for a few seconds, then carefully pull the pencil out leaving the tissue paper on the heart. Continue adding more pieces of tissue paper in the same way.
Keep adding…you’ve got the hang of it now!
The closer together you put the tissue paper pieces, the fuller your heart will look. Try to get the pieces right up against each other where they attach to the heart. If you like, you can just make an outline of the heart with the tissue paper.
I like it better when the entire heart is filled up. It will take a little more time but it will be worth the effort.
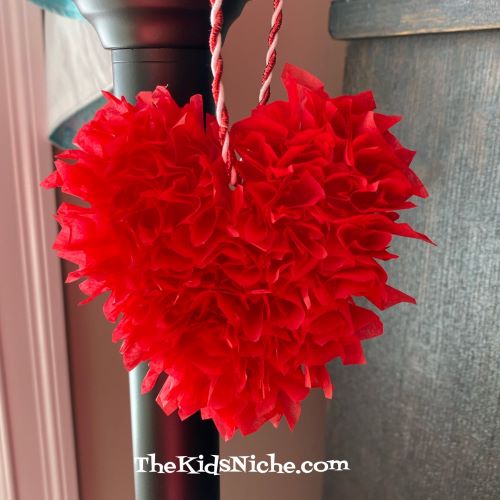
You did it! Isn’t that a pretty ornament to decorate your house for Valentine’s Day? I think it would be really pretty to use more than one color of tissue paper. If you used red, white and pink, wouldn’t that look nice? I hope you’ve enjoyed this Valentine activity! I’d love to see your hearts, if you care to share them!
Knock! Knock! Who’s there? It’s me and I’m here to share some funny jokes with you! Knock! Knock! jokes have been around a long time. Let’s look at some today that might tickle your kiddos funny bones. And maybe yours too! 😉
#1.) Knock! Knock!
Who’s there?
Tank.
Tank who?
You’re welcome!
—————————————–
#2.) Knock! Knock!
Who’s there?
Honey bee.
Honey bee who?
Honey bee a dear and open the door!
——————————————————-
#3.) Knock! Knock!
Who’s there?
Lettuce.
Lettuc who?
Lettuce in please! It’s cold out here!
—————————————————
#4.) Knock! Knock!
Who’s there?
Icy.
Icy who?
Icy you looking at me!
——————————————————–
#5.) Knock! Knock!
Who’s there?
A herd.
A herd who?
A herd you were home so I came over to see you!
———————————————————-
Haha! I hope you had fun with these Knock! Knock! jokes. Maybe you can try them on your friends sometime! 😉
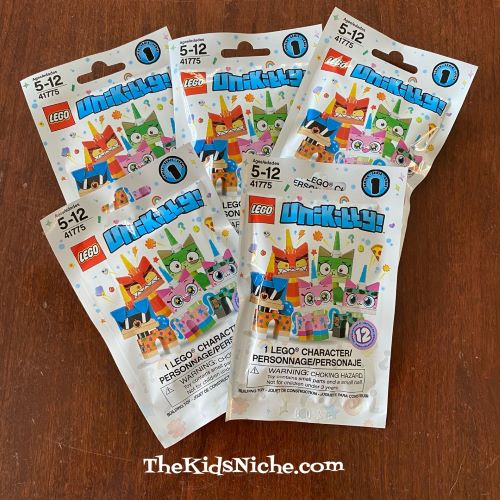
Are your kids crazy about Lego? It’s super fun to build and it’s good for eye hand coordination, patience, building skills, organization skills and so much more. It’s a great hobby that kids and adults can enjoy. It’s a great activity for spending quality time together. I found a super deal on UniKitty Lego at our local Barnes & Noble store. Little packaged Lego building sets that make 1 UniKitty normally priced at $3.99 were on sale for $1.00 each! The cashier told me that the prices on these are set by each store so check your local Barnes & Noble to see if they have the UniKitty sets for $1.00. Look for a sticker on the display box that says “Cheap! $1”.
Ok, I have to confess…I am a Lego fan myself. I bought one of these cute UniKitty’s back before Christmas, but last week I ended up buying 5 more. Haha! Cheap entertainment, right? Of course, I could say I bought them for my blog… 😉 Let me show you which ones I ended up with out of 6 packages. First is the one I bought before Christmas.
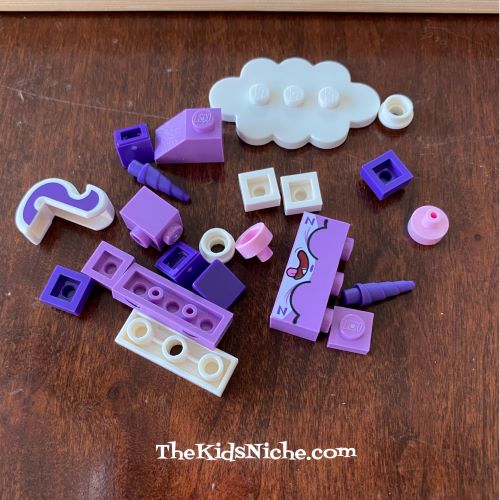
Here’s what one set looks like right from the bag.
In the process of building…
And finished!
Out of 6 bags, I actually ended up with 3 of this one! Haha! I think I needed someone else to pick the bags for me! 😉
The next one looked like this…
And done!
At first, I thought it was mad but then I noticed the little z’s on each side of its mouth and I think it’s just sleeping. Guess how many of this one I ended up with? Two! (See? I really did need some help picking out the right bags!)
So that was my cheap fun for the day! 6 UniKitty Lego sets…the directions are rather sparse but you can look at the enclosed paper and see how to put them together. So if you are around a Barnes & Noble store and your kids (or you!) like Lego, you might want to pop in and see if they have this great sale too!
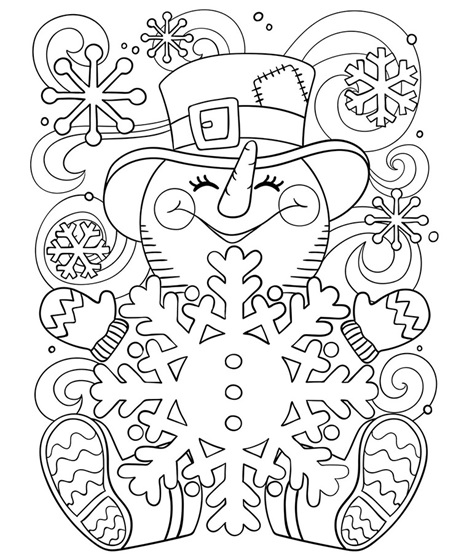
Are the kids home from school because of Covid and your nerves are wearing a little thin? Or maybe you are homeschooling and you’re looking for a craft for today? Here is an adorable little snowman coloring page from Crayola that might save the day! (And your nerves!)
He’s just so cute that I had to print one and color him myself! Here’s my version:
Do your kids love stickers? How about getting them a free bunny sticker from Annie’s?
There are 5 stickers to pick from – one per family please.
Just fill out the form, pick which sticker you’d like to have and write in the UPC number from an Annie’s product. You should receive your sticker in the mail in a month or little more. Easy peasy!
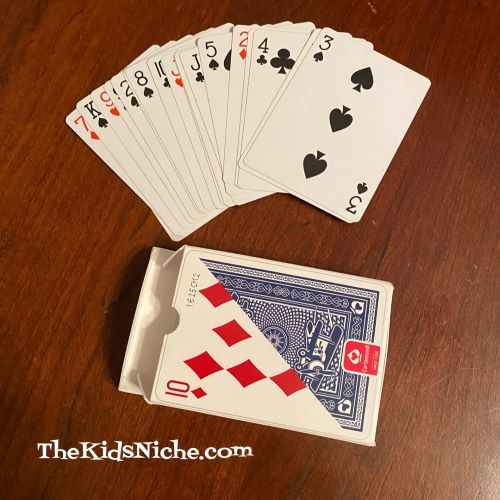
Are you looking for some fun family-friendly games for New Year’s Eve but all you have is a deck of playing cards? No worries, we’ve got you covered! Grab your cards and let’s get started!
#1.) Spoons. This game is great fun and can get a little wild! (It’s best played with people with short fingernails.) 😉 Set up the game by placing spoons in the middle of the table, one less spoon than the number of players. Make sure there are spoons within reach of each player. Deal 4 cards to each player.
The dealer places the remaining cards face down on his/her right side. Play begins with the dealer drawing one card from the pile. The idea is to get 4 cards with the same number. The dealer looks at the card and decides to keep it in his hand and discard one card from his hand OR he passes the card to the next person. Everyone plays at the same time, once the cards reach your spot in the circle. Each person does the same thing, either swapping the card for one in his hand or passing it on to the next person. You should always have 4 (and only 4) cards in your hand. When a player has 4 cards with the same number, he takes a spoon from the middle of the table. All other players then try to get a spoon too. The person that doesn’t get a spoon loses that round and loses a life. If you lose 3 lives, you are out of the game. Some people will sneak a spoon quietly and keep playing while others will yell and swoop in to grab one. Either way, you’ll be laughing and having fun!
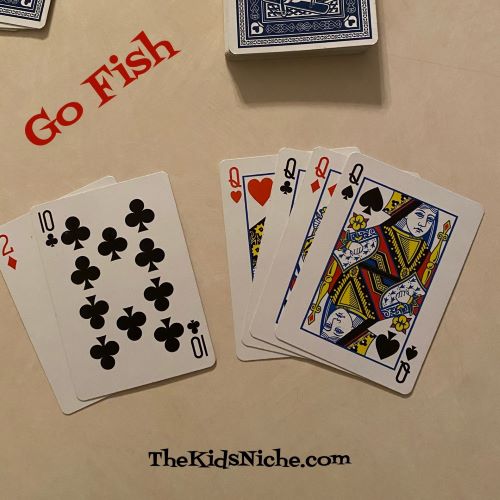
#2.) Go Fish. This game has been popular for a very long time and you probably already know how to play it. When playing Go Fish with a full deck of cards, you need to get 4 of each number for it to be a match. (Some actual Go Fish card games only need 2 matching cards for a match.)
The dealer deals 5 cards to each player. Arrange your cards so like numbered cards are together. The player to the dealer’s left starts by asking another player for a certain card. Example: “Joe, do you have any Queens?” If Joe has any Queens, he must give ALL of them to that player. If Joe doesn’t have any Queens, he says “Go Fish” and the player must draw one card from the draw pile. If the player draws from the draw pile and gets the card they asked for, OR if they get the card they asked for from another player, they take another turn. When a match of 4 cards is made, it is laid down in front of the player.
If a player runs out of cards and there are still cards left in the draw pile, he draws 5 more cards. Play continues until all the matches have been made. The player with the most matches is the winner.
#3.) Cuckoo. This is a game I haven’t played yet but it sounds like fun. It’s very simple to learn. Each player begins the game with 3 lives. The dealer gives 1 card to each player. The remaining cards are set aside and not needed.
The idea is to avoid being the player with the lowest numbered card at the end of that round. When it’s your turn, you can choose to keep your card or swap it with the player on your left. After each player has taken their turn, everyone shows their card and the player with the lowest number loses that round and loses a life. You continue to play rounds until there is only one player left in the game. The last player in the game is the winner.
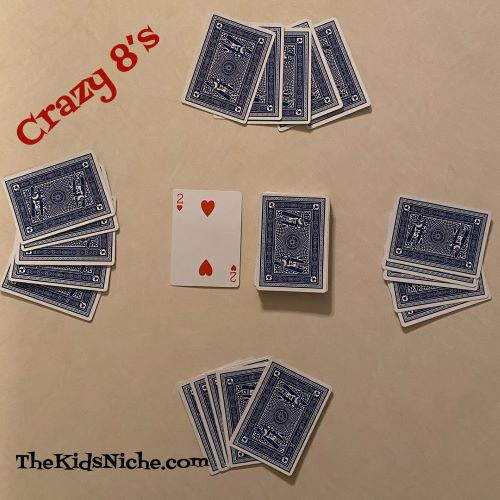
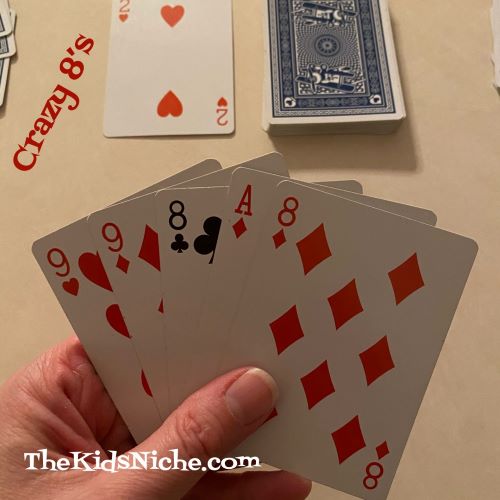
#4.) Crazy Eights. This game can be played by fairly young children, perhaps with a bit of help or prompting from a parent. Set the game up by dealing 5 cards to each player. (Deal 7 cards to each player if there are only 2 players.) Place the remaining deck in the center of the playing area for the draw pile and turn one card over to begin the discard pile. If the card is an 8, place that card back into the middle of the draw pile. The goal is to be the first player to get rid of all your cards.
The player to the dealer’s left goes first. They play a card from their hand that matches either the number or the suit (heart, club, diamond, spade). In my example, they would play a 2 or a card with hearts.
In this example hand, the player would play the 9 of hearts on the discard pile then play continues to the next player. If the player has no matching card, he draws one card from the draw pile. If it matches he can play that card. The player continues to draw 1 card at a time until he gets a card that matches. This game is called Crazy Eights because all 8 cards are considered WILD! You can play an 8 as a wild card and then you decide what the suit will change to. Example: if the card to play on is a 2 of Hearts, a player can play an 8 card and then say the play will now go to Clubs and the next player must play a Clubs card. Play ends with the first player to play all of his cards. If you want to keep score after each round, the cards that are left in the other players hands are added up and the points are given to the player winning that round. Kings, Queens and Jacks are worth 10 points each, 8’s are worth 50 points each and all other cards are at face value.
#5.) Memory. This is another game that has been around for ages and ages and you likely know how to play it too. Memory is good for well, your memory! 😉 You can play with the entire deck of cards or you can make it a smaller game by only playing with 2 suits. The game is set up by laying the cards out face down in even rows or as close to even as you can. The example game is using just 2 suits.
Play begins by turning over 1 card and then turning over a second card. If the NUMBERS match, you take both cards and place them in front of you and then you take another turn. If the 2 cards do not match, they are turned back over and play moves to the next player.
Play continues until all the matches have been made. The player with the most matches is the winner. The trick to this game is to pay close attention when other players take their turns and try to remember what you see.
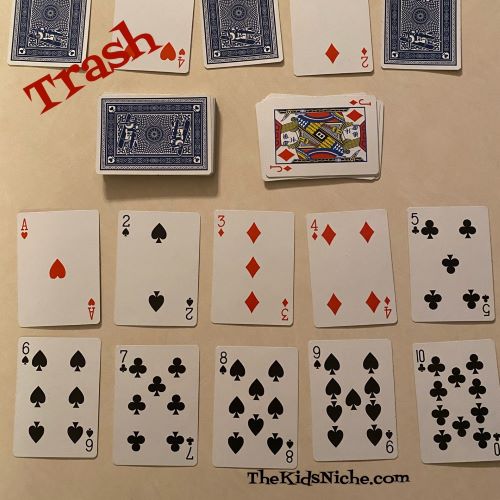
#6.) Trash. This is another game that I haven’t played but I am looking forward to playing it at my first opportunity! I found this game on the Bicycle Playing Cards website and I will just copy and paste their instructions. (The pictures are mine.) Here is a link to the page if you’d like to check it out there: https://bicyclecards.com/how-to-play/trash/#filter=.kids
THE PACK
Two players use one standard deck of 52 cards, 3-4 players use two decks, 5-6 players use three decks
OBJECT OF THE GAME
Be the first player to complete your layout of ten cards Ace through Ten (A,1,2,3,4,5,6,7,8,9,10)
CARD VALUES/SCORING
Aces count as one, cards 2 to 10 have their face values, Jacks are wild, and Queens and Kings automatically end the player’s turn
THE DEAL
Each player is dealt ten cards face down in two rows of five cards each. Players are not allowed to look at their cards. The remaining cards are placed face down to form the stock pile.
THE PLAY
The first player draws from the stock. If the card is any card Ace through ten, the player places that card in its correct location in the layout (the top left card of the layout is the 1 or Ace position, then 2, 3, etc.). To do this, the player must remove the face down card that is occupying that location and turn it face up. This card, in turn, is placed in its appropriate location, if available, displacing the face down card that was there. This continues until the player finds a card that cannot be placed – a Queen or a King or a number card whose location is already occupied by a face up card with that number. The player must then discard the unplayable card, placing it face up on the table next to the stock pile to begin a discard pile, and the turn to play passes to the next player.
The next player will begin their turn by drawing either the top card of the face down stock pile or the top card of the discard pile (the card discarded by the previous player). The player will then place their card face up in the correct location in their layout, if available, displacing the card that was there to its own location, and continue until they find an unplayable card, which they add to the top of the discard pile to end their turn.
Since Jacks are wild, a Jack can be placed face up in any location containing a face down card, displacing the card that was there. Also a pip card whose correct location currently contains a face up Jack can be placed in that location displacing the Jack, which can then be moved to any other location with a face down card, displacing the card that was there.
If the stockpile runs out before anyone completes their layout the cards of the discard pile, apart from its top card which is left in place, are shuffled to make a new stock pile.
HOW TO KEEP SCORE
The winner of the hand is the first player to complete their layout by having an appropriate face-up card in each location.
The cards are then shuffled and re-dealt, but the winner of the hand has one fewer card in their layout. After winning one hand a player only has locations A-9 and Tens become unplayable for them. A player who has won twice only has locations A-8, and so on.
The winner of each hand plays first in the next hand.
The game continues until a player has only one location and wins the hand by filling it with an Ace or Jack. This player wins the whole game.
——————————————
I hope you find these games fun and entertaining for your family! And if you are reading this on New Year’s Eve, I hope you have a wonderful time welcoming the new year in! 🙂
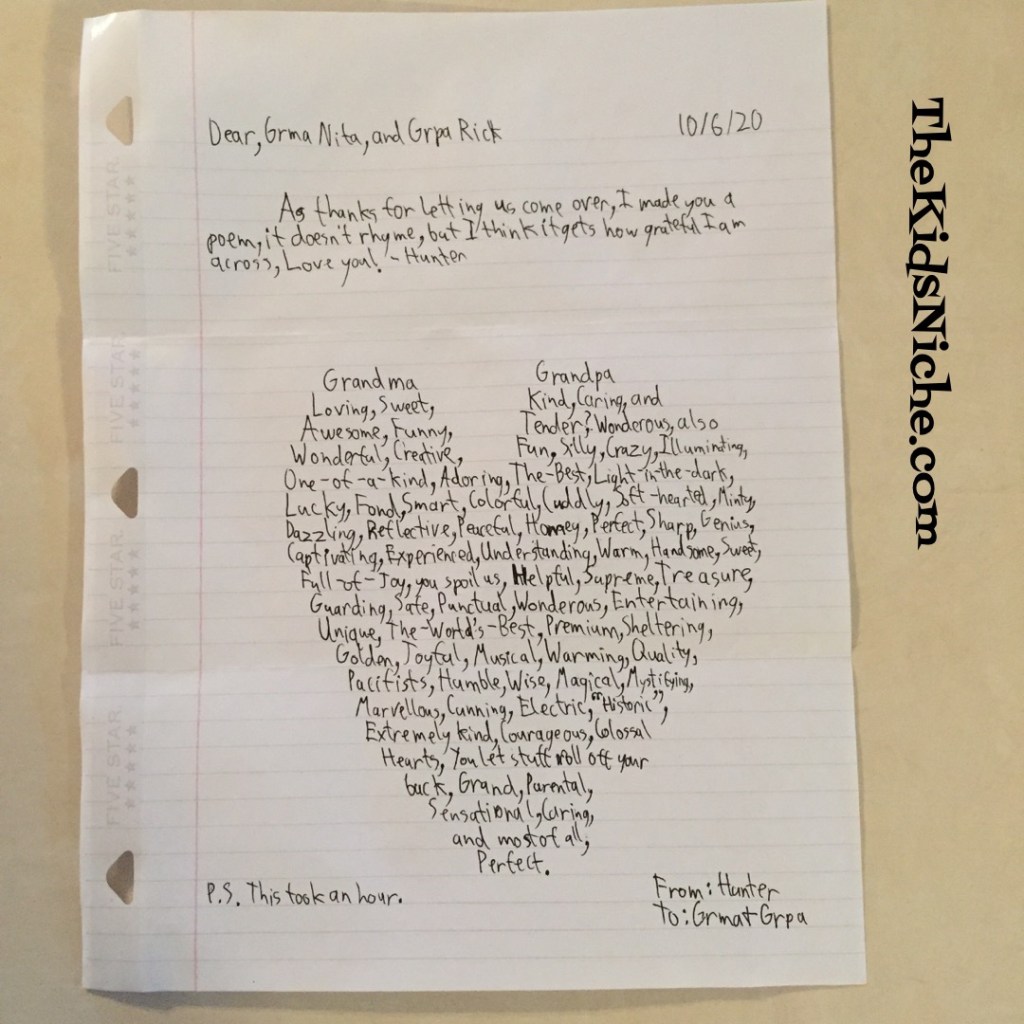
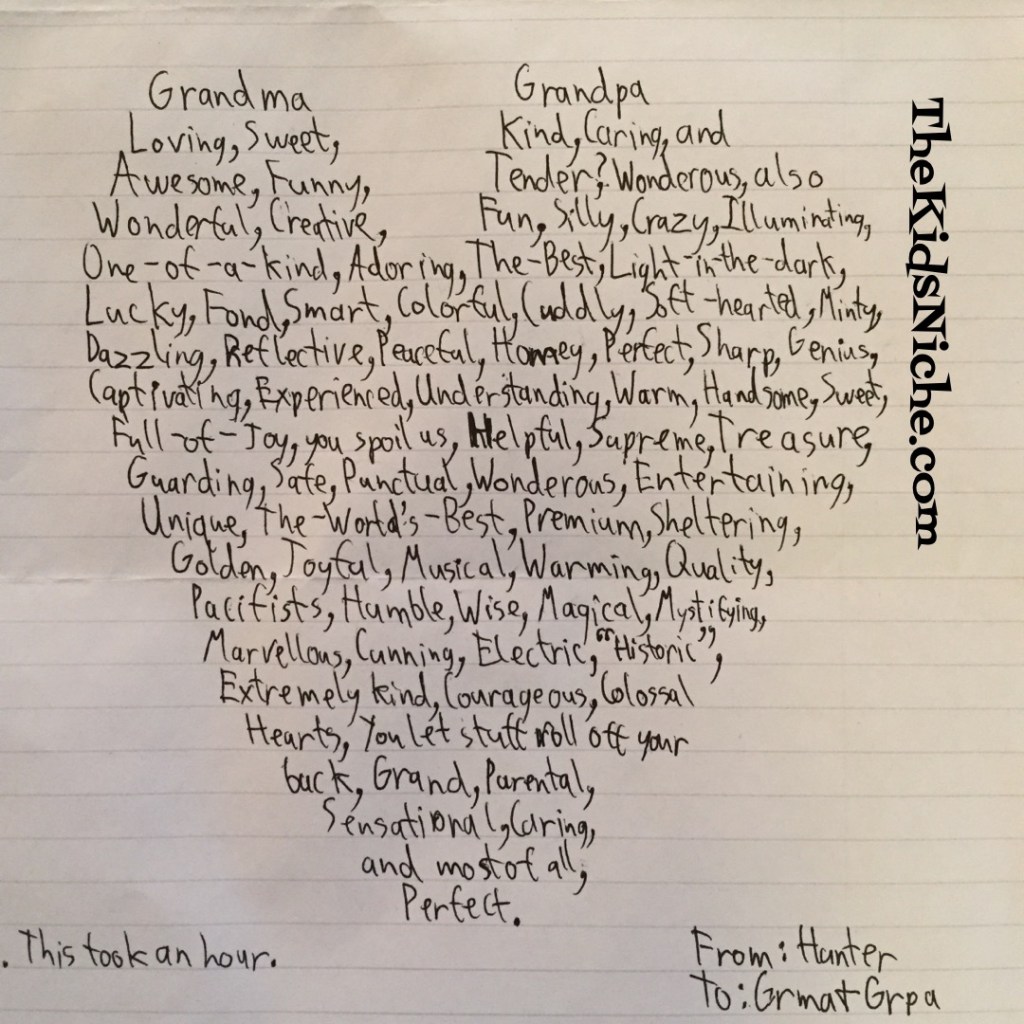
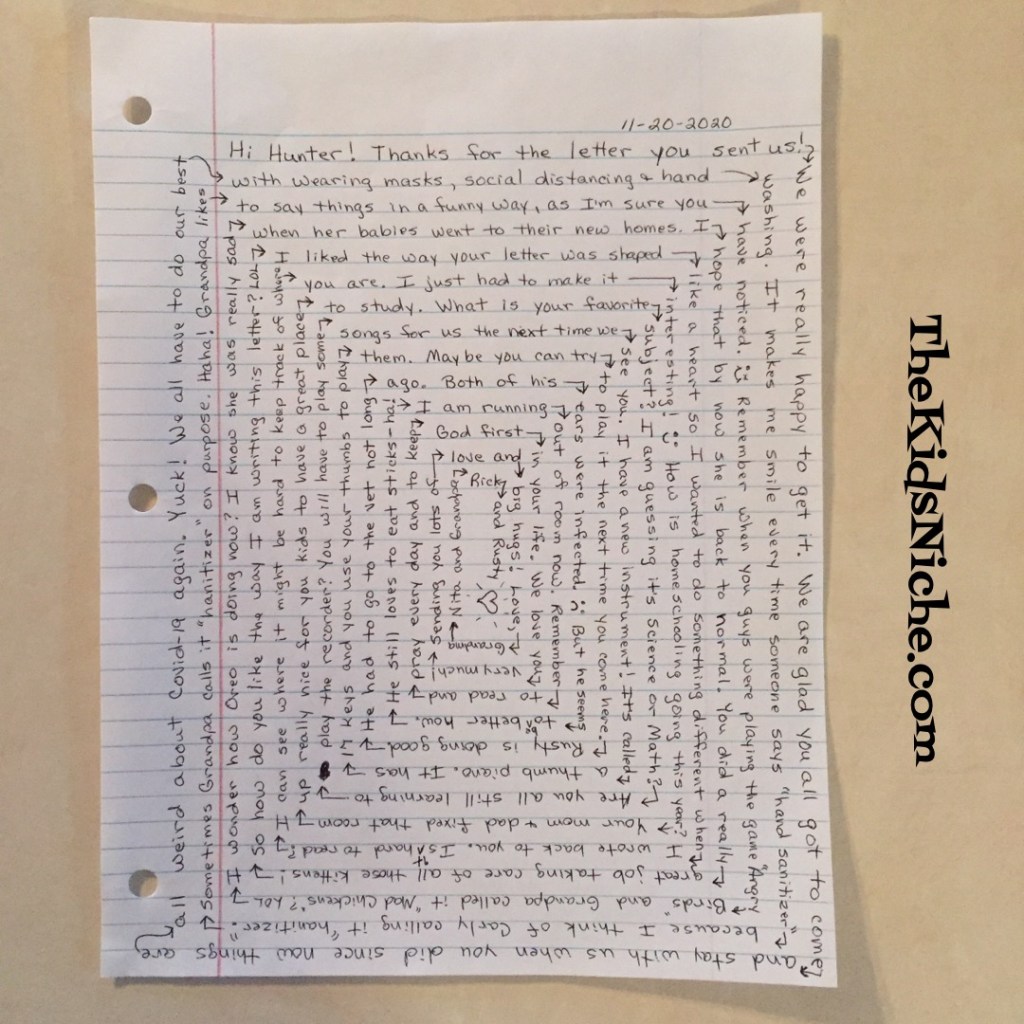
Do you write letters to your grandkids? Letter writing seems to be a thing of the past for a lot of people, but who doesn’t love to get mail? A hand written letter does something special to warm the heart and is appreciated by almost everyone. Not long ago, we received a very special letter from our grandson, Hunter. The grandkids had spent a week with us and Hunter wrote us a special thank-you note. Look at what he did:
He wrote it in the shape of a heart! Isn’t that neat? 🙂 What an original idea!
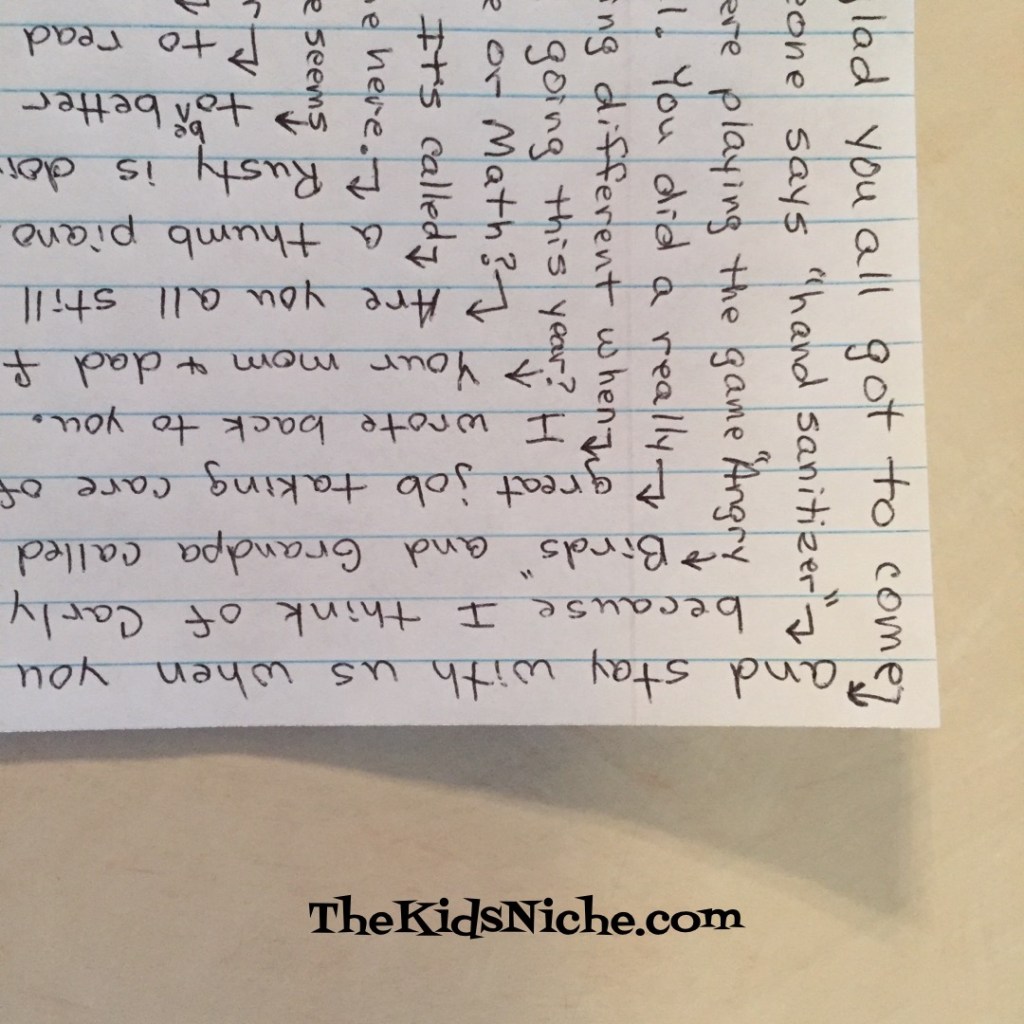
The words he wrote were also very sweet but I did laugh when I saw that he said we are “historic”. LOL (Is that a nice way to say “old”? Haha!) His letter got me to thinking of funny ways to write letters that could cheer someone up. So the letter I wrote back to him looks like this:
Can you see how I wrote it? I started out the usual way of writing in the first space. But when I got to the right side of the page, I turned the page and wrote down the right side.
When I came to the bottom of the page, I turned the paper again and wrote along the bottom.
So I wrote all around the outside edge, around the entire paper. Each time I came back to the beginning, I moved in another space and continued going around and around and the space got smaller and smaller until I ran out of room to write.
When Hunter gets his letter, he will have to turn the paper around and around to read it. 😉
Another way to write a goofy letter is in a circle. I drew a circle with a pencil to start my next letter to Hunter’s brother, Kendan.
As you probably guessed, I wrote this letter in a circle with each line moving a little closer inside.
Can you think of any other fun ways to write a letter? In a triangle shape? Maybe a square or an oval? I’m pretty sure I will think up some other fun ways to write letters, but maybe these 3 ideas will get you started on your own letter writing adventure! Have fun! And you just might get a letter in return! 😉
It’s that time of year again when you might find those cool looking yellow and black striped Monarch butterfly caterpillars! We found our first one a couple weeks ago.
I brought the caterpillar inside and gave it it’s own cool apartment to live in. I gave it plenty of fresh milkweed leaves to munch on with a few drops of water on them and a stick for climbing to the top of its apartment . Within just a couple of days, it had gone into its chrysalis.
Then the waiting and watching began. Yesterday I noticed that the chrysalis was turning a darker color so I knew that the time for hatching was getting close. This morning when I got up, this is what I saw:
Hello, world! The new Monarch butterfly has arrived! 🙂
This Monarch butterfly is a girl. After giving her a few hours to plump up her wings and dry off, I took her outside. As soon as I walked outside, she started fluttering excitedly around in her apartment! She was ready to go! I took the lid off, let her crawl up onto my finger and she flew off before I could even get her completely out of the apartment. Good bye, beautiful lady! We wish you well! 🙂
The plight of the Monarch butterfly concerns all of us. Their population is really struggling. Their numbers are down 53% over last year for the ones that winter in Mexico. Those that overwintered in California this last year have decreased by 86%! So we need to try and help them as much as we can. Planting native nectar plants such as the common milkweed, swamp milkweed and butterfly milkweed. And avoid using pesticides. Let’s all help preserve these beautiful creatures!
Let’s do one more post about fun things to do with dominoes. This time we’ll talk about making cookies to look like dominoes! Sound yummy?
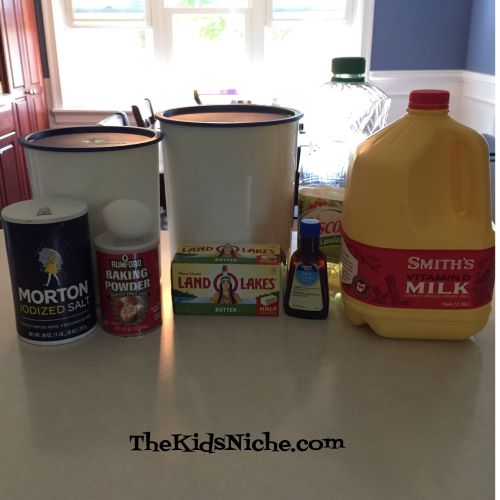
I used a recipe that’s in an old Pillsbury cookbook. These cookies are simple to make and the kids could have fun helping you mix them up, bake them, decorate them…and then help eat them too, of course! Here’s a copy of the recipe:
First gather all the ingredients together. We use vanilla in place of the almond extract.
Here we are doing step #1 of the recipe.
Adding the dry ingredients…
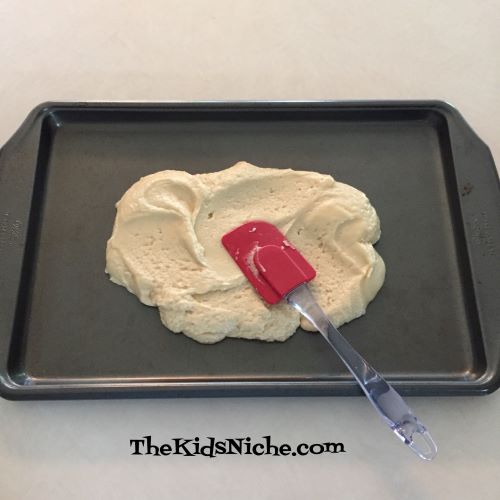
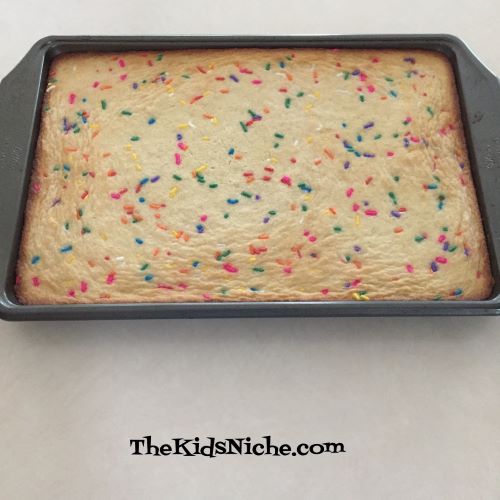
Spreading the dough in the pan…
Spread the dough all the way to the edges of the pan. It will be a thin layer of dough. We also added sprinkles which the recipe doesn’t call for, but kids love sprinkles, right? (When decorating the cookies to look like dominoes, the sprinkles do rather take away from the domino effect, so you might not want to use them. But sprinkles are cool, so you decide. Ha!)
The recipe calls for 10-12 minutes of baking time, but our batch was getting a little too brown after just 10 minutes, so you might want to check your cookies at 8 minutes.
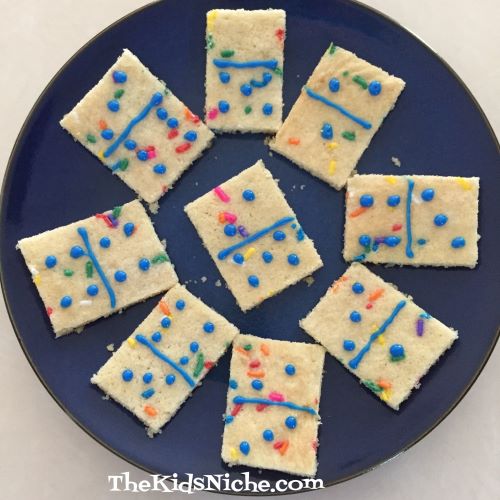
Allow the cookies to cool, then cut them into rectangular shaped pieces. I used a tube of purchased frosting for decorating. Just make a line across the middle of each rectangle cookie and add some dots to each side. Presto! You have dominoes!
Easy peasy! Domino cookies make a fun snack and go along with our other posts on learning with dominoes. Don’t forget to share your cookies! 😉