Yes, it’s Earth Day once again! That means it’s time for our annual walk to look for signs of Spring and see what flowers and other nature items we can find. Pop your shoes on and let’s go! 🙂 Here are some things we found:
Our Creeping Phlox flowers are blooming and they are so beautiful! Here we have light purple…
Also white…
And possibly my favorite colors, pink and white.
Next we found a bush with red and pink flowers. (Sorry, I don’t know what kind of bush it is.)
I bet you know the name of these bright yellow flowers! If you said dandelions, you are right!
Oh, look who is hanging out and gathering pollen on this dandelion!
These tiny little wild violets are growing in our yard. Yes, all by themselves. We didn’t plant them.
Here is another pinkish-purple flower that grows all on its own too. It even grows up through stones!
Speaking of stones…look what we found in our driveway, of all places! Two Killdeer eggs! From what we read, it seems Killdeer often lay their eggs in not very safe places.
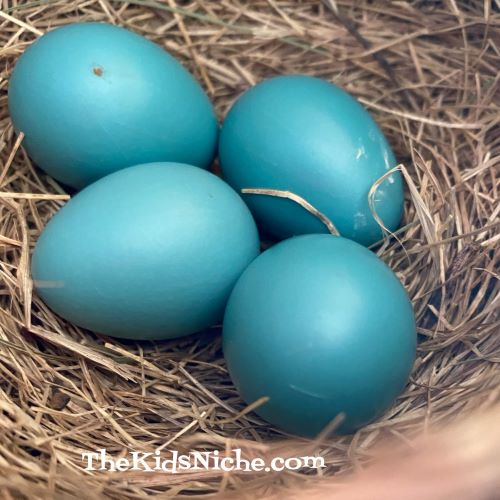
While we are talking about birds and their eggs, look what else we found on our walk.
Care to guess what’s hiding inside this nest? This is a Robin’s nest and look what a beautiful color their eggs are!
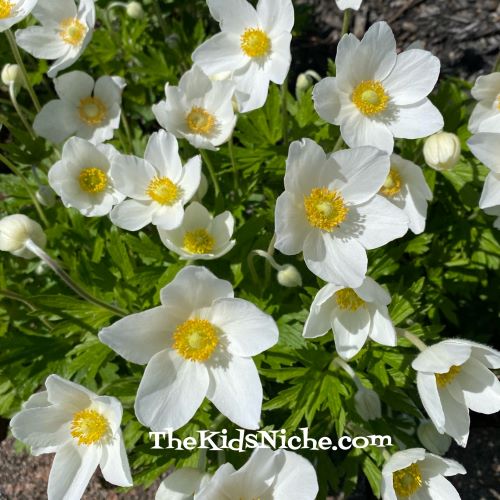
Here’s another batch of pretty white flowers.
We’re almost done with our Earth Day walk today, but keep an eye out for trees that have blossoms right now too!
I hope you’ve enjoyed going on this walk with us, but I hope you can take time outside to go on your own walk and that you will find all kinds of beautiful things in nature that will amaze you! 🙂
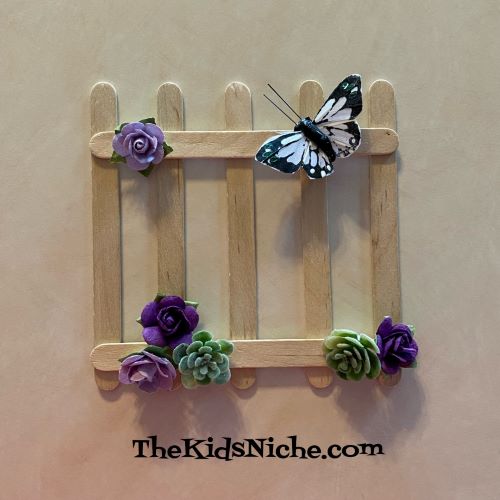
The calendar says it’s officially Spring (even though it doesn’t feel like it outside where we live) so it’s time to do some Spring crafts for kids! Today we made a mini picket fence that is really so cute! This could be a great Mother’s Day gift for a child to make with some assistance from an adult.
You will need 7 craft sticks, some craft glue, some miniature flowers and a butterfly or bug puffy sticker or button.
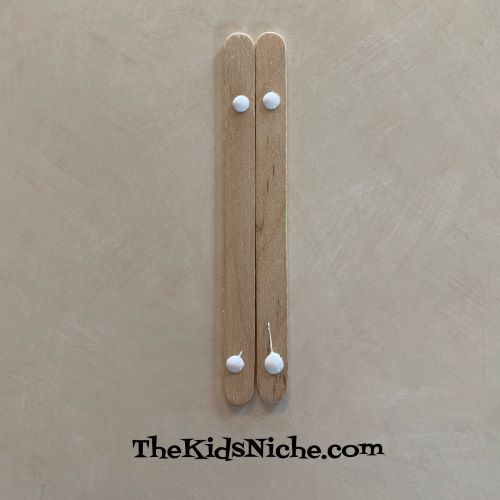
You can use the craft sticks as they are or they would look really cute painted white. Start with 2 sticks and place 2 dots of glue on each stick at the same place on the 2 sticks.
Slide the 2 sticks apart and place another craft stick horizontally across the top and one across the bottom onto the glue dots. Try to keep the sticks straight so they form an even rectangle.
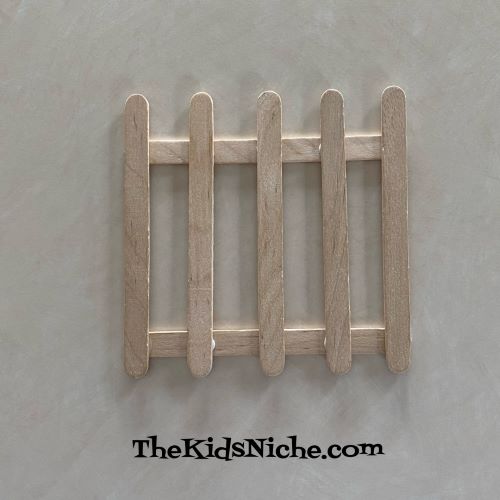
Allow the glue time to dry before moving to the next step. Once the glue is dry and your fence can be moved without the sticks moving, turn it over. Place 3 dots of glue in even spots across the top and 3 dots across the bottom stick.
Lay 3 craft sticks vertically on the dots of glue, as shown in the following picture.
Allow the glue to dry again until all the sticks will stay in place. (For a quicker project, you could use a glue gun, but craft glue is safer for younger children.) Once the fence is dry, turn in back over so the front side is up and decorate it by gluing on miniature flowers and a butterfly.
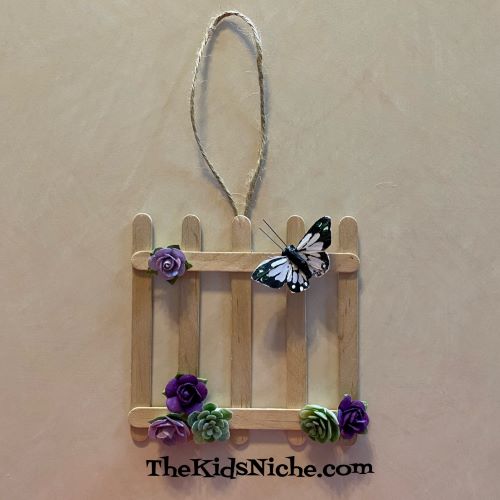
You can add a magnet to the back for hanging. Or add a piece of twine by gluing each end of the twine to the top sides of the back of the fence.
Or glue both ends of the twine to the backside of the middle vertical stick.
That’s it! Now you have a cute mini picket fence to display around your house and make you think of warm Spring days! 🙂
It’s that time of year again! 🙂 It’s time to take a walk and see what signs you can find that Spring is on the way! Now if you live in a place that has a lot of snow right now, I’m sorry! We are in Ohio and we might still get some snow, but I’m keeping my fingers crossed that we are done with snow for now!
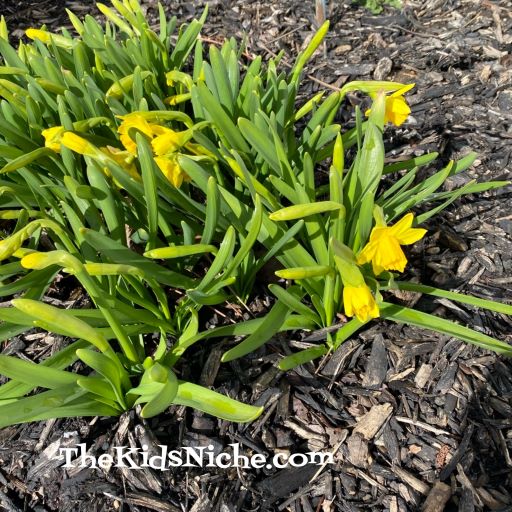
We live in the country and I love taking walks around to see what new signs of Spring I can find. It gives me hope that one day soon it will be warm outside again! So what do you think you might find? Look for new flowers peeking up through the ground. Like our mini daffodils…which actually have a few flowers blooming now!
I even spotted this lone little dandelion. 🙂
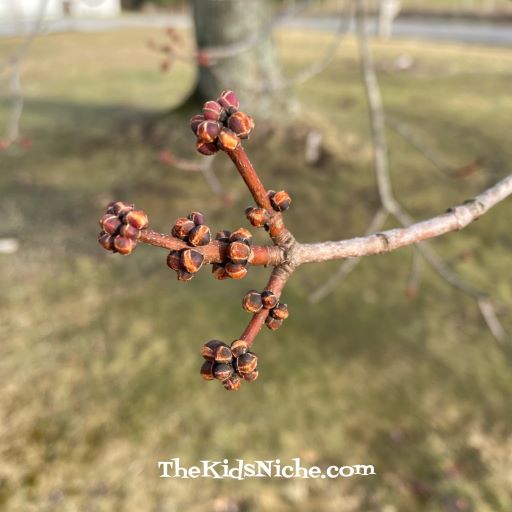
Our trees are getting buds on them.
Our Daylilies are peeking through the ground and last year’s foliage.
And so is another type of lilies.
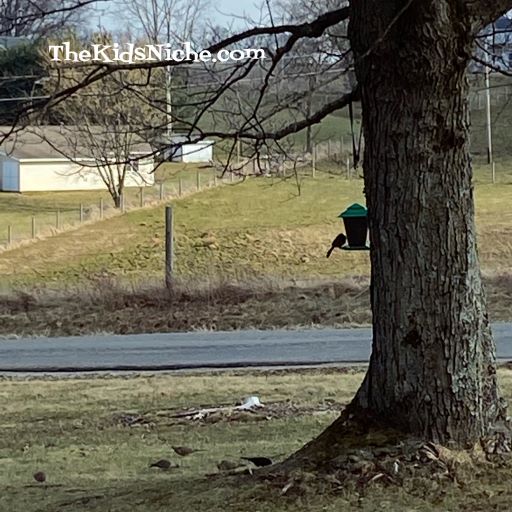
The ice cream store in a little town close to us is open again! 🙂 Watch for birds that are gone in the winter, but show up again in the Spring. We’ve seen Robins, Bluebirds and a Red-Winged Blackbird! Every time I see one, I get excited!
You will know that it’s almost Spring when the greenhouses open up again and this happens:
Haha! That has been me a few times in the past! 😉
The daylight hours are getting longer and this Sunday we will set our clocks ahead one hour for Daylight Savings time. (If you live in most states in the United States, it’s probably not your favorite thing to do.)
Do you love Spring? What are your favorite things to look for that tell you Spring is not far away? The sun is shining today, but the temperature and the wind are making it feel cold yet. But Spring is on the way, so keep your chin up and have fun looking for signs of Spring! 🙂
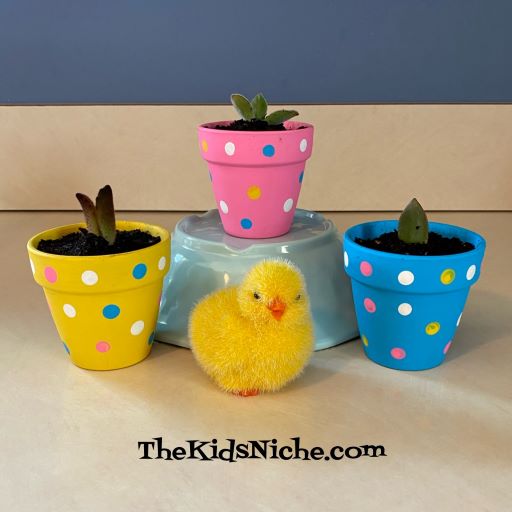
I hope you had a wonderful Easter weekend! If you look out the window here today, you would think it was April 1st instead of April 18th because it looks like we got an April Fool’s joke played on us outside! We have snow! Ok, yes, snow is pretty and all that, but we are ready for Spring now! 😉 So let’s do a cute Spring project painting little clay pots and pretend we don’t see the snow.
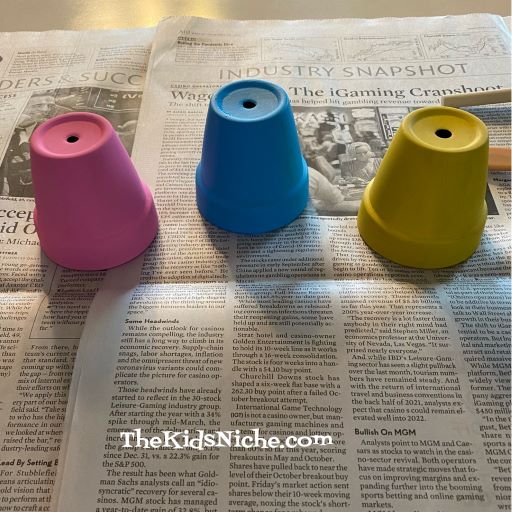
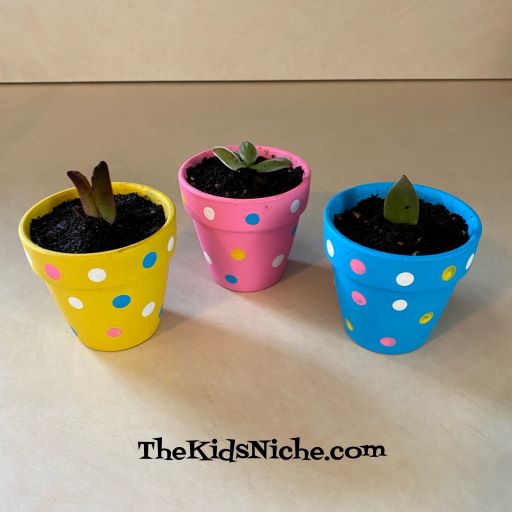
I found a pack of 3 small clay pots at the Dollar Tree store and decided they would be cute painted for Spring with some succulents planted in them. So go grab some little pots, some paint, sponge brushes and some newspaper to protect your surfaces.
I chose yellow, pink and blue for the main colors for my pots.
I painted the outside of the pots plus I painted part of the way down inside the pot.
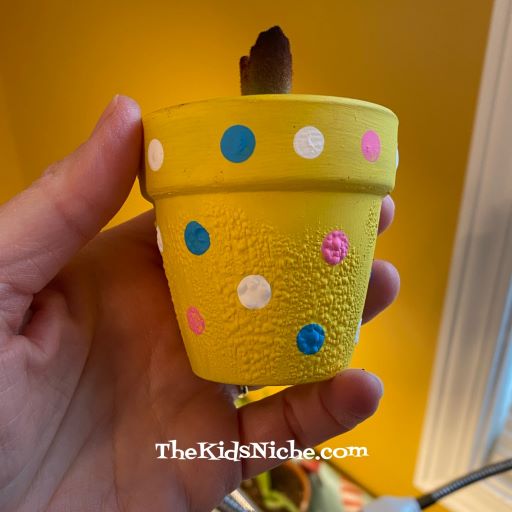
Using the eraser end of a pencil, I painted dots on the outside of each pot in contrasting colors.
I painted 1 coat on 2 of my pots but I painted a second coat on the yellow pot. I think I didn’t need to do that.
A word of caution – allow your pots plenty of drying time before adding plants! I didn’t let my yellow pot (that had 2 coats of paint) dry long enough before I added my succulent and the paint bubbled up because of the moisture in the dirt.
Check your local Lowe’s or Home Depot stores or a greenhouse for some little plants to add to your beautiful little pots.
And there you have it! Bright and colorful painted pots to cheer you or someone else up! Spring is just around the corner! 🙂
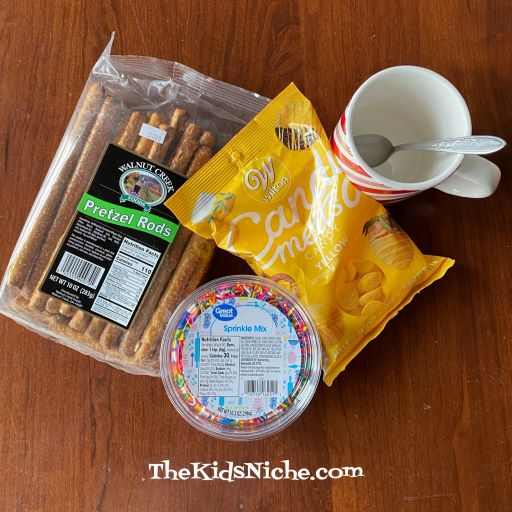
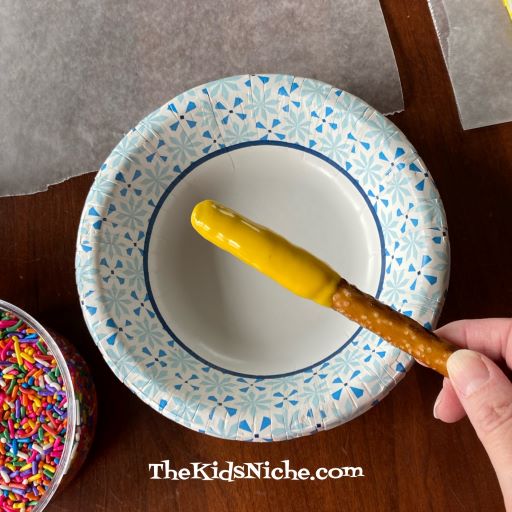
Here’s a fun quick project you can do with the kids to welcome Spring! Or for some extra fun for Easter…pretzel rods dipped in candy and coated in sprinkles!
You will need a bag of Wilton Candy Melts (I used yellow but there are other colors available), some wax paper or parchment paper, pretzel rods, a microwave safe mug and some candy sprinkles.
Put some candy melts in a microwave safe mug or cup.
Melt in the microwave according to the package directions.
Dip the pretzel rod into the melted candy. Tipping the cup sideways some can help to get the candy farther up on the pretzel.
Let the excess candy drip back into the cup. While holding the dipped pretzel over a clean bowl, drop/pour the candy sprinkles over the melted candy part of the pretzel.
After you have added the sprinkles, lay the pretzel on a piece of wax paper or parchment paper. The candy will gradually harden again or you can place the dipped pretzels in the refrigerator for 5-10 minutes.
And that’s all there is to it! 🙂 You can arrange the pretzels on a plate or in a cup or vase and share them with your family and friends. Sweet and salty mixed together is a great combination! Yummy!
It’s only 10 more days until the official first day of Spring!! Are you getting excited? Whoohoo, I am! It’s going to feel like winter and it’s supposed to snow this weekend, but Spring is really just around the corner! It’s time to take our annual walk around outside (bundle up if it’s cold where you are!) and look for hints of Spring. Here’s a few that I found today!
Look at the trees. Are they starting to get buds on them?
Violas are some pretty dainty, but really tough flowers and I found one blooming today!
The daffodil flowers are pushing their way up through the ground.
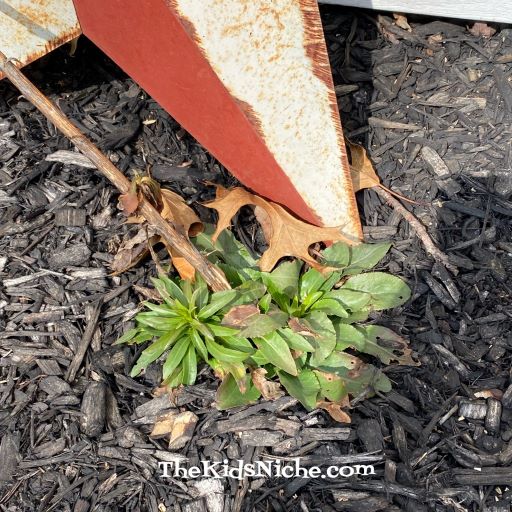
I can’t remember which flower this is at the moment, but, hey, it’s green and it’s growing! 🙂
This may look like a pile of old dried up leaves but look closely and you can see some green leaves growing down inside there! Can you spot any?
Some of our favorite birds are showing up at the bird feeders again! I counted 15 different kinds of birds here the other day. 🙂
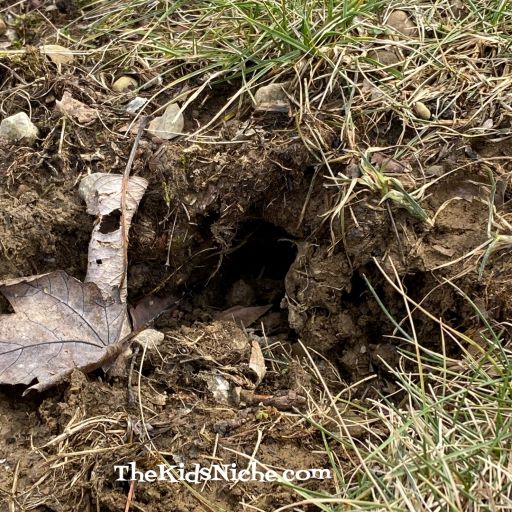
Our dog, Rusty, found this chipmunk hole today. He’s on the lookout now for the occupants of that hole. 😉
Now it’s your turn! What signs of Spring can you find outside close to where you live? If you get some snow this week or weekend, don’t get discouraged because Spring is almost here!! 🙂
Here is a cute and so simple way to make some great looking spring decor! You will need a pint canning jar (or other clear jar), some M&M’s candy and some artificial flowers.
Fill the jar with the M&M’s and cut the flowers to the size appropriate for your jar. Stick the artificial flowers into the jar with the M&M’s. And that’s all there is to it! 😃
How’s that for an easy and quick spring decoration?! So cute! 😉
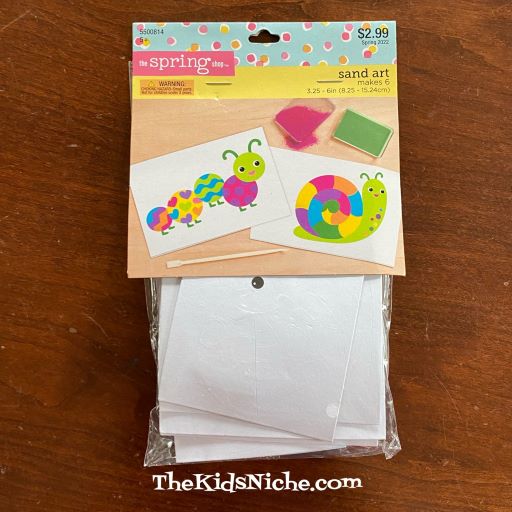
I found these 2 craft kits for kids at a Hobby Lobby store the other day and wanted to share them with you. While I haven’t made these kits yet, they look like a ton of fun for a really great price! These are normally priced at $2.99 (which seemed like a good price already) but were on sale for 40% off which brought their price down to only $1.79 each! 🙂
The first kit I want to share is a sand art kit. This kit comes with 6 pictures and you use sand to color them. You pull off a bit of the paper and it’s sticky underneath. You pour a little sand over the sticky part and then shake off the excess. Then you’ll move on to the next section.
On the back of the package, you can see the 6 cute designs that are included. (I’m ready to start!) 😉
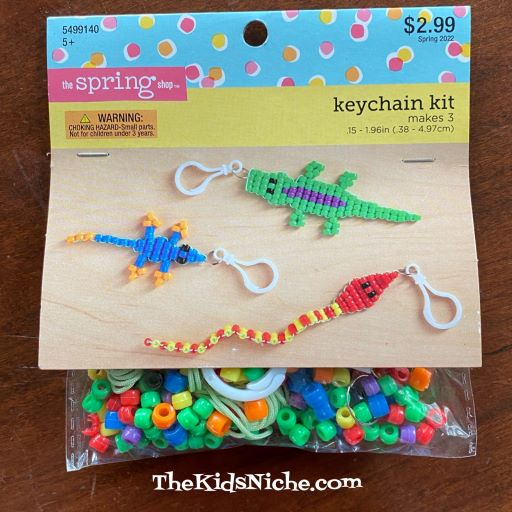
The second kit is for making key chains with beads.
Each keychain kit makes 3 keychains….1 alligator, 1 snake and 1 lizard. This looks like a fun activity to me! 😉
Hobby Lobby has lots of items on sale this week that are great for Spring! Hurry on in and see what goodies you can find! 🙂
It’s finally Spring! Once the sunny, warmer days begin to show up, our thoughts go to watching for new things to start growing outside…the spring flowers pop through the ground and bloom, our grass turns green and dandelions pop up everywhere! Yes! I love getting back to growing plants and planting flowers and veggies! It’s the perfect opportunity to teach kids about planting seeds and watching the little shoots peek through the soil and gradually grow into a big plant with flowers or yummy things to eat! There are lots of ways to grow plants and today I’ll share just a couple ideas with you. You can get started with just a few items.
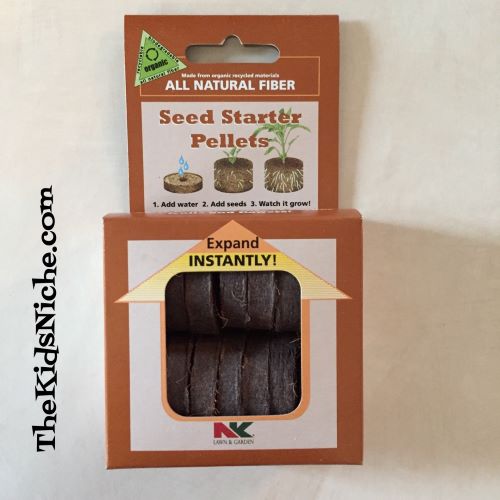
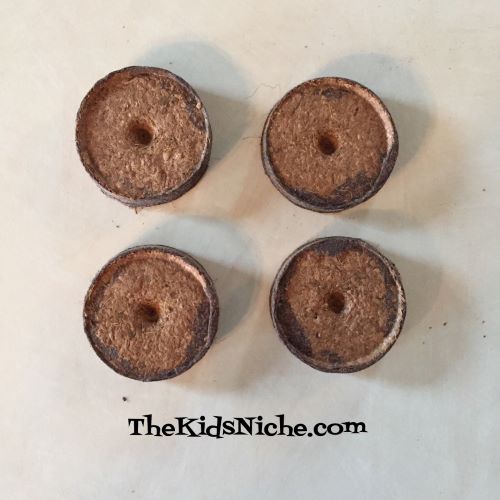
The first way I’ll show you is super simple! All you need is a packet of seeds and some seed starting pellets, found in any store that sells home and garden items.
I found this style at a Rural King store and it really doesn’t get any easier than this. It’s as simple as it shows on the box…put the pellets in warm water, let them soak a few minutes, add the seeds and set them in a sunny spot. 🙂 If you think you don’t have a green thumb, you really should try these and I think you will be pleasantly surprised. Here’s the flower seeds we’re using for our examples.
So, let’s get started! Lay some old newspapers on your table or counter top to make cleanup easy for any bits of dirt, seed or water that may escape. 😉 Grab your seed starting pellets and put them in a container that will hold water. Add some warm water and watch them swell up in just a few minutes. It’s pretty cool to watch!
Ready for seeds
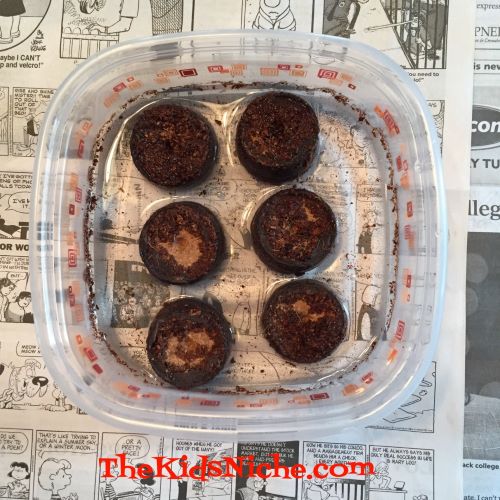
After the pellets have swollen up to around 1 1/2″ – 2″ and they feel soft inside, drop 2 seeds on the top and gently cover them with just a little bit of the dirt inside. Some seeds are super tiny so be careful not to add too many seeds to one pellet.
Notice I used 2 different types of flower seeds. The ones on the left are Bachelor Buttons and the ones on the right are Zinnias.
These are ready to be set in a sunny place! It depends on the type of seed you plant how long it will be before they begin to grow or germinate. The Bachelor Buttons take 10-14 days and the Zinnias take 6-10 days. You can find this information on the back of the seed packet along with other information like how far apart to plant them after they grow, whether they are an annual or perennial, how tall they will grow, etc. It will be a good lesson in patience while you check each day to see if they have appeared yet. 😉 Keep the dirt moist but don’t make them soggy!
Now onto the second way of starting some seeds! Did you notice the egg carton with egg shells in it and the potting soil in the first picture? Yep, that’s what we’re using for this example. Save up some halves of egg shells until you have enough for the number of plants you want to start. I scooped some potting soil into a small bowl and because it was really dry, I added a little bit of water to it. After stirring the water and soil together, I spooned some into each egg shell half.
This time I used the Viola seeds because they are one of my favorite flowers! They look like miniature pansies and their colors are just so pretty! Again, add just 2 seeds to each egg shell half, cover with a bit of the potting soil and pack down ever so lightly.
The Viola seeds are very tiny! See the 2 light brown seeds in the center? That’s them! 🙂 They’re all ready to set in a warm sunny window. Keep the dirt moist but don’t add too much water at a time since any extra water can’t drain away. When the plants are big enough to be planted into a larger container, just crack the shell some so the roots have room to keep growing.
Now, just in case you aren’t really into growing flowers or your kids would like to grow something they can eat, here is one more example of something fun to grow. I used the same seed starting pellets as before but this time I added Cherry Tomato seeds.
Cherry Tomatoes grow well in containers, so you can grow these even if you live in the city and don’t have room for a garden. They like lots of sun and would do great on a patio. This type takes 7-10 days to germinate and around 65 days until you and the kids will have 1″ little red tomatoes to eat that you grew yourselves! 🙂 And that makes them taste even yummier! 🙂 Have fun while you introduce your kids to the joy of growing things!