The other day I mentioned we would be making a suncatcher with a Makit & Bakit kit that I bought at a Joann Fabrics store. Today’s the day! I have seen this type of kit before but I had never done one. So time to teach an old dog a new trick! 😉 Here’s how they are done:

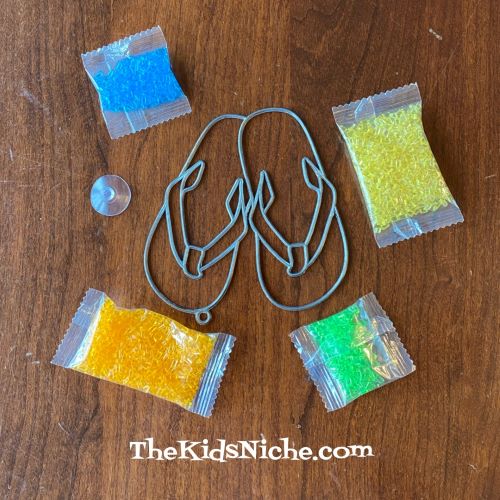
This is what was included in the kit. The instructions were printed on the back of the cardboard.
The idea of making them is simple. First line a cookie sheet with aluminum foil.

Place the frame, flat side down, onto the foil lined cookie sheet.

Start with one color and fill an area of the frame with that color of the little plastic pieces. First I did orange.

Then the yellow…

Next came green…

And finally the blue.

The trick is getting and keeping the colors in the places you want them. It’s good to have a toothpick and a pair of tweezers handy for moving the little pieces around. And tweezers are nice for filling in the little spaces. Here’s a closer view so you can see what they look like when they are ready for the oven.

Now you preheat the oven according to the package directions. Do NOT use a microwave!! Place the cookie sheet with your suncatcher in the heated oven and follow the package directions for how long to let it bake. Mine took about 15 minutes. A word of caution: Open your windows while your suncatcher is in the oven. It will give off a plastic smell. The package says it is not harmful, but if you are sensitive to odors, you might not like this part of the process. After the plastic pieces have melted, remove the cookie sheet and let the suncatcher cool before handling. Then it should peel off the foil easily. Because of the odor, I sat my cookie sheet outside to cool and that helped a lot to dispel the odor.

And there is your suncatcher! Add a bit of string if you like to hang it up. It was a fun project but a little tedious getting the little pieces in just the right place, so this might be good for kids that are a bit older. (I accidentally dropped my tweezers on my suncatcher which made the tiny pieces go flying all over…and then I had to clean them up!) And of course, adult supervision is needed when using the oven. Let me know if you give this a try! 🙂