Valentine Tic Tac Toe

Are you looking for a super fast and easy game to play with your kiddos on Valentine’s Day? They don’t come any easier than Valentine Tic Tac Toe! Grab your Valentine’s Day candy and a piece of paper and a marker and let’s play!

Draw a tic tac toe board with 4 lines. You need two players for each game. Each player takes 5 pieces of the same color of candy. For example, 5 pink hearts for one player and 5 green hearts for the other. Taking turns, each player will lay 1 of their pieces of candy on a square on the game board. The winner is the first one to get 3 of their hearts in a row. In the following picture, the player with the green hearts won.

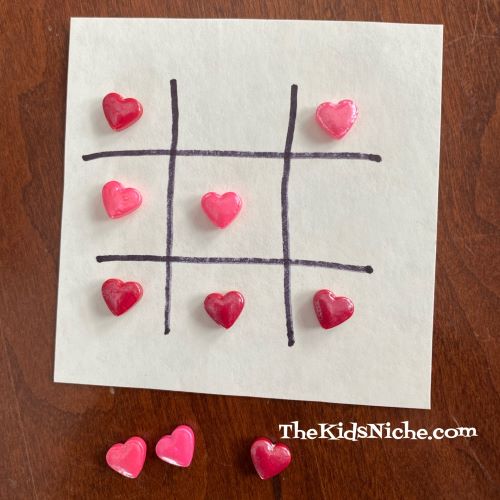
If nobody gets 3 in a row, its a tie game, as you can see in the following picture.

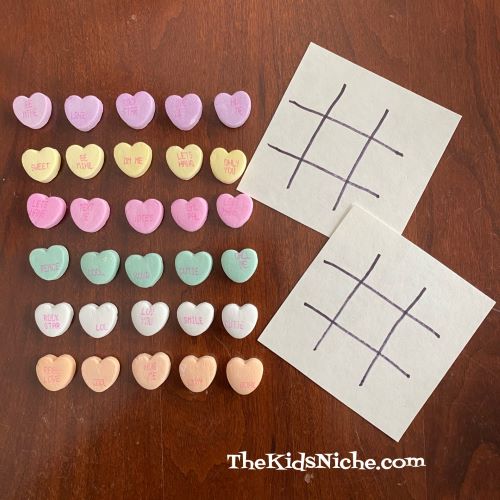
Since we can’t be with our grandkids this year, I’ve sent them a package of goodies for Valentine’s Day. This game is one of the things I included. Here’s enough colored hearts to play 3 separate games. 🙂

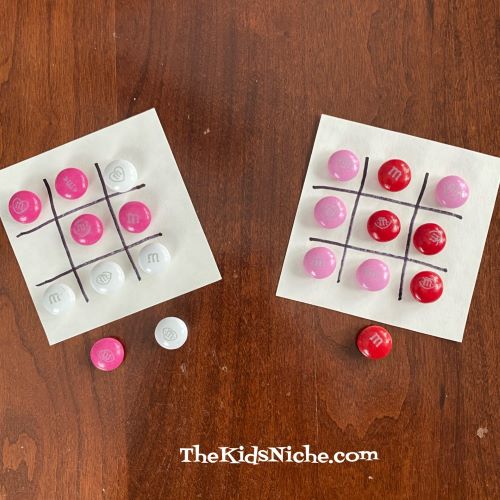
Can’t stand conversation hearts candy? (Me either!) You can play the same game using Valentine M&M candies! Yum! I guess they are called Cupid’s Mix M&M’s. (Chocolate! NOW we’re talking!)

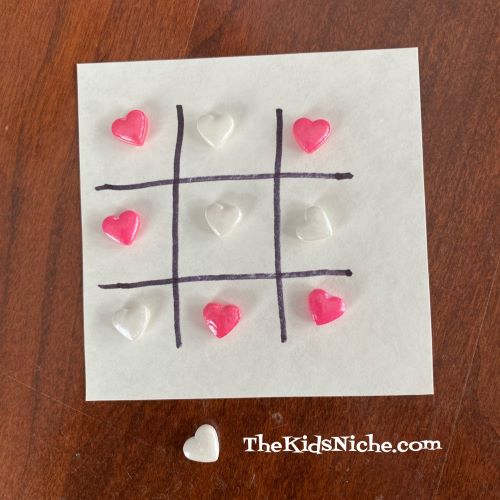
Looks like white won!

And pink won this game! 😉

OR you can use the candy heart decorations made for topping treats!

It’s a tie! Play another round.

Red’s the winner this time!

No matter if you win or lose the game of Valentine Tic Tac Toe, everyone is a winner because after you are done playing…you can EAT the candy! (That’s the best part!) Have fun! 🙂

Handmade Valentine’s Card for Kids to Make

We’re back with another idea for a Valentine card kids can make. This one involves strawberries and blueberries. Ready? Grab a piece of paper or a blank card, a pencil and colored pencils or crayons and some markers. Start with a half a sheet of paper, cardstock or construction paper.

Fold it in half to make it card-sized. On the front of the card, we’re going to draw a strawberry. Start out by drawing this shape.

Next, add some leaves and a stem.

Use your colored pencils, markers or crayons and color the strawberry. I used colored pencils.

Looking good! Now make some tiny little lines for the seeds on a strawberry. I used a black pen to draw mine.

Your strawberry is finished! Now add the words, “You are “berry” sweet!” to the front of the card.

Open the card and on the inside right hand side, let’s draw some blueberries. I drew 3 but you can draw however many you like. Start with a circle and then add 2 more circles that are partially hidden behind the first one.

Add one small circle inside each of these circles. Then add 5-6 almost triangles to the little circle.

Color the blueberries. You’re almost done! Add the words, “Have a “berry” Happy Valentine’s Day!”

Great job! Who will you give your handmade Valentine to? Remember to sign your name. I hope you’ve had fun making this “berry” nice Valentine’s Day card! 🙂

Handmade Valentine Card for Kids to Make

We’re coming at you today with another fun card that kids can make for Valentine’s Day. All you need is a piece of paper, colored pencils or crayons and a black marker.

My paper is construction paper so I cut it in half.

Take 1 of the pieces and fold it in half to make a nice size for a card.

Now draw a bunch of grapes on the front of the card. Draw circles and partial circles to make the grapes. I used a purple colored pencil but grapes can be other colors too.

Keep drawing and coloring in the grapes until you like how big your bunch is.

Add a brown stem at the top of the grapes.

Use green to draw in a couple of leaves.

Now add a simple face. I used a black marker to draw 2 dots for eyes and a curved line for a mouth.

Add the words “I love you a “bunch”! ” at the bottom of the card.

Open the card and on the right hand side, draw another bunch of grapes like you did on the front of the card. Write the words at the bottom…”Have a “grape” Valentine’s Day!”

Remember to sign your name. Give it to someone special on Valentine’s Day! I hope you enjoyed today’s craft! Have a “grape” weekend! 😉

Stained “Glass” Valentine Heart

We’re back with another great Valentine’s Day craft project! If you saw yesterday’s post about a tissue paper heart activity and you saw that I suggested you save the stencil looking part of that project for another project, this is it!

If you didn’t see that post, what you need to do is cut a piece of construction paper in half. Then taking one of those pieces and fold it in half.

Draw half of a heart shape on the folded edge of your paper. Then cut along the line you drew. When you open it, you will have a heart. 🙂 For this project, we will be using the piece with the heart cut out, but you might want to save the heart to use it for something else.

For today’s project, you will need another half sheet of construction paper, a pencil, scissors, glue and several different colors of tissue paper. First cut a 1″ wide strip from each color of tissue paper. You will need only a short piece of each color. (I had a lot left over!)

Now, take the half piece of construction paper and fold it in half. Lay the first stencil on top and trace the half of a heart on the fold like you did for the first one.

Cut out the second heart so you have 2 matching pieces.

Unfold the 2 pieces. Place the side that you drew on facing up. This will become the backside of the stained “glass” heart. Using the strips of tissue paper, lay one across the heart opening and glue the ends down.

Take additional pieces of the tissue paper strips and place them, one at a time, in different directions over the heart opening…and glue the ends down.

Add a few more strips…

Keep adding strips until all the open spaces of the heart have been covered with tissue paper.

Take the other piece of construction paper you cut the heart out of and apply glue as it is shown in this picture.

Place it on the paper you have been gluing the strips to so that the edges meet and the 2 hearts match up. This will cover up all the ends that you glued down and allow the light to shine through the heart cutout. And there you have it! You’ve made a stained “glass” Valentine heart! Put it up to a window and look how pretty it is when the sun shines through the heart!

Doesn’t that look nice? Make as many as you like (Or as many as your parents will allow!) and put them close to your windows to make your house look festive. 🙂 You could also make a hole at the top and put a piece of string through so you can hang up your stained “glass” art. I hope you had fun today! Check back for more Valentine’s Day ideas soon!

Valentine Tissue Paper Heart

Are you ready for another fun Valentine’s Day project? Let’s make a really pretty 3-D heart!

You will need some construction paper, red tissue paper (or the color of your choice), scissors, glue, a piece of string and a pencil with an eraser.

You will need to cut approximately 75 little squares of the red tissue paper. I cut mine about 1 1/2″ square. They don’t need to be perfect because the paper will be “scrunched up”. Any smaller than that could be difficult to work with. If you have a cutting mat and a rotary cutter, this part will go much quicker, but scissors work fine. 🙂

Take HALF of a sheet of construction paper and fold it in half.

Drawing on the folded edge, draw half of a heart shape.

Sorry, that’s rather hard to see. Cut out the half -heart shape and you will have a whole heart when you unfold it.

Set aside but save the piece that looks like a heart stencil for a project we will do another day. 🙂

Your finished heart can be added to a card, have a magnet attached to the back or be made to hang up like an ornament. If you would like your heart to hang as an ornament, now is the time to add a hole at the top. Go ahead and put your string through the hole because it will be harder to do later. (I found that out the hard way!)

You are now ready to start using the tissue paper squares. Take 1 square and your pencil with an eraser.

Place the pencil eraser in the middle of the square of tissue paper.

Wrap the tissue paper down around the pencil end.

Apply a very small amount of glue to the tissue paper at the end of the pencil eraser.

While holding the tissue paper onto the pencil end, place the tissue paper onto the heart you cut out. Start out close to the outside edge of the heart.

Hold in place for a few seconds, then carefully pull the pencil out leaving the tissue paper on the heart. Continue adding more pieces of tissue paper in the same way.

Keep adding…you’ve got the hang of it now!

The closer together you put the tissue paper pieces, the fuller your heart will look. Try to get the pieces right up against each other where they attach to the heart. If you like, you can just make an outline of the heart with the tissue paper.

I like it better when the entire heart is filled up. It will take a little more time but it will be worth the effort.

You did it! Isn’t that a pretty ornament to decorate your house for Valentine’s Day? I think it would be really pretty to use more than one color of tissue paper. If you used red, white and pink, wouldn’t that look nice? I hope you’ve enjoyed this Valentine activity! I’d love to see your hearts, if you care to share them!

It’s February! That means Valentine’s Day!

We made it through January 2021! Whoohoo! Welcome to February! What is the most fun thing that happens in February? I think it’s Valentine’s Day! I hope we can share lots of ideas of fun things to do that center around Valentine’s Day. Today’s fun is an activity making a Valentine’s Day card involving pears! Pears? Yep, pears! 🙂 You’ll need 1 piece of white paper, (printer paper is fine) 1 piece of yellow paper or a yellow crayon or marker, glue, some markers or crayons and a pencil.

Let’s start by folding the white paper in half.

Then in half again the other direction.

This is your card base.

Using your yellow paper, lightly draw 2 small pear shapes and 1 larger pear shape. The larger pear shape needs to fit on the front of your card.

Cut out your pear shapes and get ready to put your card together. 🙂

Glue the large pear onto the front of your card. You can draw a face, arms and hands, legs and feet or anything else you want to do to make your “pear” person. Here is how I did mine.

Now add the words “You are “pear”-fect!” 🙂

Now open your card and glue the 2 smaller pears onto the right hand page. You can give them arms and legs and a face and whatever else you would like to add. Then write the words, “We make a great “pear”.

Decorate the rest of your Valentine’s card and save it to give to that special someone on Valentine’s Day! Hope you had fun making this “pear”-fect card! 😉

Valentine’s Day Craft

Happy Valentine’s Day!! 🙂 Today I want to share a cute little craft kit that I found at Walmart that is a perfect project for Valentine’s Day. It’s Crayola’s String of Hearts kit using their Model Magic. It cost around $5.00.

Here’s what you’ll find inside the box: 1 pouch of red model magic, 1 pouch of white model magic, directions, 1 marker, 1 tube of glitter glue, 1 string, 1 tool for poking holes and 1 heart shaped cutter.

Remove 1 chunk of model magic from the pouch and roll it out to about 1/8″ thick. You can use a rolling pin, the side of a glass or just your hands. Use the heart shaped cutter to cut out as many hearts as you can. I found through trial and error that it’s best to leave a little bit of room between the hearts. It makes it easier when trying to pick them up. (I cut the red batch a little too close together and they tended to stick back together when I tried to lift them.)


I found it helpful to use a small spatula to slide under the hearts to help release them from my cutting board.

Using the little tool for poking holes, poke 2 holes in each heart. Don’t be afraid to make them too big as they seem to close up some as the hearts dry. The holes are where the string will go through them.

You can also make tiny marks on the edge of a heart using the tip of the heart shaped cutter.

As you cut out the hearts, you will have leftover scraps. Save them for now. Flatten and cut hearts out of the other color of model magic. Again, save your scraps.

You can use your leftover scraps to simply squish them back together and re-roll them to cut more hearts out. But if you take a bit of each color and squish them together just a little, you can cut out hearts that look like this:

I just LOVE these! If you mix some red and white together, but squish them together for a longer amount of time, you can make pink hearts. 🙂

If you use a little less red and a little more white, the pink will come out an even lighter color. Now you need to allow your hearts to sit out over night to dry. I kinda helped mine along a bit by heating my oven to its lowest setting, turning the oven off and letting the tray of hearts sit in the oven for an hour. Some of my hearts might have been rolled out a bit too thin, but I made 55 hearts with this kit!

After your hearts have dried, you can use the included marker and tube of glitter glue for decorating your hearts. Allow the glitter glue time to dry before proceeding.

Now you can string some of your hearts together to make a decoration to hang up. Put the string into the right hole from the right side, cross over the back of the heart and bring the string up through the heart going back to front. Continue in the same way to string as many hearts together as you would like. If your holes seem to be too small, gently use the poking tool to open them up more.

Here’s a closer view so you can see how to string the hearts together.

Do you have leftover hearts? You can glue them onto paper to make a picture or even a card for Valentine’s Day.

Hope your Valentine’s Day is special! Thanks for reading my blog! 🙂

Valentine Fun Craft

Wow, I can hardly believe that Valentine’s Day is a week from today!! Are you looking for a fun craft for the kids to do for Valentine’s Day? Here’s a cute little guy that I used to make when I was a little whippersnapper. It doesn’t take much to make it…red or pink paper, white paper, scissors, glue or tape, a marker and, if you have them, heart shaped cookie cutters. If you don’t have the cookie cutters, no problem! You can draw hearts to cut out.

First thing to do is to make 1 large heart and 4 small hearts out of the red or pink paper. I traced around cookie cutters.

I used a piece of printer paper for my white paper. Make 4 strips of paper approximately 1/2″ wide by the width of the paper. (8 1/2″)

You should have 1 large heart, 4 small hearts and 4 strips of white paper.

Draw a face on the large heart with a marker or crayon or pen. Make it as silly or as sweet looking as you like.

Take one strip of paper and beginning at one end, fold it back and forth in accordion style. Then repeat that with each of the other 3 strips.

Glue 1 small heart to one end of each of the 4 strips.

The 4 accordion strips with hearts become this little guy’s arms and legs. Glue them in place like in the following photograph and you’re finished!

You can add a Valentine wish to the back of the large heart and use it for a Valentine’s card to give to your favorite Valentine! Have fun! 🙂