Tomorrow is the day for hearts and love and flowers and fun! 😉 Here’s a quick idea for a super simple game you might play with the kids on Valentine’s Day. Let’s call it Valentine Tic Tac Toe.
All you need is a piece of paper and a pen and some Valentine’s Day candy. Pick out 5 pieces of 2 different colors of candy…1 color for X and a different color for O. Draw a Tic Tac Toe board on your paper and you’re ready to play! There are lots of candy pieces that would work for Valentine Tic Tac Toe. Here’s enough colors of candy conversation hearts for 3 different games.
I love M&M’s candy so that’s the one I would choose to play with! 😉
You can even find candy hearts in the food decorating aisle of your favorite grocery store.
Depending on the size of your family or group, you could play separate games and the winners advance to the next round. The final winner could get a special prize and everyone could enjoy some Valentine’s Day candy! ;) Have fun!
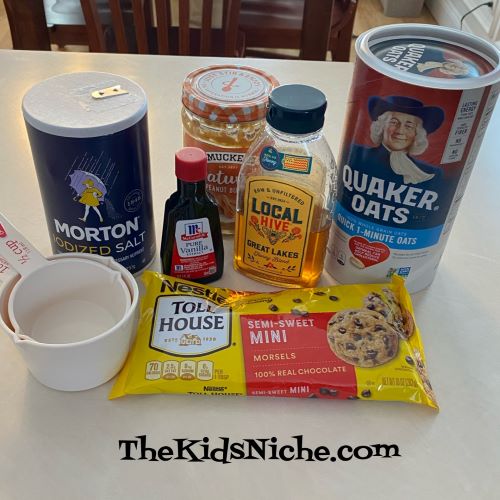
Hello again! Hope you are “enjoying” winter (does anyone enjoy winter?!) and are staying healthy! We have been busy busy bees here! We tore up the old carpet in our living room and hallway and hope to lay down a new floor soon! As most remodeling projects go, we keep running into snags and things that have to be fixed first and the days have been flying by without me getting to chat with you. I am determined to change that today! 🙂 So how about an easy snack idea for Valentine’s Day that you probably have the ingredients for and makes up pretty quickly? It’s called Peanut Butter Energy Bites. There are many ways to make these and I have a couple of suggestions that depend on the age of your children. Here we go!
If your kids are a little older, you can make these with uncooked oatmeal. If your kids are pretty young yet, I would go with crushed graham crackers. The oatmeal makes them more chewy, but blending the oatmeal in a food processor or blender helps with that some. My favorite way is using graham crackers.
You will need 1 Cup oatmeal OR crushed graham crackers, 1/2 Cup peanut butter or your favorite nut butter, 1/3 Cup honey, 1 teaspoon vanilla, a dash of salt and 1/2 Cup mini chocolate chips. To make these a little fancier for Valentine’s Day you might also want to have some sprinkles on hand.
Put all the ingredients into a medium sized bowl.
Mix well. It will be a stiff dough. Take a couple of minutes to make sure all the dry ingredients are completely mixed in. The dough will look different depending on which ingredients you chose. Here’s with the oatmeal…
Here’s with the graham crackers…
Using rounded teaspoon sized portions of dough, make the dough into balls. Place on a cookie sheet on a piece of waxed paper or parchment paper.
To make them pretty for Valentine’s Day, roll them in some sprinkles. Pop them in the refrigerator to make them more firm and easier to handle. No baking required! I also stored mine in the refrigerator.
Whether you choose to use oatmeal…
Or crushed graham crackers…
I think you will find these little snack balls to be very addicting! (We won’t mention how many I may have eaten today!) 😉 You can switch these up by trying different ingredients. Use a nut butter in place of the peanut butter or instead of chocolate chips add raisins, cranberries, white chocolate chips, chopped peanuts, coconut flakes, cinnamon, etc…the sky’s the limit! 🙂 Enjoy!
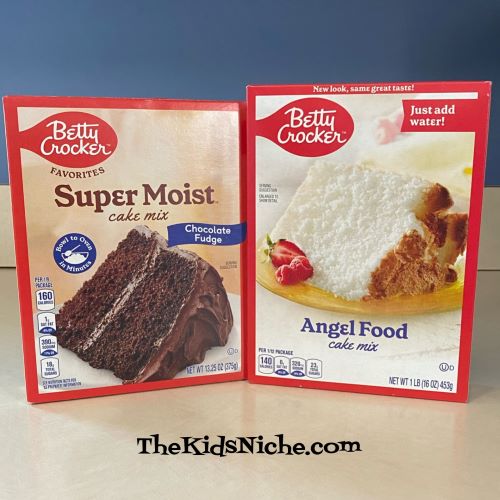
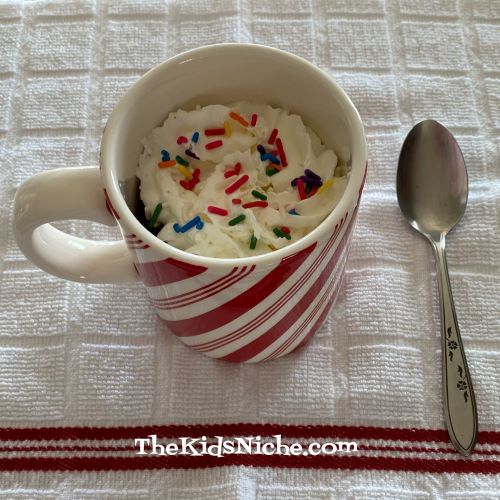
Here’s a great super fast dessert for this Valentine’s Day! So fun and easy you won’t believe it and your kids will love it! It’s a Mug Cake, which means you mix it and cook it all in a coffee mug. You will need 2 cake mixes. 1 must be an angel food cake mix and the second one can be your favorite cake flavor. I chose Chocolate Fudge. The brand of cake mixes I used was Betty Crocker but others will work just fine too.
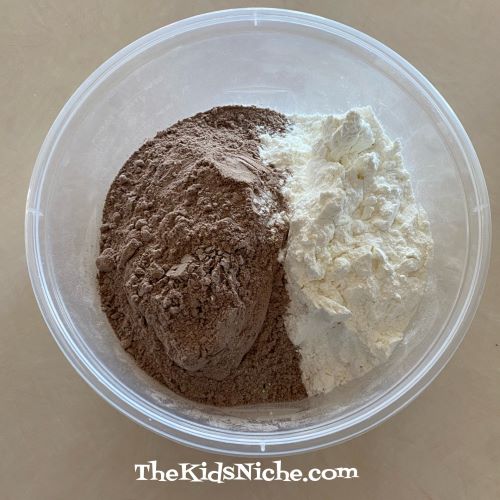
Pour both dry cake mixes into a bowl that you can store the ingredients in.
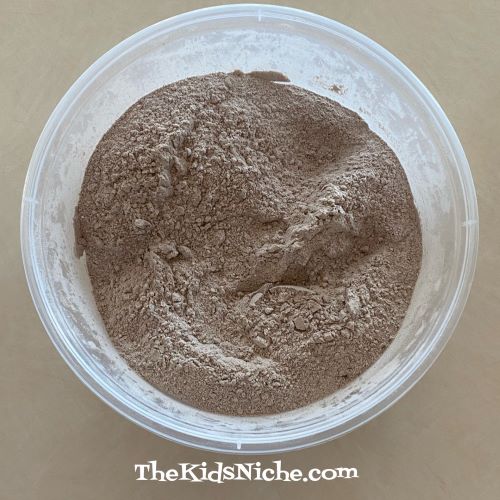
Stir together carefully as the powder will “poof” easily. 😉 Be sure its mixed together well.
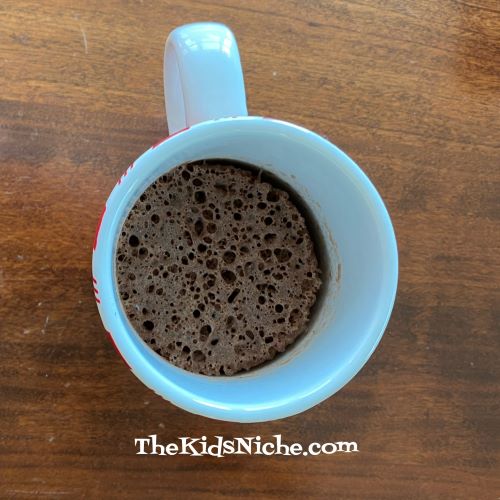
Now comes the fun part! Put 3 tablespoons of the cake mix into a microwave safe mug.
Add 2 tablespoons of water and stir together. Make sure all the dry powder on the bottom and sides of the mug are mixed in well. It will look a little foamy.
Put the mug in your microwave oven and microwave for 1 minute and presto! You have a little individual cake! 🙂
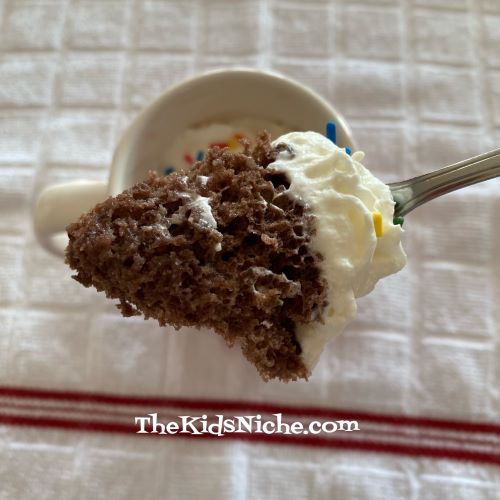
Let it cool to your desired temperature. Top with a dollop of frosting or some whipped cream or ice cream. I used whipped cream and it was quite yummy! 🙂
Doesn’t it look delicious?!
Mmmm! Super simple and super tasty! A great way to have something sweet and it’s already a controlled portion. 😉
Enjoy your Mug Cake! 🙂 You can be sure I’m enjoying mine! 😉
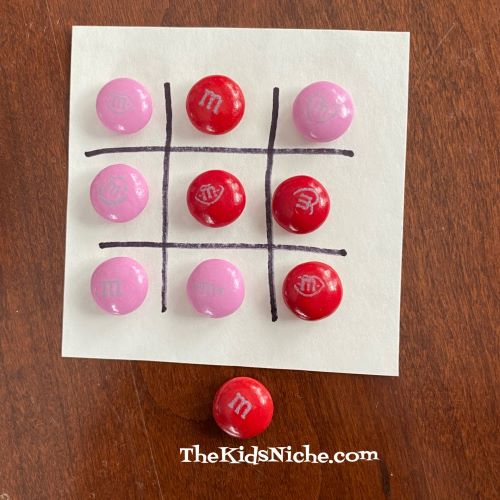
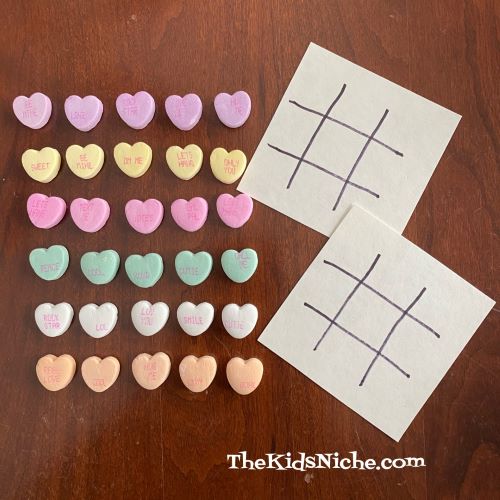
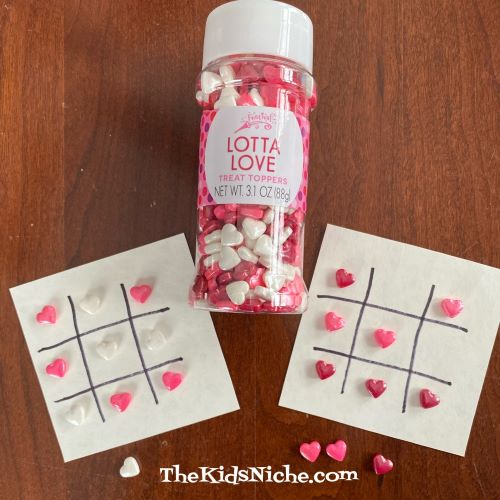
Tomorrow is the day for hearts and love and flowers and fun! 😉 Here’s a quick idea for a super simple game you might play with the kids on Valentine’s Day. Let’s call it Valentine Tic Tac Toe.
All you need is a piece of paper and a pen and some Valentine’s Day candy. Pick out 5 pieces of 2 different colors of candy…1 color for X and a different color for O. Draw a Tic Tac Toe board on your paper and you’re ready to play! There are lots of candy pieces that would work for Valentine Tic Tac Toe. Here’s enough colors of candy conversation hearts for 3 different games.
I love M&M’s candy so that’s the one I would choose to play with! 😉
You can even find candy hearts in the food decorating aisle of your favorite grocery store.
Depending on the size of your family or group, you could play separate games and the winners advance to the next round. The final winner could get a special prize and everyone could enjoy some Valentine’s Day candy! ;) Have fun!
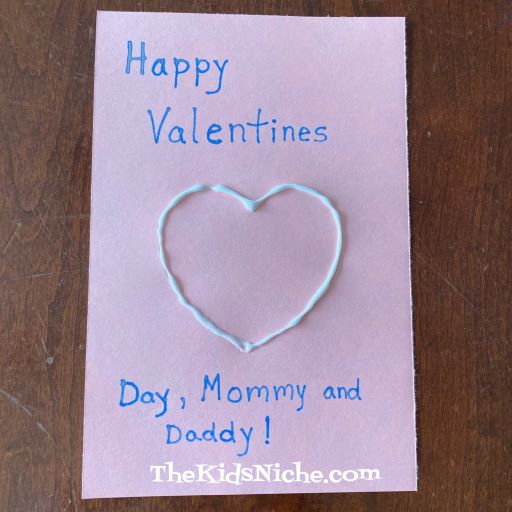
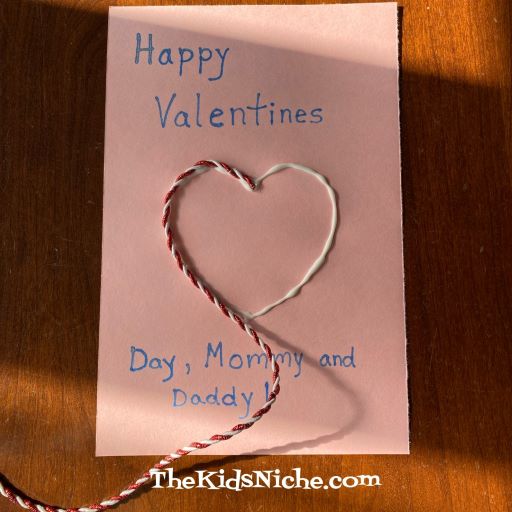
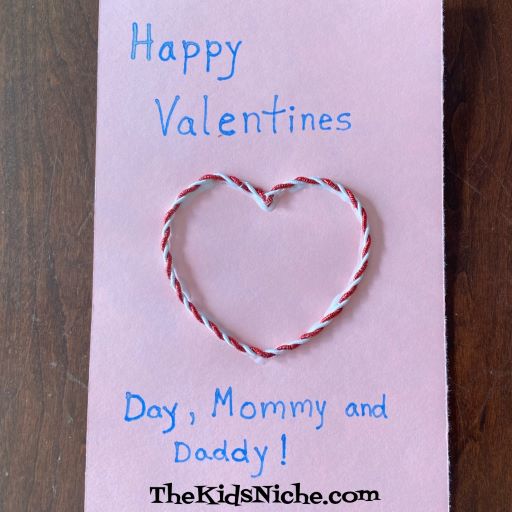
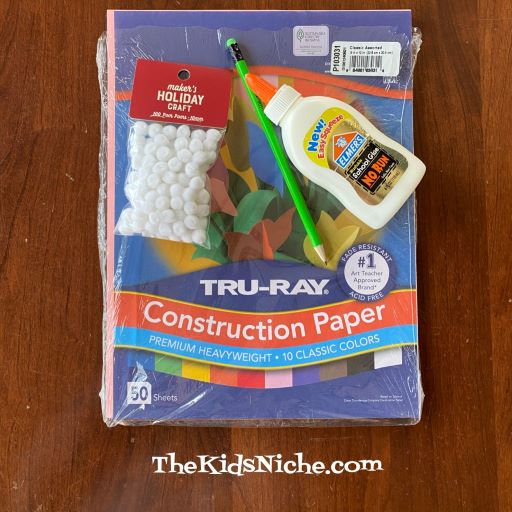
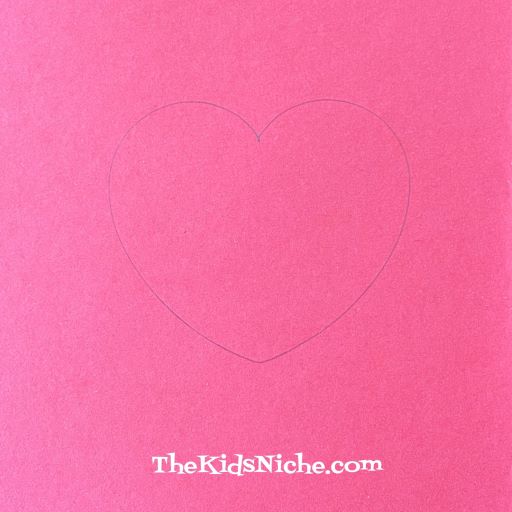
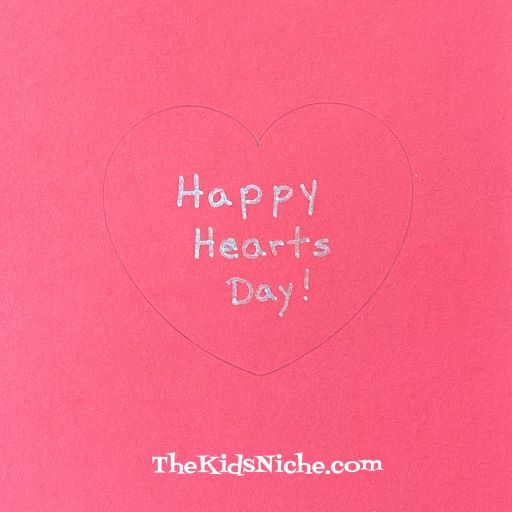
I had some other Valentine’s Day crafts in mind to do for you, but when I got sick with Covid, that all kinda went by the wayside. But I do have one more cute Valentine card idea for you that’s super quick and easy. You can make it as a decoration or a card. You’ll need a piece of construction paper (I used pink), some glue, pretty string or yarn, a pencil, markers or crayons and scissors. Begin by drawing a heart on your piece of construction paper. I used a heart shaped cookie cutter to trace around for my heart. (My apologies for the poor quality of pictures. I was coming down sick when I made this and didn’t feel up to moving around to find better lighting.)
Write your message on your card.
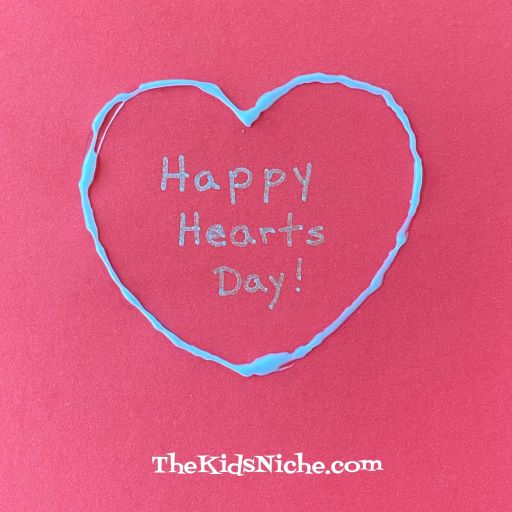
Draw a line of glue on the heart shape.
Lay a piece of the pretty string or yarn all around on the line of glue.
Cut the string or yarn to the right length to finish the heart shape.
That’s all there is to it! 🙂 Your card or decoration is finished! Allow the glue time to dry and then share your craft with that special someone.
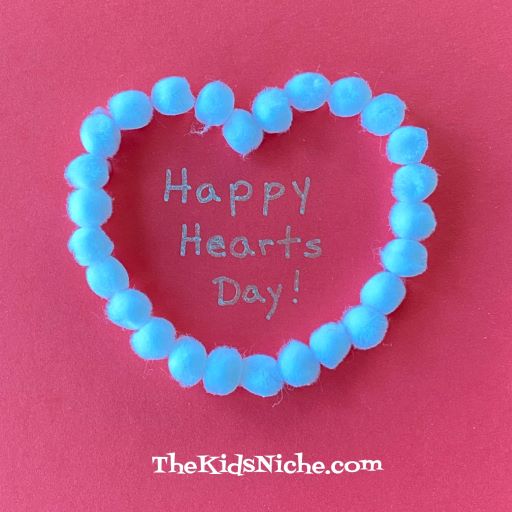
It’s February and that means Valentine’s Day is right around the corner! Here’s a simple but fun Valentine that your kids can enjoy making. You can make it as a Valentine card to give to that special someone or let it be a decoration to brighten up your house for Valentine’s Day.
You will need some construction paper, a pencil, glue, little pom poms and a marker or two.
I chose to use red paper and white pom poms, but you could use pink or white paper with red, pink or white pom poms. Go with what you have on hand or can find easily at a store. Begin by drawing a heart shape on the paper. I used half of a piece of construction paper and I also traced around a heart shaped cookie cutter.
If you would like to write a message on your heart, do it now.
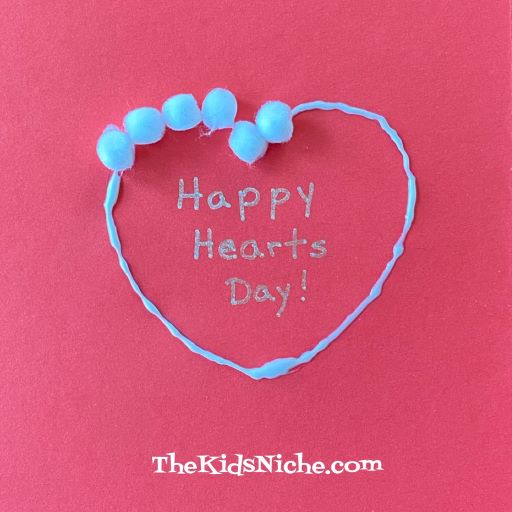
Put a line of glue all around the outline of the heart.
Place the little pom poms on the glue and press them down a little bit.
Keep placing the pom poms on the line of glue…
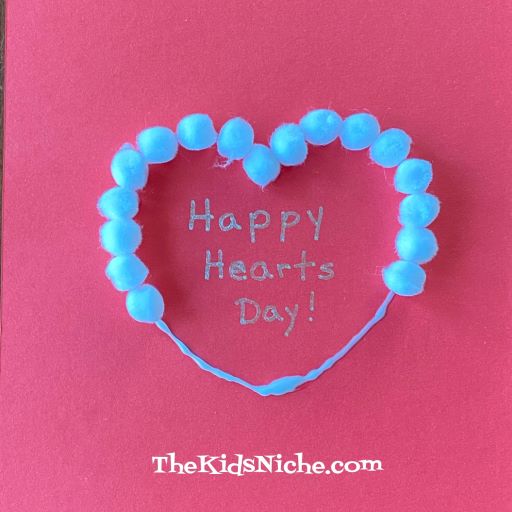
…until you have filled the whole line with pom poms.
That’s all there is to it! You’ve made a cute Valentine! 🙂 You can decorate the rest of the paper if you’d like to or leave it as it is. Have fun making your own handmade Valentine! 🙂
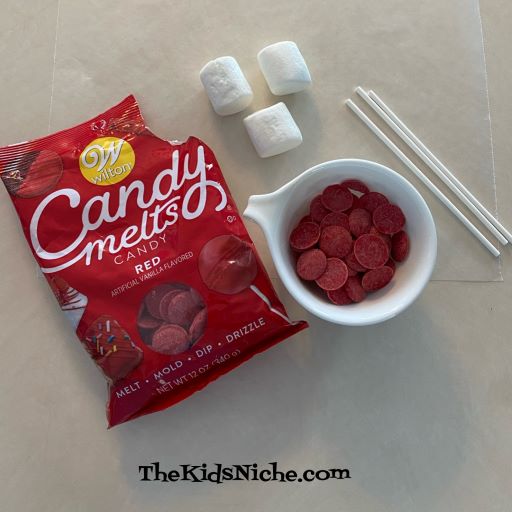
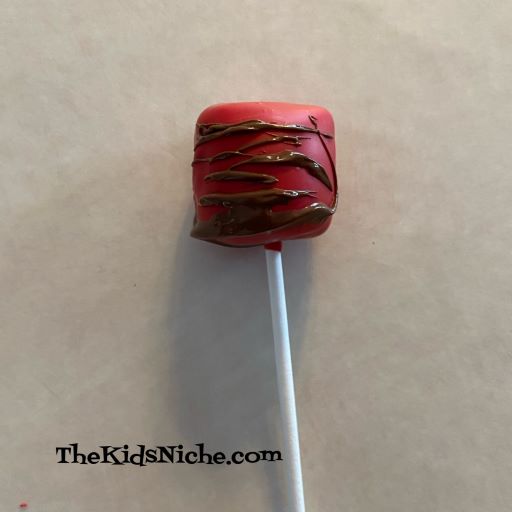
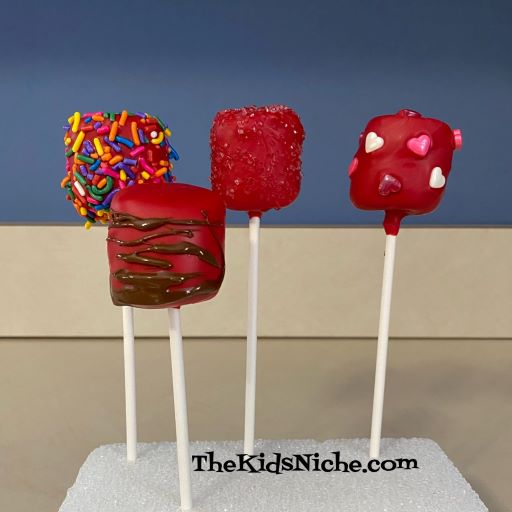
If you are looking for a yummy treat for your kids for Valentine’s Day, you might like this one – candy coated marshmallows! (My hubby ate 3 of them last night so they must be pretty good!) 😉
You will need marshmallows, paper sticks, candy melts and sprinkles or edible decorations.
Melt some candy melts in a small container according to the package directions. I melted mine in the microwave.
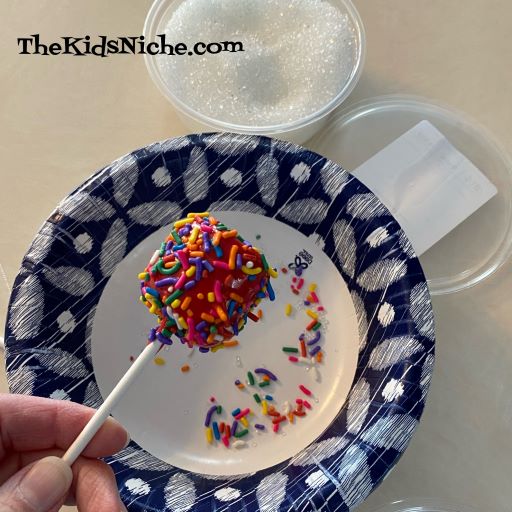
After the candy melts are melted, dip one end of a paper stick into the candy.
Push the stick into the middle of the marshmallow.
Submerge the marshmallow in the melted candy, turning it so it is completely covered with the candy.
Allow the excess candy to drip back into the dish and then lay the coated marshmallow on a piece of wax paper. Or if you have a piece of styrofoam, you can stick the marshmallow into the styrofoam to hold it.
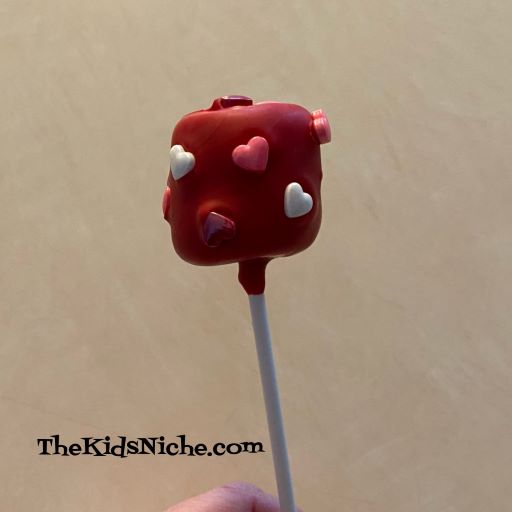
Quickly, before the candy hardens, add the sprinkles or edible decorations to the marshmallow. I used gourmet white sugar…
Sprinkles…
And candy hearts.
You can also use more of the melted candy wafers to decorate by letting some strings come down from a spoon.
And there you have it! Pretty candy covered marshmallows for a fun Valentine’s Day treat! You can stick them in a block of styrofoam for serving too. Or put them into individual plastic treat bags and tie them closed with a ribbon bow. 🙂
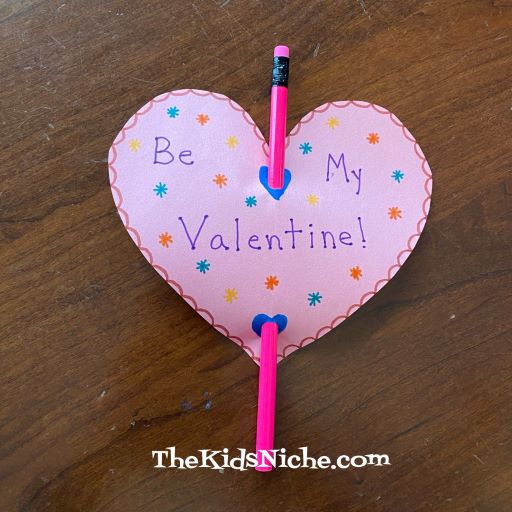
Hi everyone! 🙂 Today is January 25th and Valentine’s Day is just about 3 weeks away. So I want to start sharing a few ideas to make your Valentine’s Day more fun. 🙂 Today we’re going to make a simple Valentine’s card that adds a little something extra to it. This would be great for your kids to make at home for those in-school Valentine’s Day parties.
This card doesn’t need any fancy supplies. You will need some construction paper, scissors, markers, a single hole punch and some new pencils.
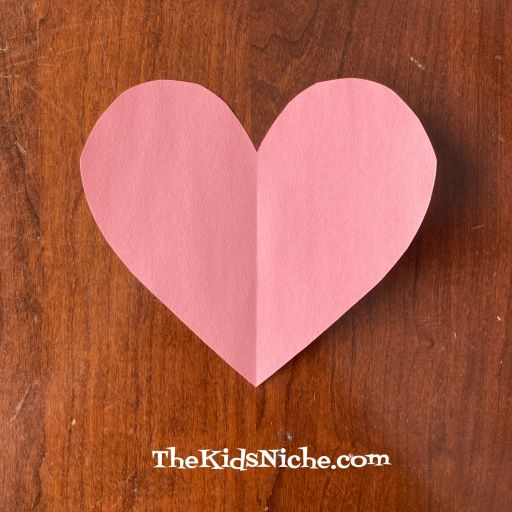
I discovered through a bit of trial and error, that making a heart that is a little bit bigger makes this card work better. I started out using a cookie cutter to trace around for making a heart, but it wasn’t really big enough to insert the pencil without tearing the paper. Let’s get started! 🙂
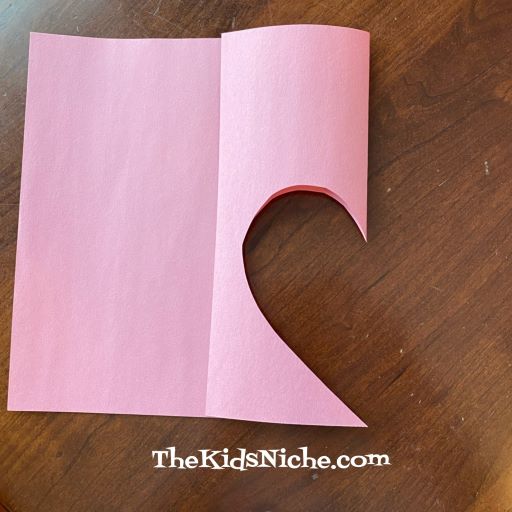
Start by folding one end of a piece of construction paper over about 3 1/2 to 4″.
Cutting on the folded edge, cut out the shape of half of a heart. Remember, make it a fairly large heart.
Open your heart and lay it flat on the table.
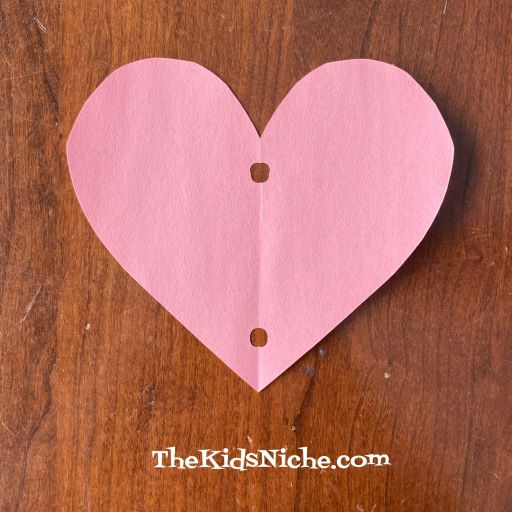
Using the hole punch, make 2 holes in similar areas of the heart as in the following picture. Don’t get too close to either edge of the heart or it’s easy for the hole to tear out.
Check to see if the holes are big enough for the new pencil to fit through. If they aren’t big enough, you can make them a little wider with the hold punch by sliding it over just a tiny bit and punching it again.
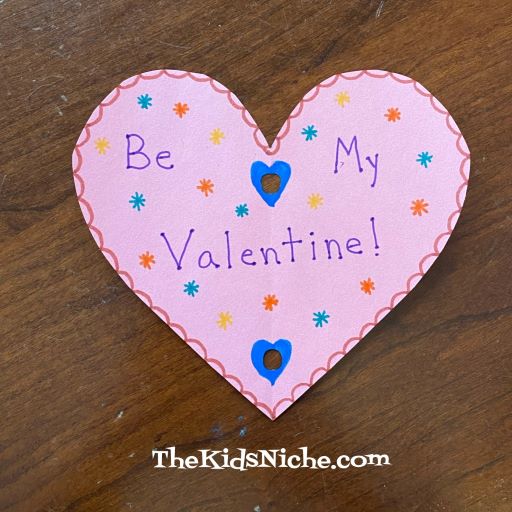
Next, decorate your Valentine heart. 🙂 And you might want to sign your name on the backside.
Slide the pencil through the 2 holes and your Valentine is ready to share! 🙂
You might be able to find some really cute Valentine pencils at a nearby store. I didn’t have any right now and we just had another snow storm so I’m not planning to be at a store any time soon! 😉 I hope you will have fun making your own happy Valentines to share with others this Valentine’s Day! 🙂
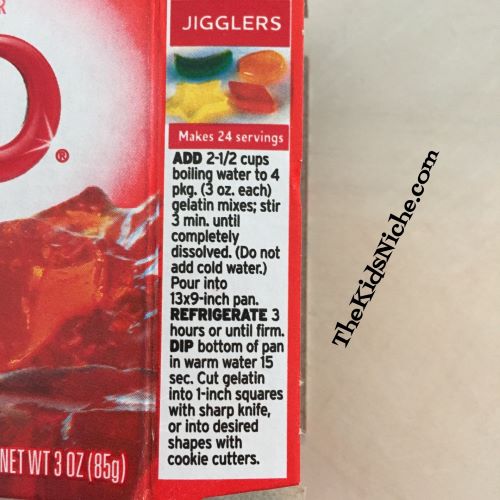
Remember Jello Jigglers? We hadn’t made any here in ages but they would make a cute treat for Valentine’s Day. The directions are right on the boxes of Jello and they only need Jello and water to make them.
I suggest using red Jello for Valentine’s Day. I made half of a recipe and used an 8″ x 8″ pan.
Heart shapes are great for Valentine’s Day, of course. 😉
Remember to dip the pan in hot water for a few seconds to help with removing the shapes. The smaller sized hearts came out easier than the large ones. And there they are!
To make them fancier, add a bit of whipped cream on top or some pink yogurt.
Be careful that the kids you share these with are old enough to chew them up well. They take some extra chewing! Hope your Valentine’s Day will be a fun one! 🙂
Valentine’s Day is getting closer and if you still need a card for someone young (or young at heart), this card might be just the thing. It’s quick and easy to make and adds a little something fun to your card.
Here’s what you’ll need: a piece of cardstock, a small piece of red cardstock or construction paper, scissors, glue, pencil, heart template or cookie cutter (or cut your own), markers/crayons/colored pens or pencils and a glow stick. I found a pack of 6 glow sticks at the Dollar Tree for $1. Oh, and a couple pieces of scotch tape.
We’ll begin by folding the piece of cardstock in half to make a large sized card.
Decorate the front of the card for Valentine’s Day.
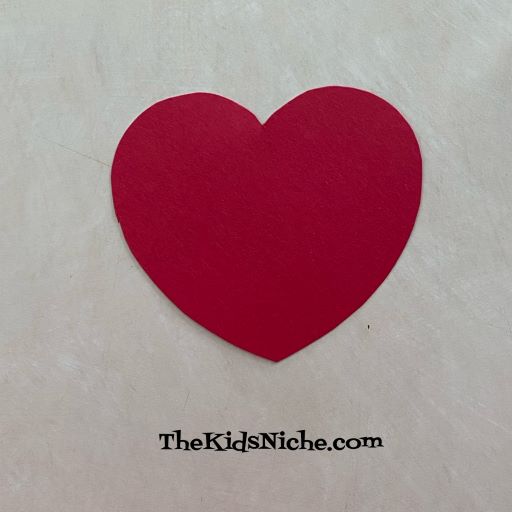
Next trace around the heart template or cookie cutter or draw your own heart on the red paper.
Cut out the heart shape with your scissors.
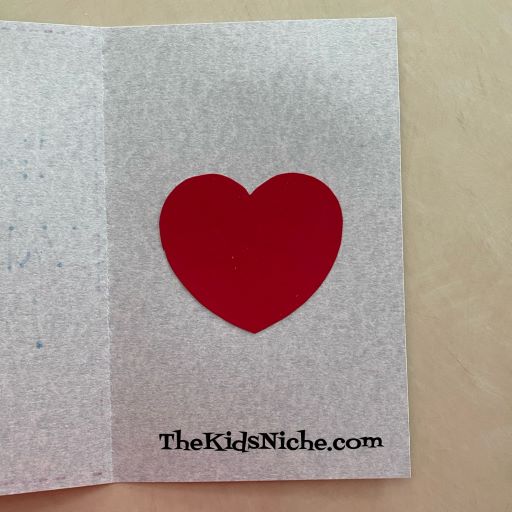
Open the card and glue the heart approximately in the middle of the right side section.
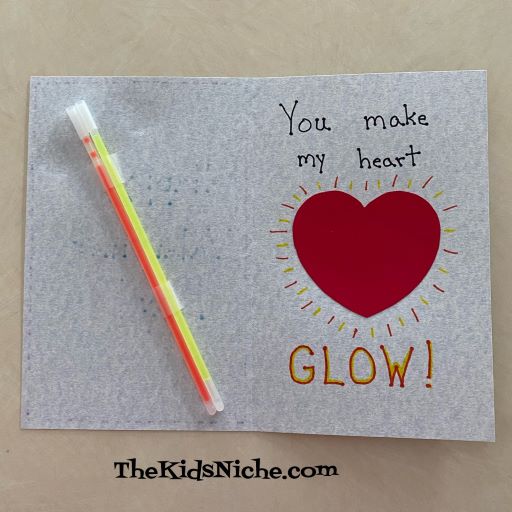
Next write the words, “You make my heart GLOW!” I used an orange marker for the word GLOW and added some yellow on the letters too. I also added some short lines all around the heart with the orange and yellow markers to make the heart look like it’s glowing.
Now for the fun part, tape at least 1 glow stick (not broken yet!) on the left inside section of the card.
And there you have it! The recipient can now bend the glow stick and make it glow! 🙂
Glow sticks make the card more interesting since there is something to DO after reading the card. It could also be fun if you bend the glow stick so it starts glowing, RIGHT before you give the person the card! Then the card itself will be glowing and they can still play with the glow stick. 😉 So make some of these Valentine’s Day cards for the special people in your life that make your heart glow! 😉