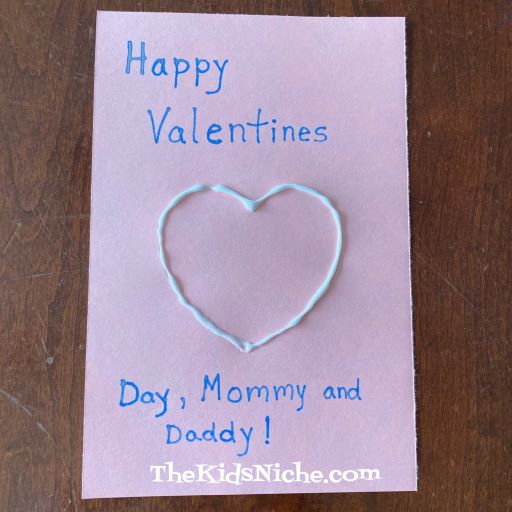
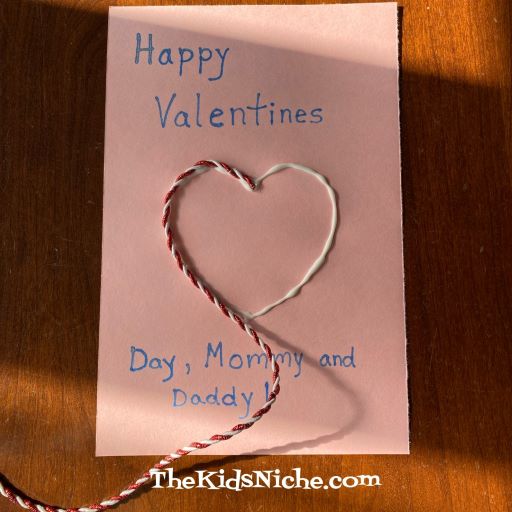
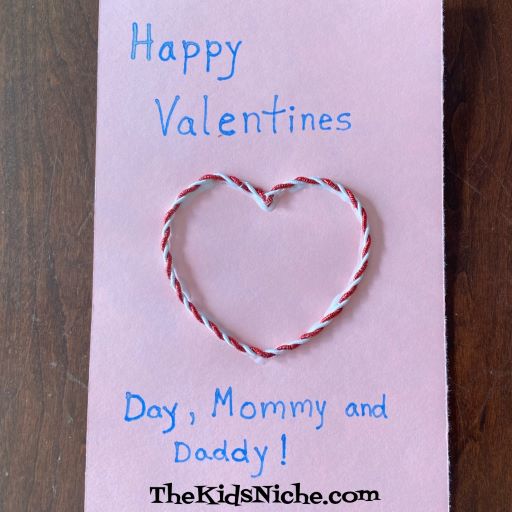
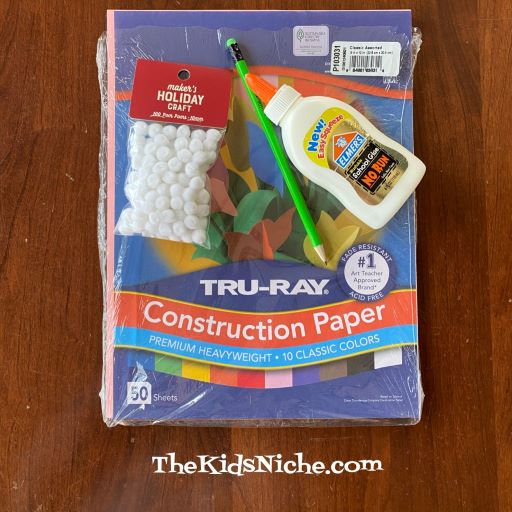
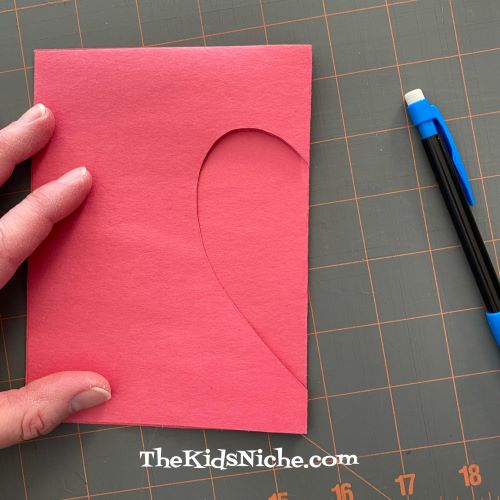
I had some other Valentine’s Day crafts in mind to do for you, but when I got sick with Covid, that all kinda went by the wayside. But I do have one more cute Valentine card idea for you that’s super quick and easy. You can make it as a decoration or a card. You’ll need a piece of construction paper (I used pink), some glue, pretty string or yarn, a pencil, markers or crayons and scissors. Begin by drawing a heart on your piece of construction paper. I used a heart shaped cookie cutter to trace around for my heart. (My apologies for the poor quality of pictures. I was coming down sick when I made this and didn’t feel up to moving around to find better lighting.)
Write your message on your card.
Draw a line of glue on the heart shape.
Lay a piece of the pretty string or yarn all around on the line of glue.
Cut the string or yarn to the right length to finish the heart shape.
That’s all there is to it! 🙂 Your card or decoration is finished! Allow the glue time to dry and then share your craft with that special someone.
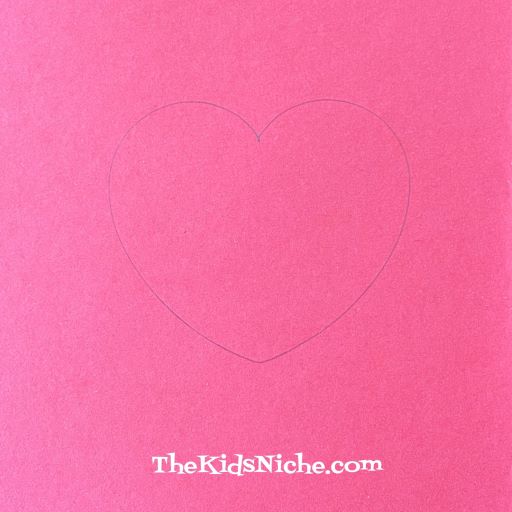
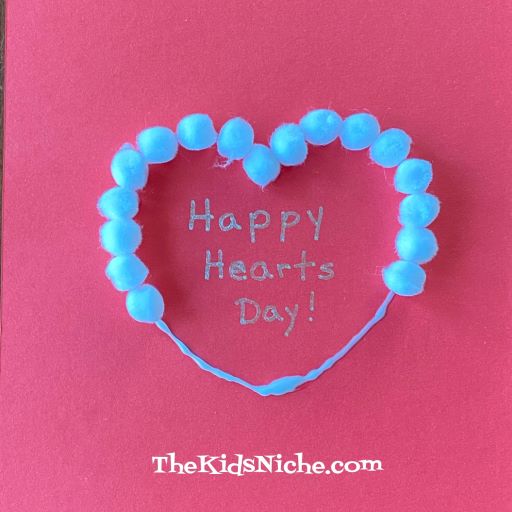
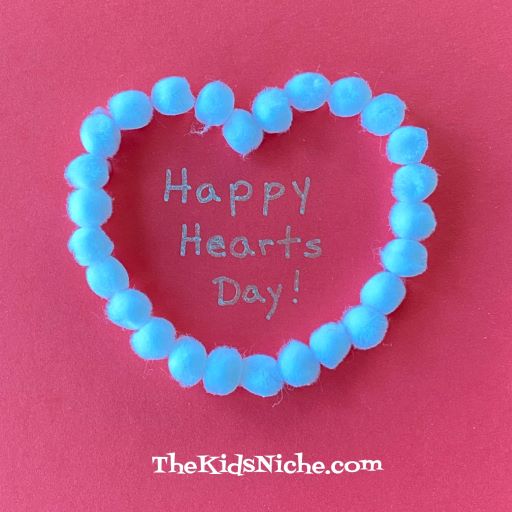
It’s February and that means Valentine’s Day is right around the corner! Here’s a simple but fun Valentine that your kids can enjoy making. You can make it as a Valentine card to give to that special someone or let it be a decoration to brighten up your house for Valentine’s Day.
You will need some construction paper, a pencil, glue, little pom poms and a marker or two.
I chose to use red paper and white pom poms, but you could use pink or white paper with red, pink or white pom poms. Go with what you have on hand or can find easily at a store. Begin by drawing a heart shape on the paper. I used half of a piece of construction paper and I also traced around a heart shaped cookie cutter.
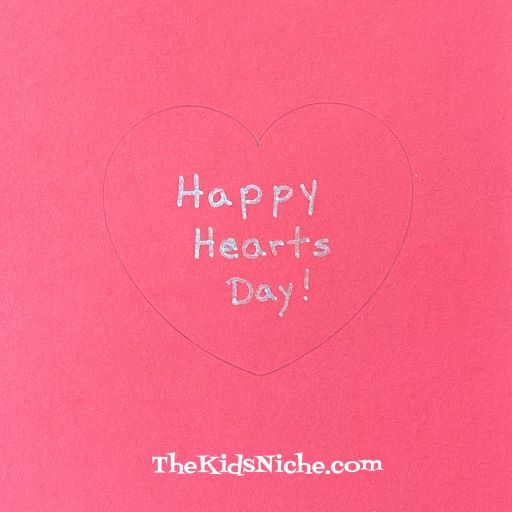
If you would like to write a message on your heart, do it now.
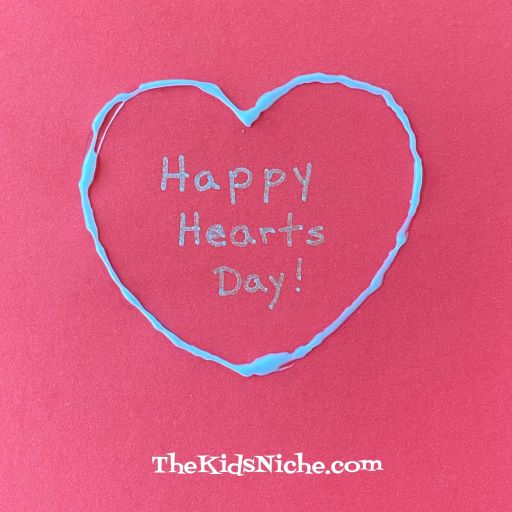
Put a line of glue all around the outline of the heart.
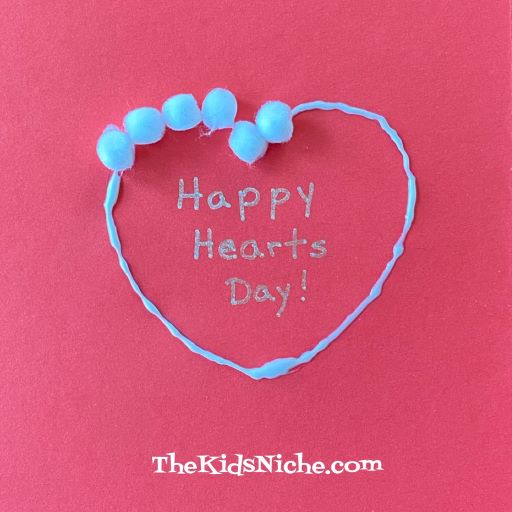
Place the little pom poms on the glue and press them down a little bit.
Keep placing the pom poms on the line of glue…
…until you have filled the whole line with pom poms.
That’s all there is to it! You’ve made a cute Valentine! 🙂 You can decorate the rest of the paper if you’d like to or leave it as it is. Have fun making your own handmade Valentine! 🙂
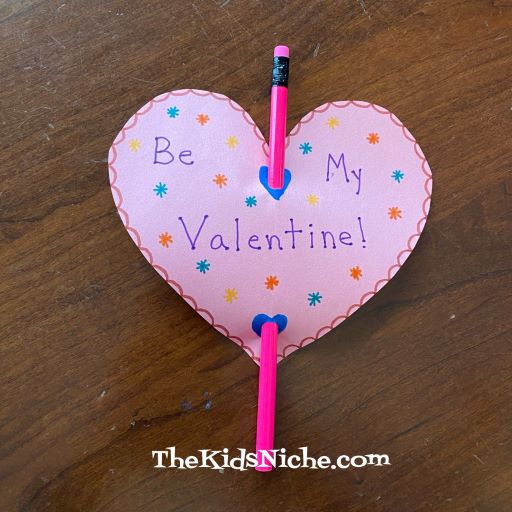
Hi everyone! 🙂 Today is January 25th and Valentine’s Day is just about 3 weeks away. So I want to start sharing a few ideas to make your Valentine’s Day more fun. 🙂 Today we’re going to make a simple Valentine’s card that adds a little something extra to it. This would be great for your kids to make at home for those in-school Valentine’s Day parties.
This card doesn’t need any fancy supplies. You will need some construction paper, scissors, markers, a single hole punch and some new pencils.
I discovered through a bit of trial and error, that making a heart that is a little bit bigger makes this card work better. I started out using a cookie cutter to trace around for making a heart, but it wasn’t really big enough to insert the pencil without tearing the paper. Let’s get started! 🙂
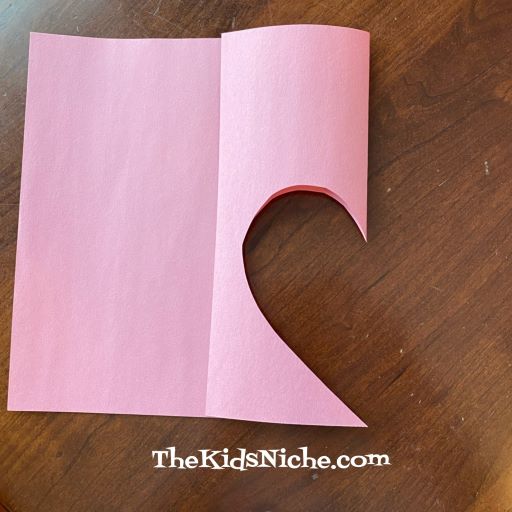
Start by folding one end of a piece of construction paper over about 3 1/2 to 4″.
Cutting on the folded edge, cut out the shape of half of a heart. Remember, make it a fairly large heart.
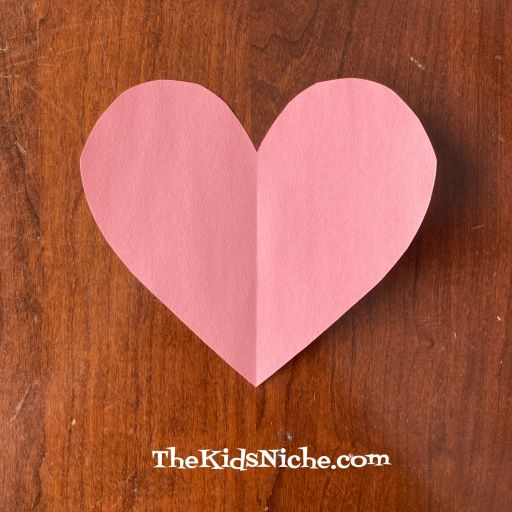
Open your heart and lay it flat on the table.
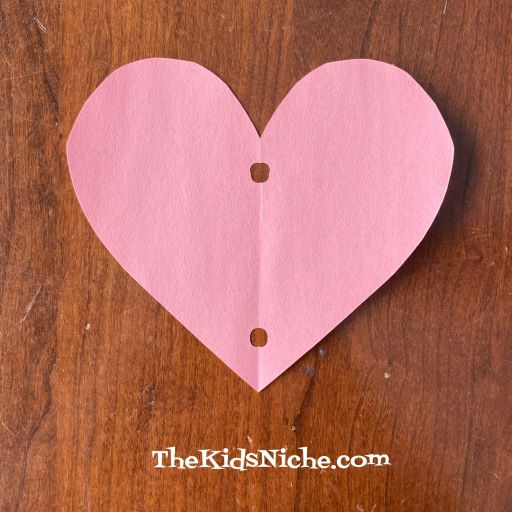
Using the hole punch, make 2 holes in similar areas of the heart as in the following picture. Don’t get too close to either edge of the heart or it’s easy for the hole to tear out.
Check to see if the holes are big enough for the new pencil to fit through. If they aren’t big enough, you can make them a little wider with the hold punch by sliding it over just a tiny bit and punching it again.
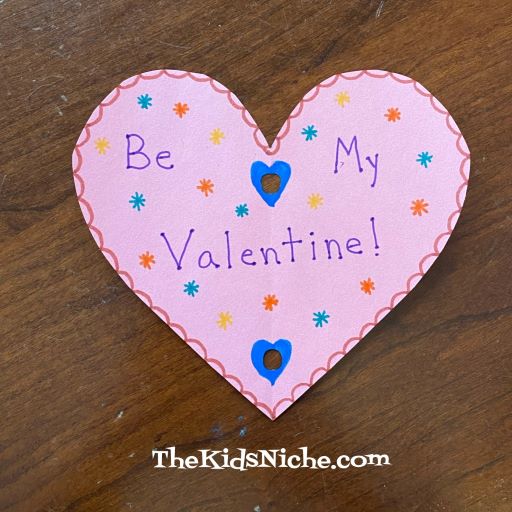
Next, decorate your Valentine heart. 🙂 And you might want to sign your name on the backside.
Slide the pencil through the 2 holes and your Valentine is ready to share! 🙂
You might be able to find some really cute Valentine pencils at a nearby store. I didn’t have any right now and we just had another snow storm so I’m not planning to be at a store any time soon! 😉 I hope you will have fun making your own happy Valentines to share with others this Valentine’s Day! 🙂
Valentine’s Day is getting closer and if you still need a card for someone young (or young at heart), this card might be just the thing. It’s quick and easy to make and adds a little something fun to your card.
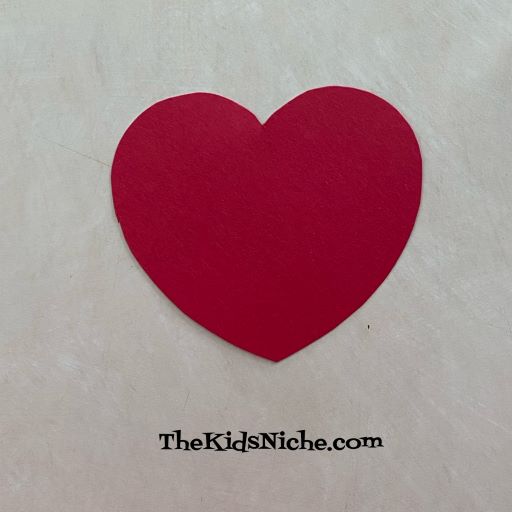
Here’s what you’ll need: a piece of cardstock, a small piece of red cardstock or construction paper, scissors, glue, pencil, heart template or cookie cutter (or cut your own), markers/crayons/colored pens or pencils and a glow stick. I found a pack of 6 glow sticks at the Dollar Tree for $1. Oh, and a couple pieces of scotch tape.
We’ll begin by folding the piece of cardstock in half to make a large sized card.
Decorate the front of the card for Valentine’s Day.
Next trace around the heart template or cookie cutter or draw your own heart on the red paper.
Cut out the heart shape with your scissors.
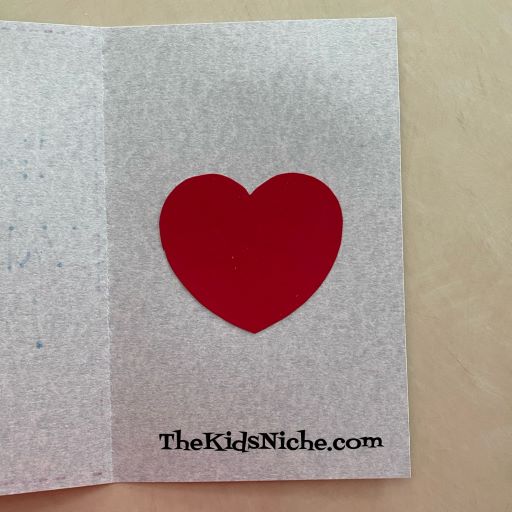
Open the card and glue the heart approximately in the middle of the right side section.
Next write the words, “You make my heart GLOW!” I used an orange marker for the word GLOW and added some yellow on the letters too. I also added some short lines all around the heart with the orange and yellow markers to make the heart look like it’s glowing.
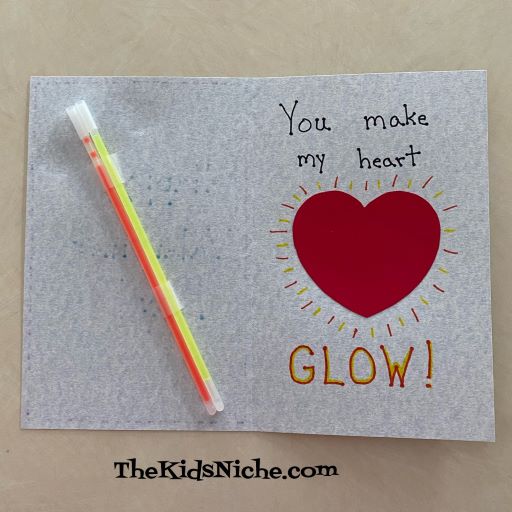
Now for the fun part, tape at least 1 glow stick (not broken yet!) on the left inside section of the card.
And there you have it! The recipient can now bend the glow stick and make it glow! 🙂
Glow sticks make the card more interesting since there is something to DO after reading the card. It could also be fun if you bend the glow stick so it starts glowing, RIGHT before you give the person the card! Then the card itself will be glowing and they can still play with the glow stick. 😉 So make some of these Valentine’s Day cards for the special people in your life that make your heart glow! 😉
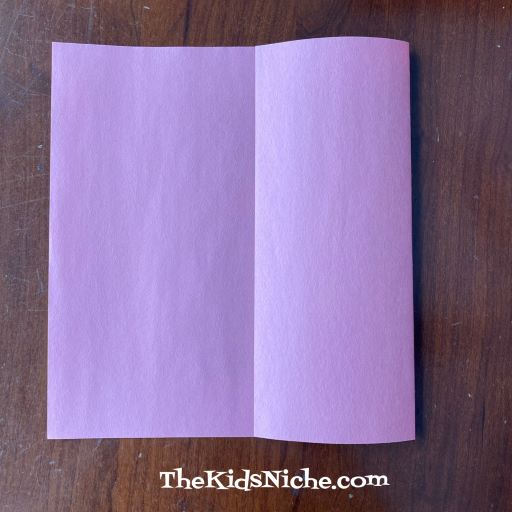
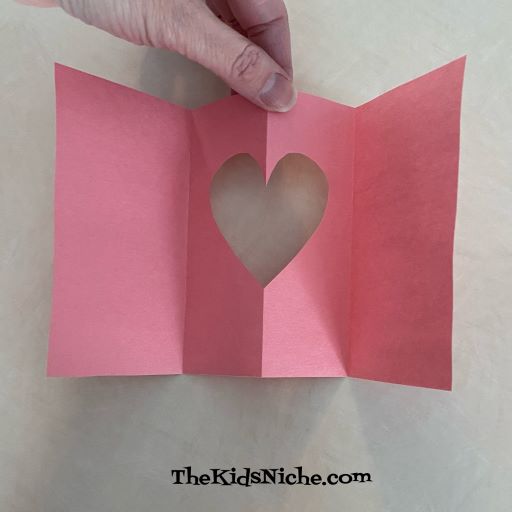
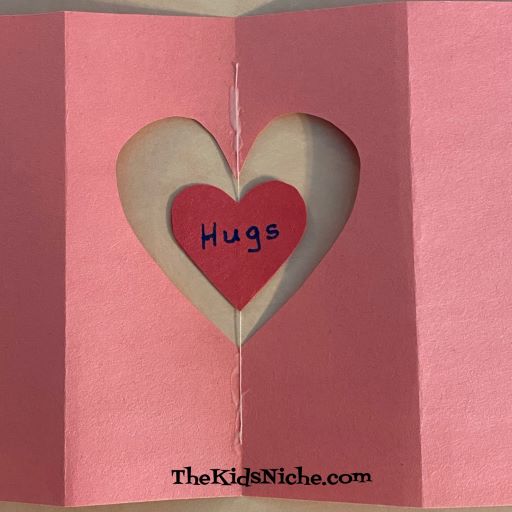
This is a fun card to open because there is a little heart inside that will twirl around when the card is opened. Sound fun? Let’s get started! You will need a piece of construction paper approximately 5 inches by 9 inches. (The size can vary.) Some scissors, glue, 2 small hearts cut from another color of construction paper, markers and some thread.
Begin by folding the piece of paper in half.
Using your scissors, cut a half of a heart shape on the fold.
Fold one side of the paper end up past the heart shaped cut.
Do the same with the second side.
When you open the card up, it should look like this from the end view.
And it should look like this from the front.
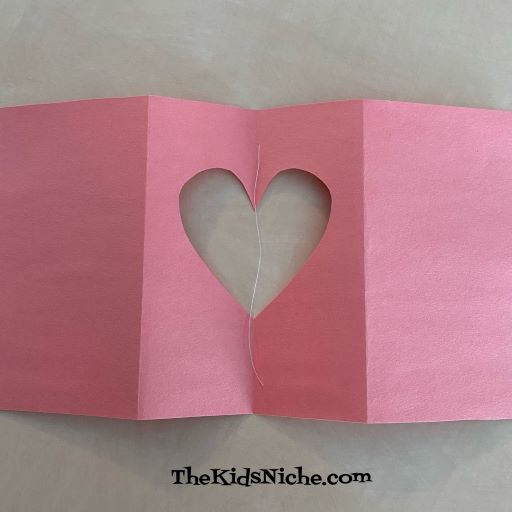
Now turn the card over so the back side is facing up. The fold in the middle of the heart cut out should be going “down” with the folds on each side going “up”. Cut a piece of thread that is just long enough to cross the heart cut-out and have a little room on each side of the top and bottom of the heart.
Make sure your little hearts are small enough to fit in the heart cut-out with room all around it so it will be able to spin.
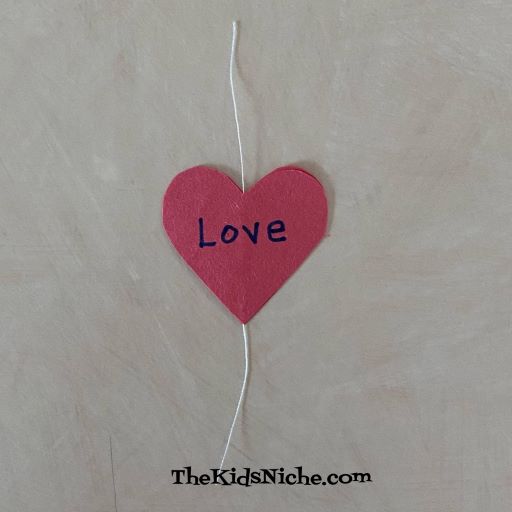
It’s time to make the twirling heart part. Put some glue on 1 small heart, making sure there is glue down the center of the heart.
Lay your piece of thread on the heart with the glue and make sure it is in the center of the heart.
Lay the second heart on top and press the 2 hearts together so they stick together completely.
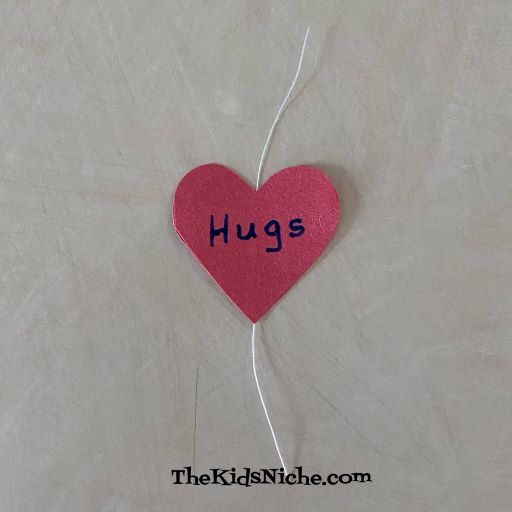
Decorate the small heart in any way you like. I wrote a word on each side.
Double check that the fold in the center of your card is down or the back side of the card is facing up.
Run a line of glue right in the center of the fold crease.
Place your small heart in the center of the heart cut-out with the strings laying on the lines of glue on each side.
Give the glue time to dry before moving on. The next step is to decorate your card by writing or drawing whatever you like on your card. The right side panel will be the front of your card when it is folded up.
This is what my card looks like when its folded.
Before closing your card, gently turn the small heart several times like you are winding it up. Carefully close the card, checking to make sure the small heart is laying flat.
When the card is opened, the small heart inside will spin! 🙂 You might want to hold the card closed with a paper clip or place it inside an envelope.
I hope you will enjoy making this Twirling Heart card! 🙂
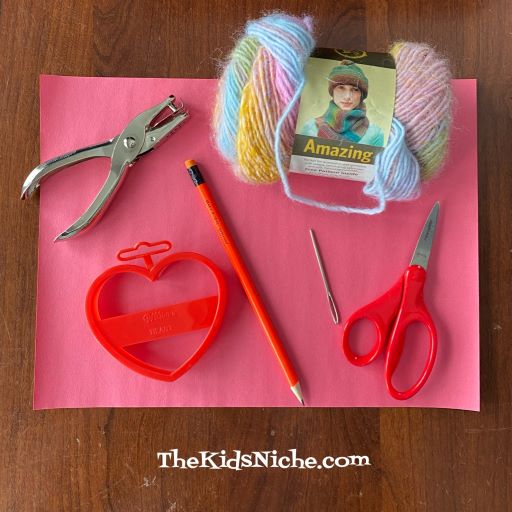
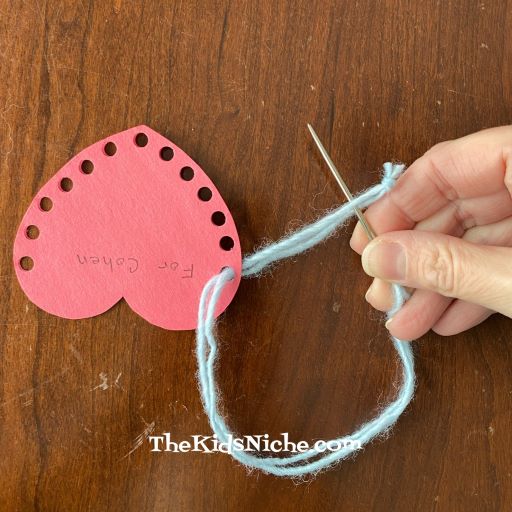
Hello and welcome to our next Valentine’s Day craft! Yes, we are going to sew on paper and make some super cute hearts that can hold some candy! 🙂
Here’s what you’ll need to get started: red or pink construction paper, scissors, a heart cookie cutter or template, pencil, some yarn, a yarn needle, a single paper punch, pen or marker and some stickers.
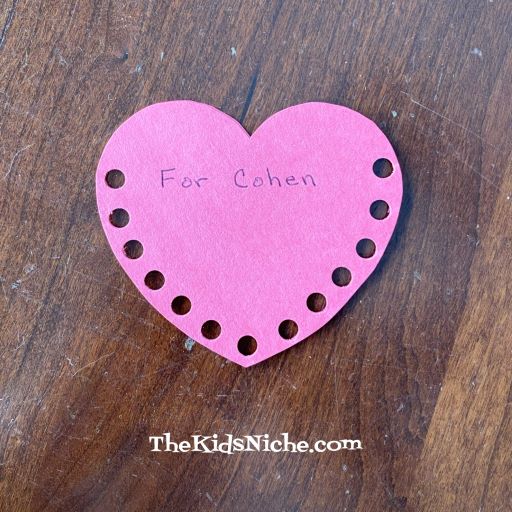
Begin by folding an end of the construction paper over so that you can fit your heart template or cookie cutter on it. This way you can cut 2 identical hearts with one time of cutting. Trace around the template or cookie cutter.
Cut out the 2 heart shapes while holding the folded paper together. Make sure you have 2 hearts held together for the next step.
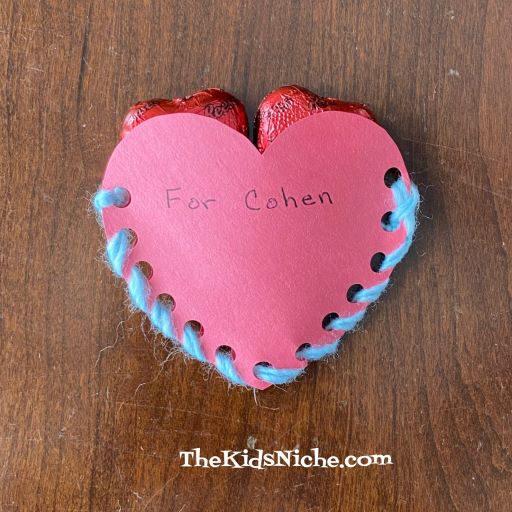
Using the paper punch, punch holes along the outside edge of the hearts, but don’t make any holes along the top of the heart. We want this area to be open so we can put candy or other small items inside the heart. Before we begin sewing, write the name of the person you will give the heart to on the front or just decorate your heart. This is a good time to add the sticker too. (Though I forgot to add the sticker until after sewing, I was able to make it work then too.) 😉
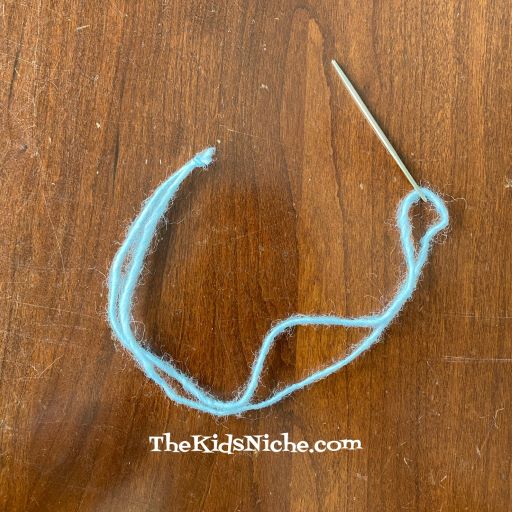
Cut a piece of yarn and fold it in half. You will want to have enough yarn to sew all the way around the edge of the heart. Thread the yarn needle with your piece of yarn. Tie a knot at the end of the yarn.
Beginning at one of the holes at the top of the heart, we will sew around the bottom edge through each hole. But first let’s secure the yarn in the first hole. Starting from the back of the heart, put the needle through the hole and pull the yarn through until you are ALMOST to the knot coming to the hole. Then take your needle between the 2 pieces of yarn and pull it up snug. This will keep your yarn secure.
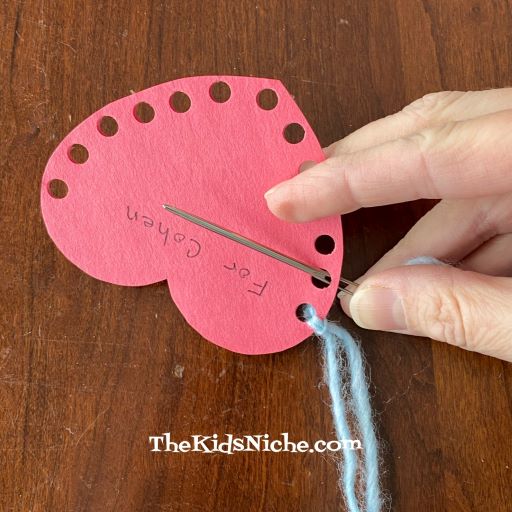
Try to keep the knot on the back side of the heart. Turn the heart over so the front side is on top again. Place the needle in the second hole and draw the yarn through. This will make a loop on the outside edge of your heart. Remember, start the needle through the hole from the back side of the heart.
Continue sewing on around the heart, bringing the needle and yarn through each hole. (Sorry I should have taken more pictures of this part.) When you have sewn through the last hole, turn the heart over again so the back side is facing up. Draw your needle under the back side of the last 2 loops of yarn.
Now draw the needle through just the second loop one more time to help secure the yarn.
Cut the yarn up close to the needle.
Tie a knot with the 2 strands of yarn and clip off the extra yarn with your scissors. And you are done sewing your heart!
Now your heart is ready for some candy or small items to stuff it. 🙂
Have fun sewing paper hearts and giving them to the special people in your life on Valentine’s Day! 🙂
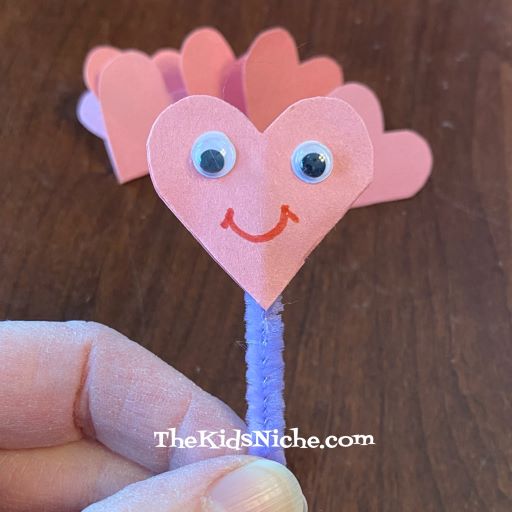
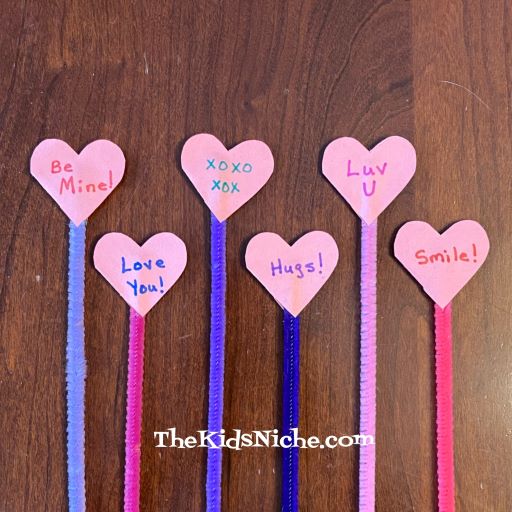
Yep, it’s February and that means Valentine’s Day will be here before we know it! Today’s post is about something fun to make that doesn’t involve sugar! 😉 Valentine pencils! You can make these to give to the kiddos or let the kiddos make them for someone else. It would be a fun way for the kids to make Valentines for their classmates for a Valentine’s Day party at school.
You will need a piece of red or pink construction paper, scissors, glue, markers, some new pencils and the same number of pipe cleaners (chenille stems) as there are pencils. You can either draw some hearts or use a small heart shaped cookie cutter to trace around.
Begin by making a fold in your construction paper, so you can cut 2 layers of a full-sized heart at the same time. Notice that the cookie cutter edge is lined up with the fold. Trace around the cookie cutter. Or if you are drawing it free hand, that’s fine.
Holding the 2 layers of paper together, cut on the line you drew. You should end up with 2 hearts connected by 1 side.
Make a cut on the crease about 1/3 of the way up from the point of the hearts.
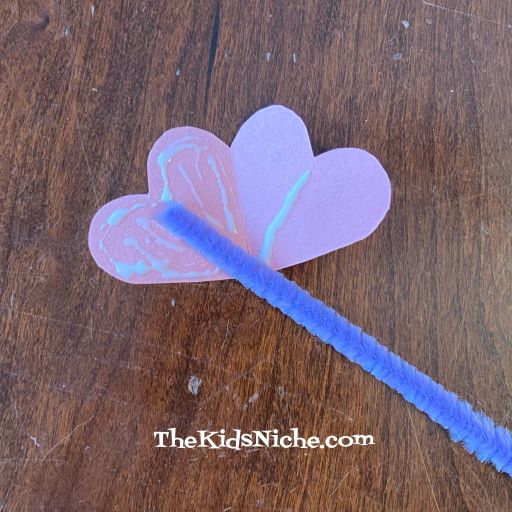
Close the heart and decorate both sides. I drew a face on one side and wrote some words on the other side. Your designs can be as simple or as fancy as you like.
Apply glue to the inside of the heart in the following manner: a line of glue up the middle of both sides and then all over just one side of the heart.
Place one end of a pipe cleaner on one side of the heart in the center.
Close the heart over the pipe cleaner and hold it closed until the glue holds it together.
That’s the front side and this is the back side.
If you have wiggly eyes, I think they make these even cuter. 🙂 Just glue them in place.
Allow the glue to dry a little before continuing with the next step. Here is the front side of some Valentine pencils I made.
And the back side.
Now for the finishing touch that turns plain ordinary pencils into Valentine pencils! Line one of the pipe cleaners up with a pencil, allowing the heart to stick up above the pencil eraser a little bit.
While holding on to the top part, wrap the rest of the pipe cleaner around and around the pencil until it’s completely wrapped and you run out of pipe cleaner.
Aren’t they fun? 🙂 The more, the merrier!
These are fun to make and you can put a sweet message on them too.
Hope this finds you all doing well and staying safe! We are in the middle of the Winter Storm Landon, but we are doing ok so far! They are warning us that we might lose our electricity, so if that happens I won’t be able to post tomorrow. Stay warm! 🙂
Are you still looking for Valentine cards that are simple enough for your kids to make? Here’s another suggestion for you! We’ll call this one the Soda Pop Valentine card. 😉 You’ll need a piece of paper, glue, a black marker, colored pencils or crayons, a pencil, scissors, a cut out paper heart and a straw.
I used half a sheet of pink construction paper for my card. I folded it in half to make a nice size for a card. On the front, using a pencil, draw a soda pop bottle.
With a thin line marker or black pen, trace over the bottle you just drew so that it stands out more plainly.
Color in the bottom 2/3 of the bottle whatever color you’d like your pop (soda) to be. I used brown for Root Beer. I wrote the words Root Beer on my bottle but you can write whatever kind of pop you like to drink and color it the same color as the drink you chose.
(Sorry I’m not sure why this picture looks purple!) Now imagine that the straw you have is inside this bottle of pop. (soda) Cut your straw to fit the bottle. Have the bottom of the straw just touching the top of the pop (soda) in your bottle. The top of the straw should stick out above the bottle opening.
Add a line of glue down the length of the straw and hold it in place on your card for just a little bit till the glue can start to set up.
If you have a permanent black marker, you can draw the rim of the bottle on your straw too so it looks more like it is inside the bottle.
Now with a pen or marker write the words, “I “soda” love you!” (I sorta love you!)
Next, you should write on the cut out heart these words…”I love you so much I think my heart might “pop”! 😉
Then glue the heart to the inside right hand side of your card.
If you like, you can add some little lines around the outside of the heart to help make the heart look like it’s ready to pop!
And there you are! All finished! Great job! Who will you share your Valentine card with? Remember to sign your name so the person will know you are the one that made this great card for them. 🙂
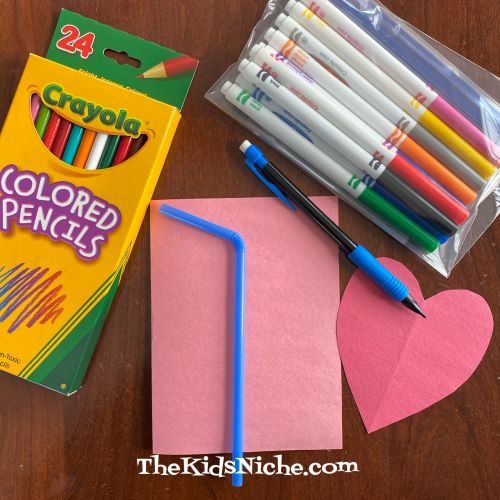
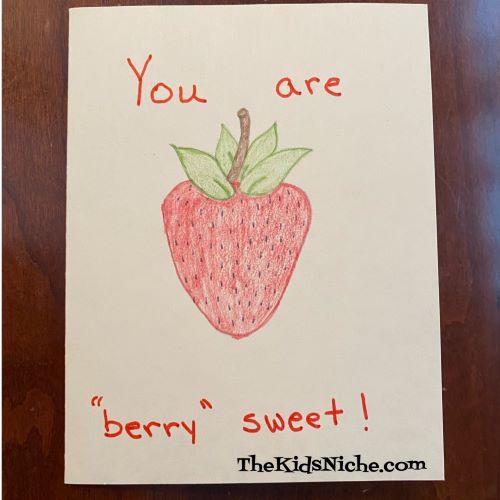
We’re back with another idea for a Valentine card kids can make. This one involves strawberries and blueberries. Ready? Grab a piece of paper or a blank card, a pencil and colored pencils or crayons and some markers. Start with a half a sheet of paper, cardstock or construction paper.
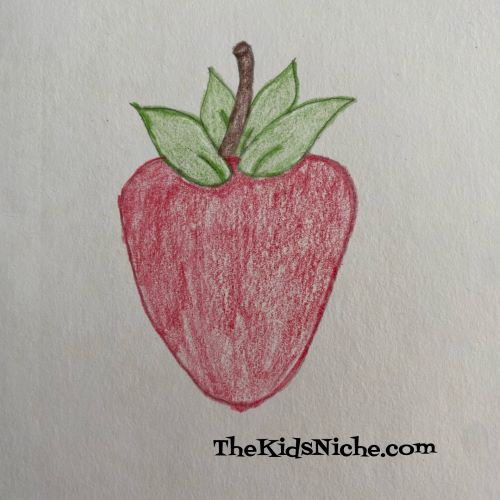
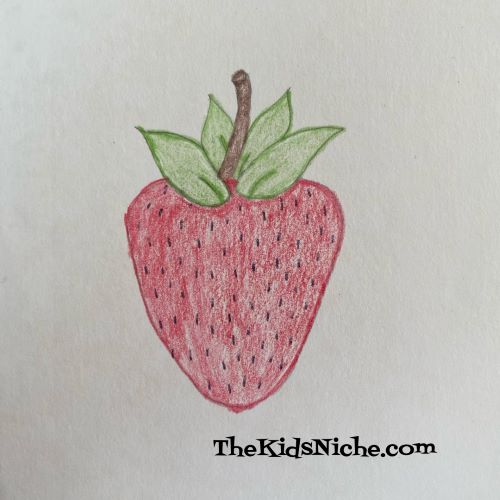
Fold it in half to make it card-sized. On the front of the card, we’re going to draw a strawberry. Start out by drawing this shape.
Next, add some leaves and a stem.
Use your colored pencils, markers or crayons and color the strawberry. I used colored pencils.
Looking good! Now make some tiny little lines for the seeds on a strawberry. I used a black pen to draw mine.
Your strawberry is finished! Now add the words, “You are “berry” sweet!” to the front of the card.
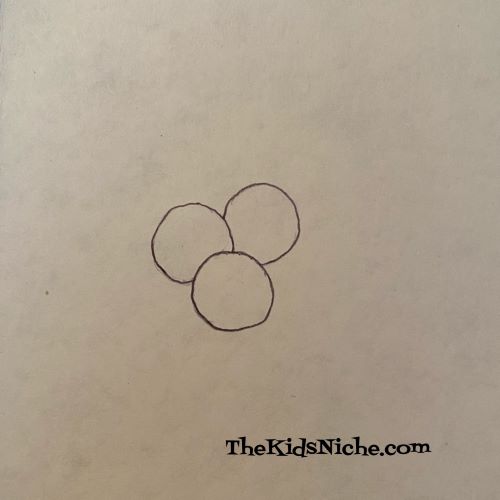
Open the card and on the inside right hand side, let’s draw some blueberries. I drew 3 but you can draw however many you like. Start with a circle and then add 2 more circles that are partially hidden behind the first one.
Add one small circle inside each of these circles. Then add 5-6 almost triangles to the little circle.
Color the blueberries. You’re almost done! Add the words, “Have a “berry” Happy Valentine’s Day!”
Great job! Who will you give your handmade Valentine to? Remember to sign your name. I hope you’ve had fun making this “berry” nice Valentine’s Day card! 🙂
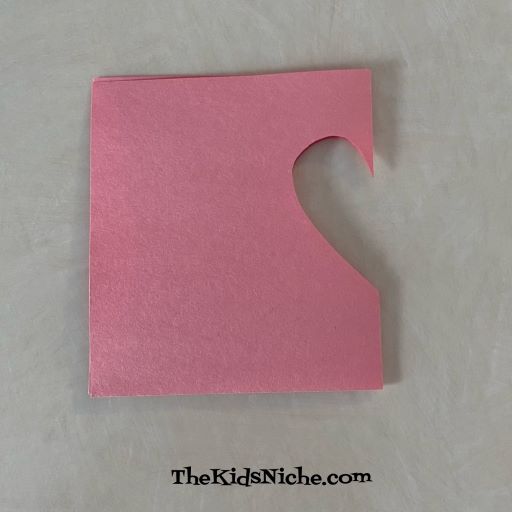
We’re back with another great Valentine’s Day craft project! If you saw yesterday’s post about a tissue paper heart activity and you saw that I suggested you save the stencil looking part of that project for another project, this is it!
If you didn’t see that post, what you need to do is cut a piece of construction paper in half. Then taking one of those pieces and fold it in half.
Draw half of a heart shape on the folded edge of your paper. Then cut along the line you drew. When you open it, you will have a heart. 🙂 For this project, we will be using the piece with the heart cut out, but you might want to save the heart to use it for something else.
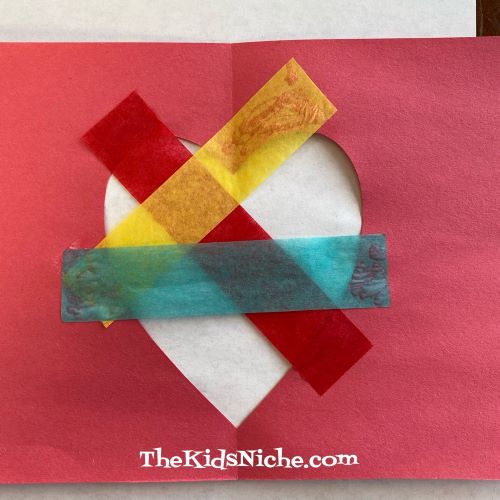
For today’s project, you will need another half sheet of construction paper, a pencil, scissors, glue and several different colors of tissue paper. First cut a 1″ wide strip from each color of tissue paper. You will need only a short piece of each color. (I had a lot left over!)
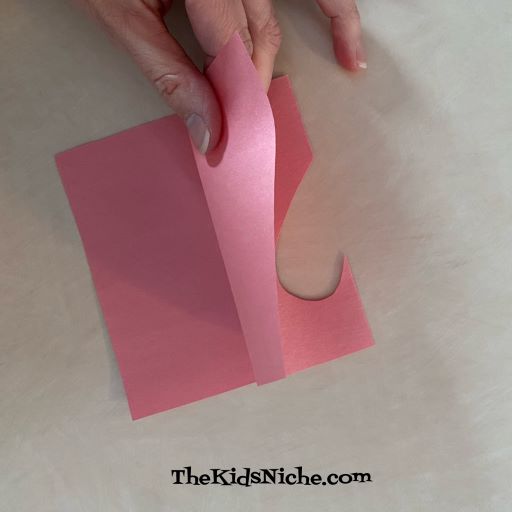
Now, take the half piece of construction paper and fold it in half. Lay the first stencil on top and trace the half of a heart on the fold like you did for the first one.
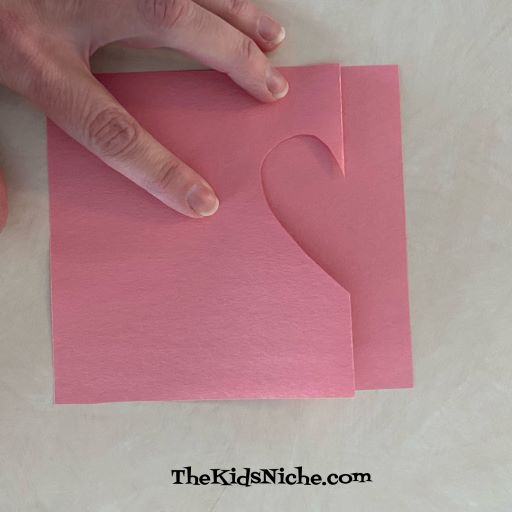
Cut out the second heart so you have 2 matching pieces.
Unfold the 2 pieces. Place the side that you drew on facing up. This will become the backside of the stained “glass” heart. Using the strips of tissue paper, lay one across the heart opening and glue the ends down.
Take additional pieces of the tissue paper strips and place them, one at a time, in different directions over the heart opening…and glue the ends down.
Add a few more strips…
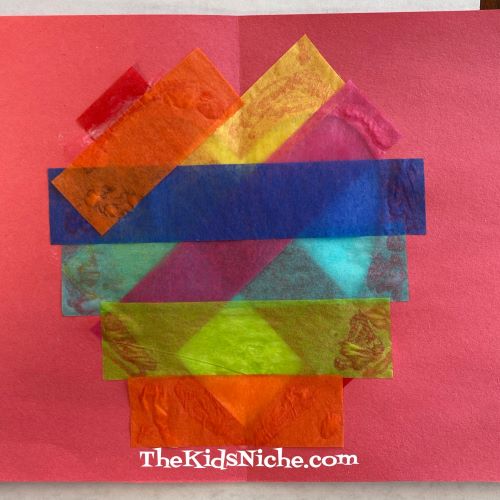
Keep adding strips until all the open spaces of the heart have been covered with tissue paper.
Take the other piece of construction paper you cut the heart out of and apply glue as it is shown in this picture.
Place it on the paper you have been gluing the strips to so that the edges meet and the 2 hearts match up. This will cover up all the ends that you glued down and allow the light to shine through the heart cutout. And there you have it! You’ve made a stained “glass” Valentine heart! Put it up to a window and look how pretty it is when the sun shines through the heart!
Doesn’t that look nice? Make as many as you like (Or as many as your parents will allow!) and put them close to your windows to make your house look festive. 🙂 You could also make a hole at the top and put a piece of string through so you can hang up your stained “glass” art. I hope you had fun today! Check back for more Valentine’s Day ideas soon!