What Happens When a Monarch Caterpillar Goes Into Its Chrysalis?

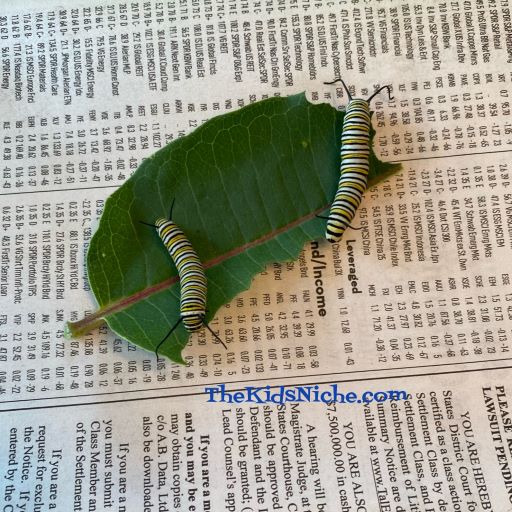
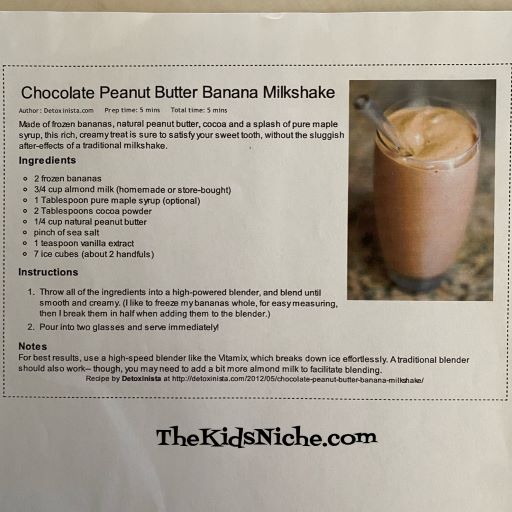
I’m back to tell you some more about what happens when a Monarch caterpillar goes into its chrysalis in the next stage toward becoming a butterfly. When the caterpillar is fully grown, it stops eating and finds a place to hang upside down. It attaches itself to the top of the hotel or a stick if its still in nature. It looks like the letter “J” when it hangs.

This next picture shows 3 different caterpillars in the different stages of going into a chrysalis.

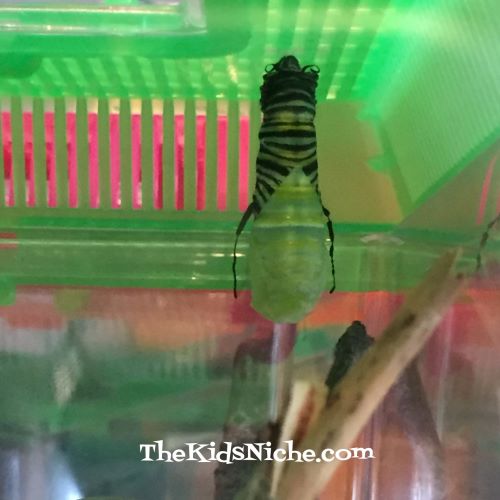
The caterpillars hang in the letter J form for a day or so and then something amazing starts happening. They straighten their bodies out just a little and if you watch very carefully at just the right time, you can see little ripples moving up across their body. They are getting ready to shed their outside layer of “skin”. The “skin” will start to split open down by the head. They are hanging upside down so their head is at the bottom.

The split will get bigger and bigger and you will see more and more of the light green part appear.

Notice how the “skin” is getting all wrinkled up at the top.

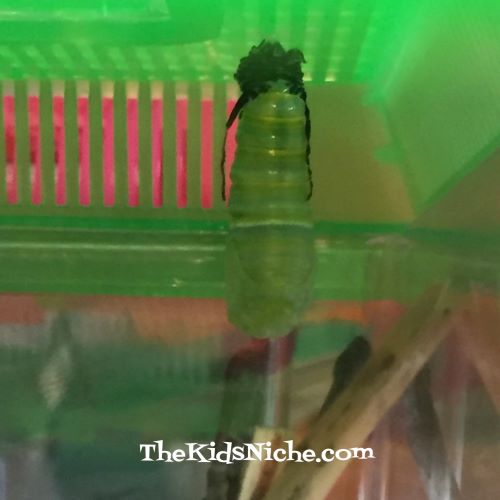
Then finally, the bunch of old “skin” they don’t need anymore falls off.

They will wiggle around inside for a little bit and it will get shorter and shorter.

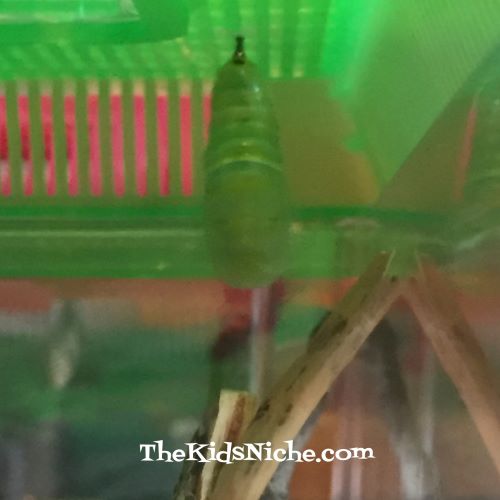
The rings at the top change and the chrysalis becomes smooth.

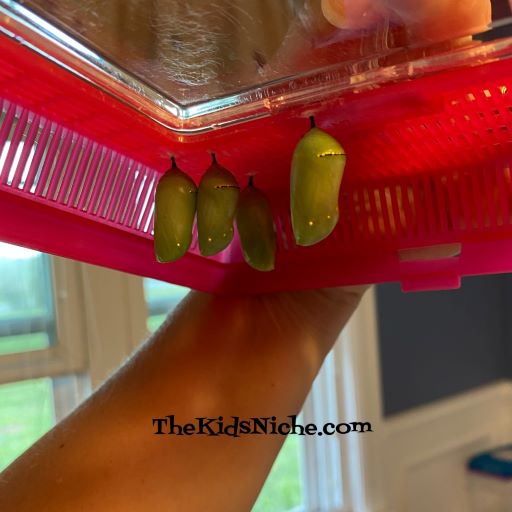
This is what a finished chrysalis looks like. Notice the gold dots and the gold line. Isn’t it amazing that a caterpillar made that??

The caterpillar is inside the chrysalis now and will be there for around 1 to 2 weeks. You won’t see much happening for a while but a wonderful, amazing transformation is taking place inside! I’ll share another post later of what happens when it’s time for the Monarch butterfly to emerge!

It’s That Time of Year Again! Raising Monarch Butterflies!

Yep, it’s begun again! In case you haven’t followed me long enough to know what I’m talking about, every summer I raise Monarch butterflies and release them back into the wild. The Monarch butterfly population had dwindled down drastically, but over the last couple of years the population has increased a LOT! Which is so exciting!! Many people are doing their part to grow plants that the Monarch’s feed on. Monarch caterpillars will only eat Milkweed plants. I look for the Monarch eggs or caterpillars and raise them in a safe place away from many of the predators that will destroy them. Here’s the start of my setup this year!

Last Sunday morning, I found 6 caterpillars and put them into their “hotels”. 😉 Some children were here that day and they discovered 5 more! And we were off and running! 🙂

I don’t put more than 4 caterpillars in one container at any given time. And I try to put the same sized caterpillars together.

Today I found 1 more caterpillar and he/she is still very tiny! Can you find him/her in the next 2 pictures?

Isn’t that pretty neat?! I won’t share all the steps today that the caterpillar goes through to become a butterfly, but for now I’ll just say eventually they form a chrysalis. They stay in the chrysalis for a while and then the Monarch butterfly emerges. It’s truly magical! (I’ll share more details in another post.) Here is a picture of 4 of this year’s caterpillars that have gone into their chrysalis now:

For some reason, it seems they all wanted to be in the same corner of their hotel! LOL Two of them are actually touching, which I’ve never had happen before. Now the wait is on till it’s time for the butterfly to put in an appearance! I really enjoy raising Monarchs each summer! 🙂 It’s a great experience to share with your kids!

Easy Number Game With Variations

Hello again! Sorry you haven’t heard from me in a few days but we needed to travel out of state for a funeral. Back home now and trying to catch up again.

So today let’s look at an easy number game that can be played different ways and only requires paper, some markers or crayons and some dice. The game also reinforces learning numbers and helps with small motor skills. Shhh! Don’t tell the kids that part! 😉 Grab 1 piece of paper for each player and 1 dice to share with all the players to begin with…and a black crayon or marker and 1 marker of another color for each player.

Basic version…

Have each player write the numbers 1 – 6 on their piece of paper. Or for the kids that are just learning their numbers, you can write the numbers for them. Leave a little space between the numbers.

Each player should roll the dice once and the player that gets the highest number will go first. To play, roll the dice once and cross off the corresponding number on your paper. Example, if you roll a 1, cross off the 1 on your paper. Pass the dice to the next player moving clockwise around the circle of players.

Continue with each player rolling the dice once and marking their paper. If you roll a number that you have already crossed off on your paper, you do nothing for that turn and play passes on to the next player.

The first person to cross off all their numbers is the winner!

Version #2…

Write the numbers 1 – 12 on each player’s piece of paper. Use 2 dice for this version of the game.

This version is played in a similar manner as the basic version, but each player rolls 2 dice. You can use the number from just 1 dice OR you can add the numbers from both dice together. In the following example, the player rolled a 2 and a 6. You could cross off the 2 OR the 6 OR the 8. You can only cross off 1 number each turn. In this picture, the 2 and the 8 have already been crossed off, so you would cross off the 6.

Again, the first player to cross off all their numbers is the winner. 🙂

Version #3…

Find something that is round in shape that you can trace around to make circles on each player’s paper. I used the bottom of a paper cup.

Draw 6 circles. (Or more, depending on how you want to play the game.)

Number the circles 1 – 6. Grab a few crayons for this version of the game.

As each player rolls the dice, they can color in the matching circle. (Sneaking in some small motor skills practice!)

You can also take the opportunity to talk about the colors the players choose to use. Some questions you might ask… What color did you choose for number 3? What is your favorite color? What else can you think of that is green? (Or whatever color they are using.)

First one with all their circles colored is the winner!

Version #4…

Draw 6 circles for this version of the game, but make the number inside each circle smaller. When the player rolls the dice, they draw/color that number of objects in the correct circle. For example, if you rolled a 6, you might draw 6 dots in the number 6 circle.

The winner is the first one to complete all their circles. I can see this game getting rather silly when players draw crazy things in their circles! 😉

I’m sure you can think of even more ways to play this game, but hopefully these ideas will get you started on your way to having fun with the number game! 🙂

Fun With Perler Beads!

Have you ever done a project using Perler beads? I have seen them for years but I finally tried a small kit and found out they are actually pretty neat! If you haven’t tried them yet, I’ll give you an overview of how they work. Here is the cute Star Wars kit that I bought and tried:

(Isn’t “Baby Yoda” adorable?!) This is everything that was inside this kit (minus the paper bowl): 225 beads (enough to make 2 “Baby Yoda”), a pegboard, instructions and ironing paper. You will also need an iron. I used the paper bowl to contain the beads and keep them from running away. 😉

Follow the instructions for where to begin placing the colored beads on the pegboard.

Keep putting beads on the peg board by following the pattern in the instructions.

Adding a few more beads…it’s starting to take shape!

And there he is! All the pegs are in the correct order! We’re ready for fusing!

Heat your iron to a medium heat. Place the pegboard on a solid heat-safe surface. I used a wooden cutting board.

Cover the beads with the ironing paper – very important! Your iron should not touch the beads directly. Using a circular motion, iron over the beads and ironing paper for 10-20 seconds. When ironed properly the beads will still have an open center.

Set a heavy book or something similar on your project while the beads cool down to prevent it from warping. Peel the ironing paper back slowly to check that the beads have fused together. If there are still loose beads, iron over them a second time. (This happened to me.)

After the beads are sticking together, carefully remove the design and turn it over. Again, cover it with the ironing paper and iron the second side. Remember to place the heavy object on top again to prevent warping. The pegboard and ironing paper are reusable.

Tah dah! Your project is finished! 🙂

You could slip a thin string or thread through one of the holes if you’d like to hang your project up. Perler beads come in soooo many colors and there are kits of all types available! Be sure to look for a fun Perler beads project the next time you are in your favorite craft store! Have fun! 🙂

Sun Catcher Fun!

Have you ever made a sun catcher? They are fun and simple to make and look so pretty hanging in the sun! I found these supplies for the project at our local Walmart store: you will need sun catcher paint pens, suction cups with a hook and, of course, an unpainted sun catcher.

Open the pack of sun catcher paint pens and select your first color. I began with pink for the kitten’s nose and the inside of her ears. Squeeze a very small amount of pain onto the sun catcher.

Use a toothpick to pop any bubbles you see in the paint and to help spread the paint around.

Keep adding paint in your desired colors to your sun catcher.

I wanted my kitten to have a white face but the sun catcher wasn’t divided into a section there, so I painted in the gray area of the face first and then let the sun catcher dry overnight.

The next morning, I added white paint into the section I left open. And after drying for a few hours, this kitten was ready to be given to our grandson as part of his birthday present. The sun catcher was painted to look like his cat, Chloe. 😊

I also enjoyed painting a turtle sun catcher to give to our son who has a turtle for a pet.

Added green and purple paint…

And several more colors to finish her! I think she turned out pretty cute! Put the hook through the hole in the top of the sun catcher and use the suction cup to attach it to any window. (Or a turtle’s aquarium!) Watch the sun shine through! 😃

There are lots of different sun catcher shapes at Walmart and they are probably also sold at craft stores. Have fun making some sun catchers of your own and catching some sunshine with them! 😃

New Crayola Crayons Collections

When I was a kid, one of my favorite things to receive was a new box of crayons! I felt that excited sensation again the other day when I came across some new collections of Crayola crayons! I found these at the Dollar Tree store and some of them I haven’t seen any place else so far.

Let’s take a minute and look at what is inside each box. 🙂 Each box contains 8 crayons.

#1.) Glitter Crayons. Colors included in this box are: berry blast, crimson clash, campfire flicker, sun shower, gritty green, blue blazes, poppin’ purple and black gold. The crayons are sparkly.

#2.) Pastel Crayons. The colors included in this box are: carnation pink, canary, spring green, sea green, apricot, sky blue, periwinkle and purple mountains’ majesty.

#3.) Pearl Crayons. The crayons in this box have some cool names too: hot cocoa, orange peel, apple orchard, shooting star, caribbean sea, cloudy sky, lavender silk and black pearl. Just listening to the color names makes me want to start coloring! 😉

#4.) Uni-crayons. These must be for coloring unicorns? Here are the colors in this box: maroon, red-orange, yellow, pine green, blue, carnation pink, silver and gold. Gotta have silver and gold for unicorn horns, right?

#5.) Cosmic Crayons. This kind I did see at Walmart in a box of 24 crayons. Colors in this box include: wild strawberry, yellow orange, yellow, jungle green, sky blue, pacific blue, hot magenta and orchid.

These crayons are so much fun! They would make a great addition to a craft bag for traveling or a goodie bag after a birthday party. Or maybe send some to those grandkids that live far away. Whatever you do with them, I hope they will bring lots of fun to someone! 🙂

Kids Summer Crafts on Sale at Joann’s!

If you are looking for some small craft kits for your kids to do this summer, stop in at your nearest Joann craft store! They have some great prices on some fun looking kits!

These are a few items included in the 60% off sale:

#1.) Melty Bead Kits. There were at least 3 designs to choose from. (Yep, they look very similar to the Perler beads.)

#2.) Scratch Art Kits. There are 6 in this package and it includes the utensil used to do the scratching.

#3.) Color-in Puzzle Kit. There are 2 sets in the package plus some markers for coloring.

#4.) Plaster Magnet Kit which includes a brush and paints. There were a few designs to choose from.

#5.) Wood Coloring Kit. These sets includes 3 markers and a few little gems.

I also saw a couple different types of terrarium grow kits that were 70% off! Normally they would sell for $29.99, but are on sale for $8.99! Wow!

If you like the Makit & Bakit kits, they have some cute ones on clearance for $2.47.

Hop on over to your nearest Joann’s for some great summer bargains that will keep your kids entertained! 🙂

Save Those Bananas!

Do you ever have too many bananas and you don’t have time to use them before they become overripe? Don’t throw them away!

You can freeze bananas to use later and it’s SUPER simple to do! There are 2 ways (at least) to do it. Grab a small freezer bag and write on the outside that it contains a banana and write the date you are freezing it.

You can simply peel the banana, stick it in the freezer bag and put it in the freezer. Doesn’t get much easier than that, right? 🙂

Frozen bananas can be used to make things like banana bread or muffins but my favorite thing to use frozen bananas for is MILKSHAKES! So with that in mind, here is another way to freeze bananas so they are ready to go in the blender to make a milkshake. Lay a piece of wax paper or parchment paper on a cookie sheet, cut the banana into slices and lay them on the cookie sheet so they are not quite touching each other.

Pop the cookie sheet into the freezer and go about doing other things while the banana slices freeze. After the slices are frozen, pick up the edge of the wax paper and quickly peel it back to loosen the banana pieces.

Pop them into the freezer bags and back into the freezer.

Now you have banana slices ready to dump into the blender with your other yummy ingredients at a moment’s notice. 🙂 And you didn’t waste those bananas! 😉

Here is my favorite recipe for using frozen bananas in a milkshake. (Shhh! Don’t tell the kids it’s actually healthy!)

Note: you can use the whole frozen bananas in this recipe or to make your own version of a milkshake. Just break the banana into a few smaller chunks before adding it to the blender. Enjoy! 🙂