Does It Have to be Lego Brand to be Fun?

Do your kids love Lego brand building blocks, but the price for them makes your wallet moan? I hear you!! I have to admit that I’ve always been one of those “it has to be Lego” people…until now. We always had Lego when our kids were growing up but I often wished there was a cheaper version. “Back then” we did try some other brands and found them sadly lacking. But I have found some sets recently that are a great, cheaper alternative and I even found some sets with a Christmas theme. I’m going to share this set with you today:

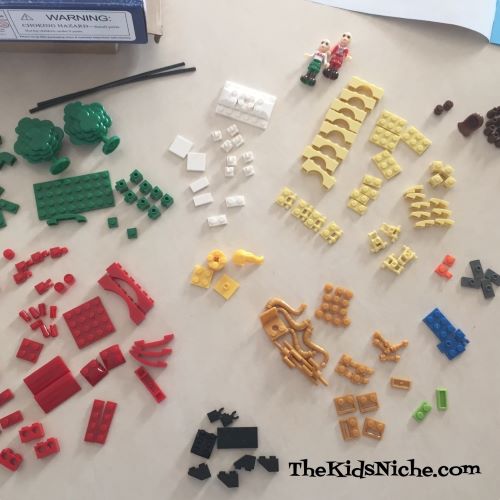
I found this set…and many others…at the website hollar.com. This set is on sale for $8.00 right now! (Unfortunately, they have been swamped with orders, so they are no longer guaranteeing delivery by Christmas. But you might want to keep this in mind, for those upcoming birthdays.) So, let’s start putting it together! The pieces come in 3 plastic bags inside the box and there is a booklet with step by step directions.

Separating the pieces into little piles of each color makes it easier to find the piece you are looking for as you build.

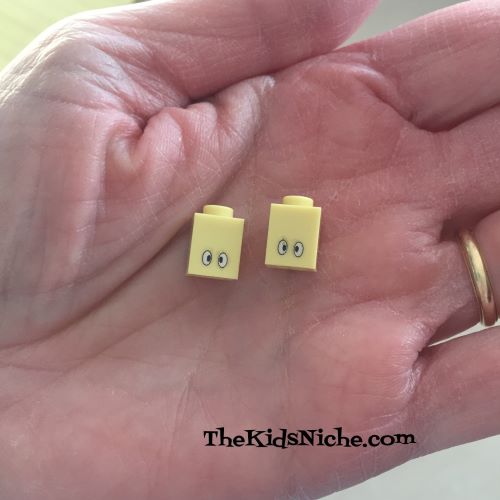
Haha! Look at these cute little pieces! What do you think they are a part of?

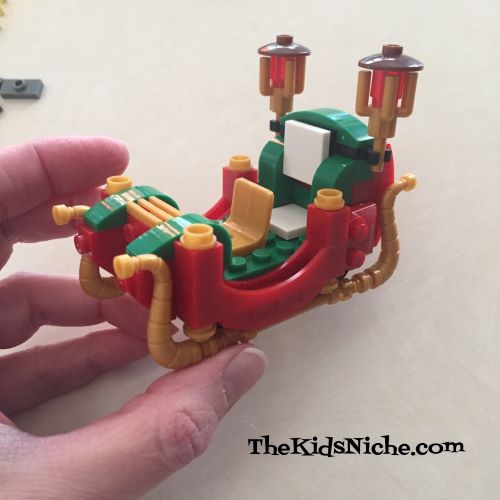
Sometimes when you start making a building blocks set, it’s hard to tell what you are working on. Can you tell what this is?

A few steps later and it’s taking shape now!

Ta dah! If you guessed the sleigh, you are right!

Now back to those pieces that had eyes on them…add a few more pieces to them and I bet you can tell what this is going to be!

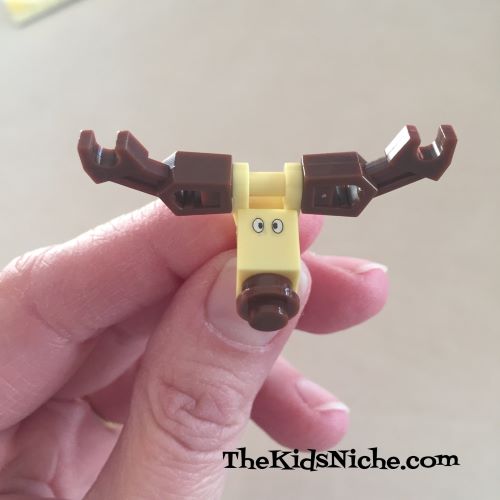
Did you say “a reindeer”? Yep, that’s right!

In this kit, you get to make 4 reindeer. Aren’t they cute?

Now to line everything up in just the right way…add a few more pieces…and presto! All done! Doesn’t it look festive?

This Christmas set was fun to put together and is rated 3 stars out of 5 for the difficulty level. A few of the pieces were a little hard to snap together but overall it’s a nice set. The quality isn’t quite as good as the Lego brand items, but it’s still nice. The reindeer and this sleigh will find its way to a spot in our winter decorations! 🙂 I hope you found this helpful!

Cookie Cutter Decorations

Happy December! It’s already feeling like winter and Christmas is coming fast! Let’s make some quick and easy decorations to spruce up your house for the holidays! Grab your favorite winter time/Christmas cookie cutters and some construction paper, a pencil and a pair of scissors and let’s get started! Here are the cookie cutters I found that we have on hand at our house.

Get a sheet of paper, any color you like or just plain white, and a cookie cutter and a pencil. Place the cookie cutter on the piece of paper and trace around the outside edge with your pencil. Try to hold the cookie cutter very still so your lines meet up just right.

Lift the cookie cutter off the paper and make sure you have a complete shape drawn on your paper.

You can color the shape right on the paper and maybe add a few more shapes to fill in the space. Or you can use a pair of scissors to cut out the shape. I cut out 3 different size star shapes on 3 different colors of paper.

You can use the shapes separately or you could do something like I did and glue them together to make one colorful star.

Paper shapes can be left just the way they are or you can color them with crayons or markers for some extra color and designs. Here are a few I did to give you some ideas to get you started. A gingerbread man made on white paper and colored with crayons…

A green Christmas tree shape using markers to color in decorations…

And a pair of blue mittens colored with markers.

You can leave your decorations just one thickness of paper, or you can put two matching pieces together by gluing the back sides together. I added a piece of thread before taping the pieces together so I have a loop to hang my mitten. (I used double-sided tape instead of glue.)

And there we have our first batch of decorations! 🙂

Here are a few suggestions for more ways to decorate your shapes: you can use Elmer’s Glitter Glue which is colored glue with the glitter already mixed in it.

Another idea is to use regular white glue (that dries clear) and some crayon shavings. Start by spreading glue over your shape in the place you want to put the first color…

Then sprinkle tiny crayon shavings over the glue and lightly press in place.

It’s ok if you sprinkle on a little more than you need because you can gently pick up your shape and let the excess fall off onto a piece of paper. Then you can save those bits for another shape.

If you would like to use a second color, put more glue on your shape in that spot. I added glue in lines to make the mitten look like it has stripes.

Sprinkle your second color on the glue. I added yellow crayon shavings and again, very gently pressed them in place.

Now gently lift your shape and let the excess fall back onto a sheet of paper so you can save it for later.

What I like to use even better than crayon shavings is glitter! I used some holographic blue glitter and it was sooo pretty! Make your design on your shape with regular white glue like we did with the last shape.

Sprinkle on the glitter…

And gently lift your shape and let the extra glitter fall off onto a piece of paper like before. Isn’t that so pretty?!

After you make your decorations, have an adult help you hang them up for everyone to enjoy! Add a string to use for hanging or maybe just a piece of tape or double sided sticky tape. You could also use your shapes to make a card to mail to a friend or relative to wish them a Merry Christmas! I hope you have fun making your house beautiful! 🙂

Thanksgiving Fun!

Here’s a few funnies to help you enjoy your Thanksgiving!

1.) Why did they let the turkey join the Thanksgiving band? Answer: Because he had the drumsticks!

2.) Why did the turkey cross the road? Answer: To prove he wasn’t chicken!

3.) What smells the best at Thanksgiving dinner? Answer: Your nose!

4.) Why didn’t the turkey finish its dessert? Answer: Because it was stuffed!

5.) Which side of the turkey has the most feathers? Answer: The outside!

How did you do coming up with the right answers? Aren’t riddles fun? Now try these Thanksgiving riddles out on your relatives and have a good laugh together! 😁

Easy Thanksgiving Turkey Craft

It’s less than a week now until Thanksgiving! Are you ready? We aren’t, but we are working on it! Do you need a few more decorations to make your house look festive? Here is an age old craft that you’ve likely seen…and done…many times before but this can serve as a reminder for you. We’ll call it the trace-around-your-hand-turkey. 🙂 All we need for this craft is a piece of paper, a pencil and something to color with. I used markers for my example.

Place your (or your child’s) hand on the sheet of paper.

Trace around your hand using the pencil.

Lift your hand off after you finish tracing around it and then add a line at the bottom to close up the hand.

You have the outline of your turkey! Great job! Draw the turkey’s eye, beak, feet and wattles. (Wattles on the turkey are the parts done in red on top of and underneath his head.)

I probably should have turned my paper the other direction since my hand is rather big and there isn’t much room for his legs and feet. But maybe this guy is just short! haha! The fingers of the hand will serve as the turkey’s feathers, so go ahead and color them whatever color you like.

Now you can draw on a wing and then color the turkey’s body.

I chose to add the words “Happy Thanksgiving!” to my picture. You could also draw and color in the background with things like grass, blue sky, a barn, a tree, etc.

And you did it! How do you like your Thanksgiving turkey? I’m sure he looks great! Now for a little Thanksgiving turkey humor… 😉

Returning to my Blog again

My sincere apologies for my long absence from this blog. My father-in-law was very ill this year and in the last few months he spent more time in the hospital than he did at home. 😦 He fought a long, hard battle with cancer and he passed away November 1, 2019. We tried to spend as much time as we could with him and so other things had to be set aside. It’s taken some time to process losing him and there are so many little things that remind us of him…which is a good thing, but also makes the tears flow again. It’s been difficult to step back into life again because it will not be the same without him. We are trying to move forward now while keeping our memories of him close in our hearts.

Thank you for your understanding at this sad time. I hope to be back to sharing more fun things to do with kids so please keep checking back! It’s almost Thanksgiving now so time to look at some fun things to do for the holidays!

Saturday Exploration

This is a great time of year for exploring outside! There are lots of “treasures” to be found! Rusty (our dog) and I went on an expedition to see what we could find in the area where we live. Rusty found a lot of sticks, which is the part that interests him! 😉

While we usually find dandelions in the spring, if you look all around you can still find one or two of them adding some bright yellow to the landscape.

We are lucky enough to have a huge pine tree on our property and we found plenty of small pine cones. I brought them inside to let them dry thoroughly so they can be used in future craft projects. (Stay tuned!)

There is a small oak tree here too, so we also found some little acorns. We added them to our “future crafting” stockpile.

Do you know what these things are? Here’s a hint: they are found on the common milkweed plant.

Yep, they are milkweed seed pods. Inside of them are the seeds for growing more milkweed plants. Here’s what they look like when they are opened:

They are pretty cool looking, aren’t they? We are trying to save up some milkweed seeds and plant them this fall so we’ll have more milkweed plants for our Monarch butterflies and caterpillars next season.

Keep your eyes open for flowers! Even if they are actually considered to be weeds, they can be so pretty! Here’s a few we found:

I don’t know what the name of this weed is but those little tassels it has are so soft and fun to hold.

Toadstools are popping up all over the place! But remember, these are NOT SAFE TO EAT!! Can you imagine a little fairy hiding under it to keep dry when it rains? 😉

I hope you will go on your own exploration and see if you can find these things where you live and perhaps some other cool stuff! I’d love it if you’d share what you find with us here! 🙂