Calming down

Sensory bottles (or calming bottles) seem to be all the rage now, so I had to try my hand at making some. They are great for distracting kids during a meltdown or stressful time as it gives them something else to focus on. Kids can help you make them or you can make them yourself. There are so many variations in the ways they can be made that the possibilities are endless!

I made smaller versions for my first attempt and I think these will be great for throwing in purse or book bag to take with you. I read that some people like to use the bigger VOSS water bottles. I found some clear plastic travel size bottles at Walmart – 7 approximately 3 oz. bottles in a package. They have 4 different colored lids which could be great for keeping track of which bottle belongs to which kid. 😉

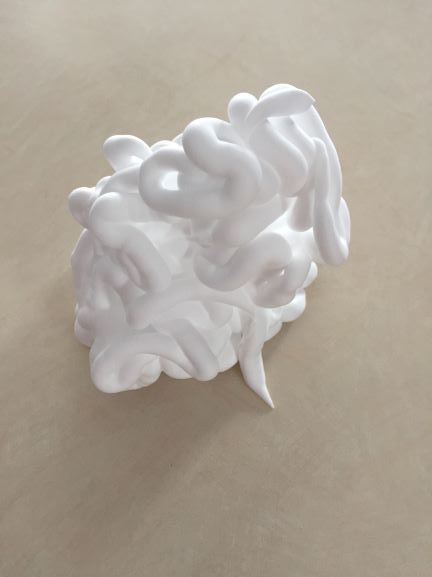
Bottles can be filled with liquid (clear glue, hair gel, baby oil, etc) for allowing items to float around or they can be filled with dry ingredients like poly pellets, white rice, sand, etc for searching for hidden items. If you’ve never used poly pellets before, here’s what they look like:

I started off making 2 Alphabet Bottles. Using the poly pellets and letter beads, I sorted out letters to include the entire alphabet in one bottle. Very young children can have fun just turning the bottle over and watching the pretty colors show up, while it can also help preschool kids learn their letters by looking for each letter in the alphabet.

I found using a funnel the best way to get the poly pellets into the bottle. You’ll want to make sure you glue the lid shut (these bottles have flip up tops) and glue the lid to the bottle, so little ones can’t get the tiny pieces into their mouths. I used a hot glue gun to glue mine shut. Leave a little empty space at the top of the bottle so there is room for movement inside.

Next I made a Beach Adventure Bottle. I had tiny seashells saved from a Florida vacation as well as some clean sand that I combined with a bit of blue glitter. I put in 2 of each color/type of seashell I had. This would be a great way to use some of the shells kids love finding on the beach during vacation and they would have a special reminder of that fun time.

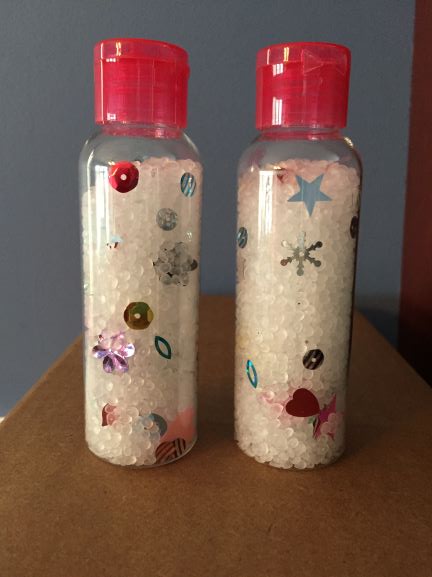
I had a bag of all kinds of sequins so those went into the next 2 bottles along with poly pellets. Shall we call them Sequin Search bottles?

I found 2 of each sequin I wanted to include in order for the 2 bottles to be identical. My idea is for 2 kids to play together while finding the matching items in their bottles.

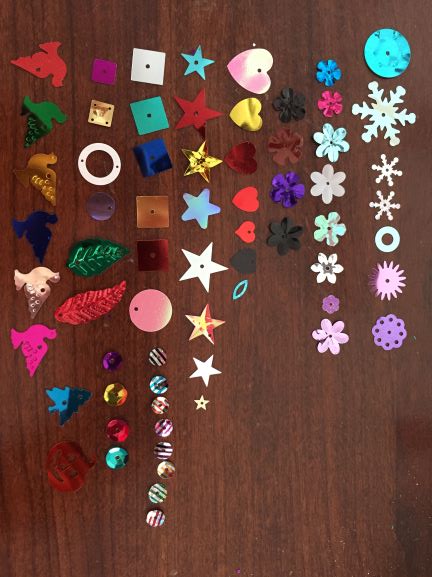
I also took a picture of the items so I can print it out (and maybe even laminate one) so the kids can see what all they need to find inside.

For bottles 6 and 7, I wanted to try using a liquid in the bottle but discovered that is a little bit trickier. Different items weigh different amounts and different liquids have a different viscosity. So after a bit of trial and error, I created the Sparkle Alphabet Bottle. I used a little of Elmer’s purple Glitter Glue and some clear liquid school glue. I have realized now…after I already glued the lid on…that I should have added a little bit of hot water to thin it down. The letters move a little too slowly in this bottle. So a word of caution, let your bottle sit for a bit, then go back and check later to see if it’s the way you want it to be BEFORE you glue the lid on! LOL (Live and learn, right?) At any rate, it looks cool and can still be entertaining. Perhaps use it as a game of trying to make word out of the letters you see.

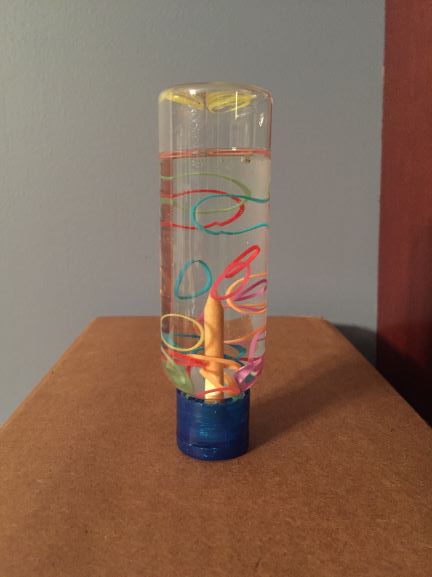
Last but not least, I made a Ring Catch bottle. For this one I used the little colored rubber bands, baby oil and a wooden golf tee. I glued the golf tee to the inside of the lid, added the rubber bands and baby oil. The idea of this bottle is to try to catch as many rings on the golf tee as you can. Or maybe try to catch a certain color…or only one…or maybe two…you get the idea. 😉 Turn the bottle over after each try to start again or to let another person try their hand at it.

It was a fun project for me on a day that I needed to stay inside out of the yucky winter weather. I hope you enjoy these ideas and have fun trying to make some of your own!

Little Things

Do you ever feel like what you can do for the kids in your life is not “fancy” enough? It’s not “extravagant” enough? I want to remind you today that little things you do with kids are often the big things. There are many ways to have fun together that don’t cost a thing. Read a favorite book together. Save up toilet paper or paper towel rolls and do a craft. Do something silly together. Here’s an example of that: For Christmas this year, our family decided to dress in Ugly Christmas sweaters or other holiday bits of fun. (And that idea got started by one of our grand kids! 🙂 ) When we all got together, our grandson and I realized that we were wearing matching socks! We had a good laugh about it, had to take our picture together and then he ran off to share the excitement with his mom. It was a fun moment!

Tell them a story. Maybe one about when you were a kid and something funny happened to you. Kids love stories about when they were a baby too. Or make up a story together. You start with a line like “Once upon a time, there was a…” and then let them tell the next part. Take turns back and forth until you reach “THE END!”…if you ever do! It’s free and they will have the best time laughing over the story you come up with together.

Play a game. Kids LOVE to play games! For older kids, let them take on an adult in Chess. (Ummm, maybe not ME, but dad’s, grandpa’s and uncles are good for that!) Or there is that all time famous game…Monopoly. 😉 IF you are feeling VERY patient and have nothing to do for the next several hours.

Don’t have any board games handy? All you need is a piece of paper and a writing utensil of some sort for a few rounds of Tic Tac Toe. No paper and pencils handy? Go for “I Spy”! If you’ve never played “I Spy” all you do is pick out an object close by and say “I spy with my little eye something (tell the color)…let’s say blue. Then the other people playing take turns guessing what you have spied. The first person to guess correctly becomes the next person to spy an object.

Those are a few simple ideas, but I just wanted to make the point that “extravagant” really isn’t necessary. It’s not really so much about WHAT you do together as it is the fact that you ARE DOING something together. That’s what they will remember and cherish.

PB & J a new way

Do you know a kiddo that LOVES peanut butter and jelly sandwiches? And wants to ONLY eat peanut butter and jelly sandwiches? Here’s a new twist to try…an egg omelette with PB & J inside! (Adding some protein there!) And just to sneak in a little fruit while we’re at it, how about adding a banana on top?

Even this Grandma thought it was pretty tasty! I used cashew butter on mine with Simply Fruit Seedless Strawberry Spreadable Preserves. (No added sugar.) Yummy! 🙂 Depending on your child’s diet/food allergies/food sensitivities, you could try peanut butter, cashew butter or almond butter and their favorite flavor of jam or apple butter. The options are almost endless!

“I’m bored!”

The dreaded complaint…”I’m bored, Mom! There’s nothing to do!” And it generally comes from a kid that has toys hanging out the wazoo! “How can you possibly be bored?!”, we wonder. It’s time to think up something different for your little prince or princess to do. That’s where I come in! 🙂 My hope is to share with you ideas that you haven’t thought of or haven’t thought of in a long time or ideas I have might have a little different twist on. Let’s start out with a simple one…it’s a simple one ingredient activity that most folks will have on hand.

Shaving cream…

Shaving cream…shaving cream?! Yep! One word of warning,..if your kiddo is little and still puts things in his/her mouth, I’d suggest using Whip Cream instead. Then if they lick their fingers, it’s not a problem. Spray some cream out on your kitchen counter top and let them have at it!

We spread our pile of foam out into a big circle…

Depending on the child’s age, this could be a fun way to practice drawing letters, numbers or shapes.

Or silly faces…

Scoop some up with some spoons…

Use a few cookie cutters…wiggle them around just a bit so they leave a mark behind when you pick them up.

Find some washable toys that can have fun in the “snow”…

And especially for boys (but girls too) let them drive some cars around in the deep snow!

Keep a wet paper towel handy for wiping off fingers that get a little too much shaving cream on them at one time. When play time is over, wipe the shaving cream up with paper towels or a wet washrag and you’re done! 🙂 It’s a simple, cheap, easy activity for your lovable littles! And you get a clean counter top out of it! 😉

The Journey Begins

Welcome to my blog!  Thanks for joining me!  I am so glad you’re here!  The purpose of this blog is to share all the great ideas that I have learned over the years of fun things to do with/for children.  My name is Anita and I am “Honey” to my loving hubby of almost 39 years, “Mom” to 4 amazing children, “Nita” to 3 wonderful in-law kids and “Grandma Nita” to 6 beautiful grandchildren.  I feel very blessed!  I had the privilege of being a stay-at-home mom while our children were growing up and since money was tight, we found many frugal ways to have fun together.  Many of those ideas (plus lots of new ones!) have been carried over to fun times with our grandkids.  I hope to share things to do WITH children and things to do FOR children and also things children can do for others.  My brain is swirling with all kinds of trouble, uh, I mean fun we can get up to together!  I’m so excited to start this journey with you!  Stay tuned! 🙂

grandkids 3