It’s That Time of Year Again! Raising Monarch Butterflies!

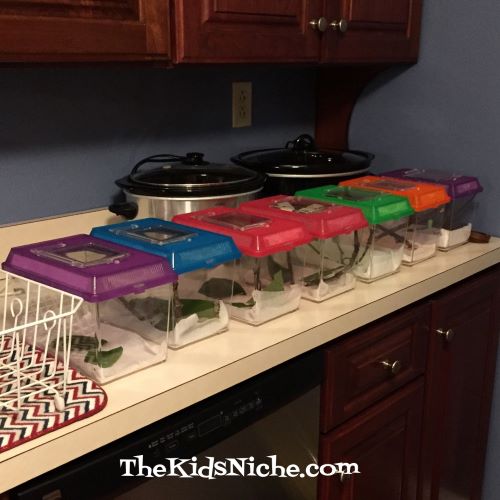
Yep, it’s begun again! In case you haven’t followed me long enough to know what I’m talking about, every summer I raise Monarch butterflies and release them back into the wild. The Monarch butterfly population had dwindled down drastically, but over the last couple of years the population has increased a LOT! Which is so exciting!! Many people are doing their part to grow plants that the Monarch’s feed on. Monarch caterpillars will only eat Milkweed plants. I look for the Monarch eggs or caterpillars and raise them in a safe place away from many of the predators that will destroy them. Here’s the start of my setup this year!

Last Sunday morning, I found 6 caterpillars and put them into their “hotels”. 😉 Some children were here that day and they discovered 5 more! And we were off and running! 🙂

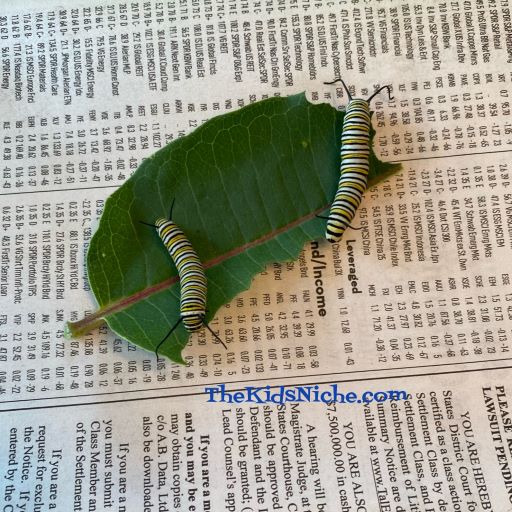
I don’t put more than 4 caterpillars in one container at any given time. And I try to put the same sized caterpillars together.

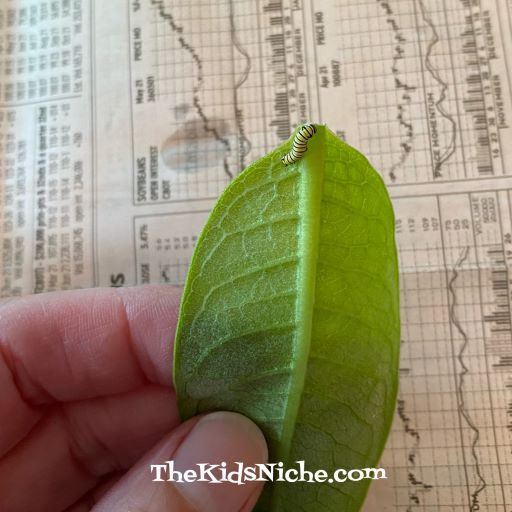
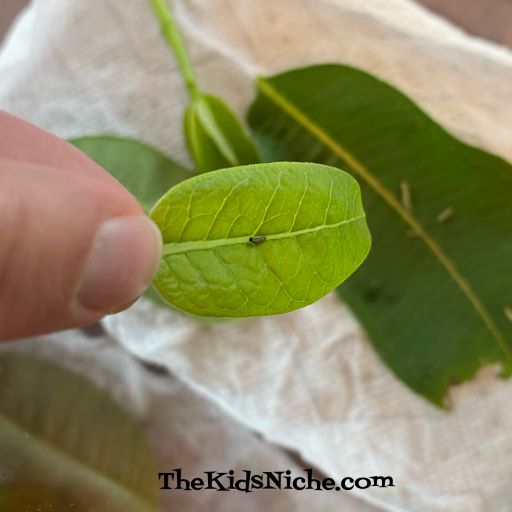
Today I found 1 more caterpillar and he/she is still very tiny! Can you find him/her in the next 2 pictures?

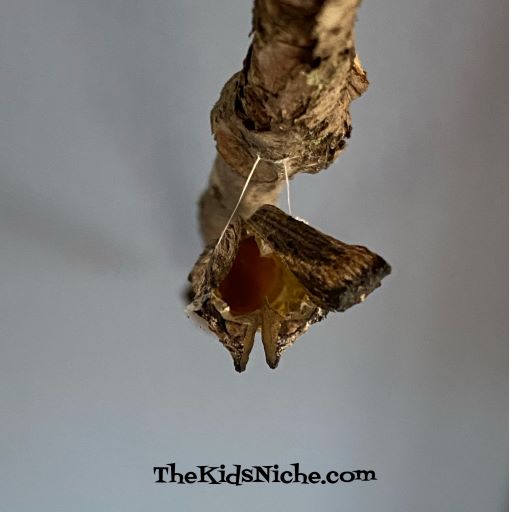
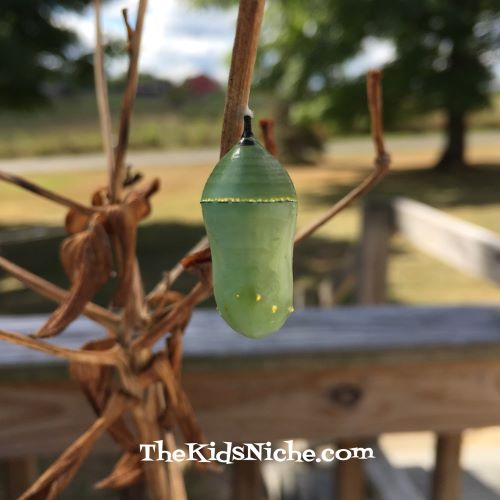
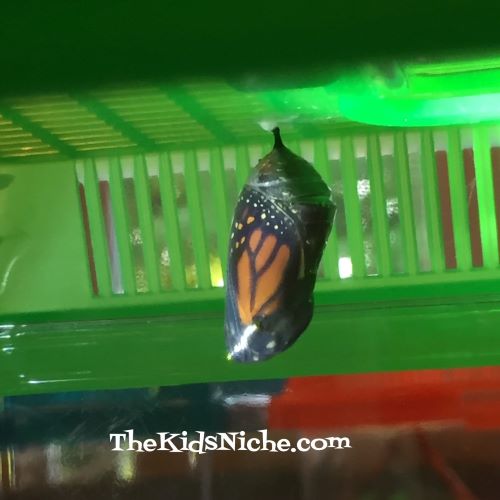
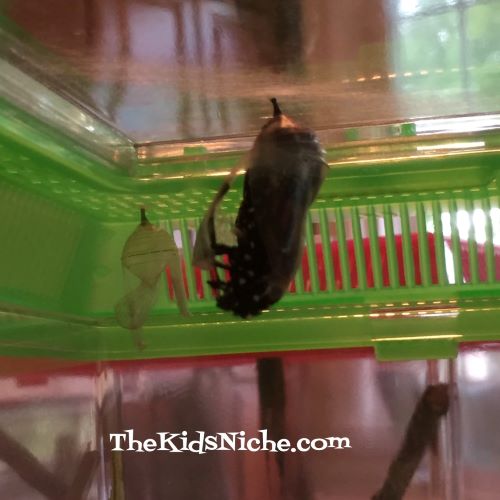
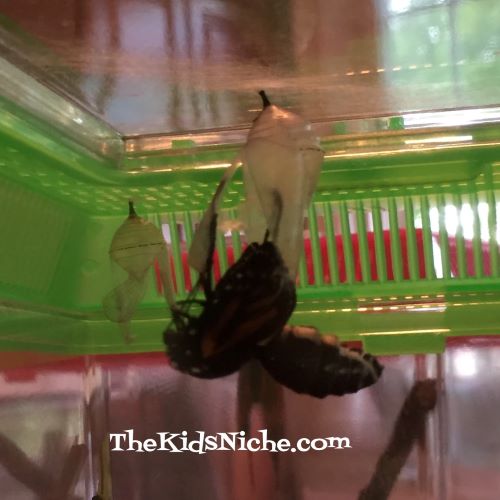
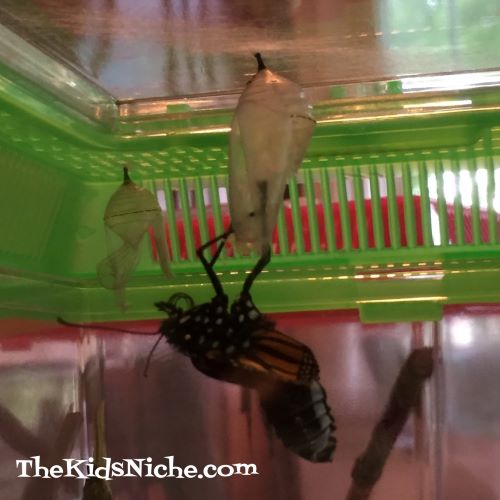
Isn’t that pretty neat?! I won’t share all the steps today that the caterpillar goes through to become a butterfly, but for now I’ll just say eventually they form a chrysalis. They stay in the chrysalis for a while and then the Monarch butterfly emerges. It’s truly magical! (I’ll share more details in another post.) Here is a picture of 4 of this year’s caterpillars that have gone into their chrysalis now:

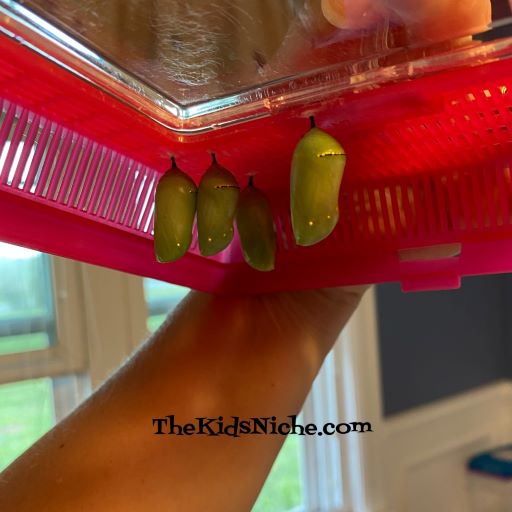
For some reason, it seems they all wanted to be in the same corner of their hotel! LOL Two of them are actually touching, which I’ve never had happen before. Now the wait is on till it’s time for the butterfly to put in an appearance! I really enjoy raising Monarchs each summer! 🙂 It’s a great experience to share with your kids!

A New Butterfly!

Something exciting happened at our house today! For the first time ever, we had an Eastern Black Swallowtail butterfly, that we raised from a caterpillar, hatch! As you may know if you follow this blog, we have been raising Monarch butterflies for a few years now, but this is the first time we raised an Eastern Black Swallowtail. And wow, is it ever pretty! 🙂

The top side of their wings looks different from the bottom side. So the last picture was the top side, and this picture is of one half of the bottom side.

I think it is beautiful! Have you ever seen the chrysalis for an Eastern Black Swallowtail? Here’s what it looks like:

It almost looks like a piece of the stick, doesn’t it? Notice the “string” that is holding the chrysalis to the stick. Pretty cool to think that a caterpillar made that! The next picture shows you what the chrysalis looks like after the butterfly came out.

Can you see that the top part is open now? Check out this really cool picture where you can see down inside the empty chrysalis. 🙂

It’s hard to imagine how a butterfly fit inside there! Wow! Soon it was time to let the new butterfly fly off to his new future. He (I THINK it was a male, but not absolutely sure on that) stayed on my hand for a few minutes and then he moved on to the flowers.

And then he was off and flying! Good-bye, beautiful butterfly! We’re so glad we could be a small part of your life! Safe travels! 🙂

Ahhh, isn’t nature wonderful? 😉

Hide and Seek With Sneaky Little Caterpillars!

As you may have seen from my earlier posts, each summer I enjoy raising monarch butterflies. Their numbers have been drastically declining so I try to do my part in keeping them alive and well. Sometimes they make me laugh. Take the other day for instance…I was cleaning out their little “hotels” and so the lid was off. Some of the caterpillars I have at the moment had recently hatched so they are super tiny. Like this little guy…

He looks like he’s making a break for freedom! In less than a minute, he was all the way up here!

I could just imagine him saying, “YES! I’ve made it to the top and here I come big world!” 🙂 But the big human was watching. I grabbed a milkweed leaf and held it in front of him. He wasn’t too sure he wanted to get on the leaf but he finally did. Gotcha, little dude!

I looked away for a few seconds and when I looked back this is what I saw…

You sneaky little caterpillar! Where did you go?? Get back here! Guess where I found him? Look at the next picture and see…

Yep, he was hiding on the backside of the leaf! 😉 There were 10 little guys in that “hotel”, so I had to go on a hunt to find them all. Let’s see…we’ve now got #2 and #3…

There’s #2 through #7…

Added in #8 and #9…

Where in the world is #10 hiding?? OH, there he is! 🙂 Hiding on the bottom side of a milkweed leaf again!

Found them all! It can be hard but still fun when trying to spot all the little caterpillars. I guess I need to invest in a magnifying glass! 😉

Monarch Butterflies Emerging From Their Chrysalis

Hello and welcome to another adventure in the life cycle of the Monarch butterfly! Last week we looked at how the Monarch caterpillar changes into its chrysalis. Today we’ll see what happens when it’s time for the butterfly to emerge from the chrysalis. (Hang on until the end of this post for the video!) So just to remind you, here’s what the Monarch butterfly’s chrysalis looks like.

When the time for the butterfly to emerge is getting close, the chrysalis will start to turn a darker color and look black. Notice in this picture that one chrysalis looks green but the one in the background is black.

Here is a closer look.

Did you notice that you can see the butterfly’s wing inside the chrysalis? My pictures aren’t super clear because they are taken looking through the plastic container, but here is a picture taken with a flashlight shining on the chrysalis.

Whoa!! How cool is that?! The chrysalis is now very thin and you can see the butterfly! Next, the chrysalis starts to slowly open. Can you see along the left hand side that the chrysalis is splitting open?

Then the split becomes a little wider. The butterfly is hanging upside down right now and you can start to see its head coming out first.

The butterfly is dropping down a little lower now. You can start to see its legs that are folded up close to its head.

It’s now beginning to slide out of the chrysalis!

Sliding farther out…almost there! The chrysalis will stay attached to the top of the container as the butterfly slides down and out of it.

And it’s out! Look how big it’s body looks right now and how small and folded up it’s wings are.

The butterfly grabs a hold of the empty chrysalis and it will hang right side up now.

As the butterfly hangs on the chrysalis, it will pump fluid into its wings and the wings will begin to expand and the body will become smaller. This next picture was taken 5 minutes after the butterfly emerged or eclosed. Its wings are still wrinkled looking.

Then 10 minutes…it’s wings are looking straighter.

And then here is 15 minutes after emerging.

It takes a couple of hours for the butterfly to finish this process and for it’s wings to expand and dry off. They don’t need to eat right away so it’s good to give them time to dry off and to begin to flex their wings. After a few hours have passed, I carefully open the container and put my hand close to the butterfly and they usually climb onto my finger. And then it’s time to set them free outside.

Here is a video I took of the process of the butterfly emerging from it’s chrysalis. It is so amazing to watch this happen!

It has been such a rewarding experience for me to help these beautiful creatures along in their transformation from a tiny little egg into an amazing gorgeous butterfly! This is my second year of raising and releasing Monarchs and I hope I can continue to do so for many years to come! I hope you have enjoyed coming along with me on this journey! 🙂

Tiny Monarch Caterpillars Grow FAST!

Remember these cute TINY little guys we looked at last week? There are 2 on the top left and 1 at the bottom. If you missed that blog post, you can find it here: https://thekidsniche.com/2020/08/21/monarch-caterpillar-babies-are-so-tiny/

You are not going to believe how fast they grow!! Check out this picture that was taken yesterday, August 27, 2020.

Can you say WHOA!! Now they look like fat little sausages! That’s because they eat a LOT of Milkweed leaves! If you find a Monarch caterpillar and you would like to raise it inside your house, just make sure that you have access to lots of Milkweed leaves for them to eat. They will only eat Milkweed leaves.

Would you like to see where we found a bunch of our caterpillars this year? Some were on this Swamp Milkweed plant. Swamp Milkweed plants grow pretty tall and they have pink flowers in the Spring. Can you find 3 caterpillars in this picture?

We found more caterpillars on this Butterfly Milkweed plant. Butterfly Milkweed plants don’t grow as tall as the Swamp Milkweed and they have pretty orange flowers in the Spring. Can you find 3 caterpillars in this picture too? One of them is hiding down low on the right side of the picture. 😉

Sometimes we have found caterpillars on the Common Milkweed plants. This is what it looks like. It’s leaves are much bigger than the other 2 Milkweed plants and it also has pink flowers in the Spring.

When we bring the caterpillars inside our house, they live in a cozy little apartment with a couple of sticks to climb on and Milkweed leaves to eat. We place a damp paper towel on the bottom of the apartment to make it easier to clean up after them every day. They also poop a lot!

We had 4 apartments but we kept finding more caterpillars and eggs so we added more apartments!

We house up to 3 caterpillars in each apartment. They eat and grow and poop to their hearts’ content until one day, it’s time for the next stage in their life cycle. They climb to the top of the apartment or on a stick and then they J-hang. Don’t they look like the letter J hanging there?

Usually about a day after they start to J-hang, they will go into their chrysalis. But that’s a topic for another day! Check back next week when we’ll explore the next phase in their transformation! 🙂

It’s Butterfly Time Again!

It’s that time of year again when you might find those cool looking yellow and black striped Monarch butterfly caterpillars! We found our first one a couple weeks ago.

I brought the caterpillar inside and gave it it’s own cool apartment to live in. I gave it plenty of fresh milkweed leaves to munch on with a few drops of water on them and a stick for climbing to the top of its apartment . Within just a couple of days, it had gone into its chrysalis.

Then the waiting and watching began. Yesterday I noticed that the chrysalis was turning a darker color so I knew that the time for hatching was getting close. This morning when I got up, this is what I saw:

Hello, world! The new Monarch butterfly has arrived! 🙂

This Monarch butterfly is a girl. After giving her a few hours to plump up her wings and dry off, I took her outside. As soon as I walked outside, she started fluttering excitedly around in her apartment! She was ready to go! I took the lid off, let her crawl up onto my finger and she flew off before I could even get her completely out of the apartment. Good bye, beautiful lady! We wish you well! 🙂

The plight of the Monarch butterfly concerns all of us. Their population is really struggling. Their numbers are down 53% over last year for the ones that winter in Mexico. Those that overwintered in California this last year have decreased by 86%! So we need to try and help them as much as we can. Planting native nectar plants such as the common milkweed, swamp milkweed and butterfly milkweed. And avoid using pesticides. Let’s all help preserve these beautiful creatures!

One more Butterfly Craft

We have been having so much fun with our Monarch butterflies and doing butterfly crafts! Are you tired of butterflies? No, I didn’t think so! Who gets tired of butterflies?! So I have one more butterfly craft up my sleeve! Today’s craft takes only tissue paper and a pipe cleaner along with a pair of scissors, a pencil and something round to trace around, like a small plate. Want a sneak peek at what we’re making today? Ok, here it is!

Let’s get started! First, take one sheet of tissue paper and fold over one end until it’s large enough for a small plate to fit on it.

Make a good crease in the tissue paper on the fold by running your finger down it. Open the tissue paper back up and cut along the crease you just made.

Now fold the piece you cut off in half the other way until you have a double layer big enough for the plate to fit on.

Take your pencil and trace around the outside edge of the plate.

Keeping the two layers of tissue paper together, cut on the circle you just traced around the plate. You should end up with 2 circles that are the same size.

Now let’s prepare the pipe cleaner to become the butterfly’s body. Fold the pipe cleaner in half and twist it a few times on the end with the bend in it so you have a twist that goes about 1/3 of the way up.

Back to the tissue paper circles now. Starting on one side of the circle, in the middle, start scrunching up the circles until you have them both gathered together in the middle.

Now put the 2 scrunched up circles together by holding them against each other in the center.

Take the pipe cleaner and slide it over the middle portion of the scrunched circles. Give it a few twists to secure it in place.

Don’t worry if your butterfly looks a little scrunched up because now you can gently move the tissue paper around until you get the butterfly’s wings to look just right. Do this gently because tissue paper will tear pretty easily.

And there’s your beautiful butterfly! Make as many as you like in as many colors as you like!

I think these would look lovely if you tied a piece of thread to them and hung them up where they could blow in the breeze and look like they are flying! I hope you enjoyed this project and that you make a bunch of butterflies of your very own! 🙂

Easy Butterfly Craft #3

Welcome back! Here we go again with another easy butterfly craft! All you need this time is 2 pieces of construction paper, a pencil, scissors, colored markers and some Elmer’s glue. You’ll want 2 different colors of construction paper – 1 for the butterflies and 1 for the background sheet. Take your butterfly colored paper, fold it in half and then cut it on the fold.

Take 1 of those pieces and fold it in half again.

Now draw the outline of one side of a butterfly’s wings. Look at the next picture for a suggested way to draw it.

Keeping the paper folded, cut out the outline with your scissors.

This time, you need to open the butterfly wings and cut down the center so you have 2 pieces of the wings.

Choose one side of each wing piece and color it however you would like.

I colored a line around the outside of the butterfly wing and so I put a piece of scrap paper underneath it in case my marker got a little off the edge. That will keep the surface underneath your wing clean.

Next, decide where you would like to place the wings on your background paper and glue them down. In our next step, we will be adding the butterfly’s body so be sure to leave enough open space for that.

Now for the butterfly body…draw several small circles in a row up against the flat side of the wing. Color the circles in. Then you can draw on the antennae.

I even added smiling faces. 🙂

Give your butterflies a few dashed lines out the back side so they look like they have been flying. And that’s it! You’ve made more butterflies! I hope you enjoyed this craft! Be sure to check back for more about butterflies soon! 🙂

3-D Butterfly – Easy Butterfly Craft #2

Let’s get back to making some more butterflies! This craft project takes construction paper, a few little pom-poms, scissors, glue, markers, and a pencil.

Select the color you would like your butterfly to be. You’ll need one color for the butterfly and one for your background paper. I chose orange for my butterfly and white for my background. (I also chose yellow for a second butterfly but I’ll share that craft next time.) 🙂 Your background paper will not be cut so you can set it aside for now. Take your butterfly color paper and fold it in half and then cut or tear it on the fold.

You will only need one piece for each butterfly. Take one piece and fold it in half again.

Using your pencil, draw an outline of one side of a butterfly’s wings. Make sure you draw the part of the wing that would attach to the butterfly’s body on the fold. This is important because after you cut it out, you want to be able to open the wings like you would a book. Sorry it’s hard to see the outline of the pencil drawing. 😦 You can see it better if you look at the yellow piece.

Go ahead and cut out the butterfly wings, but be sure NOT to cut the folded edge where you have drawn where the wings attach to the body.

Taking a marker, draw lines on your butterfly wings…I’ll just be showing the orange wings now and saving the yellow for our next project. 🙂 Or you can decorate your wings however you like. I tried to make my butterfly wings look something like a Monarch butterfly.

Open your wings up and draw or color on the inside part too. Don’t bother drawing on the bottom side as we will be putting glue on there.

Now you are ready to glue your butterfly wings to the background paper. Put glue only on the bottom side where you didn’t color or draw.

The top part of the wing should not be glued down. Now to make it look 3D, take a small piece of the scrap paper leftover after you cut out the wings and roll it up into a little tube.

Glue the end to the roll so it will stay rolled up in a tube shape. Next open the wings and put a little bit of glue on the tube and place it inside the wings right up against the fold.

Place a little bit of glue on top of the little tube…

Then fold the wings closed and hold the wings in place for a little bit till the glue takes a hold. Now your butterfly’s wings look three-dimensional. 🙂

Next, glue the little pom-poms in a row to make the butterfly’s body. I used black for my butterfly.

You’re almost finished! With your marker, you can draw some antennae on your butterfly’s head. And it’s fun to add some dashes out the back to make it look like that’s where your butterfly has been flying. 🙂

Here’s a look at the back side of the butterfly so you can see better how his wings are three-dimensional.

I hope you have fun making your butterfly craft! 🙂 Come back tomorrow for another fun butterfly project! And keep your eyes open for real butterflies when you are outside!

And She’s Off! Butterfly Release

I promised yesterday that today would be the BIG DAY!! It’s time for our Monarch Butterfly that we hatched in our home, to wander out into the big world on her own! It was actually a little bit anticlimactic after all of the excitement of waiting for her to emerge. Did you catch that little word “her”? Yep, it’s a female! (Males have 2 black spots on the top side of their wings that females don’t have.)

Male and Female Monarch Butterflies

So here is Beauty in one last picture inside her little house. (Yes, I might have named her! haha!)

I carefully opened her house, reached in and gently lifted her out and sat her among some Purple Coneflowers.

Beauty immediately opened her wings to the sun…flexed them a few times and she was off! I only had time to snap one picture of her before she flew straight up and over the top of our house and out into the big new world! Go, Beauty, go! We’re rooting for you! 🙂

Butterfly #2…called The Queen by her loyal human subjects…also took her maiden voyage this morning over in Indiana! She (yes, also a female!) spent a little more time hanging around on the Milkweed plant before venturing out on her own. Isn’t she beautiful?!

The third chrysalis I bought at the Pollinators Festival hasn’t hatched just yet. I’ll keep you updated on that one’s arrival and whether its a boy or a girl. Isn’t this interesting? We are all having so much fun with this project! You really should try it too if you get the chance! 🙂