Are you curious about what is behind door #2 in the Lego Friends Advent Calendar? Let’s find out! 🙂 Where is door #2? Aha! I found it!
Opening the door….and what do you see?
(I have to confess that I don’t know what the picture on the door is for because it’s not for the pieces inside this part of the box. Hmm…maybe I will figure that out as we go along…?)
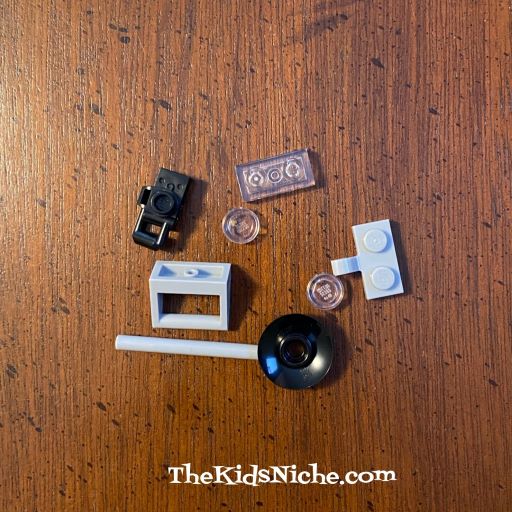
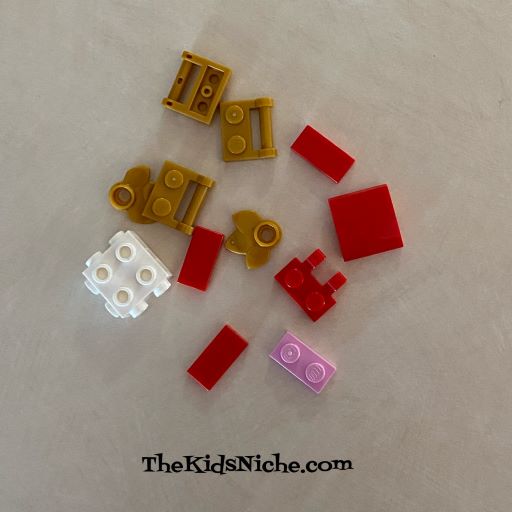
Well, here are the pieces…now, what do they make?
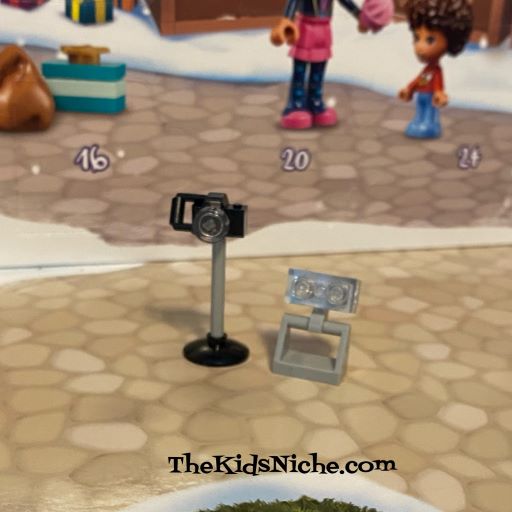
Looking at the box again to see what this might be and I think it’s the camera on a stand and an extra light box.
Yep, the pieces fit together to make these!
I think its the camera and light for taking pictures when the kids meet with Santa! 🙂
That was fun! See you tomorrow when we see what is behind door #3! 🙂
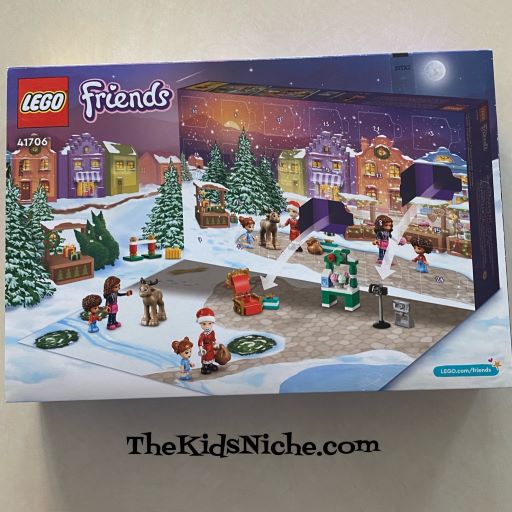
And just like that, it’s December! Does your family have an advent calendar? Our family hasn’t done one before, but this year I decided to get a Lego Friends Advent calendar. Each day I will share with you whatever little surprise shows up behind that day’s door. 🙂
Advent calendars help us count down the days until Christmas Day. There are soooo many kinds of Advent calendars out there! They have them for Lego, Hot Wheels, Matchbox cars, Play Doh, chocolate, beauty products, jewelry, pets, wine, The Elf on the Shelf, rubber ducks, candles and the list goes on and on!! You can buy them premade or make one of your own.
Back to our Lego Friends Advent Calendar…the first picture is from the front of the box. Now let’s look at the backside.
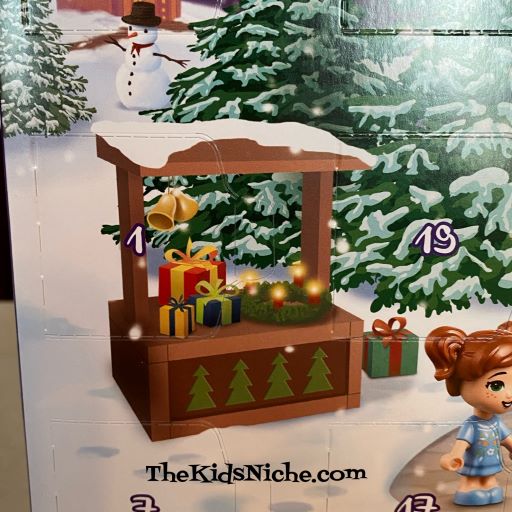
From the backside of the box, you can carefully cut through the tape holding it closed and a flap will open up. You can make a fun Christmas scene here by adding each day’s surprise Lego set after you put it together.
There are separate little closed doors marked on the box and each door is labeled with a number.
The numbers are not in order so you get to do a little search to find each day’s numbered door. Today is December 1, so let’s find the box marked with a 1. There it is!
Let’s carefully open door #1…look what’s inside!
A small pack of Lego pieces…
Hmm…I wonder what these make? There aren’t any printed directions to build from, but after looking at the box a bit, I think these pieces make Santa’s chair.
Yes, they do! How fun!
Ok, I’m putting the chair in the Christmas scene!
I wonder what will be behind tomorrow’s door? Check back tomorrow to find out! 🙂 This is going to be lots of fun!
I went on another trip to a Dollar Tree store to check out what might be new for some Christmas/Winter fun. I found this felt gingerbread man kit that I thought was cute and is simple enough for even the little kids to do with a little help with gluing.
I know you can’t tell from the picture, but this guy is big! He measures about 15″ tall by about 11″ wide. 🙂 Since I bought him at a Dollar Tree store, he only cost $1.25 plus tax. Pretty cheap fun, right? All you need besides the kit is some glue. Be sure to save the small picture of the finished gingerbread man to use as your guide in putting him together.
One tip before you get started…you might like to make a pattern for each felt piece before you glue them together and then you can make as many gingerbread men as you would like to make. 😉
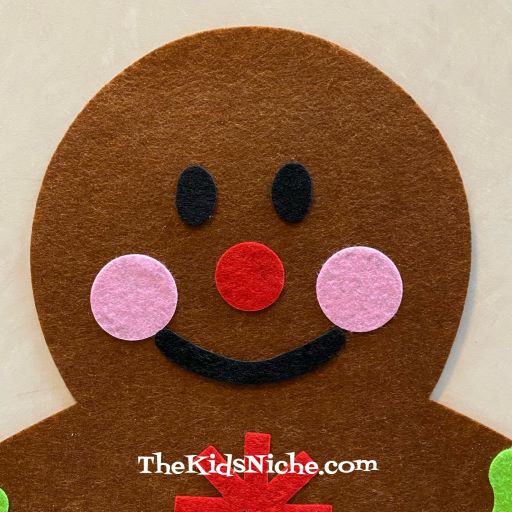
Here’s what is inside: felt shapes for the gingerbread man, eyes, nose, mouth, cheeks, snowflakes and rickrack.
The eyes and mouth punch out from the black piece of felt.
And the light green piece of felt punches out into 4 pieces of rickrack.
Please note that there is a wrong and a right side to the gingerbread man. One side has printing on it so that will, of course, be the back side.
Grab your glue and let’s put this guy together! 🙂 I started by gluing on his eyes, nose and mouth.
Add his cheeks and snowflake buttons down the front.
Glue the 4 pieces of rickrack on his arms and legs and your gingerbread man is finished! 🙂 Note: the rickrack pieces didn’t quite reach from side to side on his arms and legs but it looks cute anyway.
You can add a magnet or a piece of string to the back of your gingerbread man if you would like to be able to hang him up. Check your nearest Dollar Tree store for this simple and cute gingerbread man felt kit! Have fun! 🙂
Ok, so yesterday I made the comment about sharing a Halloween craft when it was still September…but today I did some shopping and I was surprised (well, maybe shocked) to see how much Christmas stuff is in the stores already! Is it just me or do the Christmas decorations show up earlier every year? I like Christmas too, but already?? Here’s what greeted me when I walked into Lowes today…
Aaaaand a bunch of Christmas trees.
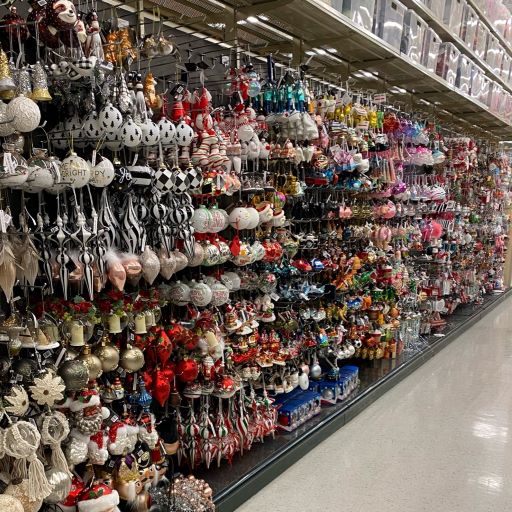
Look at what I saw when I went into Hobby Lobby…
You gotta check out these ADORABLE gnomes! So cute! (Ok, it did make me smile just looking at them. And yes, that sign says 50% off.)
Before you get the wrong idea, I am NOT Scrooge! I love buying gifts for our family and I love the Christmas season. But my question to you is “Is the Christmas season starting too early?” I don’t usually wait till the last minute to do my shopping. But seeing all the items in the stores now makes me feel like I’m a real slow poke! LOL So, tell me what you think? Are you buying Christmas decor and/or gifts already? Or is it too soon for you? Thanks! I look forward to seeing your responses! 🙂
Things are a bit crazy around our house this year with a lot of things going on. So here is a repeat of a special Taste Testing Tuesday from last year. 🙂 And if you are worried about someone stealing your Christmas cookies, I’ve heard that certain elves can be bribed to guard them for you. 😉
It’s time to rev up your taste buds! Yep, it’s Taste Testing Tuesday once again. And I’m betting today’s taste test will be your all time favorite! What are we testing? Christmas Cookies!!! A special thank you goes out to my daughter, Megan, for sharing some pictures with me of some of the Christmas cookies they made at their house this week. 🙂 Here are some suggestions for yummy cookies you can make and test out:
#1.) Peanut Butter Blossoms. Oohh these are soooo yummy! A peanut butter cookie with a chocolate kiss added on top. Drooooooling…
#2.) Rice Krispies Treats Christmas Trees. These are made just like the original Rice Krispies Treats recipe on the cereal box plus some green sugar and sprinkles added. Then cut them into triangles and you’re done!
#3.) Molasses Crinkles – This is one of my favorite cookies. I remember making them with my mom when I was a little girl. 🙂
#4.) Sour Cream Cookies – I was looking for the recipe that my Grandma used to make for us and these are similar but not quite the same. The recipe calls for adding a frosting glaze to these while they are still hot but I went with sprinkles instead to cut down on the amount of sugar.
#5.) Cut-Out Butter Cookies – Ok, this has to be my all-time favorite cookie! (Molasses Crinkles are a close 2nd.) This is another recipe I made with my mom when I was little. Well, and even after I got “big”. And then I made them with our kids and now our daughter made this batch with her kids. 🙂
I have to admit that decorated cut-out cookies get my vote for at least LOOKING the best! 😉
#6.) Russian Teacakes – This cookie is one of my hubby’s favorite cookies. They rank pretty high with me too. I make them with finely ground pecans but you can use other nuts instead. They are rolled in powdered sugar which helps to make them especially tasty.
#7.) Peanut Butter Cookies – Another one of our favorites! Ok, yes, there seems to be a pattern developing here, doesn’t there? I have a lot of favorite cookies! Haha! One of my jobs when I was little and helping my mom make these was to make the criss-cross pattern on each cookie. I always thought that was pretty cool. 😉
So what is your favorite Christmas cookie? Do you make Christmas cookies at your house? Maybe you buy some from a store? What is your all-time favorite cookie that you would ask for if you could have any cookie in the world? I hope you have a great Christmas cookie Taste Testing Tuesday at your house! 🙂
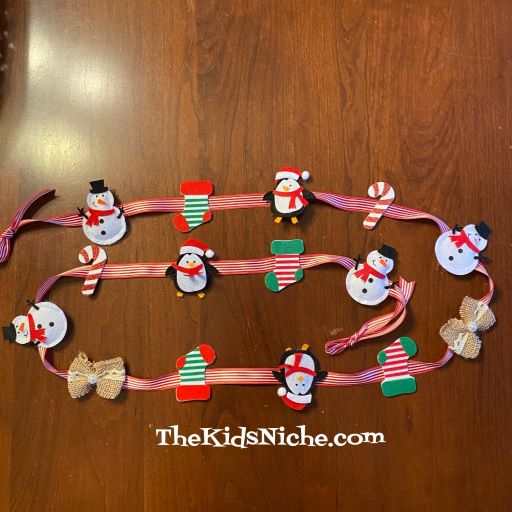
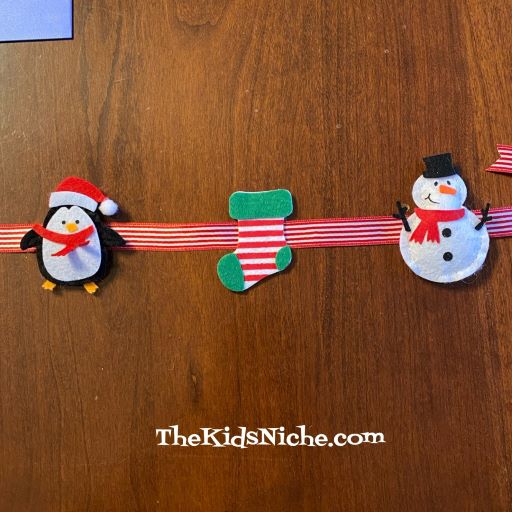
Today I want to share with you a Christmas garland that I made using puffy stickers. It’s simple to make but does require using a hot glue gun. Regular school glue might work but I wasn’t sure it would hold the weight of the stickers so I used a glue gun.
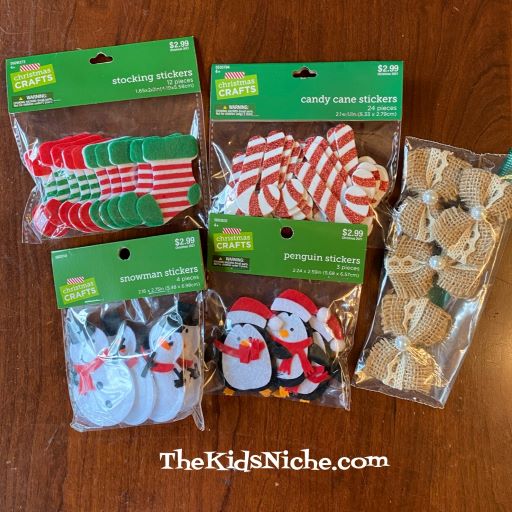
You’ll need some ribbon in the color/design of your choice and some puffy stickers. You could use regular stickers too, but leave the backing on them for this project. Begin by picking your ribbon.
Get your stickers out and ready. I found these at Hobby Lobby for 50% off. Except for the burlap bows…those are some I had leftover from another project.
Decide how long you want your garland to be and cut the ribbon a few inches longer to allow for making a slip knot on each end for hanging.
I folded my ribbon in half and made a tiny mark on the center. I picked which sticker I wanted to be in the center of my garland. Then I put some glue on the mark.
Don’t remove the backing on the sticker. Just place it on the glue dot and hold it in place for a few seconds.
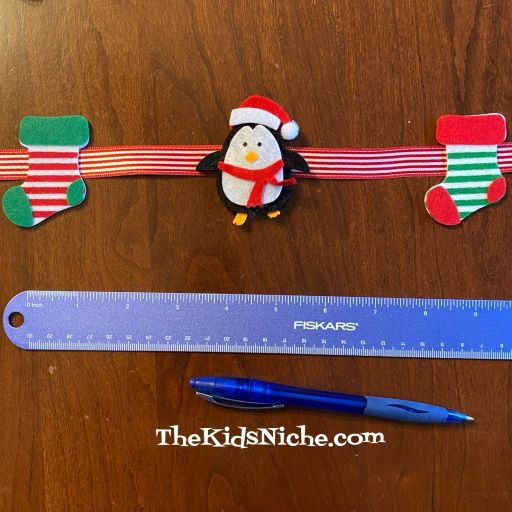
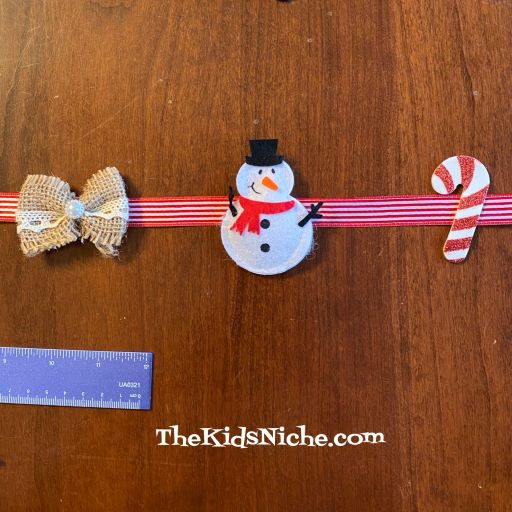
I used a ruler to measure from the center of the sticker to 4 inches in each direction. I made a small dot on the ribbon with a pen and that’s where I placed the next dot of glue from the glue gun.
I followed the same pattern on both sides of my center sticker.
Just keep marking the ribbon every 4″ and gluing on stickers until you run out of room on your ribbon.
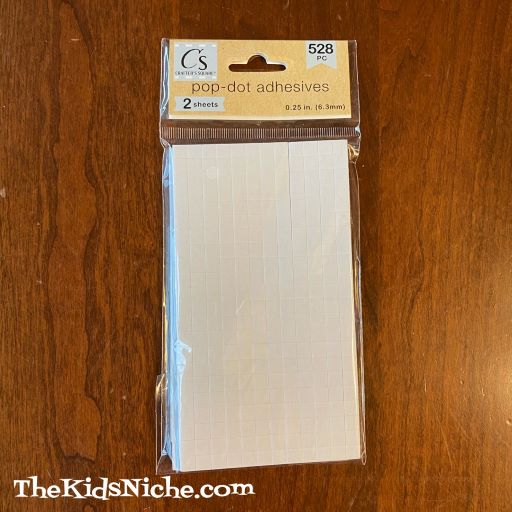
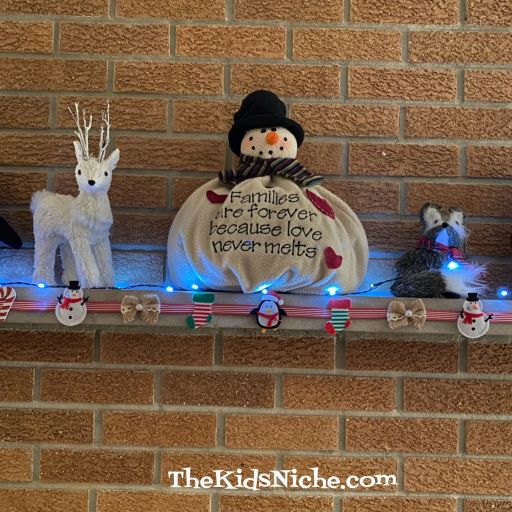
The weight of the puffy stickers made the stickers want to lean forward when I tried to hang the garland up. So I used some of these little dot adhesives to help hold my garland to our fireplace mantel. Depending on what type of stickers you use if you will need to do this step. (The pop-adhesive dots might not work well on painted walls so be careful where you use them.)
So here you are! I think my garland is cute and I’m sure yours will be too!
I hope you will have fun making a Christmas sticker garland for your home! 🙂
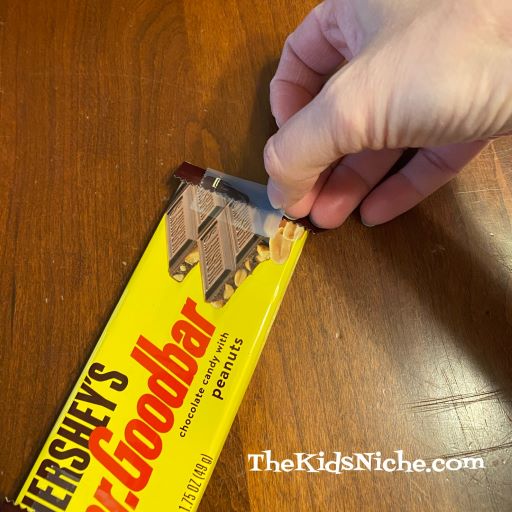
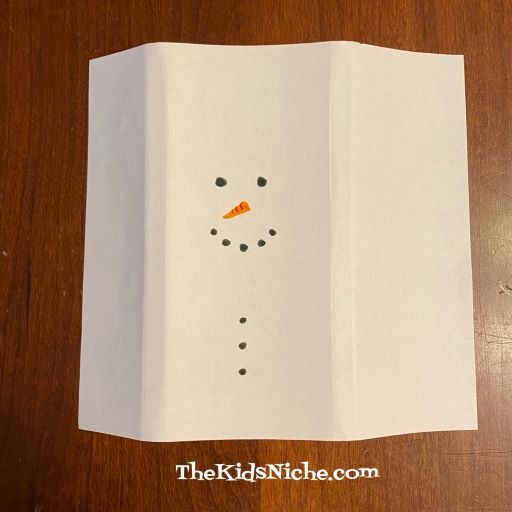
Hello again! Hope this finds you all doing well and having fun preparing for Christmas! Here’s a cute craft to add to your holiday fun! I’ll show you a basic way to make it, but then the sky is the limit on how you decide to decorate your candy bar snowman. 🙂 You’ll need a candy bar, some white paper, tape, scissors and some markers for a basic snowman. I’ll be showing you how to use some foil also, but it’s up to you if you use it or not.
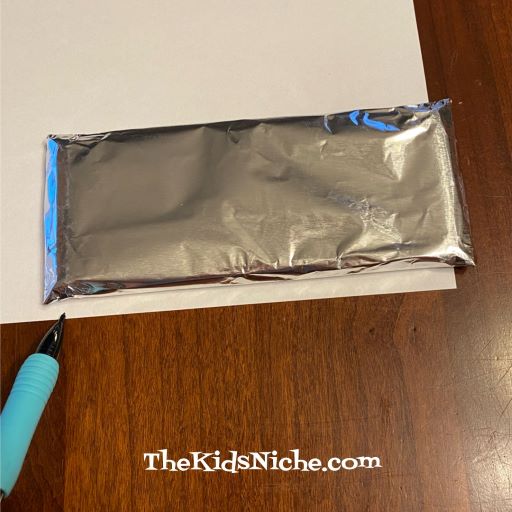
We’ll start by taping down the extra wrapper on the 2 ends of the candy bar.
As I mentioned already, I wrapped foil around the candy bar to make it look fancier, but if you don’t want to use foil on yours, you can skip ahead to the step using the white paper. To use the foil, tear off a piece a little bigger than the candy bar. This piece is bigger than I needed and I cut in down to a smaller size. You need enough foil to completely cover the candy bar.
Wrap the first side up and hold in place with a piece of tape.
Then wrap the second side up so it crosses over the first edge. I used double-sided tape to secure this side of foil.
Neatly fold the foil in on both ends of the candy bar.
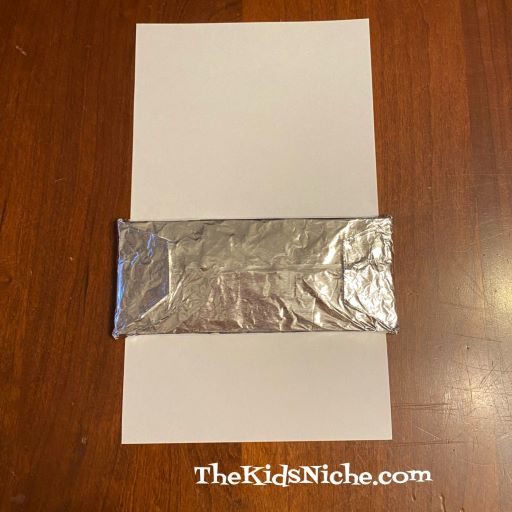
The size of the candy bar you are using will determine what size you cut the white paper into. If you used foil, you will want to cut the white paper so that the foil shows a little on both ends of the candy bar after you wrap the white paper around it. If you didn’t use the foil, you can make the white paper go all the way to both ends of the candy bar.
Also cut the length of the paper so it will wrap around the candy bar and cross over a little on the back side.
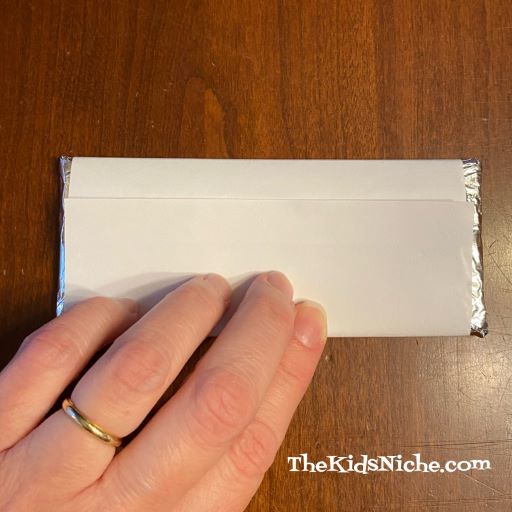
Wrap the paper around the candy bar, but don’t tape/glue it in place just yet. Run your fingers down the sides of the candy bar so you leave creases in the paper. Then remove the paper from the candy bar. It’s time to start drawing our snowman. 🙂
You need to draw your snowman in between the middle creases on your paper. This will be the front of the snowman. I added eyes, a nose, a mouth and buttons using markers. I suggest doing all of your drawing before putting the paper around the candy bar.
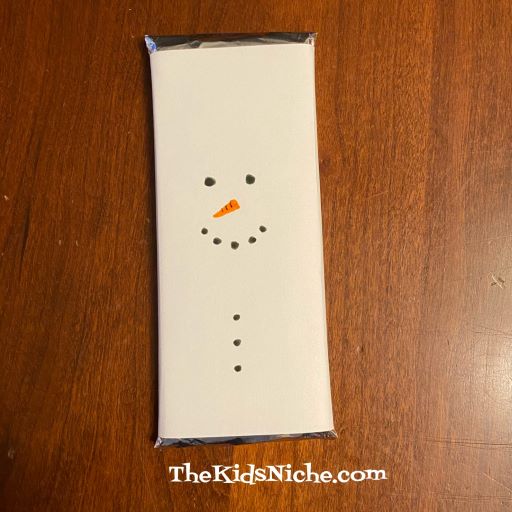
Wrap the paper around the candy bar and tape it together on the back.
You can draw on a hat and scarf or use bits of colored paper to make them.
Your candy bar snowman can be finished now and shared with that someone special! 🙂 Or here are a few more suggestions you might want to try. You can use a pair of the small stretchy gloves for a hat. And tie or glue on some ribbon for a scarf.
You can use wiggly eyes instead of just drawing eyes or use tiny pom poms. Maybe you’d like to add sequins, snowflakes or real buttons to your snowman. A piece of fleece can be made into a hat or scarf. Let your imagination go wild or just use things that you have on hand. There’s no right or wrong way to make your snowman. 🙂 And each one you make can be different.
I hope you can take this basic candy bar snowman idea and turn it into some special snowmen all your own! Have fun! 🙂
I found a couple of felt craft kits at the Dollar Tree store and wanted to share this idea with you. At just $1.00 for each kit, you can craft with up to 5 kids! Pretty good price, right?! So here’s the 2 kits I found:
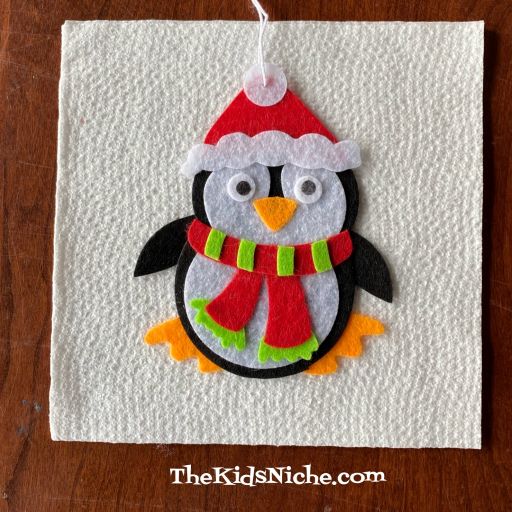
Let’s look at the penguin felt ornament kit first.
This little guy is so cute!
When you open the package, you will find 5 individually packaged kits.
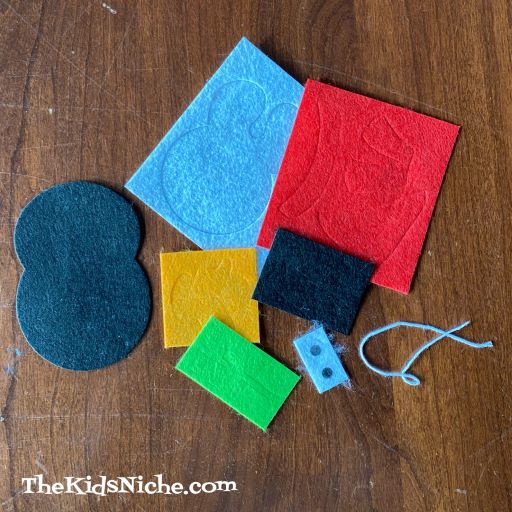
In each individual package, you will find this:
The felt pieces for making the penguin have been punched and for the most part you can gently pull them apart to get the pieces ready to use. Have a pair of small scissors handy in case any pieces need a little help getting free.
Once all the pieces are separated, you are ready to put your penguin together. I would recommend using a craft glue like Tacky Glue instead of Elmer’s glue. I used the Elmer’s glue when making my penguin and I had some trouble getting the pieces to stay together. I switched to the Tacky Glue.
There weren’t any instructions included in the package, but you can figure out how to put the penguin together by looking at the picture on the front of the package. (Remember, this kit only cost $1.) 😉 And here is my finished penguin! I think he’s a cutie!
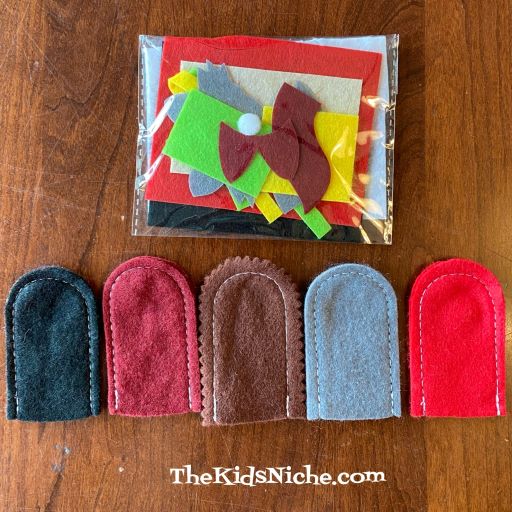
Now let’s look at the second kit I bought. This kit is for making animal finger puppets.
They are cute too!
I had more difficulty getting these felt pieces separated and I did resort to using a pair of scissors at times. Also this package did not have the kits divided into separate kits already, so you will have to figure out which felt pieces go with each finger puppet. It’s rather like making a puzzle. 😉
Here they are separated into the pieces for each animal. I didn’t go ahead and make the puppets because I wanted to save them for a fun project for some kids I know. 😉
These kits might be a little too difficult for really young children but I’m sure ages 7 or 8 and up will enjoy making them. I’m not sure if the felt pieces will stick together well enough to be used as finger puppets, but they would definitely make some very cute ornaments to hang around your house. 🙂 Mark these down as 2 more fun projects from Dollar Tree! 🙂
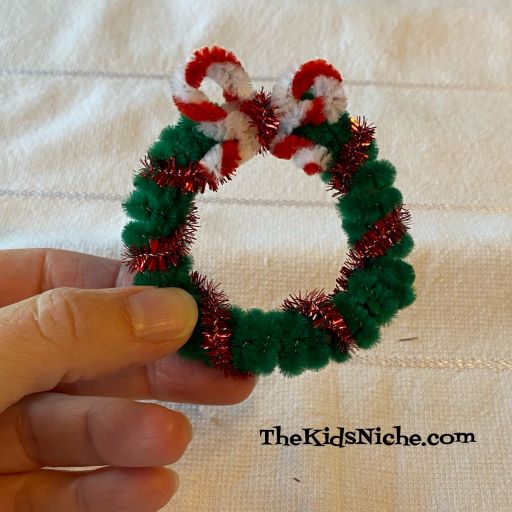
As the title of this post tells you, today I want to show you how to make a fun Christmas Wreath using only pipe cleaners (or chenille stems). Aren’t they cute?
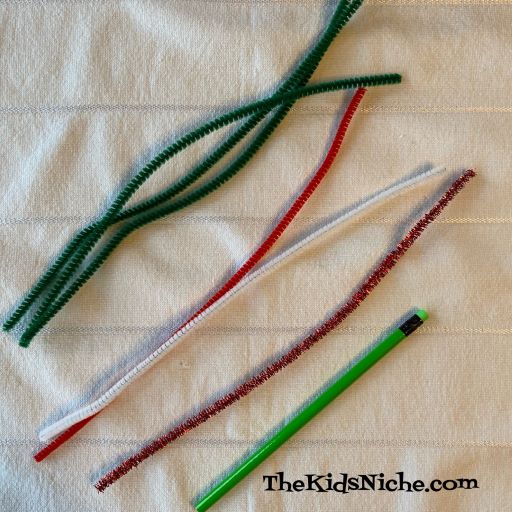
All you need are pipe cleaners in a few colors…3 green, 1 white, 1 red and 1 sparkly and 1 pen or pencil for wrapping some of the pipe cleaners.
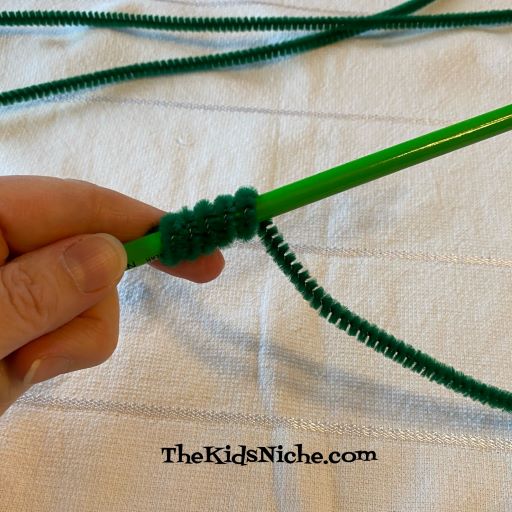
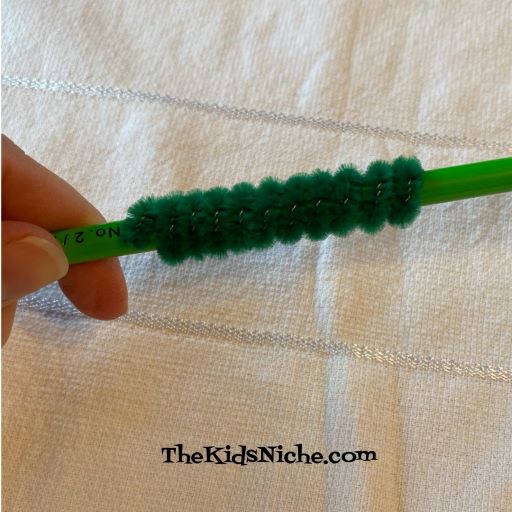
Begin by wrapping 1 green pipe cleaner around the pen or pencil. Make sure both ends are wrapped around the pencil so it’s all uniform.
Continue wrapping until you’ve used the entire pipe cleaner.
Slide the wrapped pipe cleaner off the pencil.
Wrap the other 2 green pipe cleaners in the same way.
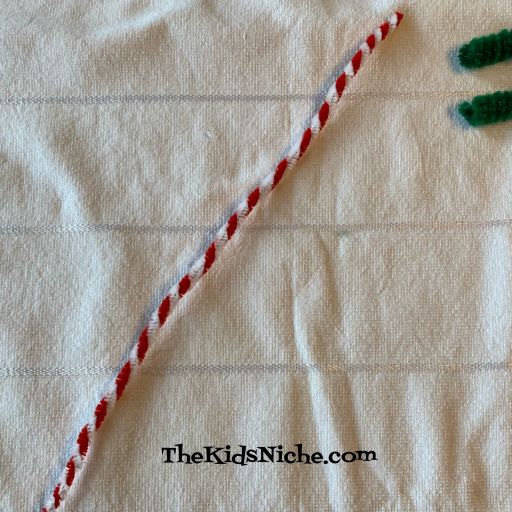
Next, take the red pipe cleaner and the white pipe cleaner and while holding one end of each together, begin twisting them.
Continue twisting to the other ends of the pipe cleaners. It will look like the stripes on a candy cane. 🙂
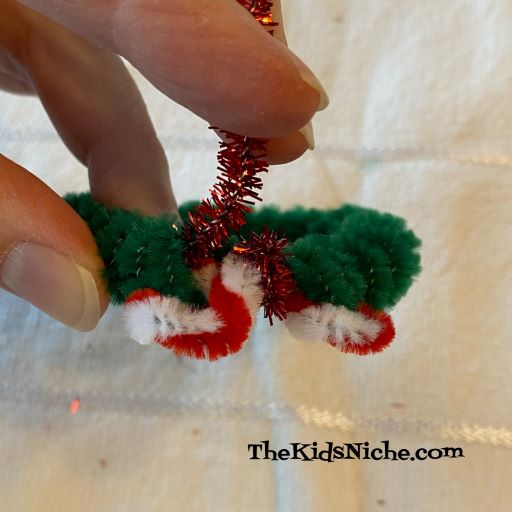
Take the red and white twisted pipe cleaner and slide a green spiral onto it.
Slide the other 2 green spirals onto the red and white pipe cleaner too.
You will now bend the red and white pipe cleaner into a circle and the green part will begin to look like a little wreath.
Give the red and white ends a twist to hold your wreath in a circle.
Now to make the red and white bow. You will not actually tie a normal bow. Just bend a loop off to the left side and let the tail cross to the opposite side.
Take the other tail and bend a loop on the right side, letting the tail cross over to the left.
Now you’ll need to wrap a piece of pipe cleaner around the center of the bow to hold it in place. If you have a scrap piece of pipe cleaner in a matching color you can use that. Or use the end of your sparkly pipe cleaner.
Take the ends to the back side, twist them together and clip the ends short.
Your wreath could be finished now or you can use the sparkly pipe cleaner to fancy it up a bit.
Stick one end of the sparkly pipe cleaner into the back of the wreath spiral end by the back of the bow.
And then wrap the sparkly pipe cleaner around your wreath in wide wraps, leaving spaces so there is some sparkle all around the wreath.
Once you have used up the sparkly pipe cleaner, tuck the end into the green part of the wreath so it isn’t seen. And you have finished your first pretty little wreath! 🙂
You can experiment with other colors like blue and white to make more pretty wreaths. I hope you’ll enjoy this latest Christmas craft project! 🙂