Greetings once again! I hope everyone had an awesome Thanksgiving weekend! 🙂
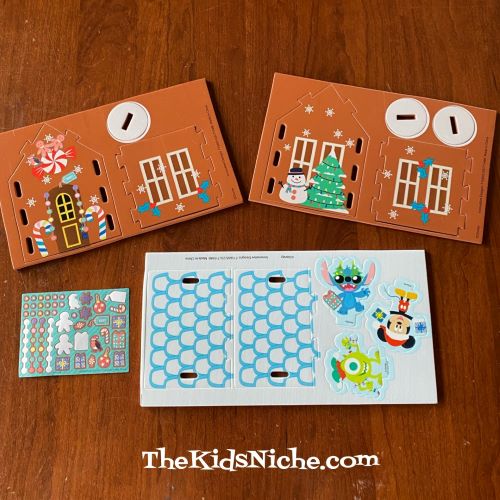
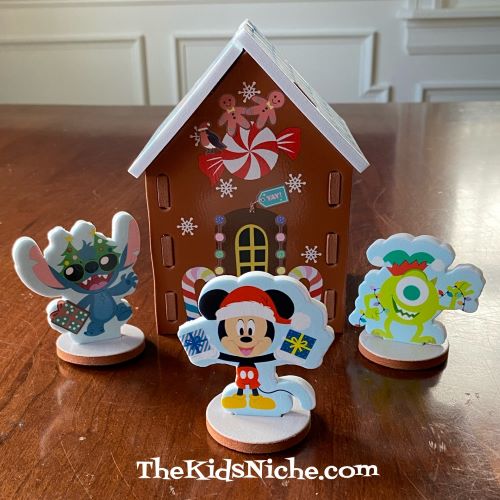
Do you find it hard to make edible gingerbread houses, but you think gingerbread houses are just so cute? (Am I the only one?! I can’t tell you how many gingerbread houses have ended in failure at our house!) How would you like to make a simple gingerbread house out of foam pieces that’s easy enough for the kids to make mostly on their own? While it’s not edible, it’s very cute and totally mess free! 😉 I found this adorable kit at our Target store for $3.00.
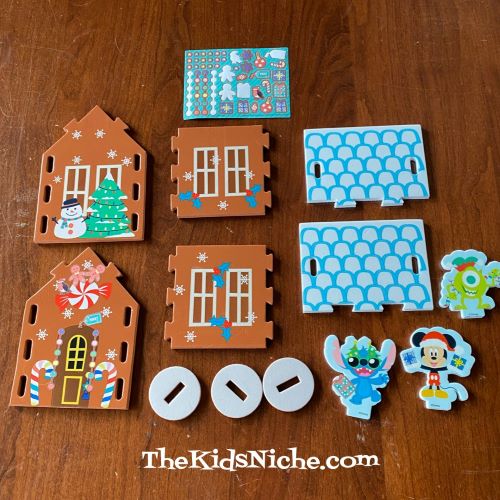
The foam sheets are already cut and some designs have been printed on the foam shapes.
The pre-printed shapes punch out very easily.
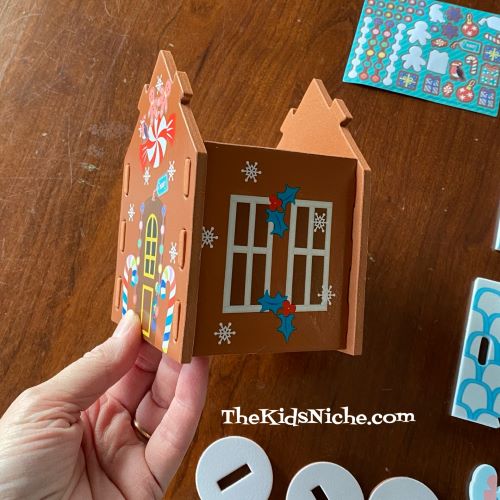
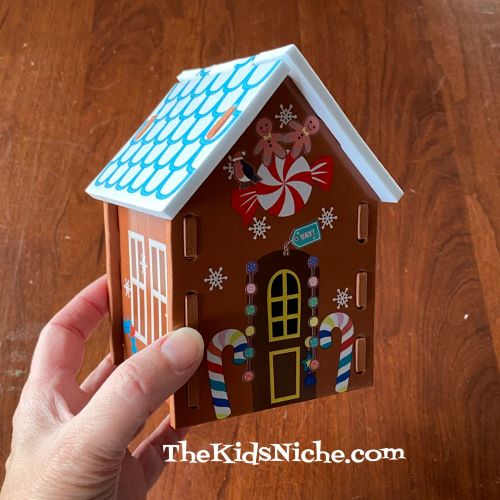
There are some instructions provided in the box, but our 10 year-old granddaughter didn’t even look at them. 😉 It goes together quite nicely. First she did the house part…
…and then added the roof pieces.
The Disney characters have stands so they will stay upright on their own. Stickers are included and you can decorate your gingerbread house as much or as little as you like.
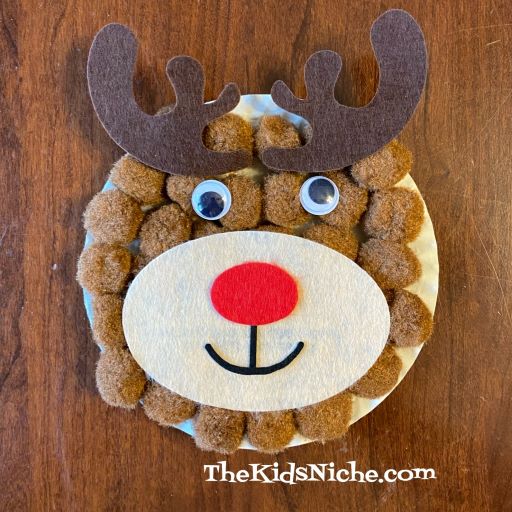
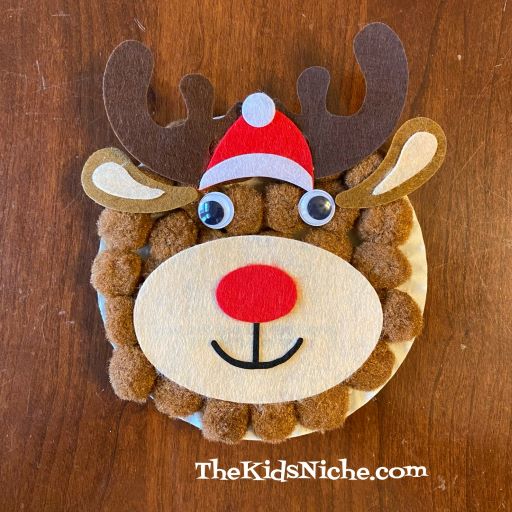
I found this cute Reindeer craft kit at a Dollar Tree store close to us. While I have to admit that this wasn’t one of my favorite crafts that I’ve gotten there, by using lots of glue and not being a perfectionist, it will turn out pretty cute. 😉
Here’s a look at what’s inside the kit:
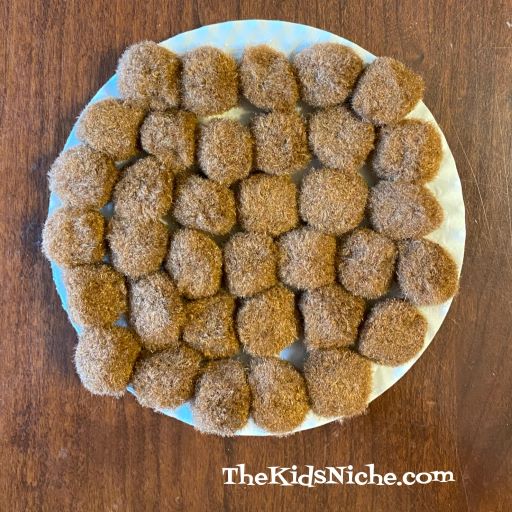
I started by spreading glue all over the paper plate. Use plenty of glue. (The plate didn’t want to lay flat so if you’d rather make your own circle out of paper, that would work great.)
Stick the brown pom poms all over the plate. I felt like there weren’t quite enough pom poms to cover the entire plate, but in the end it still looks good. I suggest leaving the empty space at the top where it will be covered up by the antlers and hat.
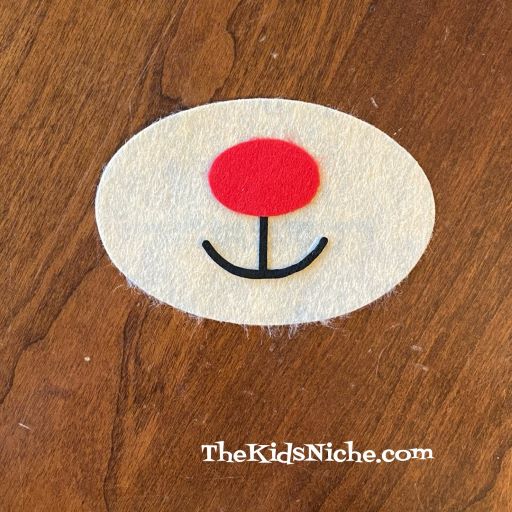
Glue the pieces together to make the face, mouth and nose.
Glue this piece…using plenty of glue…on top of the pom poms. Glue on the 2 eyes. I suggest putting the eyes right on top of a pom pom instead of in the gap between pom poms. That way the eyes will stick on better.
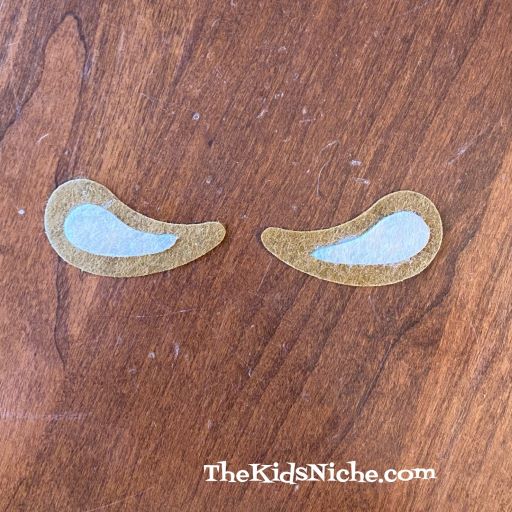
Each ear has 2 pieces, so glue them together next.
I glued the antlers on next…using lots of glue, but only on the bottom part of the antlers. The top part of the antlers won’t be touching anything.
The Santa hat is 3 pieces that you can glue together next.
Now it’s time to glue on the hat and the ears.
Yep, your reindeer will be cute! But I would let it sit for a while to completely dry before moving it around much or trying to hang it up. After my kit was completely dry, it stayed together fine, but it tended to fall apart while the glue was still wet.
I guess this must be Rudolph since he has a red nose! 😉
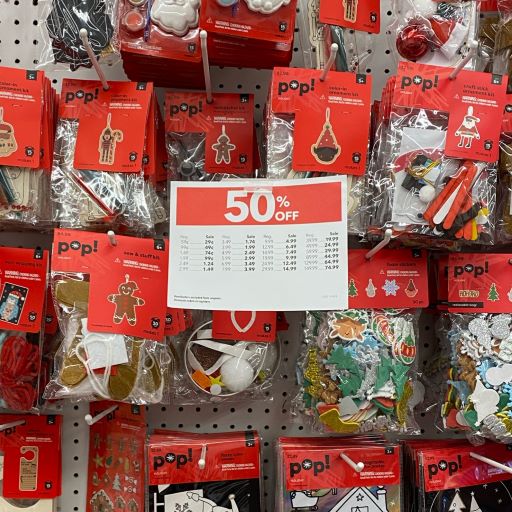
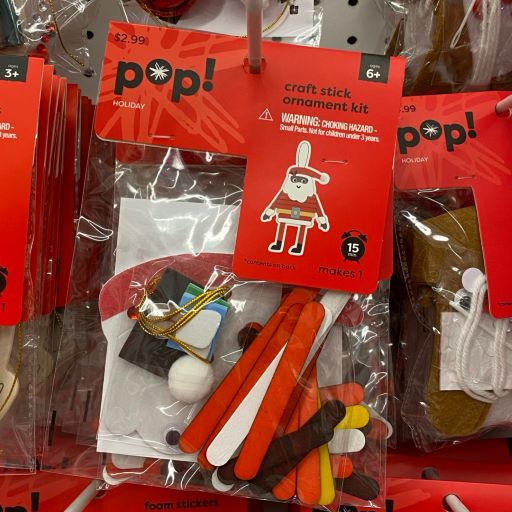
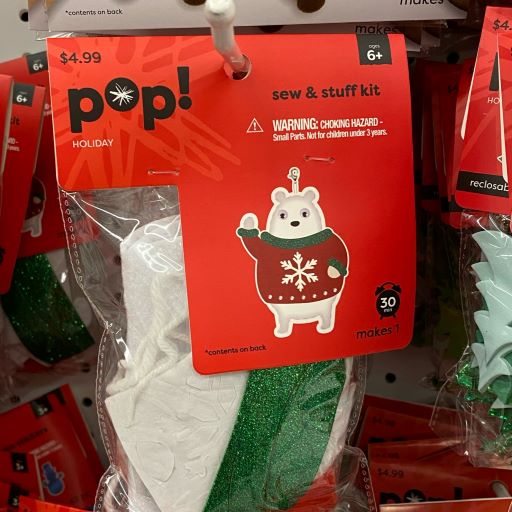
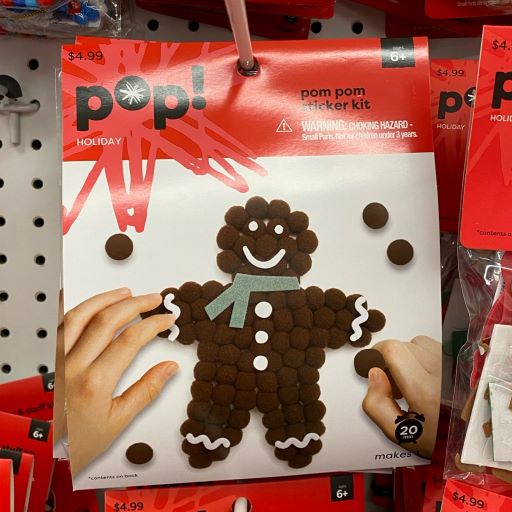
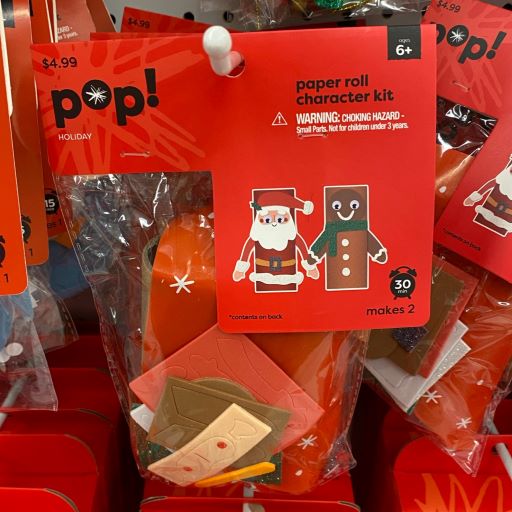
Are you looking for some fun crafts for the kids to do for Christmas time? Joann Fabric stores have a bunch of great looking kits the kids are sure to have a blast with. AND they are 50% off right now!
I took some pictures so you can see just some of the kits that are available. Check your local store or online to see if they carry the ones you’d like to get.
That’s only a few of the kits they have! As they say, hurry in for best selection! 😉
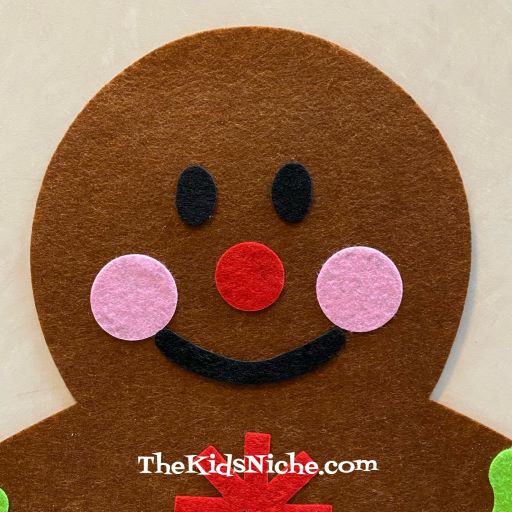
I went on another trip to a Dollar Tree store to check out what might be new for some Christmas/Winter fun. I found this felt gingerbread man kit that I thought was cute and is simple enough for even the little kids to do with a little help with gluing.
I know you can’t tell from the picture, but this guy is big! He measures about 15″ tall by about 11″ wide. 🙂 Since I bought him at a Dollar Tree store, he only cost $1.25 plus tax. Pretty cheap fun, right? All you need besides the kit is some glue. Be sure to save the small picture of the finished gingerbread man to use as your guide in putting him together.
One tip before you get started…you might like to make a pattern for each felt piece before you glue them together and then you can make as many gingerbread men as you would like to make. 😉
Here’s what is inside: felt shapes for the gingerbread man, eyes, nose, mouth, cheeks, snowflakes and rickrack.
The eyes and mouth punch out from the black piece of felt.
And the light green piece of felt punches out into 4 pieces of rickrack.
Please note that there is a wrong and a right side to the gingerbread man. One side has printing on it so that will, of course, be the back side.
Grab your glue and let’s put this guy together! 🙂 I started by gluing on his eyes, nose and mouth.
Add his cheeks and snowflake buttons down the front.
Glue the 4 pieces of rickrack on his arms and legs and your gingerbread man is finished! 🙂 Note: the rickrack pieces didn’t quite reach from side to side on his arms and legs but it looks cute anyway.
You can add a magnet or a piece of string to the back of your gingerbread man if you would like to be able to hang him up. Check your nearest Dollar Tree store for this simple and cute gingerbread man felt kit! Have fun! 🙂
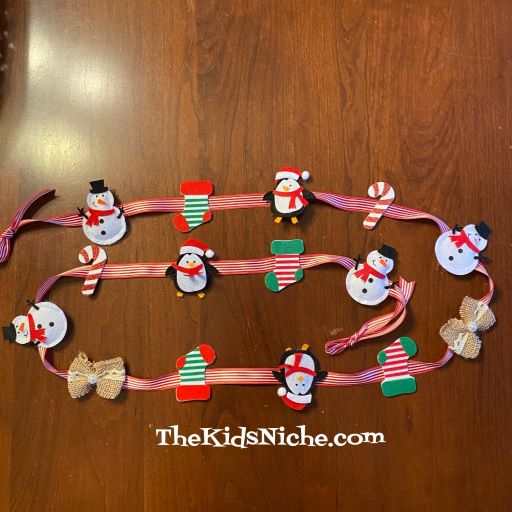
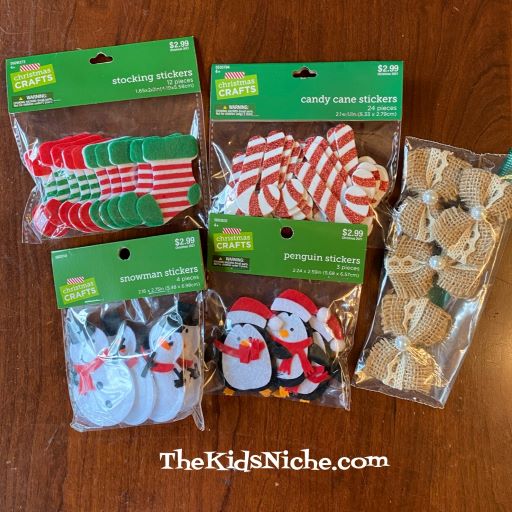
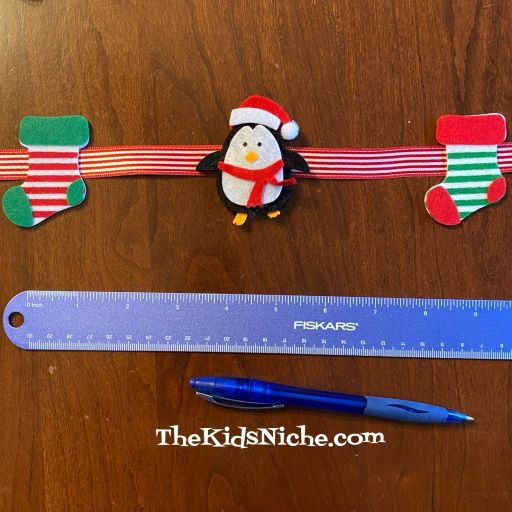
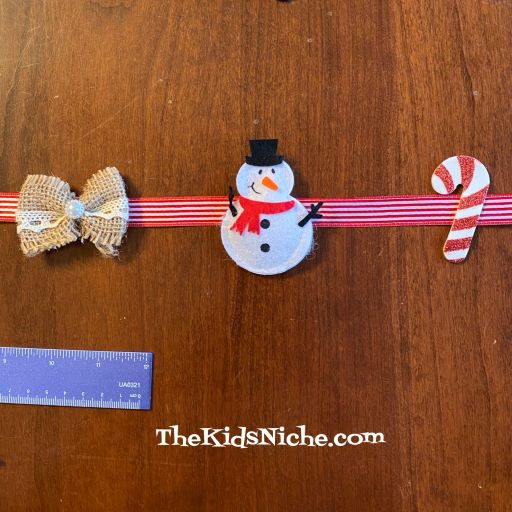
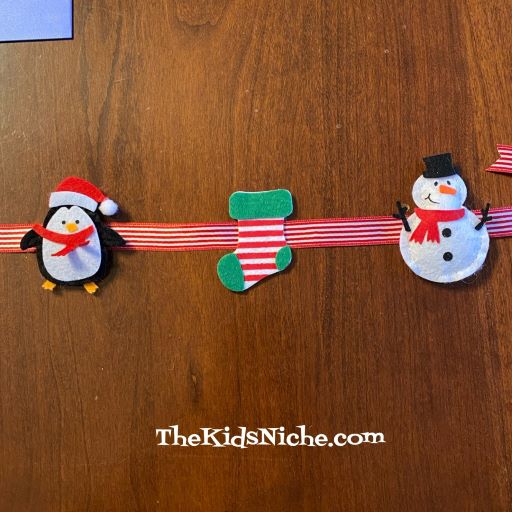
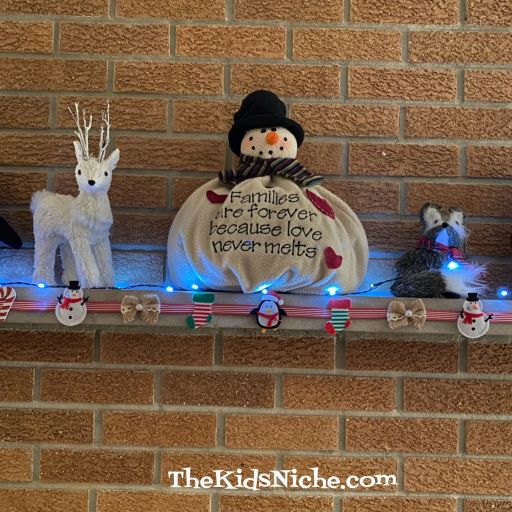
Today I want to share with you a Christmas garland that I made using puffy stickers. It’s simple to make but does require using a hot glue gun. Regular school glue might work but I wasn’t sure it would hold the weight of the stickers so I used a glue gun.
You’ll need some ribbon in the color/design of your choice and some puffy stickers. You could use regular stickers too, but leave the backing on them for this project. Begin by picking your ribbon.
Get your stickers out and ready. I found these at Hobby Lobby for 50% off. Except for the burlap bows…those are some I had leftover from another project.
Decide how long you want your garland to be and cut the ribbon a few inches longer to allow for making a slip knot on each end for hanging.
I folded my ribbon in half and made a tiny mark on the center. I picked which sticker I wanted to be in the center of my garland. Then I put some glue on the mark.
Don’t remove the backing on the sticker. Just place it on the glue dot and hold it in place for a few seconds.
I used a ruler to measure from the center of the sticker to 4 inches in each direction. I made a small dot on the ribbon with a pen and that’s where I placed the next dot of glue from the glue gun.
I followed the same pattern on both sides of my center sticker.
Just keep marking the ribbon every 4″ and gluing on stickers until you run out of room on your ribbon.
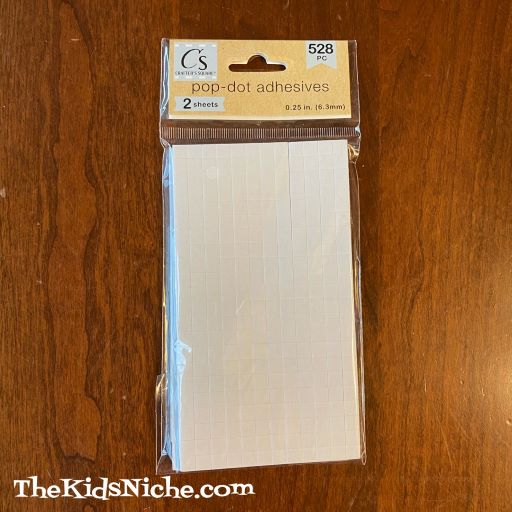
The weight of the puffy stickers made the stickers want to lean forward when I tried to hang the garland up. So I used some of these little dot adhesives to help hold my garland to our fireplace mantel. Depending on what type of stickers you use if you will need to do this step. (The pop-adhesive dots might not work well on painted walls so be careful where you use them.)
So here you are! I think my garland is cute and I’m sure yours will be too!
I hope you will have fun making a Christmas sticker garland for your home! 🙂
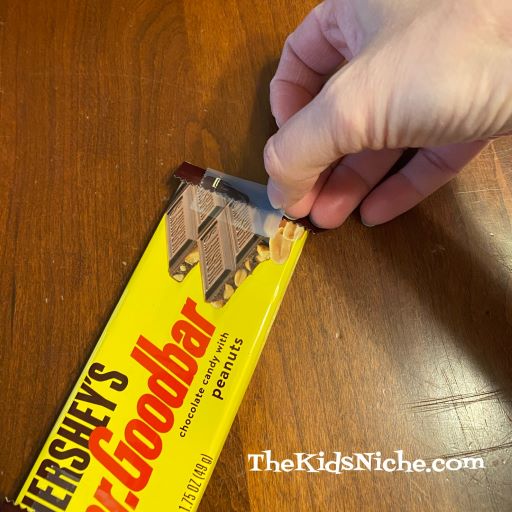
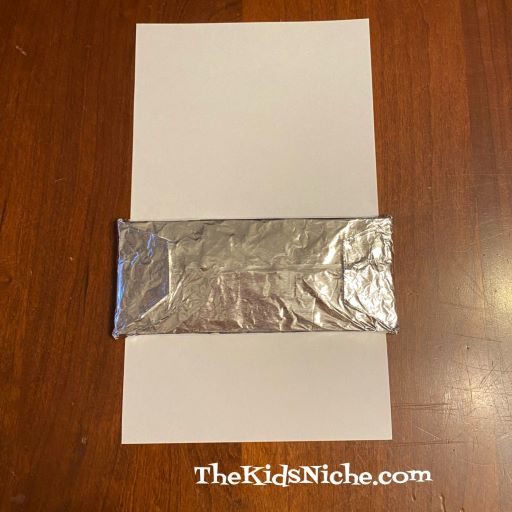
Hello again! Hope this finds you all doing well and having fun preparing for Christmas! Here’s a cute craft to add to your holiday fun! I’ll show you a basic way to make it, but then the sky is the limit on how you decide to decorate your candy bar snowman. 🙂 You’ll need a candy bar, some white paper, tape, scissors and some markers for a basic snowman. I’ll be showing you how to use some foil also, but it’s up to you if you use it or not.
We’ll start by taping down the extra wrapper on the 2 ends of the candy bar.
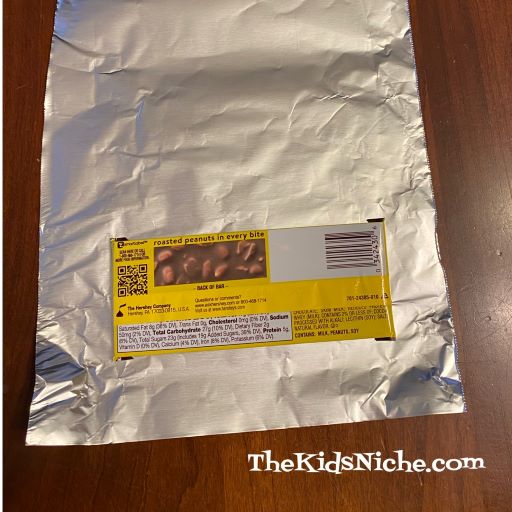
As I mentioned already, I wrapped foil around the candy bar to make it look fancier, but if you don’t want to use foil on yours, you can skip ahead to the step using the white paper. To use the foil, tear off a piece a little bigger than the candy bar. This piece is bigger than I needed and I cut in down to a smaller size. You need enough foil to completely cover the candy bar.
Wrap the first side up and hold in place with a piece of tape.
Then wrap the second side up so it crosses over the first edge. I used double-sided tape to secure this side of foil.
Neatly fold the foil in on both ends of the candy bar.
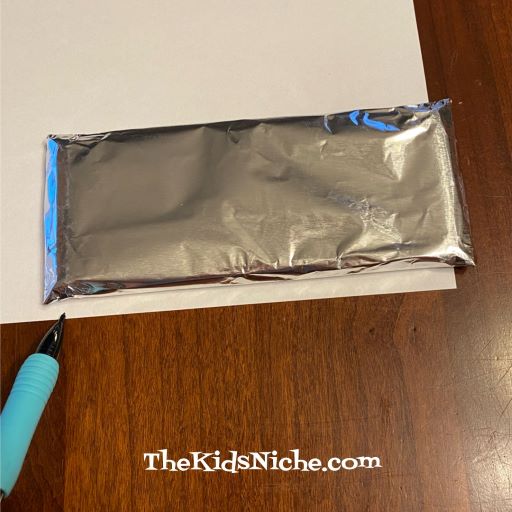
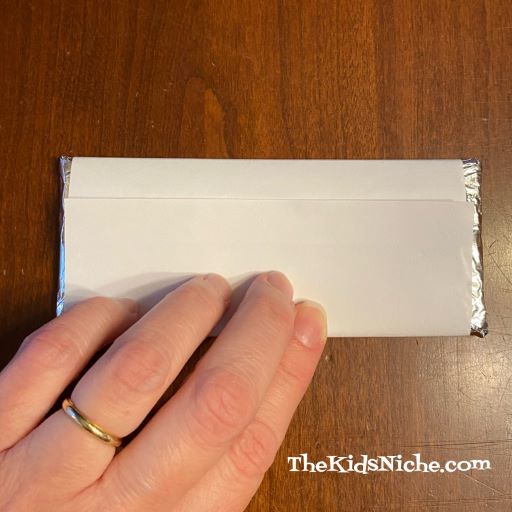
The size of the candy bar you are using will determine what size you cut the white paper into. If you used foil, you will want to cut the white paper so that the foil shows a little on both ends of the candy bar after you wrap the white paper around it. If you didn’t use the foil, you can make the white paper go all the way to both ends of the candy bar.
Also cut the length of the paper so it will wrap around the candy bar and cross over a little on the back side.
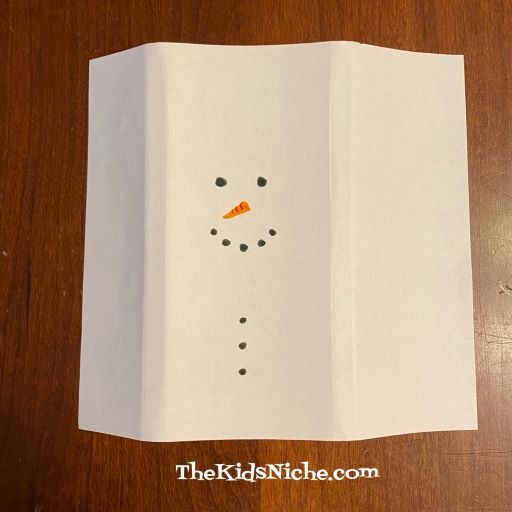
Wrap the paper around the candy bar, but don’t tape/glue it in place just yet. Run your fingers down the sides of the candy bar so you leave creases in the paper. Then remove the paper from the candy bar. It’s time to start drawing our snowman. 🙂
You need to draw your snowman in between the middle creases on your paper. This will be the front of the snowman. I added eyes, a nose, a mouth and buttons using markers. I suggest doing all of your drawing before putting the paper around the candy bar.
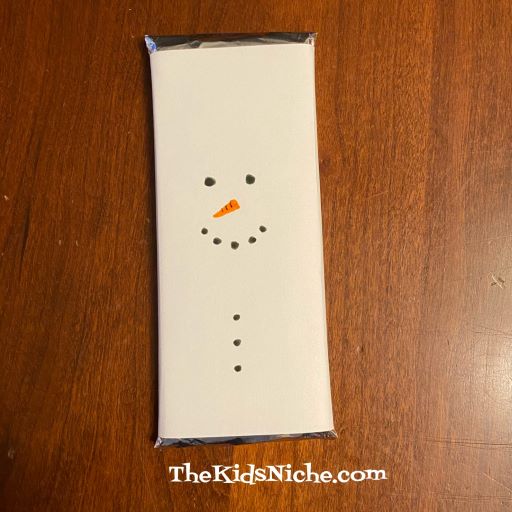
Wrap the paper around the candy bar and tape it together on the back.
You can draw on a hat and scarf or use bits of colored paper to make them.
Your candy bar snowman can be finished now and shared with that someone special! 🙂 Or here are a few more suggestions you might want to try. You can use a pair of the small stretchy gloves for a hat. And tie or glue on some ribbon for a scarf.
You can use wiggly eyes instead of just drawing eyes or use tiny pom poms. Maybe you’d like to add sequins, snowflakes or real buttons to your snowman. A piece of fleece can be made into a hat or scarf. Let your imagination go wild or just use things that you have on hand. There’s no right or wrong way to make your snowman. 🙂 And each one you make can be different.
I hope you can take this basic candy bar snowman idea and turn it into some special snowmen all your own! Have fun! 🙂
I found a couple of felt craft kits at the Dollar Tree store and wanted to share this idea with you. At just $1.00 for each kit, you can craft with up to 5 kids! Pretty good price, right?! So here’s the 2 kits I found:
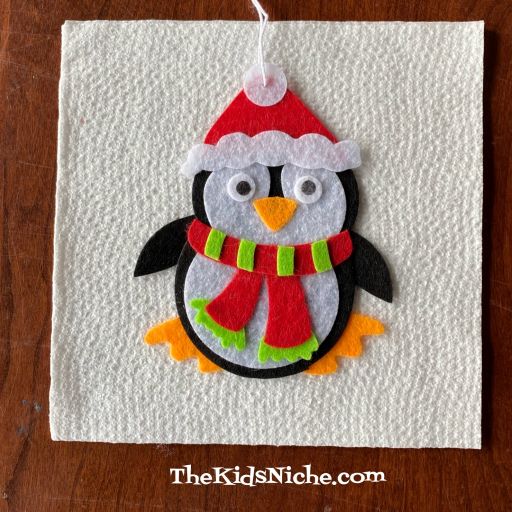
Let’s look at the penguin felt ornament kit first.
This little guy is so cute!
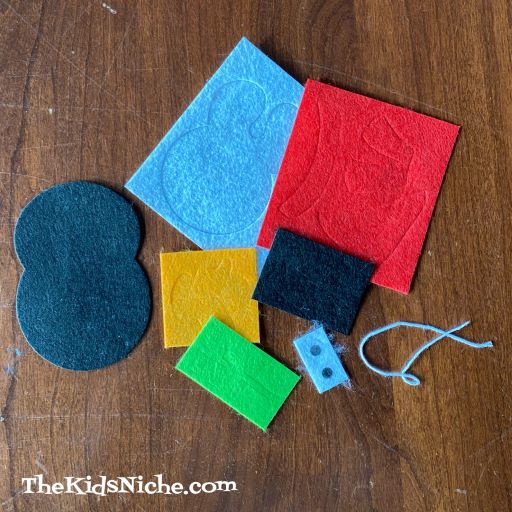
When you open the package, you will find 5 individually packaged kits.
In each individual package, you will find this:
The felt pieces for making the penguin have been punched and for the most part you can gently pull them apart to get the pieces ready to use. Have a pair of small scissors handy in case any pieces need a little help getting free.
Once all the pieces are separated, you are ready to put your penguin together. I would recommend using a craft glue like Tacky Glue instead of Elmer’s glue. I used the Elmer’s glue when making my penguin and I had some trouble getting the pieces to stay together. I switched to the Tacky Glue.
There weren’t any instructions included in the package, but you can figure out how to put the penguin together by looking at the picture on the front of the package. (Remember, this kit only cost $1.) 😉 And here is my finished penguin! I think he’s a cutie!
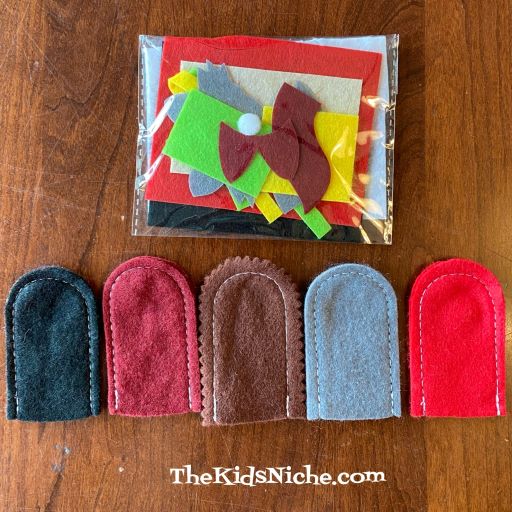
Now let’s look at the second kit I bought. This kit is for making animal finger puppets.
They are cute too!
I had more difficulty getting these felt pieces separated and I did resort to using a pair of scissors at times. Also this package did not have the kits divided into separate kits already, so you will have to figure out which felt pieces go with each finger puppet. It’s rather like making a puzzle. 😉
Here they are separated into the pieces for each animal. I didn’t go ahead and make the puppets because I wanted to save them for a fun project for some kids I know. 😉
These kits might be a little too difficult for really young children but I’m sure ages 7 or 8 and up will enjoy making them. I’m not sure if the felt pieces will stick together well enough to be used as finger puppets, but they would definitely make some very cute ornaments to hang around your house. 🙂 Mark these down as 2 more fun projects from Dollar Tree! 🙂
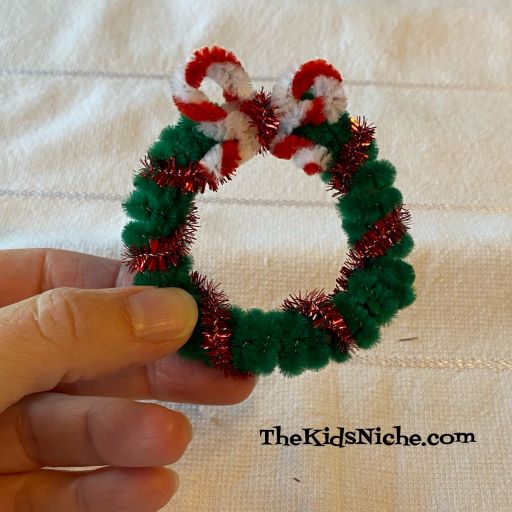
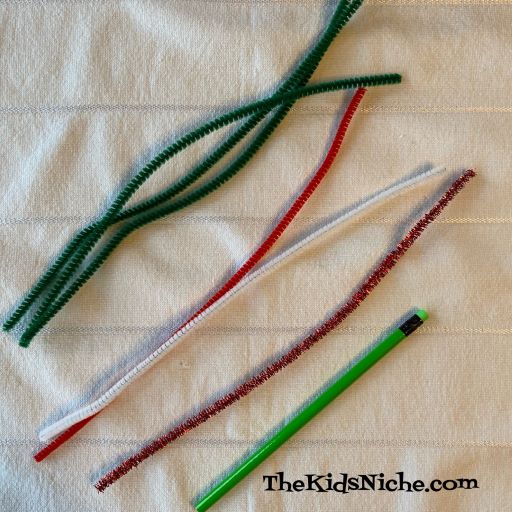
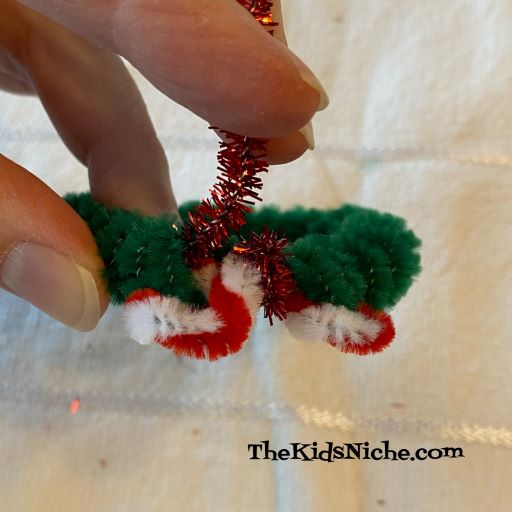
As the title of this post tells you, today I want to show you how to make a fun Christmas Wreath using only pipe cleaners (or chenille stems). Aren’t they cute?
All you need are pipe cleaners in a few colors…3 green, 1 white, 1 red and 1 sparkly and 1 pen or pencil for wrapping some of the pipe cleaners.
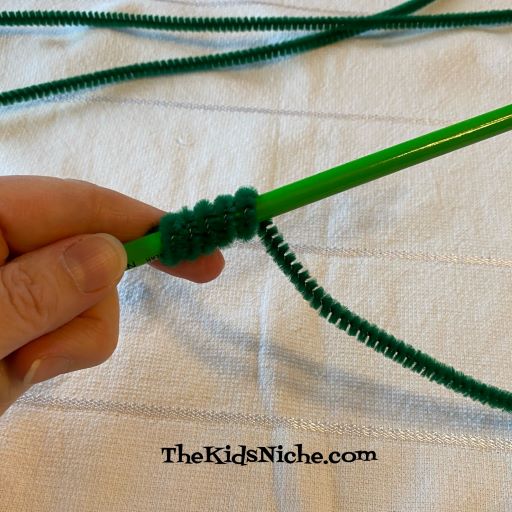
Begin by wrapping 1 green pipe cleaner around the pen or pencil. Make sure both ends are wrapped around the pencil so it’s all uniform.
Continue wrapping until you’ve used the entire pipe cleaner.
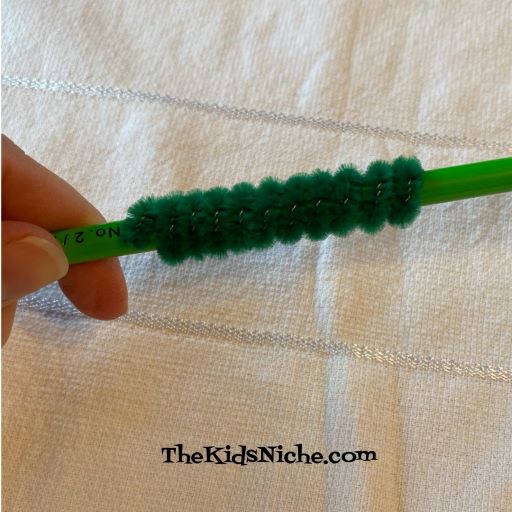
Slide the wrapped pipe cleaner off the pencil.
Wrap the other 2 green pipe cleaners in the same way.
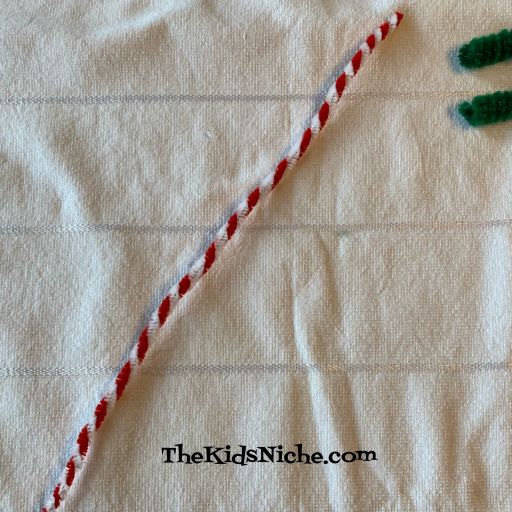
Next, take the red pipe cleaner and the white pipe cleaner and while holding one end of each together, begin twisting them.
Continue twisting to the other ends of the pipe cleaners. It will look like the stripes on a candy cane. 🙂
Take the red and white twisted pipe cleaner and slide a green spiral onto it.
Slide the other 2 green spirals onto the red and white pipe cleaner too.
You will now bend the red and white pipe cleaner into a circle and the green part will begin to look like a little wreath.
Give the red and white ends a twist to hold your wreath in a circle.
Now to make the red and white bow. You will not actually tie a normal bow. Just bend a loop off to the left side and let the tail cross to the opposite side.
Take the other tail and bend a loop on the right side, letting the tail cross over to the left.
Now you’ll need to wrap a piece of pipe cleaner around the center of the bow to hold it in place. If you have a scrap piece of pipe cleaner in a matching color you can use that. Or use the end of your sparkly pipe cleaner.
Take the ends to the back side, twist them together and clip the ends short.
Your wreath could be finished now or you can use the sparkly pipe cleaner to fancy it up a bit.
Stick one end of the sparkly pipe cleaner into the back of the wreath spiral end by the back of the bow.
And then wrap the sparkly pipe cleaner around your wreath in wide wraps, leaving spaces so there is some sparkle all around the wreath.
Once you have used up the sparkly pipe cleaner, tuck the end into the green part of the wreath so it isn’t seen. And you have finished your first pretty little wreath! 🙂
You can experiment with other colors like blue and white to make more pretty wreaths. I hope you’ll enjoy this latest Christmas craft project! 🙂
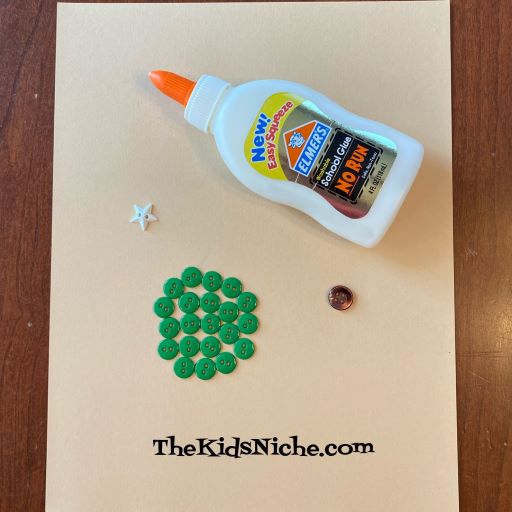
Hi there! Today we’re making another Christmas craft using buttons. Yep, it will be a Christmas tree! What’s nice about this project is that there is an easy version for younger kids, but also a more challenging version for older kids or even adults. 🙂 You will need some green buttons, 1 brown button, 1 star button (or sticker or cutout), a piece of cardstock and glue.
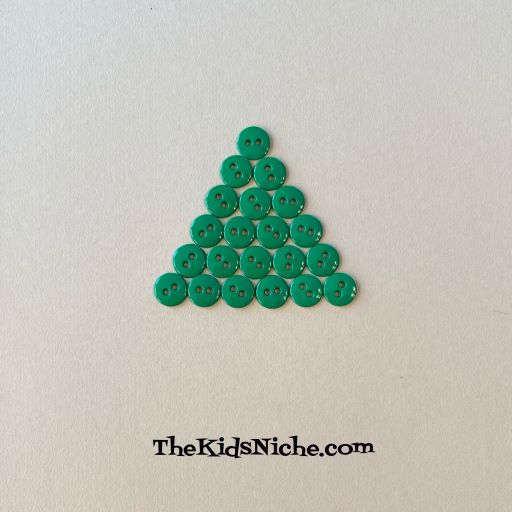
Start making your Christmas tree by laying 1 green button in the first row, then 2 green buttons in the second row, and 3 green buttons in the third row. Look at the following picture to see how to place the buttons. You can glue the buttons down as you go or get them all in place and then go back and glue them.
Continue in this manner, adding 1 more green button for each new row until you have laid out 6 rows of buttons.
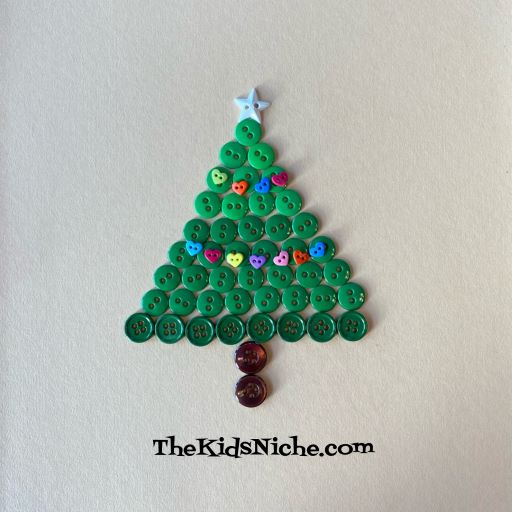
Add the brown button at the bottom in the center for the trunk of the tree. And put the star above the top button.
And there is your Christmas tree! 🙂 How cute is that?!
Next, I’ll show you version #2, which is still a simple version, but uses different colors and only 5 rows of buttons. This time you’ll need 6 red buttons, 9 green buttons, 1 brown button and 1 star.
Row #1 is 1 green button. Row #2 is 2 red buttons. Row #3 is 3 green buttons. Row #4 is 4 red buttons. And finally row #5 is 5 green buttons. Add the star to the top and the brown button for the trunk at the bottom. And this tree is done! 🙂
For the last (harder) version for today, make the tree part with all green buttons and add in as many rows as you’d like to make the tree larger. The tree shown here has 9 rows of green buttons. I used slightly different shades of green for my Christmas tree. I used 2 brown buttons for the trunk of this larger tree.
If you would like to decorate your tree, make sure all the tree buttons are glued in place and have had a chance to dry before continuing. I had some tiny heart shaped buttons that I used to make it look like 2 strings of lights on my tree.
Or you can place your decorations randomly around the tree for this effect.
You could also use bits of pretty yarn or thin ribbon to decorate your tree. So whatever skill level your kids are at, I hope they can have fun making their own Christmas tree! 🙂