Learning the alphabet with 26 letters can be a bit daunting for some kids. Finding ways to make it fun can help to ease the stress or anxiety they might be feeling. Here are 2 quick ways to make it seem more like a game or a craft and help you sneak in some learning when they aren’t looking! 😉
The first way is to use some magnetic letters. I found this batch at Walmart. Your kids can play with the letters on the side of your refrigerator or try using a metal cookie sheet. The cookie sheet keeps the letter all in one easy place and means it can be taken to a chair or comfy spot for playing.
The second idea is to use some beads with letters printed on them. These come in several shapes, sizes and colors. With some string, your kids can make a bracelet while putting the letters on the string in order. Wearing the bracelet can make it fun to sing the alphabet song while moving each letter bead as that letter is sung.
Or make a slip knot in each end of the string after the letter beads have been strung and now the letters can be hung up. 🙂 Hope these 2 quick and easy ideas will bring some fun to your house while learning letters. 😊
I found this oh, so adorable little teddy bear while I was looking through Pinterest. I had to see if I could make him look as cute as the instructions showed him and I think my second try turned out pretty well. 🙂 I didn’t have ribbon that was really thin enough so my bow might look a little bit big for him, but he’s still adorable.
This would be a fun project for kids that are a little older, say maybe starting around 8-10 years old. You only need 1 pipe cleaner per bear plus a little bow and 3 seed beads and some glue. The bears are pretty little which adds to their “cuteness factor”. They fit in the palm of your hand.
Here is a link to the Pinterest page with a video that shows you how to make the teddy bears.
Or here is another one that has written instructions and pictures in case you want to see things a little slower than the video. 😉
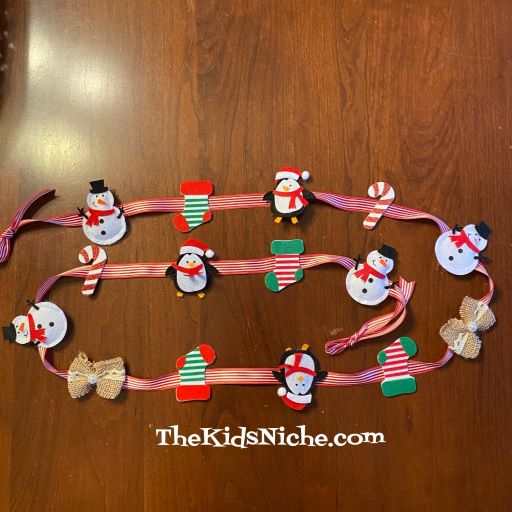
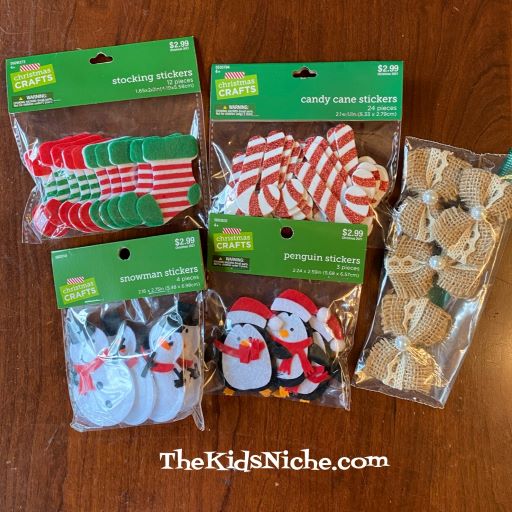
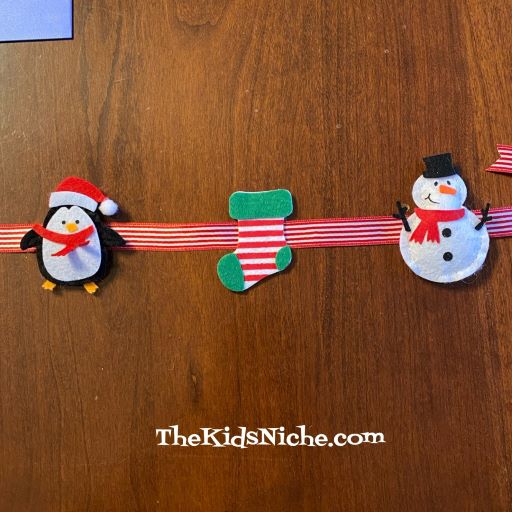
Today I want to share with you a Christmas garland that I made using puffy stickers. It’s simple to make but does require using a hot glue gun. Regular school glue might work but I wasn’t sure it would hold the weight of the stickers so I used a glue gun.
You’ll need some ribbon in the color/design of your choice and some puffy stickers. You could use regular stickers too, but leave the backing on them for this project. Begin by picking your ribbon.
Get your stickers out and ready. I found these at Hobby Lobby for 50% off. Except for the burlap bows…those are some I had leftover from another project.
Decide how long you want your garland to be and cut the ribbon a few inches longer to allow for making a slip knot on each end for hanging.
I folded my ribbon in half and made a tiny mark on the center. I picked which sticker I wanted to be in the center of my garland. Then I put some glue on the mark.
Don’t remove the backing on the sticker. Just place it on the glue dot and hold it in place for a few seconds.
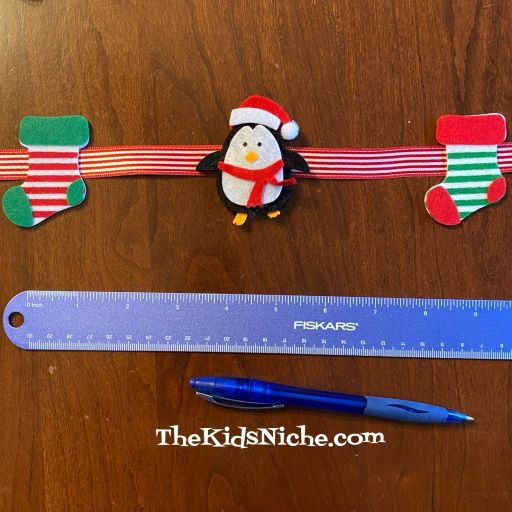
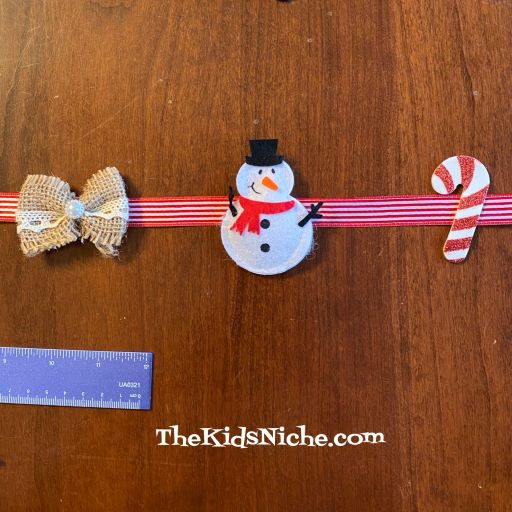
I used a ruler to measure from the center of the sticker to 4 inches in each direction. I made a small dot on the ribbon with a pen and that’s where I placed the next dot of glue from the glue gun.
I followed the same pattern on both sides of my center sticker.
Just keep marking the ribbon every 4″ and gluing on stickers until you run out of room on your ribbon.
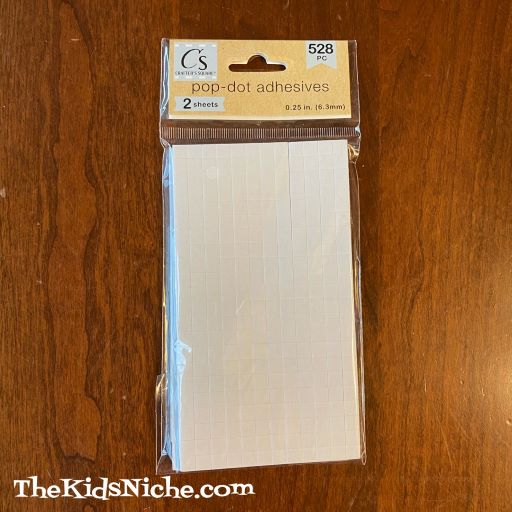
The weight of the puffy stickers made the stickers want to lean forward when I tried to hang the garland up. So I used some of these little dot adhesives to help hold my garland to our fireplace mantel. Depending on what type of stickers you use if you will need to do this step. (The pop-adhesive dots might not work well on painted walls so be careful where you use them.)
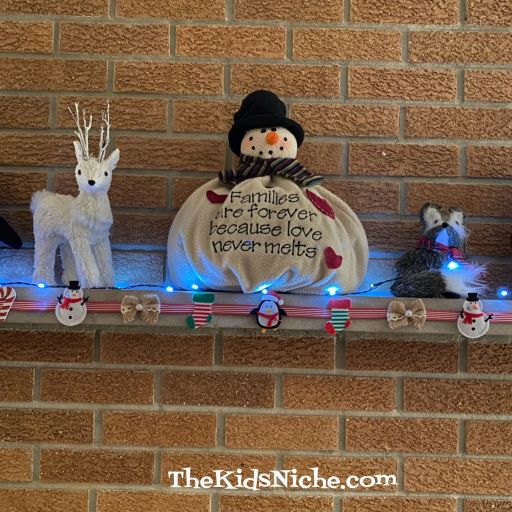
So here you are! I think my garland is cute and I’m sure yours will be too!
I hope you will have fun making a Christmas sticker garland for your home! 🙂
Thanksgiving is just a week away! It’s time to make a fun Thanksgiving Turkey!
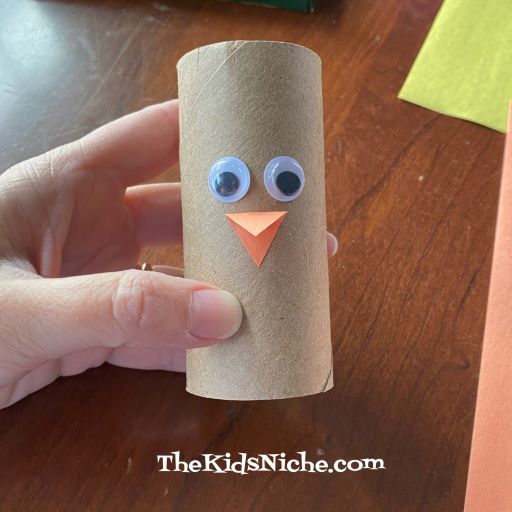
You’ll need an empty toilet paper roll, some different colored paper, pencil, glue and/or tape, scissors, a piece of thin cardboard or cardstock, 2 wiggly eyes and you might want some markers.
If you would like to color your turkey’s body (the toilet paper roll) with the markers, go ahead and do that first. I decided since the toilet paper roll was already brown, I would use it as is. Glue the wiggly eyes onto the turkey’s body.
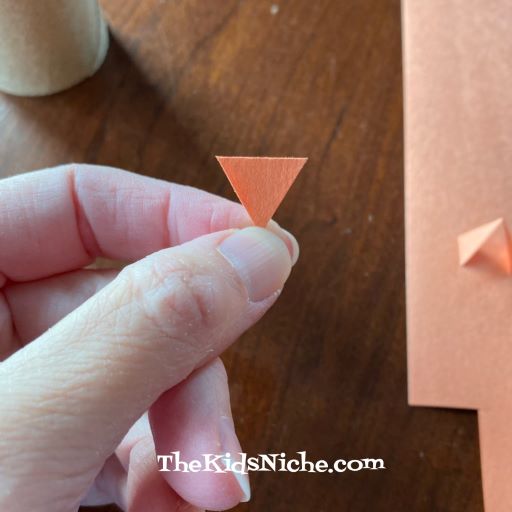
Let’s make the turkey’s beak next. Cut out a small rectangle from either orange or yellow paper.
Fold the rectangle in half, bringing the 2 shorter sides together.
Keeping the folded side up, cut from approximately the middle of the bottom side up to the right hand corner.
Make the same type of cut up to the upper left hand side, forming a folded triangle.
Still keeping the folded edge at the top, glue the bottom side of the triangle onto the turkey below his eyes.
Cut another small rectangle from red paper to make the turkey’s wattle. No need to be perfect, just cut something similar to the one in the following picture.
And glue it on the turkey beside his beak.
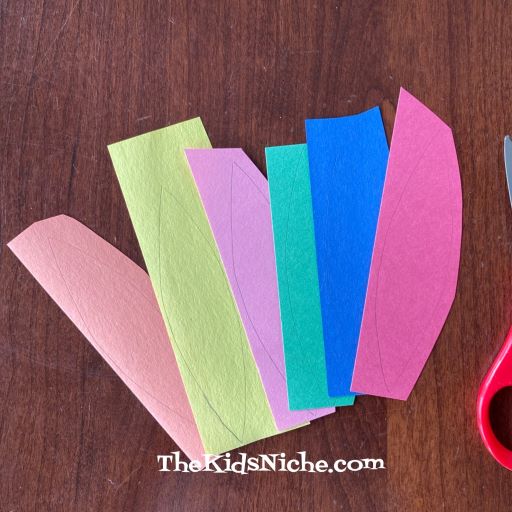
It’s time to make some feathers. Using the thin cardboard or cardstock, draw a simple feather shape to use as the pattern for making feathers for the turkey’s tail. (It doesn’t need to be perfect. The feathers will overlap each other and hide any flaws.) 😉
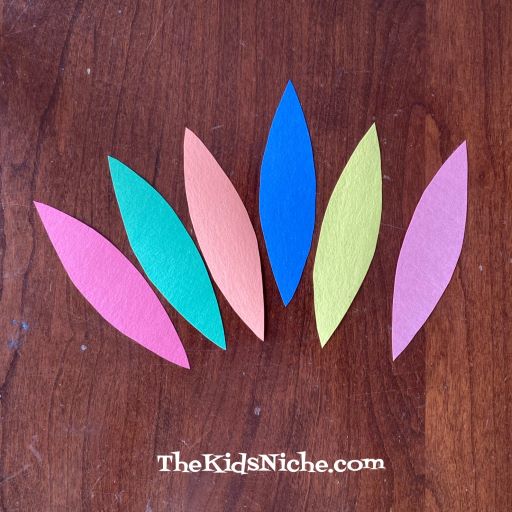
Trace around the feather pattern on several different colors of paper. I used 6 different colors but if you don’t have that many colors, make more than one of the colors you have so you end up with 6 feathers.
Cut the feathers out. This is great practice for kids in using their small motor skills.
Glue the feathers to the back side of the turkey, but put glue only on the bottom part of the feathers. Only put glue on the part that will be up against the turkey’s body or where it lays on another feather.
And your Thanksgiving turkey is finished and ready to be part of your home’s decorations for the holiday! What’s nice about this turkey is that nobody will be eating him! 😉
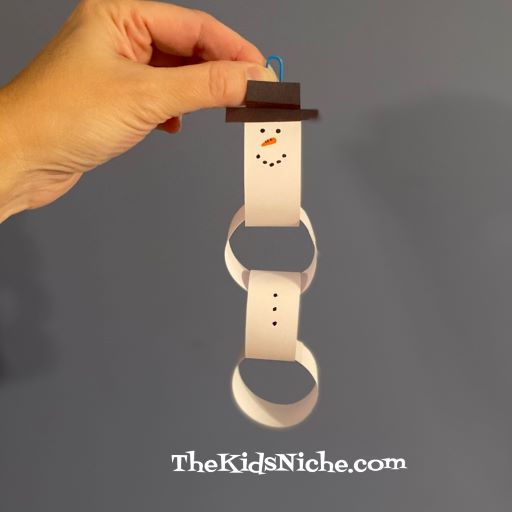
Are you ready for a snowman craft? It’s just about a week till Thanksgiving Day and we’ve had some snow here already so I think we’re good to go! This guy is so cute and so simple that you and the kids are going to love making him. And maybe want to make more than one! 😉 Check him out!
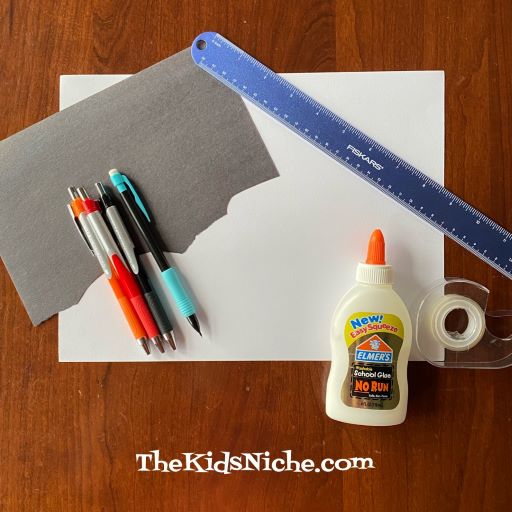
All you need to get started is some white paper, a small scrap of black paper, a pencil, a ruler, scissors, glue or double sided tape and some colored pens or makers.
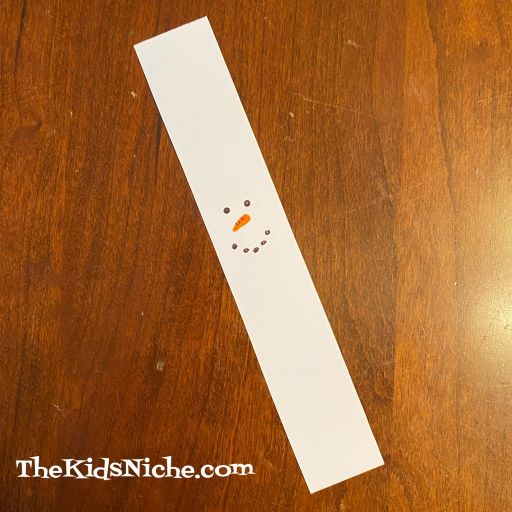
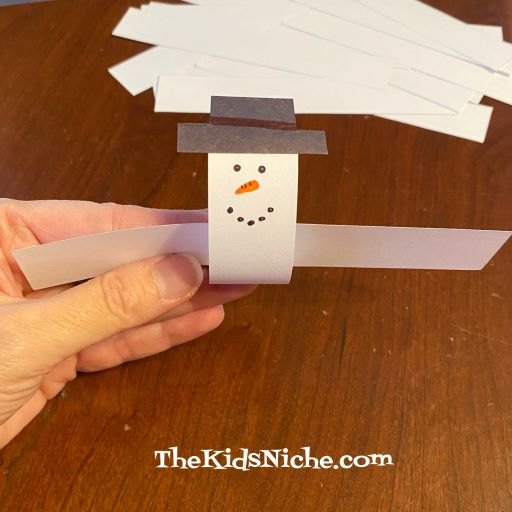
Begin by cutting the white paper into strips approximately 1″ by 6″.
Take 1 strip of white paper and draw a snowman’s face in about the middle of the strip of paper.
Using either your glue or the double sided tape, attach the 2 ends of the paper strip together to form a circle.
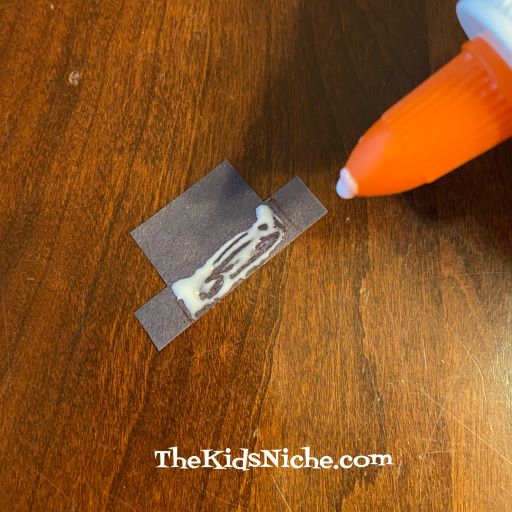
Now cut a hat out of the scrap of black paper, making it as wide as the snowman’s head.
Glue only the small area shown in the following picture so that the snowman’s hat will stand up.
Place the hat on the snowman and hold it in place for a few seconds while the glue starts to set up.
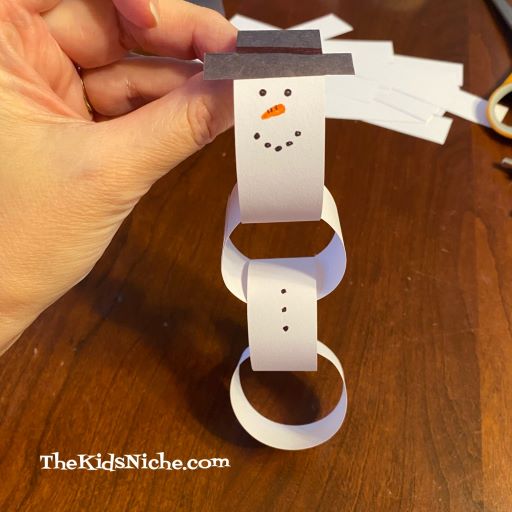
Now you will add a few other strips of the white paper to make a chain. To do this, slide one strip through the snowman’s head, as shown in the next picture.
Using either tape or glue, again fasten the ends together in a circle. Continue adding strips of white paper until your snowman is as long as you’d like him to be.
I made my snowman 4 chains long but he can be as long as you like! 😉 I drew some buttons on his “belly”.
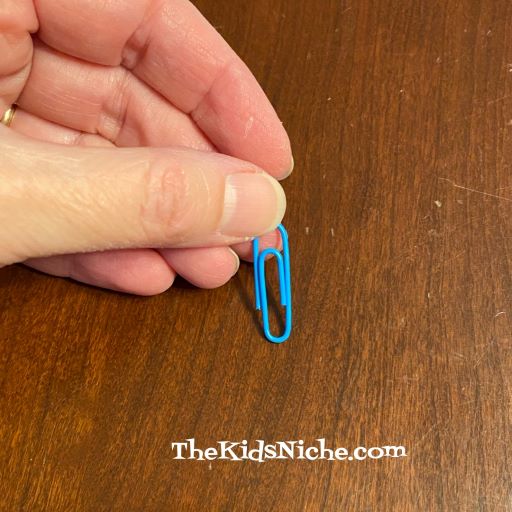
If you would like to be able to hang your paper chain snowman up, perhaps on your Christmas tree, you’ll need a piece of string or a paper clip. If you use string, just fold the string in half and tape the ends to the back of the snowman’s head. I’ll show you how to use the paper clip.
Open the paper clip up.
Using regular scotch tape, tape it to the back of the snowman’s head.
And you’re done! Now you have a cute snowman to use to decorate your house for winter! Have fun making paper chain snowmen! 🙂
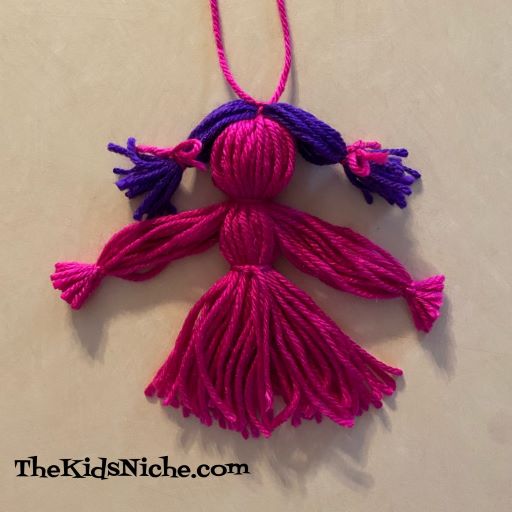
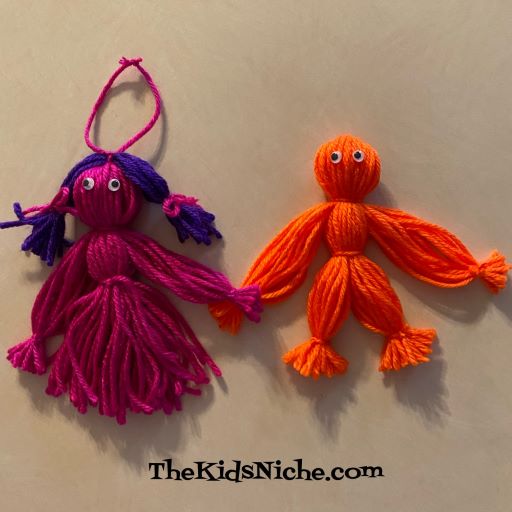
The other day I was thinking about the yarn dolls that we used to make. I can’t quite remember who taught me to make them but I think it might have been a family thing that was passed down to me.
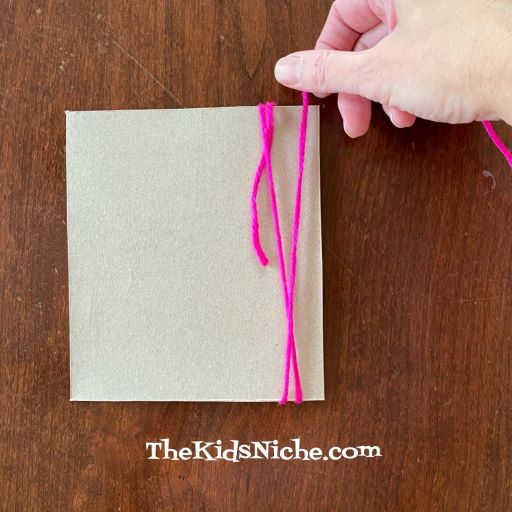
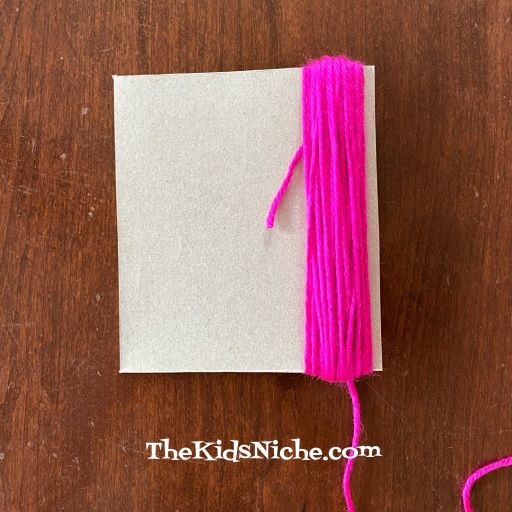
At any rate, making yarn dolls can be fun and all you need is yarn, a piece of cardboard and a pair of scissors.
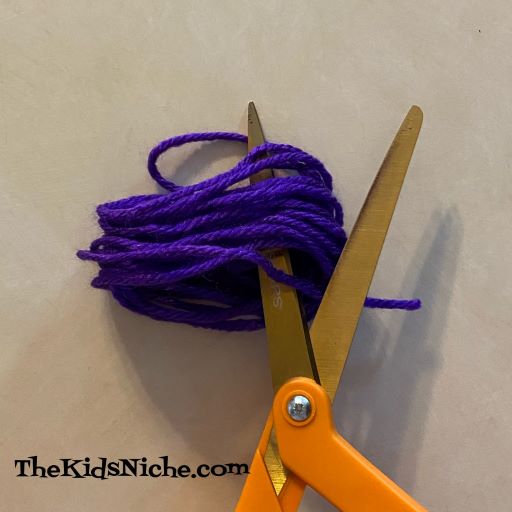
The size of your yarn doll will be determined by the size of your piece of cardboard. My cardboard piece was about 6″ long. Begin by wrapping the yarn around the piece of cardboard.
Wrap it around at least 50 times. Then cut the yarn.
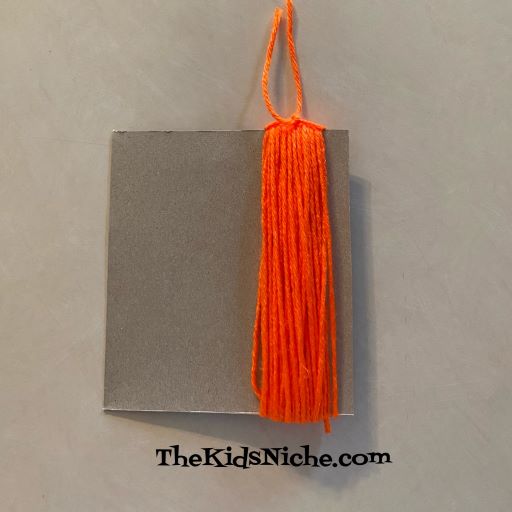
There is a step that I forgot to do while I was making the pink doll, so I will be showing that step with the orange yarn I used for a second doll. While the yarn is still on the cardboard, cut another piece of yarn about 5-6″ long and slide it under the yarn on the cardboard. (I added the yarn to the pink doll but at a later time which made it harder to do. Ooops!)
Pull it up toward the top and tie a knot. This piece of yarn will help keep the doll’s head in a nice shape and can be used to add hair or to hang the doll.
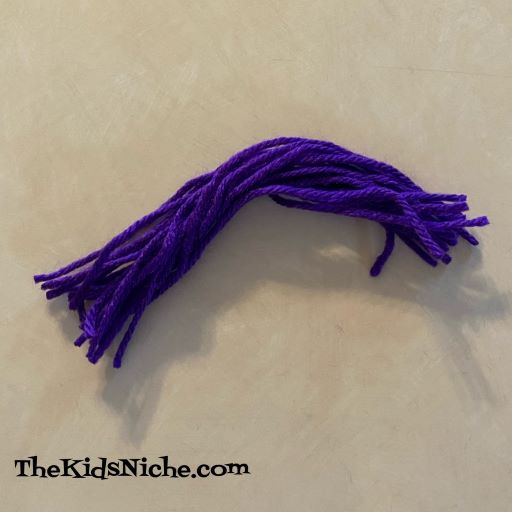
Slide the yarn off the cardboard.
Back to the pink doll! Ha! Using your scissors, cut the yarn on the opposite end from where it’s tied.
Keep the yarn bent in half.
Cut another piece of yarn to be used to make the dolls head and lay it out on your work surface. Lay the folded yarn on top of it.
Tie a knot with the additional piece of yarn and that makes the head.
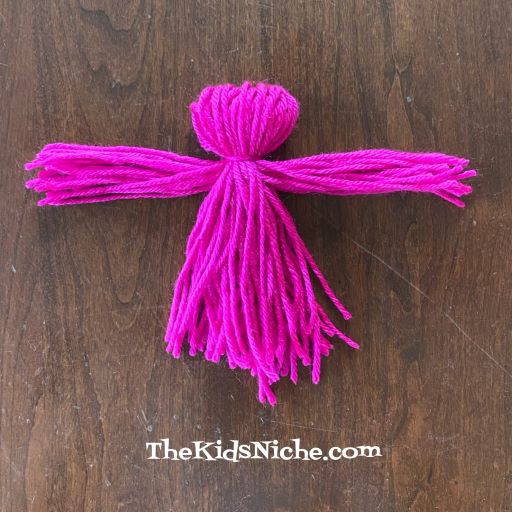
Separate a section on each side of the body. I did approximately 15-18 pieces of yarn in each side section.
Using a small piece of yarn, tie the 2 side sections close to the ends. Trim and there are your doll’s arms. 🙂
Cut another piece of yarn and lay under your doll, just a little past the arms. Tie a knot. This will make the doll’s waist.
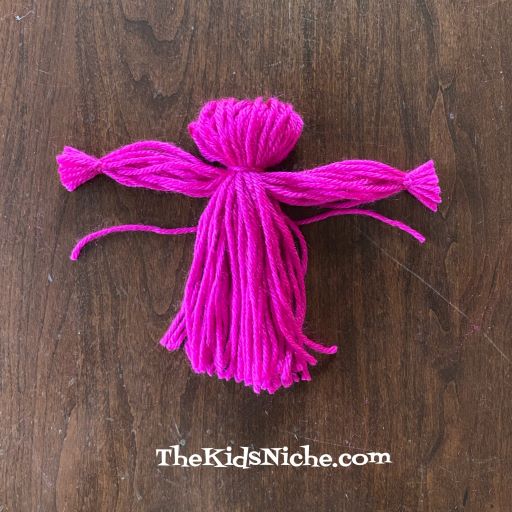
I made this doll to be a girl wearing a dress. So all I did to finish her was trim the bottom yarn to look neater. She’s ready for playing!
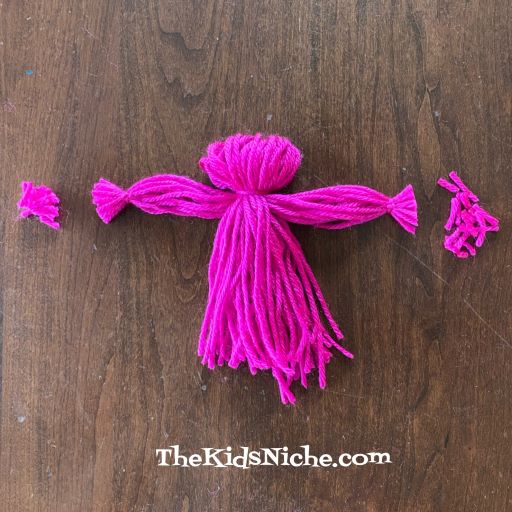
Now, what if you want your doll to be a boy? There are just a couple more steps for that! We’ll pick up with the orange yarn doll at the point where we’ve already made his arms and waist.
Divide the bottom yarn into 2 sections.
Using 2 more pieces of yarn, tie around each leg in the same way you did the arms. Trim, and your boy doll is now finished too! 🙂
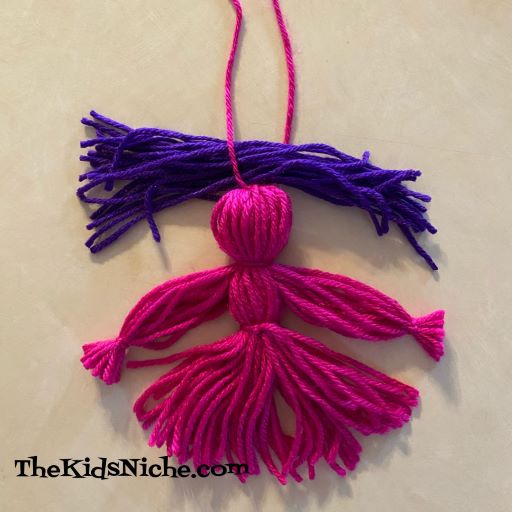
The dolls are ready to be played with now and this is how I remember them. But if you are feeling ambitious, I’ll show you a way to add hair to your doll. Get some more yarn…can be the same color or different. Wrap the yarn around your hand 20 times or so.
Slide it off your hand, keeping the loops together. Cut one end of the loops like we did for the doll.
This time you will lay the hair pieces out flat.
Lay the yarn bundle up at the top of the doll’s head. Using the yarn that is tied to the top of the doll’s head, put one yarn string on top of the bundle and the other yarn string under it. This is so you can tie the hair to the doll.
Tie the knot.
Now you can arrange the hair as you would like. I put it into 2 pony tails and tied each with a piece of yarn tied in a bow.
One more extra detail you can add is to give the dolls some eyes. Simply glue on a pair of wiggly eyes. (I actually prefer the dolls without the eyes, but that’s your choice.)
You can leave the string on the top in case you want to hang the doll up or you can trim it close and get rid of it. I’ve show you one doll done each way.
Yarn dolls are fun and easy to make! I hope you will try a few! 🙂
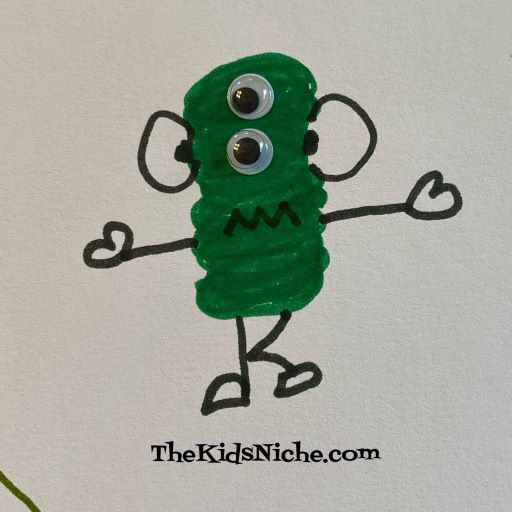
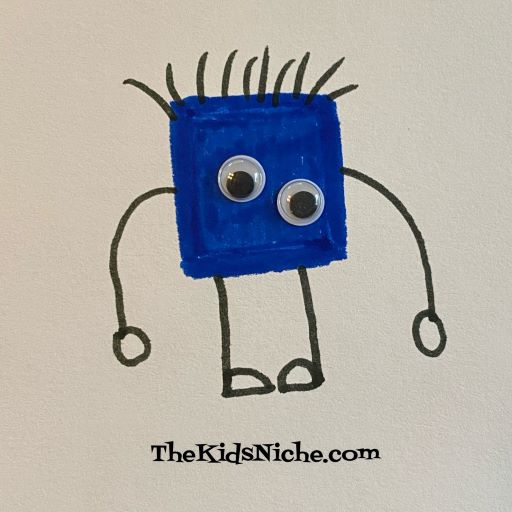
October is the month for witches and goblins and ghosts aaaand….MONSTERS! So let’s look at one easy way to draw funny or scary monsters! There is no right or wrong way when drawing a monster because, well, monsters come in every shape and size and design, right?! They can be any color you want them to be and have as many (or few) eyes and arms and legs. This is YOUR monster! You’ll need just a few things…a piece of paper and some markers. Oh, and some wiggly eyes make them even cooler!
First, draw some shapes or blobs with your markers. Remember, any shape is A-OK! Yep, even a flower is great.
Next place some wiggly eyes on your monster shapes. You don’t need to glue them down yet unless you want to, then that’s ok. I didn’t glue mine down yet, just in case I wanted to move them as I continued designing my monsters.
Now add more details like noses, mouths, arms, legs, hair, etc.
When you’re finished adding details, glue the wiggly eyes down, if you haven’t already done so. And you did it! You are a MONSTER MAKER!! Great job! I’ll show you my monsters in closer detail to give you some ideas.
This one looks like a person…maybe he or she is making friends with the monsters?
This monster has 3 eyes, 4 arms and 3 legs. Wow!
This orange guy has short arms and legs, funny hair and 3 eyes.
Here’s a one-eyed flower monster running away from something.
Whoa, this monster’s eyes go up and down instead of across! And look how big his ears are!
This guy might have been scared by someone…is it YOU? Maybe the monsters are scared of people?
I hope this will give you some fun ideas about how you can draw some monsters. You can even make up a story about your monster. Or draw them a house…or a pet…some trees…you get the idea! Have fun! 🙂
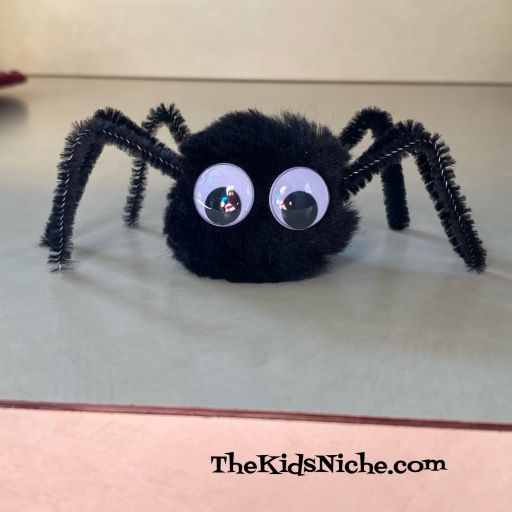
Are you looking for something fun to help decorate your house for Halloween? You might enjoy making some Halloween pom pom spiders with your kids. They are more cute than scary, but they could be scary in the right situation. 😉
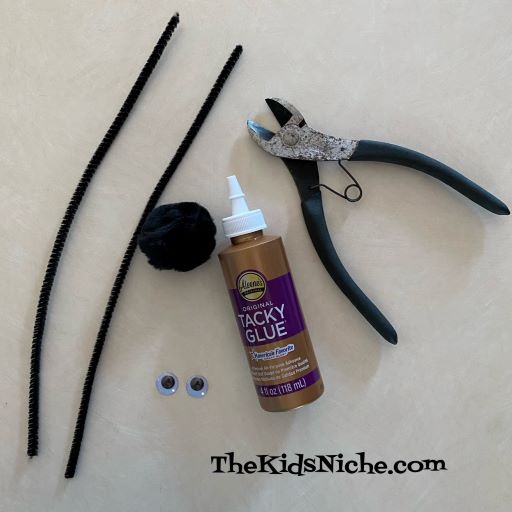
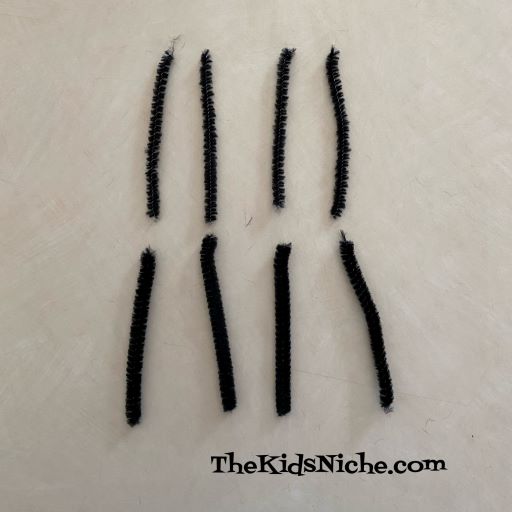
Here’s what you’ll need for this project: a black pom pom (I used a 2 inch size), 2 black pipe cleaners or chenille stems, some glue and 2 wiggly eyes. You will need to cut the pipe cleaners so a pair of wire cutters or a sturdy pair of scissors is helpful.
Begin by bending 1 pipe cleaner in half.
Then cut it on the crease so you have 2 halves.
Fold each of those pieces in half again and cut them on the crease also.
Do the same with the second pipe cleaner so you have 8 pieces.
Bend each of these pieces into a letter V shape. These will be the spider’s legs. I know that spiders actually have 8 legs, but that is a lot of legs to glue onto 1 pom pom so you may want to do like I did and let your spider have just 6 legs. 😉
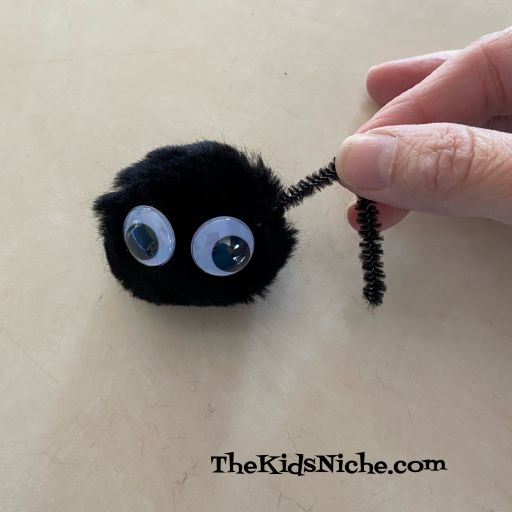
Now switch to working on the pom pom and glue the 2 wiggly eyes onto it.
Make sure the eyes will stay in place before moving to the next step. Apply glue all around one end of a “leg”.
Stick the leg into the side of the pom pom, leaving space for the other 2 or 3 legs to be added to that side.
I found it helpful to sit the spider’s body (the pom pom) on an upside down Dixie cup.
Hold each leg in place for a little bit so the leg doesn’t just fall back off. After putting 3 or 4 legs on one side, turn the spider so you can add the 3 or 4 legs to the opposite side.
You might want to let your spider sit and dry for a little bit before you move him around much. Once he is dry enough, that’s when the fun begins! 🙂
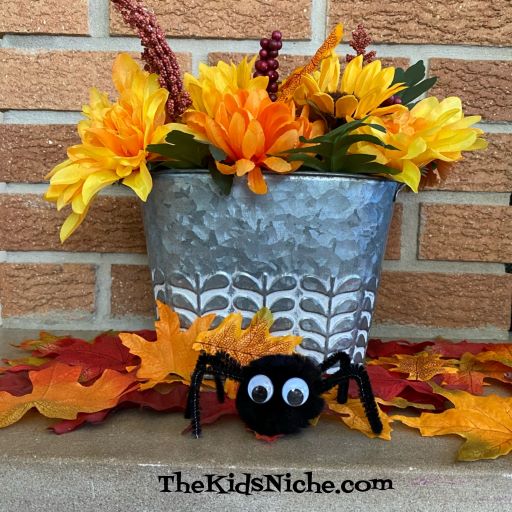
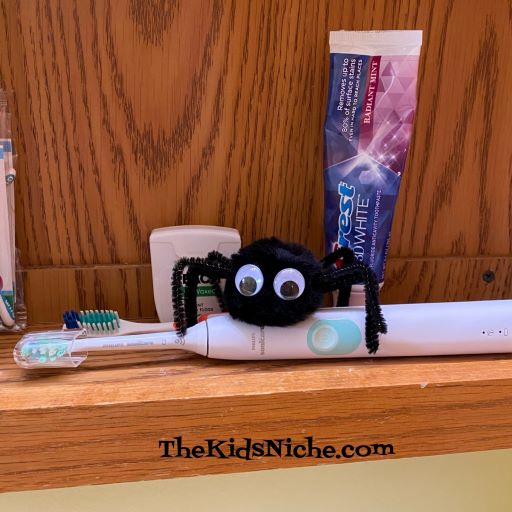
Where can you put your spider to make people laugh or even to give them a little Halloween scare? If you are careful and move the legs gently, you can reposition the spider’s legs to make him sit in different locations.
Want to give Mom a surprise? Hide him somewhere in the kitchen. 😉
Or maybe in the bathroom so Dad finds him?
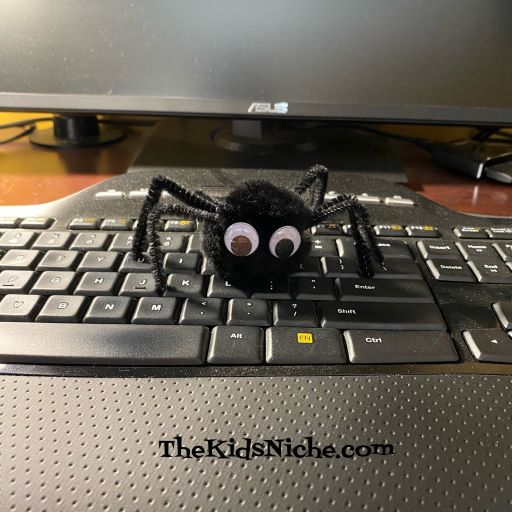
On someone’s computer keyboard? (Yes, it’s rather dusty, isn’t it? But since the owner is sick right now, we won’t mention it.) 😉
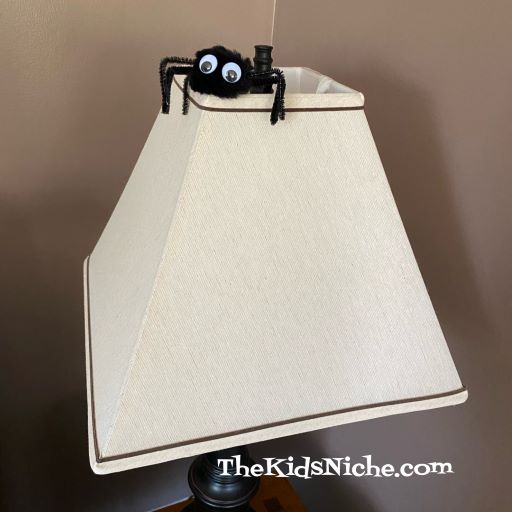
On a lamp in the living room?
In the refrigerator??!
Or maybe you should just keep him in with the Fall decorations. 😉 Wherever you put him, just be sure the person who will find him has a good sense of humor and they won’t mind!
I hope making this little Halloween spider will help bring some Halloween fun to your house! 🙂
I made a stop at our local Dollar Tree store and, of course, I had to check out the kids items. 😉 That’s what grandmas do, right? I want to share 3 fun things with you that I saw.
#1.) Dominoes. Double Six dominoes, 28 pieces.
These will be great for helping kids learn to match numbers and colors or just for playing the game of Dominoes.
And yes, they will stand up so you can build lines that will fall down with a push on a single domino. 🙂
#2.). Sparkle by Number Unicorn Kits
You just peel and stick on little “gems” to make the picture sparkle!
I know a little girl or two that would think this is fun to do and so pretty! (And maybe some BIG girls too!) 😉
There were 2 different unicorn pictures at our local Dollar Tree store.
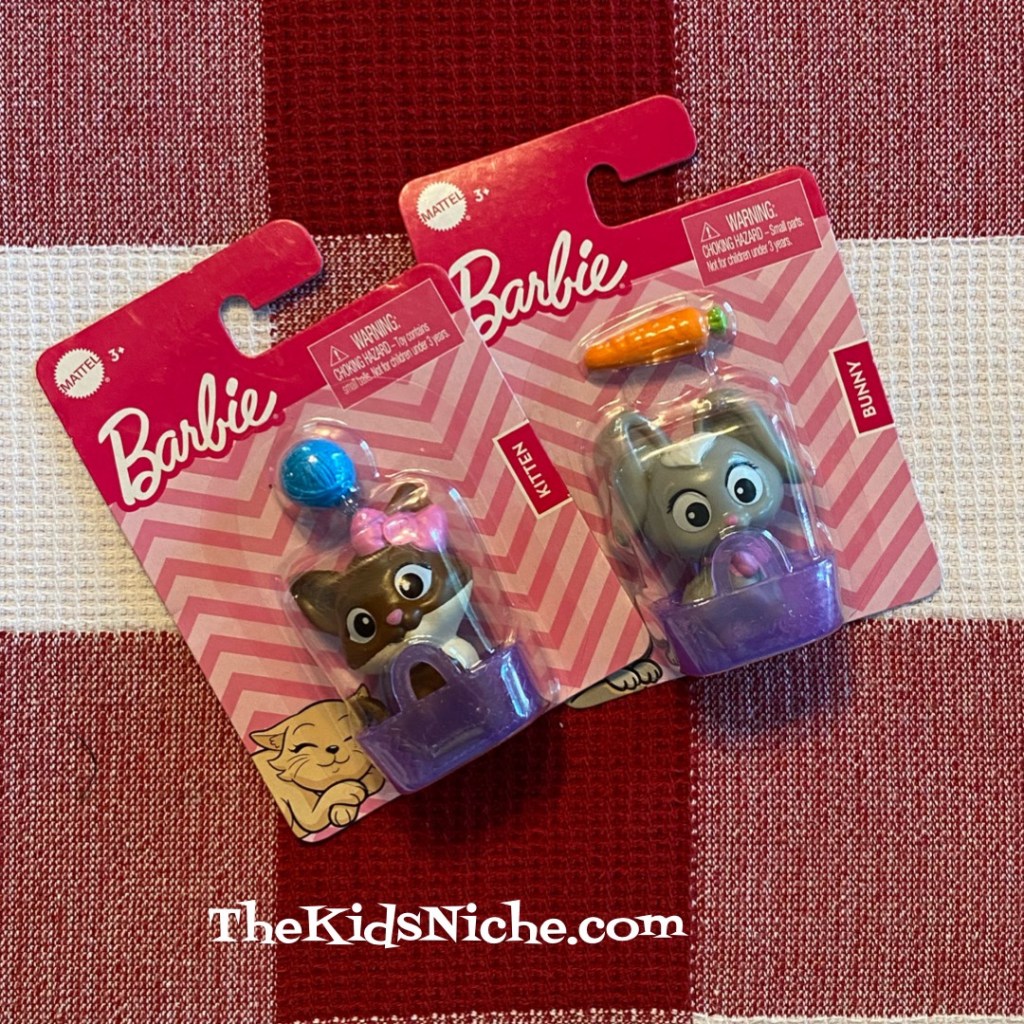
#3.). Barbie pets. They had a kitten and a bunny that would be fun to add to a Barbie doll play set.
I always have fun when I wander the aisles of our local Dollar Tree store! I hope you can find some fun goodies for yourself and for your favorite kids! 🥰
Grab some newspaper to cover your table and a smock or old shirt to cover the kids and let’s have some fun finger painting! I have fond memories of finger painting when I was little . 😉 I found this inexpensive set of finger paints at Walmart for $4.34.
Yep, they are washable!
There are 6 colors in the set.
I also found some white construction paper for $1.47. (Why do packs of construction paper never have white in them?!)
Don’t forget your most important utensil – damp paper towels for cleaning up! LOL
Newspaper, smock or old clothes, paint and paper…looks like we’re ready to go!
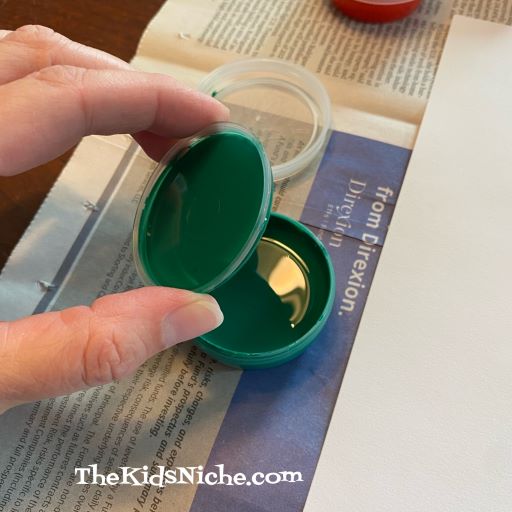
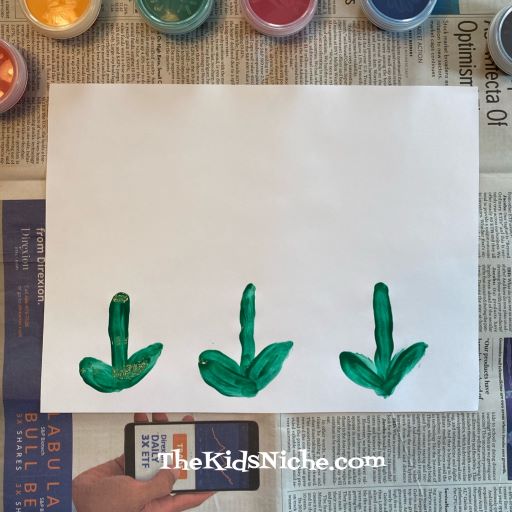
Select your first color…I decided to start with green. There is another kind of plastic lid inside the first lid.
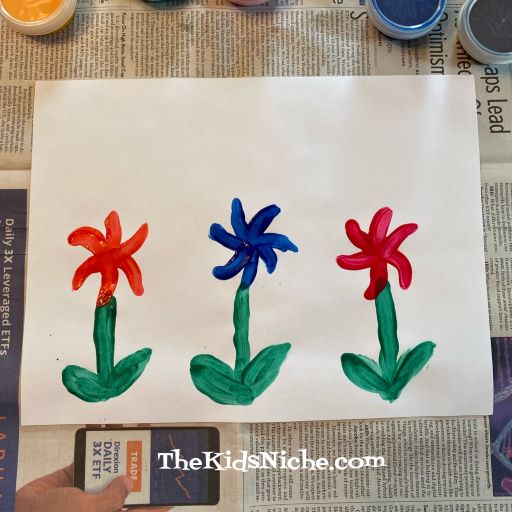
Flower stems and leaves are the beginning of my painting. Just trying something super simple that kids can do. 😉 You need a very small amount of paint on your finger at a time!
Now for some flower petals…
Let’s add a yellow dot to the center of the flowers, a sun in the top corner and some blue streaks in the sky.
Of course, you and the kids can paint anything you want! No brushes needed! You can put a small amount of each color on a styrofoam plate that the kids can dip their finger onto while they are painting. You never know, this might be the beginning work of a future great artist! Have fun!