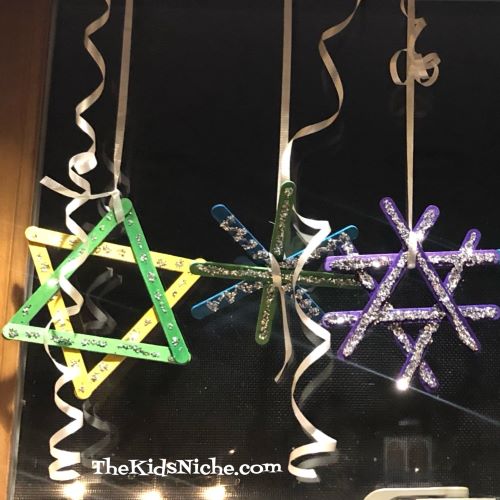
Are you looking for something to occupy the kids while they are off school for Christmas break? Here’s a super easy but fun way to make some great snowflakes. Our grandkids made these and shared these pictures with us. 🙂 (Thanks, Megan!)
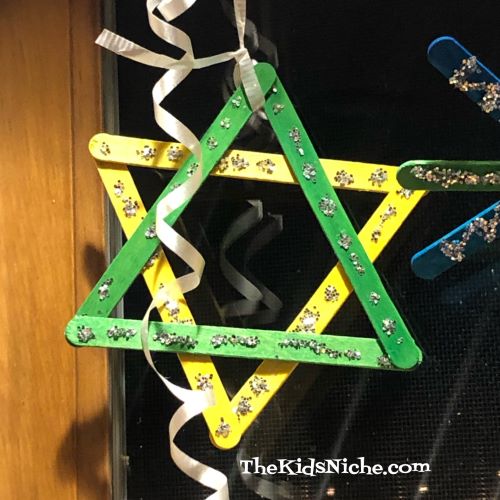
They used colored craft sticks, glue, glitter glue and curling ribbon. If you only have the plain craft sticks you could add an extra step and paint them first. If you don’t have glitter glue, regular craft glue and glitter will work too.
Glue the colored or painted craft sticks together into a snowflake pattern. As you can see from the pictures, there are several ways you can glue them together.
After the glue has dried a little, use the glitter glue to decorate your snowflake. Or if you are using glue and glitter, put drops or lines of glue on the craft sticks and then sprinkle glitter over it. Gently shake the snowflake to let the extra glitter fall off.
Tie a piece of curling ribbon onto the snowflake and hang your snowflakes up for everyone to enjoy.
If you open a pair of scissors and pull the ribbon across the blade part of the scissors, the curling ribbon will curl up and look pretty. You can do this to some extra pieces of curling ribbon to add a little more pizazz to your snowflakes. Hope you enjoy making craft stick snowflakes!! 🙂
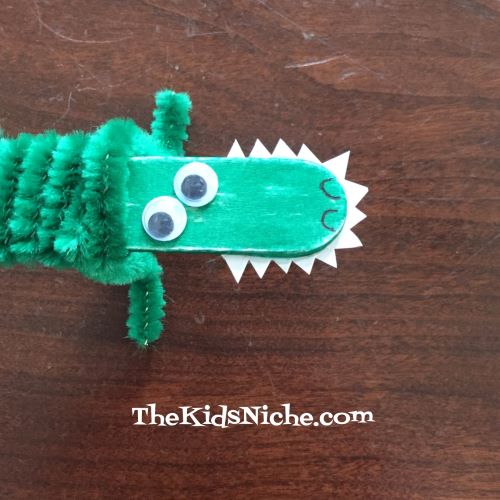
Here are a few hints about what project we will be making today – it’s green, has 4 legs and lots of sharp teeth! Can you guess what it is? An alligator!! Whoa! Alligators are scary, aren’t they? Well, the REAL ones are, but this alligator is cute and fun to make! Take a look at him…
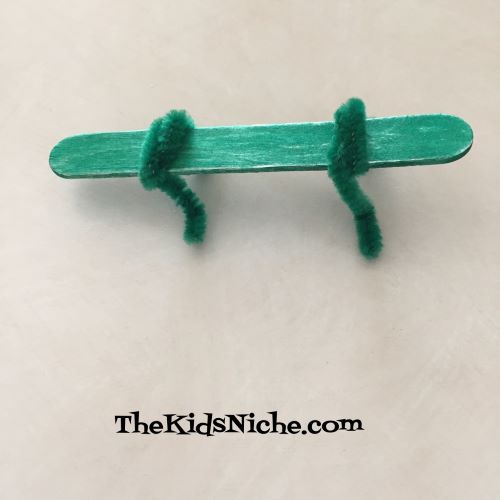
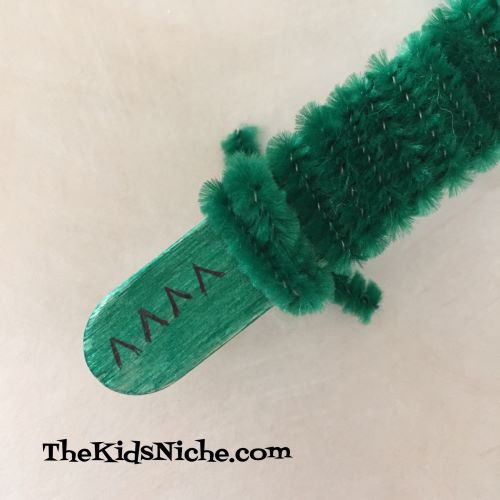
He’s pretty cool, isn’t he? Let’s get started making him! 🙂 You will need 1 flat wide craft stick, 2 green pipe cleaners, 2 wiggly eyes, a small piece of white paper and markers or paint. First you need to color/paint the craft stick green. I used a green marker for mine as it dries much faster than paint.
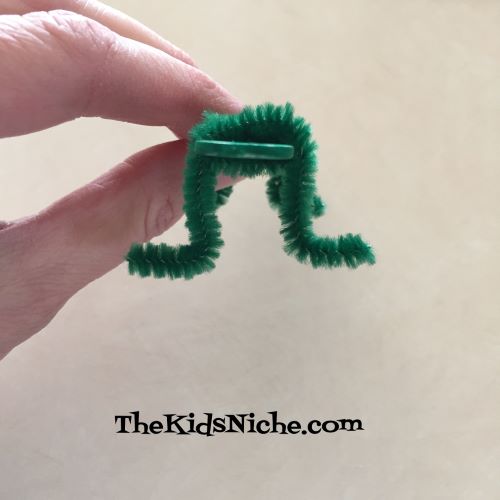
Take 1 green pipe cleaner and cut it in half. Use each piece to make the alligator’s legs by wrapping it around the stick and bending the ends a little to look like his feet.
Here’s another view…
Take the second green pipe cleaner and wrap it around the stick between the 2 sets of legs. Slide the legs in to meet the wrapped pipe cleaner so the alligator’s “tummy” is covered by the pipe cleaner.
Glue 2 wiggly eyes on. I placed mine close to his front legs so that he has a long nose. I made them a little crooked just to make him look funny. 😉 Draw 2 half circles on for his nose holes.
Next add some “V” shapes to his tail area.
All he needs now is some sharp, pointy teeth! Lay a craft stick on the edge of the white piece of paper and draw some jagged teeth around it.
Cut the teeth out with your scissors and glue them to the underside of your alligator.
And there you have it! All done and ready for some play time adventures!
Great job! Are you going to name your alligator? I’m thinking that Fitzgerald is a good name for my alligator. 🙂 Thanks for stopping by!
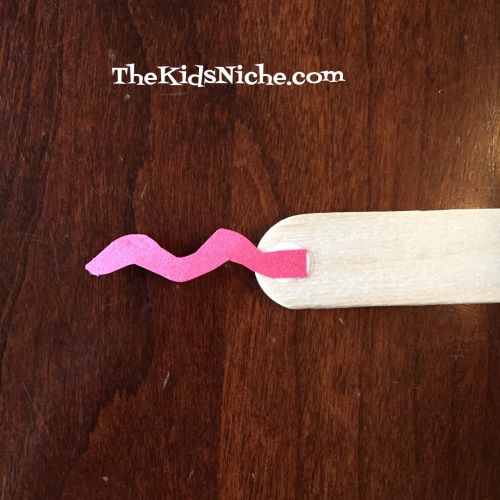
Today let’s look at making Ssssssnakes with craft sticks! 🙂 This is a really quick project and good for kids that are old enough to color. Glue 2 wiggly eyes onto the end of a craft stick.
Grab your colored pens or markers and decorate your snake however you like. I went with polka dots!
Cut a curvy tongue out of red construction paper or red felt.
Glue to the bottom of your snake on the end by the eyes leaving most of the tongue hanging out past the stick.
Aaaand your first snake is done! I couldn’t resist making a second one! 🙂
This is a quick and easy project for even young children. These don’t have to look like real snakes as you can see mine don’t! Lol It’s a nice time to practice the letter “S” since “snake” begins with “S” and snakes make a hissing sound…ssssssss! 😉 I’d love to see your snakes if you make some! Thanks for stopping by!
Here we go again with another great craft stick project! Today we’re making a puzzle! To get started, line up several craft sticks flat on a table. I used another stick to make sure my 5 sticks were lined up well.
Place 2 pieces of masking tape or painters tape across the sticks to hold them together. These are just used temporarily while we are making the puzzle.
Flip the craft sticks over and draw/color a picture on them. I suggest that some of your pictures are on more than one stick so there will be things to match up again when making the puzzle.
Once your picture is complete, remove the tape from the back. Move the sticks around so they are out of order.
Let your kids put the puzzle back together.
Ta dah! Kids will have fun drawing and coloring a picture on the sticks themselves or you can make the puzzle for them. Another idea for making a puzzle with craft sticks is to write the letters of your child’s name on sticks…one letter on each stick…and then let them put the sticks in the right order to spell their name. Great practice for learning how to spell their name!
If your child is just beginning to learn their name, you can add some other little drawings on the sticks that they can use to help match the sticks in the right order and complete the puzzle. In the same way I added the circle, square, triangle and star in my example.
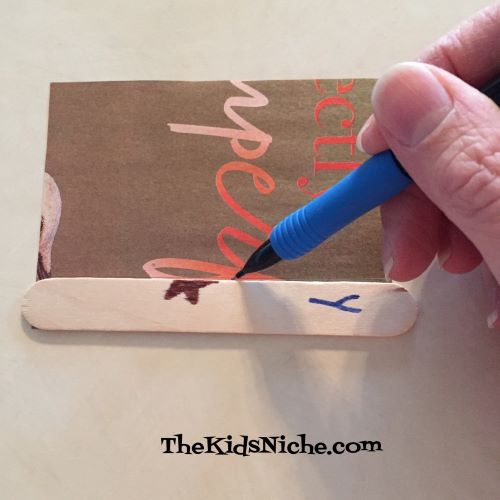
One more puzzle idea that is a little bit harder to craft but just as much fun for your littles to put together, is to use a small picture (I used one from a magazine), cut it in strips and glue it to the sticks. Older kids could enjoy making puzzles this way. Here are the steps I used…find a picture that is just a little bit shorter and the same width as the number of sticks you are using.
I decided to use the same sticks that I used for the name puzzle only using the back sides of the sticks. You can fit 2 puzzles on 1 set of sticks this way. 🙂 Place your picture upside down and lay the coordinating stick on top, then trace with a pencil down the side of the stick.
Make sure to lay the sticks in the right order so that the puzzle on the other side will still fit together. Cut the strip off the picture and glue it to the back side of the first stick.
Lay the next stick in line onto the picture, trace down the side as you did with the first stick, cut the paper strip off and glue it to the back of the second stick.
Continue in the same manner with the rest of the sticks in your puzzle until each stick has a piece of the picture glued to it.
Great job! Now mix up the sticks and let the kids have a go at putting the puzzle together!
I hope you found these ideas interesting and that you and your favorite kids have fun making puzzles together! 🙂 Thanks for stopping by! Tune in tomorrow for some more craft stick fun! 🙂
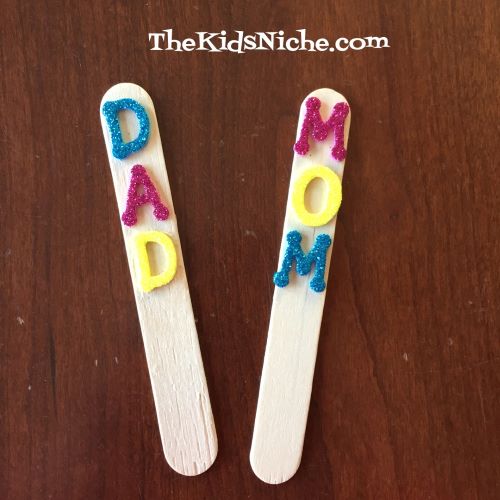
Sorry I missed a couple days this week – things got kinda crazy here as they likely have for all of you! Let’s move on to our next craft stick project! Today we’ll be adding names to sticks in two different ways. 🙂 The first way is using glittery sticker letters.
This is pretty self-explanatory, I guess. Just peel and stick the letter stickers onto the craft sticks to form a name.
You can make one for everyone in the family or make some for your friends. 🙂
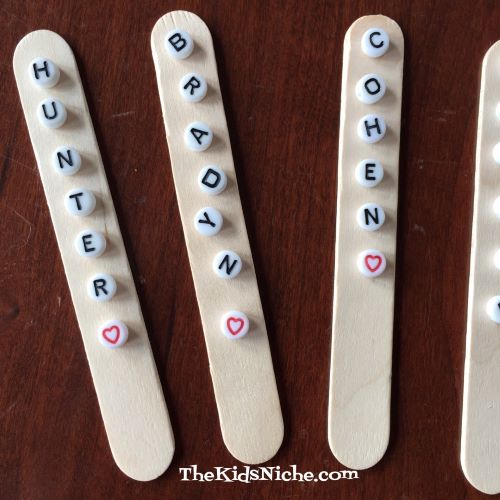
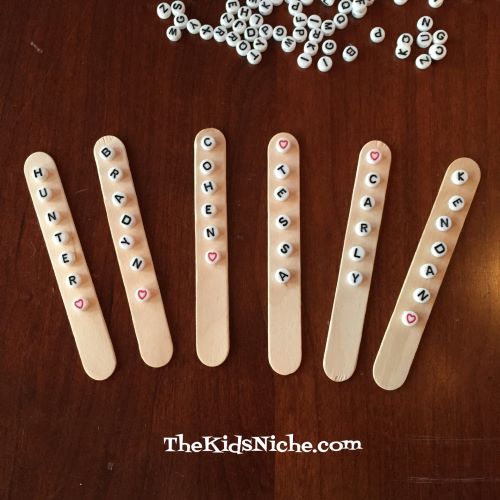
The second way to make name sticks is using the little plastic beads with letters on them.
This is a good project to help kids learn or reinforce knowing their letters by letting them sort the beads out and find the letters for their name. If they need a little help, try printing their name on a piece of paper so they have something to help them know which letters they are looking for.
You can arrange the letters straight up and down, turn them a little bit to make them a little more fun or even put them on the stick sideways.
The pack of letters I bought also had a few red hearts and they added a happy little extra to the sticks.
You can use the sticks for marking each person’s place at the table. Or make a snack in little paper cups and add the stick to each one. Hide the cups for the kids to find and they will know which one is theirs by looking at the stick. Its good practice being able to recognize their name! The sticks can also go in the child’s room or hang on their door by adding a piece of string. I’m sure the kids will have fun coming up with other ways to use them! Have fun! Thanks for visiting! 🙂
Here’s our second craft stick project for this week! This one uses wiggly eyes and some markers or colored pens with the craft sticks.
For this project we are making some funny people. Glue 2 eyes on one end of the stick and use your markers or pens to draw on faces and however much more of a person you would like to include. Here is Ben…
And next we have Mary…
It’s also fun to just draw eyes on your person. This is Lou…
And finally Betsy.
And now we have enough to have a puppet show! A simple but fun craft! 🙂
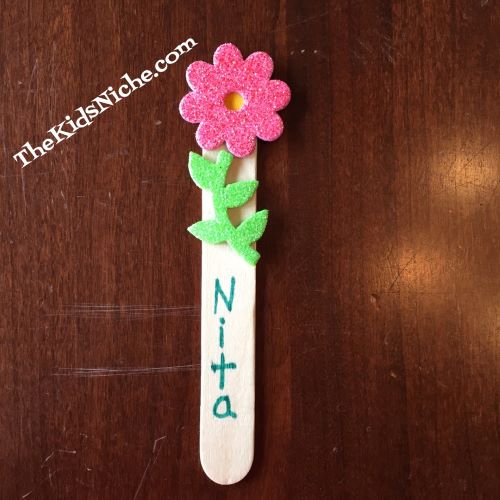
Hello and Happy Monday! This week I want to focus on some craft projects using the wide flat craft sticks…the ones that look like short tongue depressors. 😉 Ever have the Dr. hold your tongue down with a stick so he/she can look at your throat? Yea, some sticks like that, but used in a much nicer way! I think we are all longing for Spring, so today we’re going to do a project using some cute little flower stickers with the sticks. I found the craft sticks and the flower stickers at Walmart.
These flower stickers have several flower shapes and a couple of leaf shapes and come with the adhesive on the back. All you have to do is peel and stick them where you want them. These are cute flower shapes and glittery too!
Some of the larger flower stickers have the center hole punched so that you can remove it if you want to.
If you don’t like seeing the wooden stick through the hole, just grab a yellow marker and color a circle on the stick.
Place the flower sticker on top of the yellow circle and presto! Your flower now has a yellow center like some real flowers do.
I did the same thing with a little differently shaped purple flower and used a different leaf.
How about putting 3 small flowers together on a stick?
For this stick, I used one of the bigger flowers that has the center punched, but I left the center in place…and added a smaller flower too.
If you save the center circle pieces from several flowers, you can even decorate the sticks with them. Plus a few leaves used in a different manner.
Let your children have free rein with the sticks and stickers and see what neat ideas they come up with themselves. You can give them a small cup or vase to display their Spring flowers in. Or you can add a name to their flower stick and use them to mark their place at the table or as a bookmark or tuck them into a special snack cup…the ideas are endless and I’m betting your kids will think of their own ideas of how to use them. 🙂
Most of all, have FUN! Hopefully this project can help us all hang on until the real Spring flowers arrive! Be sure to check back later this week for more craft stick ideas! Thanks for visiting!