Flower Candy Pretzel Bites

Happy Good Friday to you! In today’s post, I’ll be sharing a fun food craft that would be really great to share for your Easter celebration! These little “flowers” are so cute and taste so yummy with the combination of sweet and salty.

You need only 3 ingredients…square mini pretzels, white candy melts and a bag of spring colored M&M’s candy.

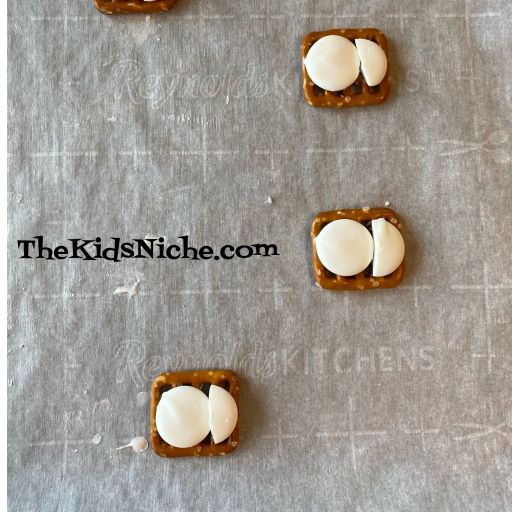
Line a cookie sheet with wax paper or parchment paper. Place some pretzels on the cookie sheet. (I started out with a lot of pretzels at one time, but now I think it’s better to do a few at a time so you can keep up with the decorating while the candy is soft.)

The directions I read suggested laying 1 candy melt wafer on each pretzel.

I think it works better if you put 1 1/2 candy wafers on each pretzel.

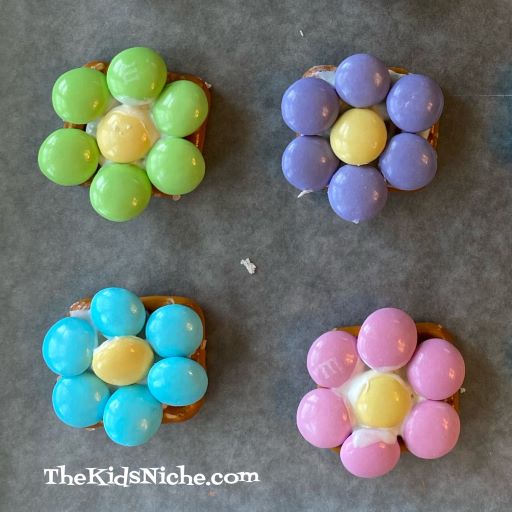
Preheat your oven to 250 degrees F. While you wait for the oven to heat up, you can sort your M&M’s into like color piles. This will make it easier to find the same color faster.

Once the oven is warm enough, place the cookie sheet in the oven for about 3 minutes. The candy just needs to soften so you can put the M&M’s on the pretzels. I found it helpful to use a small spatula to spread the warm candy on the pretzel.

When the candy is softened, place 1 yellow M&M in the center of the pretzel. Then apply 6 more of the same color M&M’s around the yellow one, pressing down into the candy.

That’s all there is to it! Continue making as many flowers as you’d like to make.

Aren’t they so cute?! Spring flower candy bites are bound to bring a smile to everyone that sees them. Especially to those who TASTE them! Haha!

Maybe set a few out on a plate for the Easter Bunny! 😉 Happy Easter, everyone! 🙂

Little Easter Bunny Bucket

Coming at you today with another cute Easter craft! This one needs the use of a glue gun so it might not be a good craft for the wee ones. But it would be really cute for you to make them for the kids. 🙂

You will need a small white bucket (I found this one at the Dollar Tree store), 1 white chenille stem (aka pipe cleaner), a small piece of white cardstock, a pink marker or crayon, 2 large wiggly eyes, 1 small pink pom pom, scissors and a glue gun with a glue stick.

You’ll begin by cutting the white pipe cleaner into 4 even pieces. (Sorry for the bad lighting and that the pipe cleaner doesn’t look white. It really was white! Lol)

Continue with your project by cutting a small strip of cardstock paper between 1-2″ wide. I cut off the end of a full size sheet of cardstock (8.5″ x 11″).

Cut the strip in half and place the 2 pieces together so when you cut the paper, you will cut both pieces at the same time.

Cut out the shape of a bunny’s ear. You should end up with 2 ears the same.

Next color the inside of each ear pink, leaving a white edge on the outside.

Now it’s time to glue things together! Start by gluing on the 2 wiggly eyes on the plain side of the bucket.

Glue on the pink pom pom for the bunny’s nose.

Put some glue on one end of each piece of the white pipe cleaner and tuck the end under the pom pom. These are the bunny’s whiskers.

Glue the bottom of each ear to the front inside edge of the bucket.

Draw on the bunny’s mouth with a marker. You’ll probably need to use a permanent marker so the mouth doesn’t wipe off.

And your bunny is ready to be filled with Easter goodies! 🙂

I hope you’ll have fun making these little Easter bunny buckets and that your kids will be tickled to receive them! 🙂

Easy Foam Easter Bunny From Dollar Tree

Easter is coming closer! Are you looking for some fun Easter crafting ideas to do with your kids? Be sure to check out your nearest Dollar Tree store! Today I want to share with you an adorable little bunny kit I found there.

This is a very easy kit to put together with the kiddos. It’s made with foam stickers. Be sure to save the little picture that shows you where each piece belongs. Here’s what you’ll find inside:

First I punched out the pink glittery pieces which are 2 pieces for the inside of the bunny’s ears, a little pink nose and a pink tummy. Then I added his eyes.

Next I did his mouth and bow tie.

It’s time to stick 2 pink spots on for his cheeks.

Now there’s just the 2 pieces of the carrot left to do. I suggest peeling off only the top part of the backing for the carrot so you won’t have an entire sticky piece hanging there.

Put the top of the carrot onto the bunny’s hand.

Lastly, put the green carrot top onto the top of the carrot. And you’ve finished your adorable bunny! 🙂

Find a cute place to put him to help decorate your house for Easter! 🙂 Hope you can find these bunnies at your local Dollar Tree store!

Easter Finds at Dollar Tree

I know that the Easter holiday isn’t until April, but I saw some fun Easter items at a Dollar Tree store today. If any of these look good to you, don’t wait too long to head to your local Dollar Tree store because they tend to sell out of items fairly quickly! The Dollar Tree stores close to us have increased their prices to $1.25 for each item. But that is still much cheaper than other stores.

Let’s start with this adorable Easter box. They had 2 sizes of boxes at our Dollar Tree store, but items can differ from one store to another. This is a square box that is open on the top.

They also have a TON of plastic Easter eggs!! The packages go from as few as 6 large eggs to as many as 18 smaller eggs.

Here are some cute bunny treat bags! There are 4 in a package.

This is what they look like. They are made from cloth and I plan to put Easter treats inside a plastic bag before I put them inside of the bunny bags.

I found some adorable stuffed animals! 🙂

Colorforms Sticker Story Adventure boards make for some great quiet time play!

And, of course, there is a LOT of candy! SweetTarts Jelly Beans looked pretty yummy to me.

Don’t forget chocolate bunnies!

I hope this will be some help for you as you plan your Easter shopping list of things to get for the kiddos’ Easter baskets! 🙂