Another Valentine Card Kids Can Make

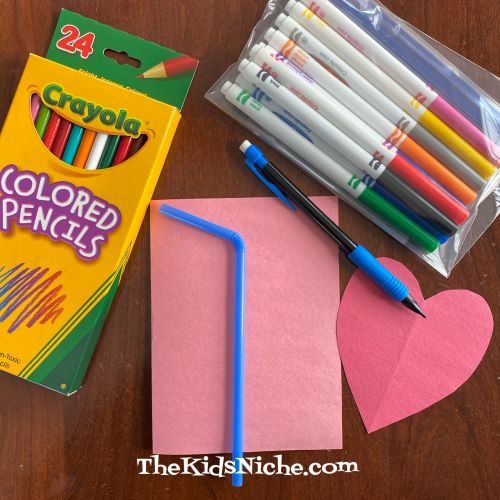
Are you still looking for Valentine cards that are simple enough for your kids to make? Here’s another suggestion for you! We’ll call this one the Soda Pop Valentine card. 😉 You’ll need a piece of paper, glue, a black marker, colored pencils or crayons, a pencil, scissors, a cut out paper heart and a straw.

I used half a sheet of pink construction paper for my card. I folded it in half to make a nice size for a card. On the front, using a pencil, draw a soda pop bottle.

With a thin line marker or black pen, trace over the bottle you just drew so that it stands out more plainly.

Color in the bottom 2/3 of the bottle whatever color you’d like your pop (soda) to be. I used brown for Root Beer. I wrote the words Root Beer on my bottle but you can write whatever kind of pop you like to drink and color it the same color as the drink you chose.

(Sorry I’m not sure why this picture looks purple!) Now imagine that the straw you have is inside this bottle of pop. (soda) Cut your straw to fit the bottle. Have the bottom of the straw just touching the top of the pop (soda) in your bottle. The top of the straw should stick out above the bottle opening.

Add a line of glue down the length of the straw and hold it in place on your card for just a little bit till the glue can start to set up.

If you have a permanent black marker, you can draw the rim of the bottle on your straw too so it looks more like it is inside the bottle.

Now with a pen or marker write the words, “I “soda” love you!” (I sorta love you!)

Next, you should write on the cut out heart these words…”I love you so much I think my heart might “pop”! 😉

Then glue the heart to the inside right hand side of your card.

If you like, you can add some little lines around the outside of the heart to help make the heart look like it’s ready to pop!

And there you are! All finished! Great job! Who will you share your Valentine card with? Remember to sign your name so the person will know you are the one that made this great card for them. 🙂

Is It Too Soon to Build a Snowman?

How do you feel about snowmen? I love them!! Especially the crafty kind that you can make in your house and they never melt! 😉 We had some cold days recently that felt like winter and we even had a light dusting of snow, so I got to thinking about snowmen and decided to make some. (Now it’s warmed back up and the temperature has been in the 60’s.) This is an easy craft for kids and takes just some “normal” kind of things you might have around your house. Let’s take a look at my snowmen…

I thought they turned out to be pretty cute! Some things that you’ll need to make these snowmen are empty toilet paper rolls, white paint, paint brush, pipe cleaners, small pom poms, ribbon or yarn or felt, maybe a button or two, wiggly eyes, orange and black markers and either a bottle of glue or a glue gun. (I used the glue gun.)

The first step is to paint the empty toilet paper rolls with white paint. Let them dry however long your type of paint requires.

Glue on 2 wiggly eyes. It doesn’t really matter what size the wiggly eyes are. I used 3 different sizes for my snowmen.

Cut a pipe cleaner in half…or even smaller…to use for the top part of the snowman’s ear muffs. Glue the 2 ends to opposite sides of the toilet paper roll. Place the ends on either side of the eyes in a place where the snowman’s ears might be if he had some. 😉

Next glue a pom pom over each end of the pipe cleaner to finish making the ear muffs.

Use the orange marker to draw a triangle below the wiggly eyes to be the snowman’s carrot nose. Use the black marker to draw on a mouth and eyebrows. (I drew the eyebrows on after I took the next picture. Oops!)

For the snowman’s scarf you can use pieces of yarn or ribbon or felt or fabric…you get the idea. 😉 For this snowman, I put 3 pieces of yarn together. Glue the scarf in one spot on the back of the snowman. Then wrap each side around to the front and cross one side over the other and glue in place.

I glued a little star button on top of where the 2 sides cross in the front. You can add 3 black dots for the stones or buttons on the snowman’s tummy, if you like.

And there you are! Great job! You’ve made a snowman! 🙂

For my second snowman, I followed the same steps, but for his/her scarf I took 3 pieces of yarn and braided them together. I tucked one end around the other in front, like you do when you are beginning to tie your shoes. Then I glued it in place.

For my third snowman, I again followed the same steps, except this time I made his/her scarf out of a piece of ribbon. And I glued on a matching button.

You can make your snowman look however you like. He/she might look different because you have different materials to use than what I had. You can shape his/her mouth in different ways to make him/her look happy or sad or silly. I’m sure he or she will look great! The important thing is to have fun making your snowmen! 🙂

It’s Fall, Y’all! Fun with Leaves

We’re into October already! Wow, did Fall sneak up on you like it did me?? One thing that we all seem to talk about in the Fall (or Autumn) is the beautiful colors of the leaves! This year it seems like the leaves have been slower to change colors, but here in Ohio they have finally gotten started and some of them are gorgeous colors! So let’s do a fun activity with the colorful leaves that are falling all around us. Fall leaves are only here for a little while before they vanish away for the season. But what if we drew and colored our own beautiful leaves that we can keep for as long as we like?

Go on a little treasure hunt outside and see if you can find 3 or 4 pretty colored leaves to bring inside with you. If you can find some that are different shapes and different colors, it will make your picture even more fun. Here are the ones I picked up:

Find a plain piece of paper and a pencil. Trace around each leaf. Just a rough tracing is fine. You can fix the lines a little if you want to after you trace it.

Depending on the age of the children doing this project how many details you will want to add to the drawing of each leaf. For young children, go ahead and let them color in the outline in the same colors as the leaf they picked. For older kids, you can add more details like the veins seen in the leaves and the stem.

Now is the time to add your beautiful colors! One suggestion I have is that you can use more than one color to achieve just the right color you are looking for. I used colored pencils for mine. Older kids might also like to identify the tree that the leaf came from. These 2 leaves are from a Maple tree.

The leaf on the left is from our Apple tree and the leaf on the right is from a bush that I don’t actually know what kind it is. Haha!

And the last leaf is from an Oak tree. The leaves of the Oak tree haven’t changed colors yet, but I like that it has a different shape to it’s leaves, so I used a green leaf.

Don’t stress over it if the color of your leaves is a bit different from the real leaves. It doesn’t matter because leaves turn so many beautiful colors that somewhere there is probably a leaf that matches the one you made. 🙂

And there you are! You have a great drawing of some beautiful leaves you can keep to remind you of Fall. Maybe you could even share your picture with someone else to make their day happier. Someone that isn’t able to get outside much would probably love to see your beautiful Autumn leaves! Have fun!

Washcloth Animals – #3 – Chick

It’s been a fun week of making washcloth animals! If you missed making the bunny, you can find it here: https://thekidsniche.com/2020/05/11/washcloth-animals-1-bunny/ If you missed the bear, this is where you can find it: https://thekidsniche.com/2020/05/13/washcloth-animals-2-bear/

So let’s make one more washcloth animal! This little chick is quite adorable and fun! You’ll need 1 washcloth (a yellow one makes him super cute), 1 regular size rubber band, a piece of ribbon or twine, 2 wiggly eyes and a small piece of orange construction paper.

Lay the washcloth out flat on your work surface.

Starting at one corner and working across on the diagonal, roll the washcloth up tightly into one long thin roll.

The place where the end of the washcloth is in the center, you will want to make sure it gets folded inside with the next step.

Fold the rolled up washcloth in half.

Bend one side down so that the tip reaches the bottom or is just slightly longer.

Fold the second side down in the same manner.

Squeeze the top part a bit to make a rounded head and wrap the rubber band around it several times.

Glue on the 2 wiggly eyes.

Tie a piece of ribbon or twine around the chick’s neck to cover the rubber band.

Using the orange construction paper, cut a rectangular piece about 1 inch by 1/2″.

Fold it in half.

Keeping the folded edge on top, cut from the center of the bottom up to the top outside edge on both sides so you end up with a triangle.

Open the triangle and you have a beak for your chick.

Glue the beak in place and your adorable little chick is done! 🙂

Thanks for visiting my blog! I hope you’ve had fun making washcloth animals with me! 🙂 Tune in next week to see what other kinds of fun things we’ll be doing!

Washcloth Animals – #2 – Bear

It’s time for another edition of making washcloth animals! Our first washcloth project was making a bunny. If you missed that project and would like to check it out, you can find it here: https://thekidsniche.com/2020/05/11/washcloth-animals-1-bunny/

Today’s washcloth animal is a cute bear. Let’s get started! You’ll need 1 washcloth, 1 regular size rubber band, 2 tiny rubber bands and a piece of ribbon. If you want to, you can also add 2 wiggly eyes and a nose and mouth made from felt.

Lay the washcloth out flat on your work surface.

Begin rolling from one side and roll to the middle of the washcloth.

Then roll the opposite side to the middle too.

While holding each end of the rolled washcloth, twist one end over.

While keeping the washcloth from unrolling, bend the twisted end down about 3/4’s of the way.

The bottom 2 rolls become the bear’s legs. Open the top part just enough to place the top 2 rolls along each side for the bear’s arms.

Using the larger rubber band, pinch the washcloth in to make a neck and head and wrap the rubber band around as many times as you can.

Now pinch up a little bit of the washcloth on each side of the head to make 2 ears. Wrap a tiny rubber band around each one to hold it in place.

Tie the piece of ribbon around the neck to cover the rubber band.

Ta dah! Your bear can be finished now. Or you can add some wiggly eyes or even make a nose and mouth from felt. I like the look without the eyes better but here’s what it looks like with eyes so you can decide which way you like better.

I hope you found this project fun! 🙂 Be sure to check back on Friday for Washcloth Animal #3!

Craft Stick Fun Project #6

Here are a few hints about what project we will be making today – it’s green, has 4 legs and lots of sharp teeth! Can you guess what it is? An alligator!! Whoa! Alligators are scary, aren’t they? Well, the REAL ones are, but this alligator is cute and fun to make! Take a look at him…

He’s pretty cool, isn’t he? Let’s get started making him! 🙂 You will need 1 flat wide craft stick, 2 green pipe cleaners, 2 wiggly eyes, a small piece of white paper and markers or paint. First you need to color/paint the craft stick green. I used a green marker for mine as it dries much faster than paint.

Take 1 green pipe cleaner and cut it in half. Use each piece to make the alligator’s legs by wrapping it around the stick and bending the ends a little to look like his feet.

Here’s another view…

Take the second green pipe cleaner and wrap it around the stick between the 2 sets of legs. Slide the legs in to meet the wrapped pipe cleaner so the alligator’s “tummy” is covered by the pipe cleaner.

Glue 2 wiggly eyes on. I placed mine close to his front legs so that he has a long nose. I made them a little crooked just to make him look funny. 😉 Draw 2 half circles on for his nose holes.

Next add some “V” shapes to his tail area.

All he needs now is some sharp, pointy teeth! Lay a craft stick on the edge of the white piece of paper and draw some jagged teeth around it.

Cut the teeth out with your scissors and glue them to the underside of your alligator.

And there you have it! All done and ready for some play time adventures!

Great job! Are you going to name your alligator? I’m thinking that Fitzgerald is a good name for my alligator. 🙂 Thanks for stopping by!

Craft Stick Fun Project #5

Today let’s look at making Ssssssnakes with craft sticks! 🙂 This is a really quick project and good for kids that are old enough to color. Glue 2 wiggly eyes onto the end of a craft stick.

Grab your colored pens or markers and decorate your snake however you like. I went with polka dots!

Cut a curvy tongue out of red construction paper or red felt.

Glue to the bottom of your snake on the end by the eyes leaving most of the tongue hanging out past the stick.

Aaaand your first snake is done! I couldn’t resist making a second one! 🙂

This is a quick and easy project for even young children. These don’t have to look like real snakes as you can see mine don’t! Lol It’s a nice time to practice the letter “S” since “snake” begins with “S” and snakes make a hissing sound…ssssssss! 😉 I’d love to see your snakes if you make some! Thanks for stopping by!

Craft Stick Fun Project #4

Here we go again with another great craft stick project! Today we’re making a puzzle! To get started, line up several craft sticks flat on a table. I used another stick to make sure my 5 sticks were lined up well.

Place 2 pieces of masking tape or painters tape across the sticks to hold them together. These are just used temporarily while we are making the puzzle.

Flip the craft sticks over and draw/color a picture on them. I suggest that some of your pictures are on more than one stick so there will be things to match up again when making the puzzle.

Once your picture is complete, remove the tape from the back. Move the sticks around so they are out of order.

Let your kids put the puzzle back together.

Ta dah! Kids will have fun drawing and coloring a picture on the sticks themselves or you can make the puzzle for them. Another idea for making a puzzle with craft sticks is to write the letters of your child’s name on sticks…one letter on each stick…and then let them put the sticks in the right order to spell their name. Great practice for learning how to spell their name!

If your child is just beginning to learn their name, you can add some other little drawings on the sticks that they can use to help match the sticks in the right order and complete the puzzle. In the same way I added the circle, square, triangle and star in my example.

One more puzzle idea that is a little bit harder to craft but just as much fun for your littles to put together, is to use a small picture (I used one from a magazine), cut it in strips and glue it to the sticks. Older kids could enjoy making puzzles this way. Here are the steps I used…find a picture that is just a little bit shorter and the same width as the number of sticks you are using.

I decided to use the same sticks that I used for the name puzzle only using the back sides of the sticks. You can fit 2 puzzles on 1 set of sticks this way. 🙂 Place your picture upside down and lay the coordinating stick on top, then trace with a pencil down the side of the stick.

Make sure to lay the sticks in the right order so that the puzzle on the other side will still fit together. Cut the strip off the picture and glue it to the back side of the first stick.

Lay the next stick in line onto the picture, trace down the side as you did with the first stick, cut the paper strip off and glue it to the back of the second stick.

Continue in the same manner with the rest of the sticks in your puzzle until each stick has a piece of the picture glued to it.

Great job! Now mix up the sticks and let the kids have a go at putting the puzzle together!

I hope you found these ideas interesting and that you and your favorite kids have fun making puzzles together! 🙂 Thanks for stopping by! Tune in tomorrow for some more craft stick fun! 🙂