Making Turkeys From Cheese and Cracker Packs

Today I’m bringing you a fun Thanksgiving craft for the kids that they can also eat! 🙂 Let’s make some turkeys from a pack of cheese and crackers or breadsticks.

You will need: individual packs of cheese and crackers or breadsticks, some colored paper, wiggly eyes, double sided tape or glue, scissors and a pencil.

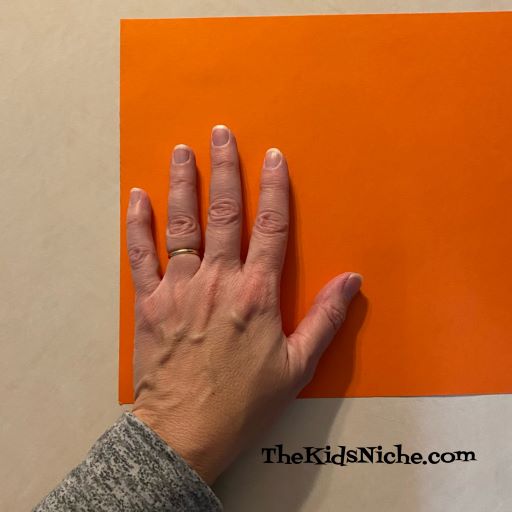
Help your child place their hand on the colored paper and use the pencil to trace around it. Little hands work best for this project but I’ll show you what you can do if you only have a “big person’s” hand like I did. 😉

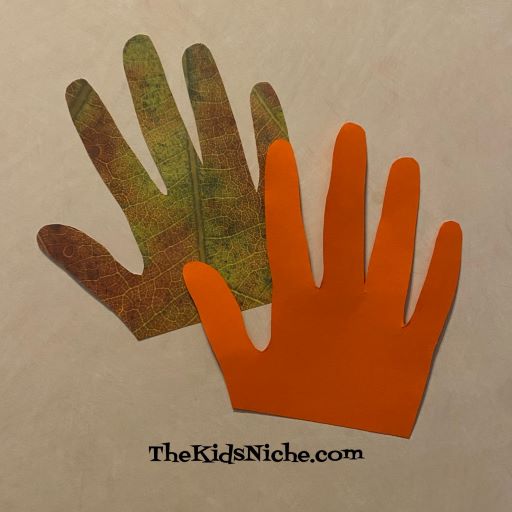
Cut out the hand shape using the scissors.

I made 2 to show you what it looks like if you care to use scrapbook paper.

Break a pack of cheese and crackers or breadsticks off from the other packs.

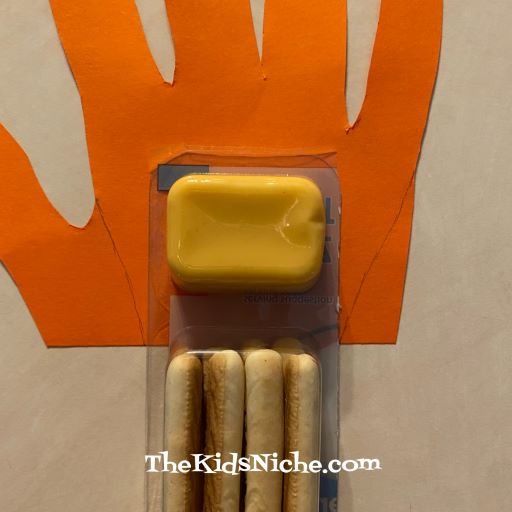
The hand shape will be taped or glued to the back of the cheese and crackers pack to be the turkey’s feathers. Lay the pack on the hand shape and see how it fits together.

Because I used an adult sized hand to make my hand shape, the turkey’s feathers are too large for the pack of snacks. I drew 2 lines and cut off the thumb part of the shape and some on the other side to make my feathers fit better.

Attach the feathers to the back of the snack pack. I used double sided tape.

Now glue 2 wiggly eyes onto the cheese part of the snack pack.

Cut a triangle out from a piece of orange paper or use white paper and color the triangle orange. Glue it in place for the turkey’s beak.

Your turkey can be finished here or you can add some turkey legs. I used yellow paper for some legs for 1 of my turkeys.

And that’s all there is to it! I hope your kids have fun making some mostly edible turkeys for Thanksgiving this year! 🙂

Making Yarn Pumpkins For Fall

Do you enjoy decorating your home for Fall or Halloween? Both are appropriate for orange pumpkins, so today let’s look at how to make some easy ones! 🙂 This is a great craft project for the kids too.

You will need some orange yarn, a piece of a green pipe cleaner and scissors.

Begin your pumpkin by wrapping the yarn around your hand. Depending on the size of your hand and the size of pumpkin you want to make, how many times you will need to wrap the yarn around your hand or fingers. You can also use a piece of cardboard instead of your hand. Hands or fingers are just…well, handy! 😉

For an adult size hand using all 4 fingers, you will want to wrap the yarn around at least 100-120 times.

Carefully slide the yarn off your hand but keep all the pieces held close together. Cut a piece of yarn from the yarn ball approximately 5-6 inches long.

Lay the extra piece of cut yarn on the table and lay the wrapped yarn on top of it, keeping the cut piece in the center of the wrapped ball.

Tie a tight knot with the cut piece of yarn in the center of the wrapped yarn. Tie it 2 or 3 times so it won’t come undone. And make sure to keep the knot tight while tying it the second time. It’s easy for it to slip looser and then you will lose the shape of your pumpkin.

Now take the small piece of green pipe cleaner and tie another knot around the middle of it on top of the first knot.

You can also just slip the pipe cleaner under the first knot you tied, but be careful as it can snag the yarn.

Twist the 2 ends of the pipe cleaner together and shape it like the pumpkin’s stem. Trim the extra length of yarn from tying the knots.

That’s all there is to it! 🙂 You can fluff your pumpkin with your fingers to make it look just right to you. Make as many pumpkins as you like and use them to decorate your house for the season.

I hope you will enjoy making yarn pumpkins! 🙂

Is It Too Soon to Build a Snowman?

How do you feel about snowmen? I love them!! Especially the crafty kind that you can make in your house and they never melt! 😉 We had some cold days recently that felt like winter and we even had a light dusting of snow, so I got to thinking about snowmen and decided to make some. (Now it’s warmed back up and the temperature has been in the 60’s.) This is an easy craft for kids and takes just some “normal” kind of things you might have around your house. Let’s take a look at my snowmen…

I thought they turned out to be pretty cute! Some things that you’ll need to make these snowmen are empty toilet paper rolls, white paint, paint brush, pipe cleaners, small pom poms, ribbon or yarn or felt, maybe a button or two, wiggly eyes, orange and black markers and either a bottle of glue or a glue gun. (I used the glue gun.)

The first step is to paint the empty toilet paper rolls with white paint. Let them dry however long your type of paint requires.

Glue on 2 wiggly eyes. It doesn’t really matter what size the wiggly eyes are. I used 3 different sizes for my snowmen.

Cut a pipe cleaner in half…or even smaller…to use for the top part of the snowman’s ear muffs. Glue the 2 ends to opposite sides of the toilet paper roll. Place the ends on either side of the eyes in a place where the snowman’s ears might be if he had some. 😉

Next glue a pom pom over each end of the pipe cleaner to finish making the ear muffs.

Use the orange marker to draw a triangle below the wiggly eyes to be the snowman’s carrot nose. Use the black marker to draw on a mouth and eyebrows. (I drew the eyebrows on after I took the next picture. Oops!)

For the snowman’s scarf you can use pieces of yarn or ribbon or felt or fabric…you get the idea. 😉 For this snowman, I put 3 pieces of yarn together. Glue the scarf in one spot on the back of the snowman. Then wrap each side around to the front and cross one side over the other and glue in place.

I glued a little star button on top of where the 2 sides cross in the front. You can add 3 black dots for the stones or buttons on the snowman’s tummy, if you like.

And there you are! Great job! You’ve made a snowman! 🙂

For my second snowman, I followed the same steps, but for his/her scarf I took 3 pieces of yarn and braided them together. I tucked one end around the other in front, like you do when you are beginning to tie your shoes. Then I glued it in place.

For my third snowman, I again followed the same steps, except this time I made his/her scarf out of a piece of ribbon. And I glued on a matching button.

You can make your snowman look however you like. He/she might look different because you have different materials to use than what I had. You can shape his/her mouth in different ways to make him/her look happy or sad or silly. I’m sure he or she will look great! The important thing is to have fun making your snowmen! 🙂

It’s Fall, Y’all! Fun with Leaves

We’re into October already! Wow, did Fall sneak up on you like it did me?? One thing that we all seem to talk about in the Fall (or Autumn) is the beautiful colors of the leaves! This year it seems like the leaves have been slower to change colors, but here in Ohio they have finally gotten started and some of them are gorgeous colors! So let’s do a fun activity with the colorful leaves that are falling all around us. Fall leaves are only here for a little while before they vanish away for the season. But what if we drew and colored our own beautiful leaves that we can keep for as long as we like?

Go on a little treasure hunt outside and see if you can find 3 or 4 pretty colored leaves to bring inside with you. If you can find some that are different shapes and different colors, it will make your picture even more fun. Here are the ones I picked up:

Find a plain piece of paper and a pencil. Trace around each leaf. Just a rough tracing is fine. You can fix the lines a little if you want to after you trace it.

Depending on the age of the children doing this project how many details you will want to add to the drawing of each leaf. For young children, go ahead and let them color in the outline in the same colors as the leaf they picked. For older kids, you can add more details like the veins seen in the leaves and the stem.

Now is the time to add your beautiful colors! One suggestion I have is that you can use more than one color to achieve just the right color you are looking for. I used colored pencils for mine. Older kids might also like to identify the tree that the leaf came from. These 2 leaves are from a Maple tree.

The leaf on the left is from our Apple tree and the leaf on the right is from a bush that I don’t actually know what kind it is. Haha!

And the last leaf is from an Oak tree. The leaves of the Oak tree haven’t changed colors yet, but I like that it has a different shape to it’s leaves, so I used a green leaf.

Don’t stress over it if the color of your leaves is a bit different from the real leaves. It doesn’t matter because leaves turn so many beautiful colors that somewhere there is probably a leaf that matches the one you made. 🙂

And there you are! You have a great drawing of some beautiful leaves you can keep to remind you of Fall. Maybe you could even share your picture with someone else to make their day happier. Someone that isn’t able to get outside much would probably love to see your beautiful Autumn leaves! Have fun!