Save Those Bananas!

Do you ever have too many bananas and you don’t have time to use them before they become overripe? Don’t throw them away!

You can freeze bananas to use later and it’s SUPER simple to do! There are 2 ways (at least) to do it. Grab a small freezer bag and write on the outside that it contains a banana and write the date you are freezing it.

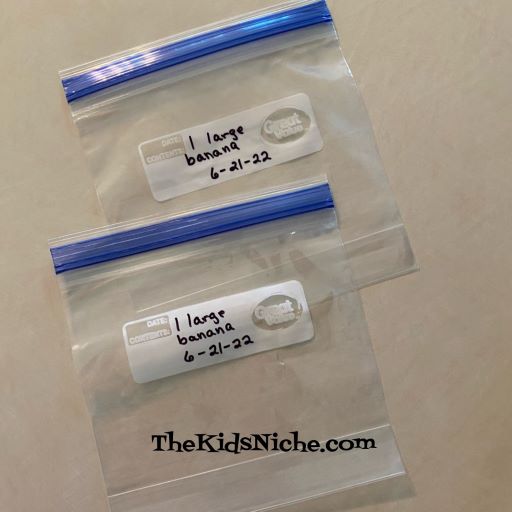
You can simply peel the banana, stick it in the freezer bag and put it in the freezer. Doesn’t get much easier than that, right? 🙂

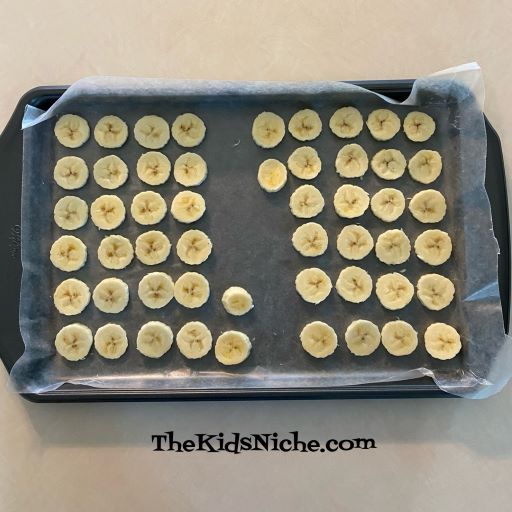
Frozen bananas can be used to make things like banana bread or muffins but my favorite thing to use frozen bananas for is MILKSHAKES! So with that in mind, here is another way to freeze bananas so they are ready to go in the blender to make a milkshake. Lay a piece of wax paper or parchment paper on a cookie sheet, cut the banana into slices and lay them on the cookie sheet so they are not quite touching each other.

Pop the cookie sheet into the freezer and go about doing other things while the banana slices freeze. After the slices are frozen, pick up the edge of the wax paper and quickly peel it back to loosen the banana pieces.

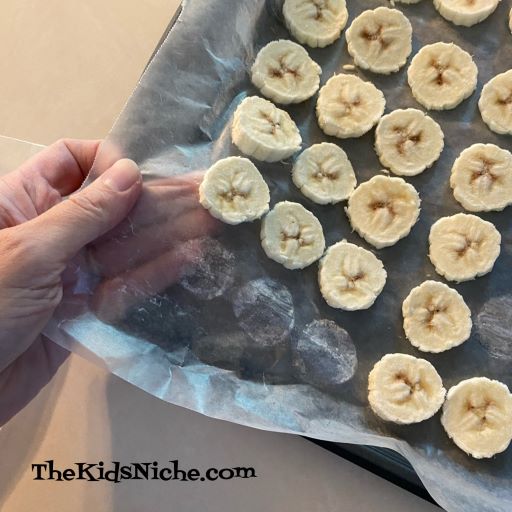
Pop them into the freezer bags and back into the freezer.

Now you have banana slices ready to dump into the blender with your other yummy ingredients at a moment’s notice. 🙂 And you didn’t waste those bananas! 😉

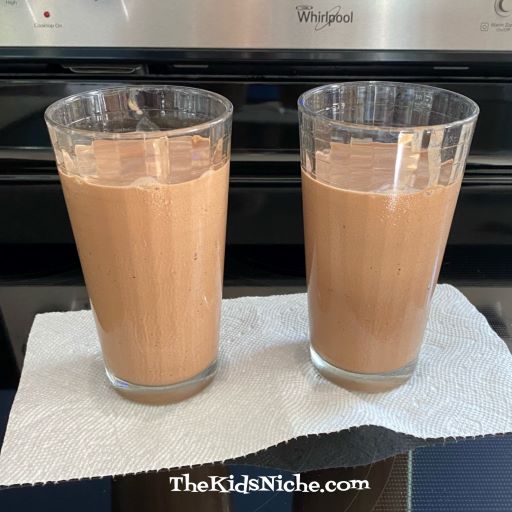
Here is my favorite recipe for using frozen bananas in a milkshake. (Shhh! Don’t tell the kids it’s actually healthy!)

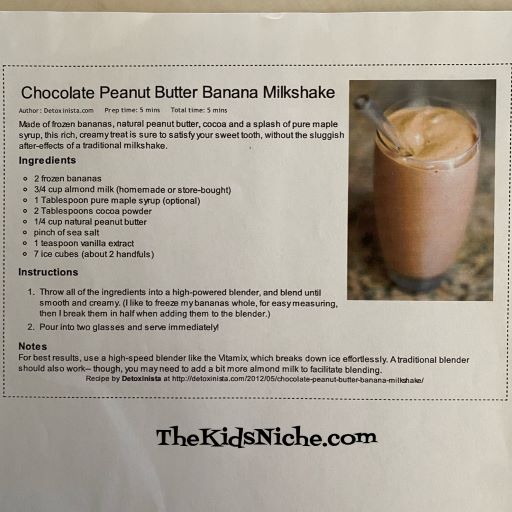
Note: you can use the whole frozen bananas in this recipe or to make your own version of a milkshake. Just break the banana into a few smaller chunks before adding it to the blender. Enjoy! 🙂

Taste Testing Tuesday #69-Healthy (Mostly) No Bake Cookies

For today’s taste test, we’re bringing you some Healthy No Bake Cookies! It says “Mostly” healthy because the cookies themselves are pretty healthy, but then it depends on what you add to them how healthy they end up. 😉 For instance, if you add raisins, you’re all good. If you add mini M&M’s, well, not quite so good. Lol My daughter shared this recipe with me after her kids gobbled up a batch in record time. (Thanks, Megan!) Their batch of cookies looks awesome!

Here is the ingredient list:

In order to make this a taste test and to have some different types of cookies to choose from I made 4 kinds. But I’m getting ahead of myself! First, let’s gather up the ingredients.

Add everything to a medium sized bowl. Remember to melt the coconut oil.

Mix the ingredients together with a spoon. I didn’t add the “goodies” to begin with, but just mixed up the cookie dough.

I divided the dough into 4 small bowls and then added a different special ingredient to each bowl.

Mix the dough in each bowl and then make 3 or 4 cookies from each bowl by using a teaspoon to scoop out the dough onto a plate.

#1.) I added raisins.

#2.) I added mini M&M’s.

#3.) I added mini chocolate chips.

#4.) I added candy sprinkles.

Put the cookies into the fridge for a little while to help the cookies set up. I wonder what things you will add to your cookies? You could try some chopped nuts, peanut butter chips, butterscotch chips or maybe some tiny candies that match the season or holiday.

What type of cookie is your favorite? How about which one is your least favorite? I hope this will spark some ideas and fun for your family! 🙂 Happy Taste Testing Tuesday to you!

Chocolate Hummus

I saw a recipe today on the Shopkick app that sounded interesting, so I wanted to share it with you. I haven’t tried it yet because I don’t have all of the ingredients on hand, but I think I will try it soon. As you can see from the title, the recipe is for making Chocolate Hummus. If your kids will go for it, it could be a great healthy snack! The following pictures are from the Shopkick app:

I’d love to hear from you if you try it and what you think of it! 🙂

If you have no idea what the Shopkick app is, it’s an app that lets you do little tasks like watching a short video or scanning a product UPC in the store and you earn points towards free gift cards. If you would care to sign up, you and I will both earn points. Use the code SALE895789 or download at https://get.shopkick.com/96Rn/dcc98d83.

Taste Testing Tuesday – #2

It’s time for another Taste Testing Tuesday! Today we will be trying ways to eat bell peppers or sweet peppers. In doing a little research on bell peppers, I found out that they are high in Vitamin A, Vitamin C and Vitamin E. They have lots of iron and anti-inflammatory properties. So not only do their vibrant colors of green, yellow, orange and red make them appealing to the eye, they are also healthy to eat.

Bell peppers are easy to prepare. Simply cut out the stem area at the top and discard. Cut the pepper in half and throw away the seeds that are inside. Rinse and just that easy, you are ready to try a yummy way of eating them!

One suggestion is to cut the pepper in quarters and then each quarter in half to make little “boats”. Fill each one with your favorite egg salad or a cheese mixture.

You can cut the peppers in slices and use your favorite dip for dipping. Try using sour cream and adding some spices like cilantro, parsley or dill. For some reason, kids love dipping their food in something…lol.

Another idea I came across was for bell pepper nachos. Slice the peppers in thin strips and sprinkle some grated cheese on top. Heat in the oven or microwave just until the cheese melts.

If your kiddos just don’t go for peppers but you’d really like to sneak some healthy goodness into their diet, try hiding finely chopped pieces of pepper in things like meatloaf or meatballs. Or run the peppers through the blender and add them to pasta or spaghetti sauce. However you try them, I hope you can use these ideas to get some awesome bell peppers into your kids’ bellies! 😉 Be sure to stop back next week for another Taste Testing Tuesday! (And for fun crafting ideas in between!)

Let’s Play With Our Food!

Have you ever handed your child an orange only to have them look at you like “Really? This snack is soooo boring!” ? Well, today let’s liven things up a bit by playing with our food! Yep, I’m giving you permission to play with your food! Grab an orange, a few baby carrots, a couple of miniature marshmallows, a few mini chocolate chips plus a knife and a cutting board. We’re going to make some fun animal shapes!

Start by cutting both “ends” off the orange.

Next slice it into thin slices, leaving the rind on.

Take 3 or 4 baby carrots and slice them into round pieces. Full size carrots would work nicely too.

Take a couple of carrot slices and carefully cut out a “v” shape in each. Take a couple more carrot slices and cut them in half. And finally take a few more carrot slices and cut them into a triangle shape.

Smash a miniature marshmallow down with your thumb to make it a flatter wider circle.

Stick a mini chocolate chip in the middle of the marshmallow circle. I put my chocolate chips in point down.

Now begin assembling your animal shapes made with food! Here are a few ideas, but I’m sure you and your kids can use your imagination to come up with more! Let’s start with a small fish…

He’s really cute but he would like a friend so let’s make another one!

Or we could make a larger fish. Let’s look at Big Fish #1…

Yes, I cut the orange circles in half to make this fish. Next we have Big Fish #2…

If you have any kids that love dinosaurs, this next idea will tickle their fancy! (Thanks for the suggestion, Josh!) Yep, you guessed it – it’s a Tyrannosaurus Rex head!! Only this time YOU will be eating HIM!

I have one more idea for your oranges and carrots. It’s a bird…it’s a plane…noooo, it actually IS a bird! 😉

Who knew that with a little bit of magic and some imagination, that an orange could be so much fun! Hope you enjoy playing with your food! 🙂