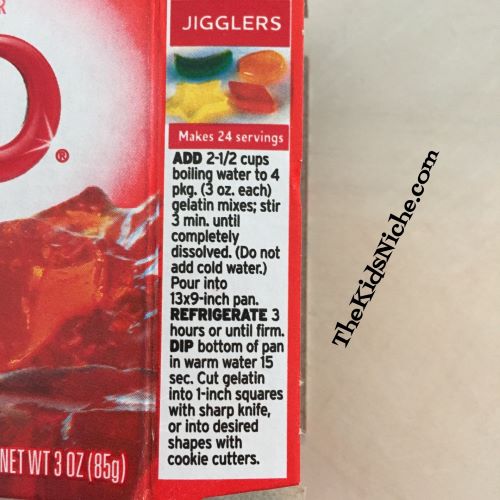
Remember Jello Jigglers? We hadn’t made any here in ages but they would make a cute treat for Valentine’s Day. The directions are right on the boxes of Jello and they only need Jello and water to make them.
I suggest using red Jello for Valentine’s Day. I made half of a recipe and used an 8″ x 8″ pan.
Heart shapes are great for Valentine’s Day, of course. 😉
Remember to dip the pan in hot water for a few seconds to help with removing the shapes. The smaller sized hearts came out easier than the large ones. And there they are!
To make them fancier, add a bit of whipped cream on top or some pink yogurt.
Be careful that the kids you share these with are old enough to chew them up well. They take some extra chewing! Hope your Valentine’s Day will be a fun one! 🙂
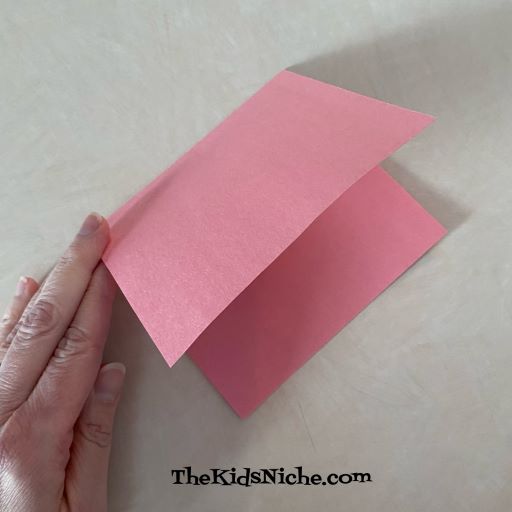
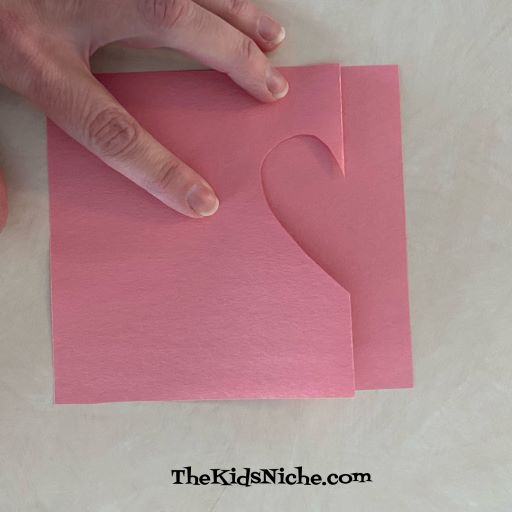
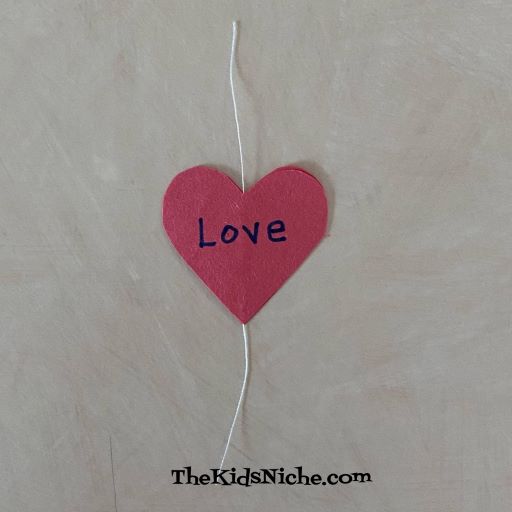
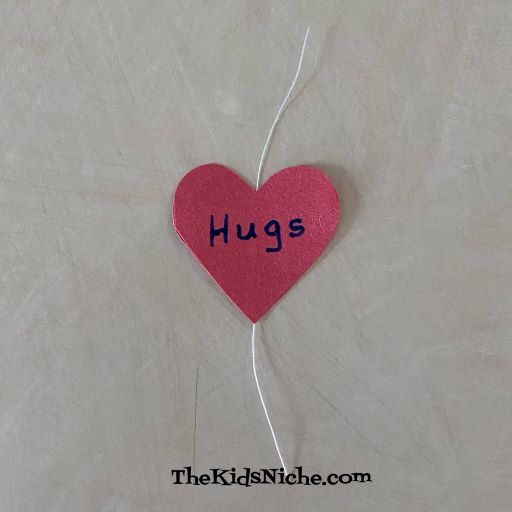
This is a fun card to open because there is a little heart inside that will twirl around when the card is opened. Sound fun? Let’s get started! You will need a piece of construction paper approximately 5 inches by 9 inches. (The size can vary.) Some scissors, glue, 2 small hearts cut from another color of construction paper, markers and some thread.
Begin by folding the piece of paper in half.
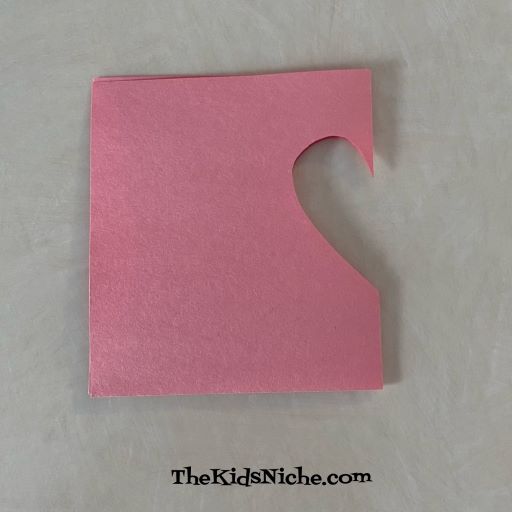
Using your scissors, cut a half of a heart shape on the fold.
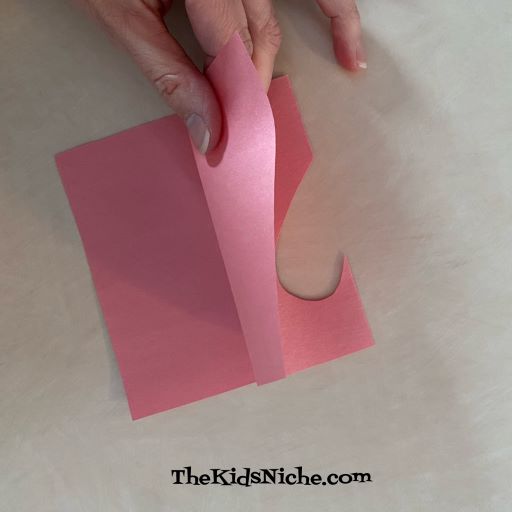
Fold one side of the paper end up past the heart shaped cut.
Do the same with the second side.
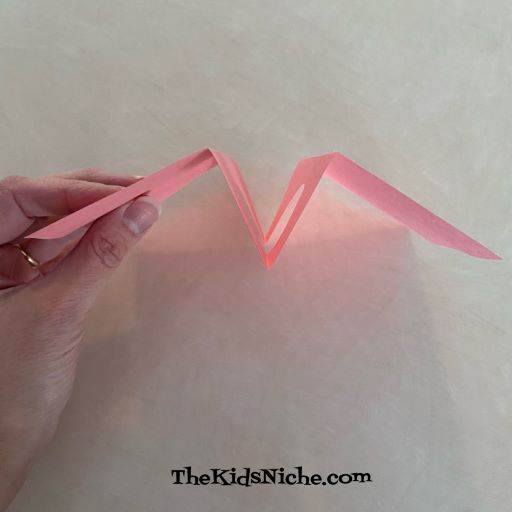
When you open the card up, it should look like this from the end view.
And it should look like this from the front.
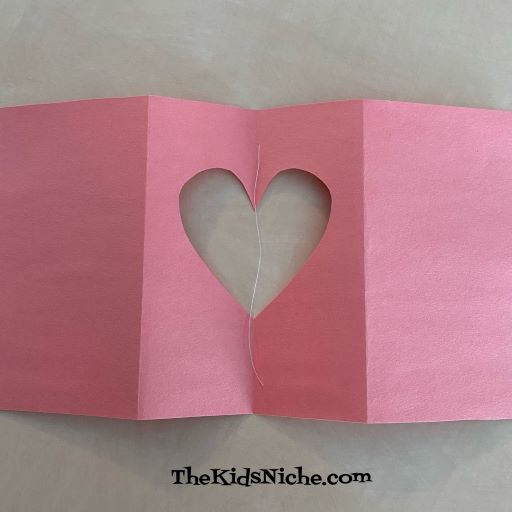
Now turn the card over so the back side is facing up. The fold in the middle of the heart cut out should be going “down” with the folds on each side going “up”. Cut a piece of thread that is just long enough to cross the heart cut-out and have a little room on each side of the top and bottom of the heart.
Make sure your little hearts are small enough to fit in the heart cut-out with room all around it so it will be able to spin.
It’s time to make the twirling heart part. Put some glue on 1 small heart, making sure there is glue down the center of the heart.
Lay your piece of thread on the heart with the glue and make sure it is in the center of the heart.
Lay the second heart on top and press the 2 hearts together so they stick together completely.
Decorate the small heart in any way you like. I wrote a word on each side.
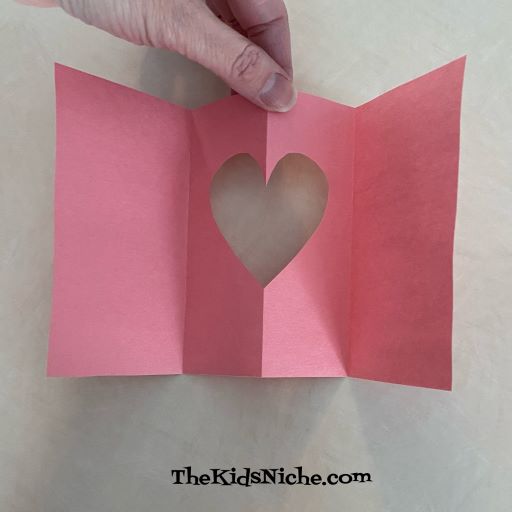
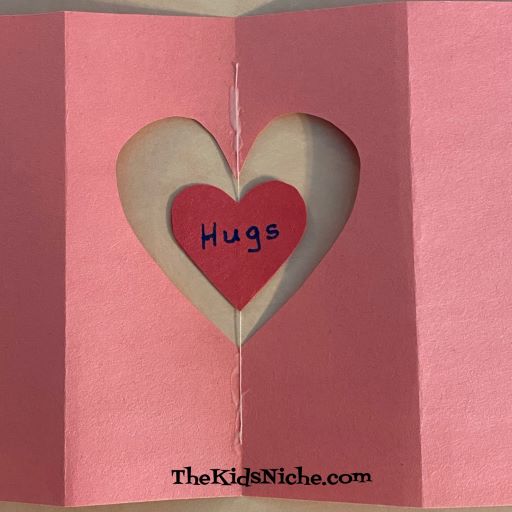
Double check that the fold in the center of your card is down or the back side of the card is facing up.
Run a line of glue right in the center of the fold crease.
Place your small heart in the center of the heart cut-out with the strings laying on the lines of glue on each side.
Give the glue time to dry before moving on. The next step is to decorate your card by writing or drawing whatever you like on your card. The right side panel will be the front of your card when it is folded up.
This is what my card looks like when its folded.
Before closing your card, gently turn the small heart several times like you are winding it up. Carefully close the card, checking to make sure the small heart is laying flat.
When the card is opened, the small heart inside will spin! 🙂 You might want to hold the card closed with a paper clip or place it inside an envelope.
I hope you will enjoy making this Twirling Heart card! 🙂
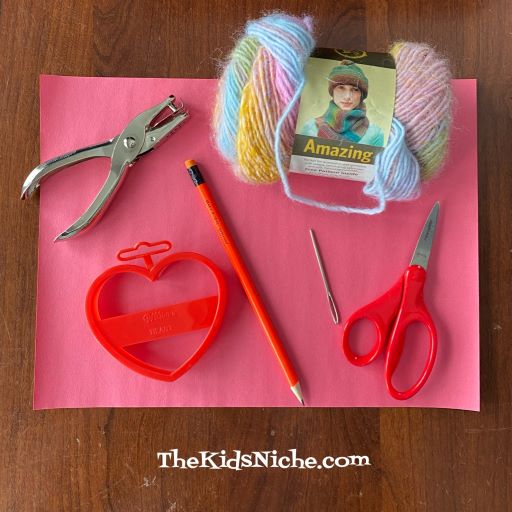
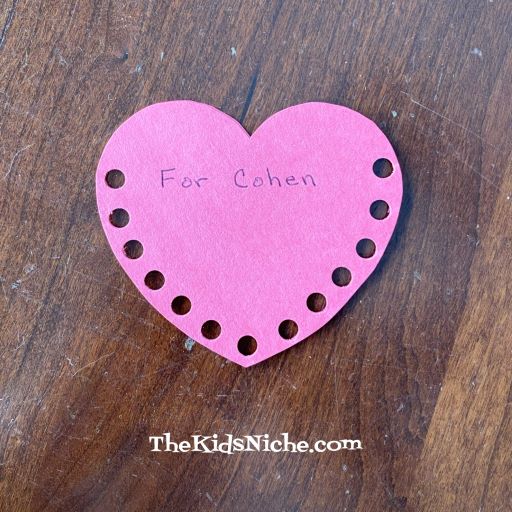
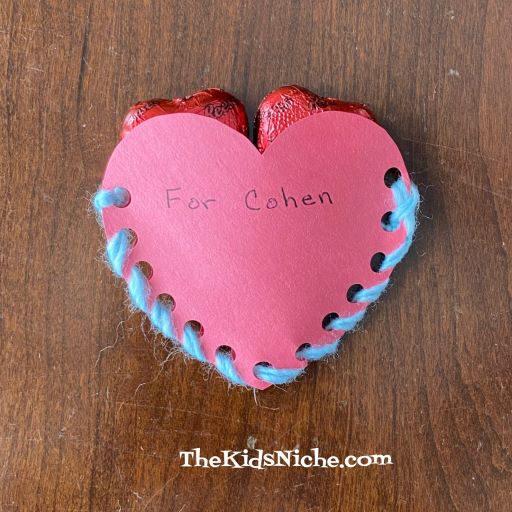
Hello and welcome to our next Valentine’s Day craft! Yes, we are going to sew on paper and make some super cute hearts that can hold some candy! 🙂
Here’s what you’ll need to get started: red or pink construction paper, scissors, a heart cookie cutter or template, pencil, some yarn, a yarn needle, a single paper punch, pen or marker and some stickers.
Begin by folding an end of the construction paper over so that you can fit your heart template or cookie cutter on it. This way you can cut 2 identical hearts with one time of cutting. Trace around the template or cookie cutter.
Cut out the 2 heart shapes while holding the folded paper together. Make sure you have 2 hearts held together for the next step.
Using the paper punch, punch holes along the outside edge of the hearts, but don’t make any holes along the top of the heart. We want this area to be open so we can put candy or other small items inside the heart. Before we begin sewing, write the name of the person you will give the heart to on the front or just decorate your heart. This is a good time to add the sticker too. (Though I forgot to add the sticker until after sewing, I was able to make it work then too.) 😉
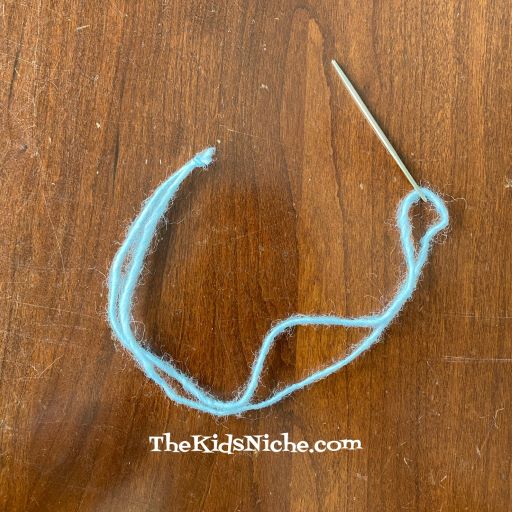
Cut a piece of yarn and fold it in half. You will want to have enough yarn to sew all the way around the edge of the heart. Thread the yarn needle with your piece of yarn. Tie a knot at the end of the yarn.
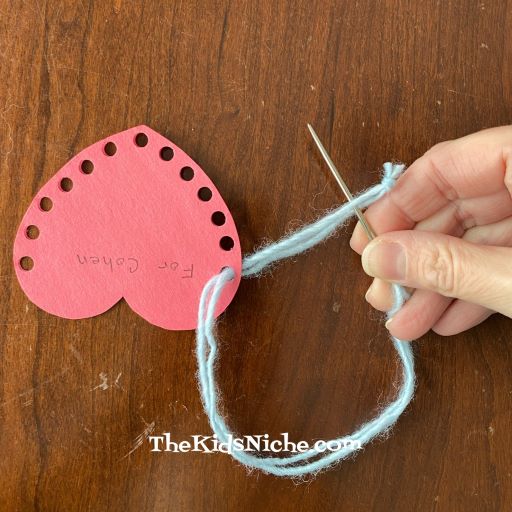
Beginning at one of the holes at the top of the heart, we will sew around the bottom edge through each hole. But first let’s secure the yarn in the first hole. Starting from the back of the heart, put the needle through the hole and pull the yarn through until you are ALMOST to the knot coming to the hole. Then take your needle between the 2 pieces of yarn and pull it up snug. This will keep your yarn secure.
Try to keep the knot on the back side of the heart. Turn the heart over so the front side is on top again. Place the needle in the second hole and draw the yarn through. This will make a loop on the outside edge of your heart. Remember, start the needle through the hole from the back side of the heart.
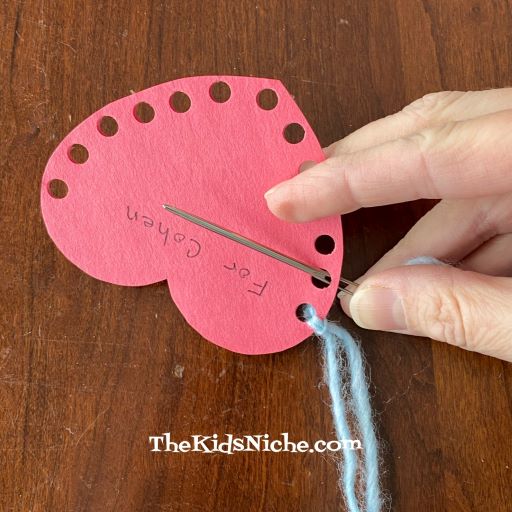
Continue sewing on around the heart, bringing the needle and yarn through each hole. (Sorry I should have taken more pictures of this part.) When you have sewn through the last hole, turn the heart over again so the back side is facing up. Draw your needle under the back side of the last 2 loops of yarn.
Now draw the needle through just the second loop one more time to help secure the yarn.
Cut the yarn up close to the needle.
Tie a knot with the 2 strands of yarn and clip off the extra yarn with your scissors. And you are done sewing your heart!
Now your heart is ready for some candy or small items to stuff it. 🙂
Have fun sewing paper hearts and giving them to the special people in your life on Valentine’s Day! 🙂
Are you ready for another fun Valentine’s Day project? Let’s make a really pretty 3-D heart!
You will need some construction paper, red tissue paper (or the color of your choice), scissors, glue, a piece of string and a pencil with an eraser.
You will need to cut approximately 75 little squares of the red tissue paper. I cut mine about 1 1/2″ square. They don’t need to be perfect because the paper will be “scrunched up”. Any smaller than that could be difficult to work with. If you have a cutting mat and a rotary cutter, this part will go much quicker, but scissors work fine. 🙂
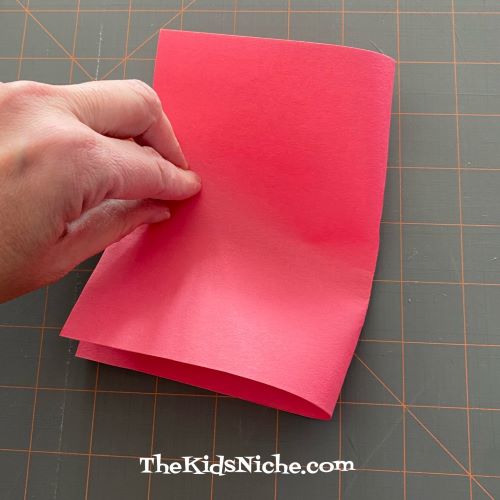
Take HALF of a sheet of construction paper and fold it in half.
Drawing on the folded edge, draw half of a heart shape.
Sorry, that’s rather hard to see. Cut out the half -heart shape and you will have a whole heart when you unfold it.
Set aside but save the piece that looks like a heart stencil for a project we will do another day. 🙂
Your finished heart can be added to a card, have a magnet attached to the back or be made to hang up like an ornament. If you would like your heart to hang as an ornament, now is the time to add a hole at the top. Go ahead and put your string through the hole because it will be harder to do later. (I found that out the hard way!)
You are now ready to start using the tissue paper squares. Take 1 square and your pencil with an eraser.
Place the pencil eraser in the middle of the square of tissue paper.
Wrap the tissue paper down around the pencil end.
Apply a very small amount of glue to the tissue paper at the end of the pencil eraser.
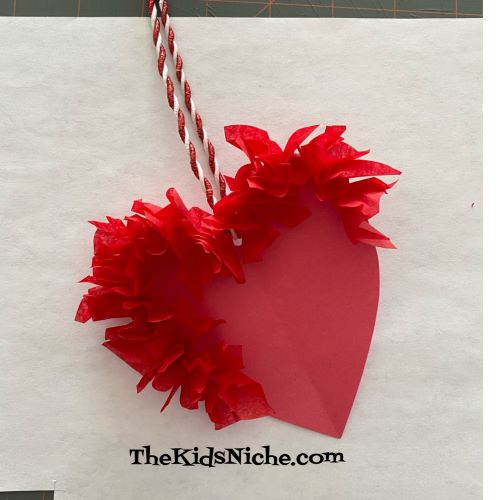
While holding the tissue paper onto the pencil end, place the tissue paper onto the heart you cut out. Start out close to the outside edge of the heart.
Hold in place for a few seconds, then carefully pull the pencil out leaving the tissue paper on the heart. Continue adding more pieces of tissue paper in the same way.
Keep adding…you’ve got the hang of it now!
The closer together you put the tissue paper pieces, the fuller your heart will look. Try to get the pieces right up against each other where they attach to the heart. If you like, you can just make an outline of the heart with the tissue paper.
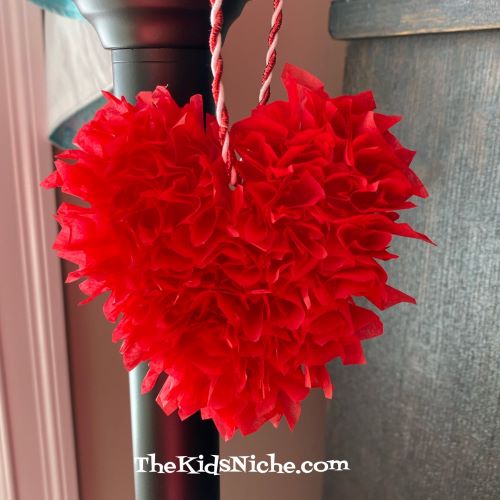
I like it better when the entire heart is filled up. It will take a little more time but it will be worth the effort.
You did it! Isn’t that a pretty ornament to decorate your house for Valentine’s Day? I think it would be really pretty to use more than one color of tissue paper. If you used red, white and pink, wouldn’t that look nice? I hope you’ve enjoyed this Valentine activity! I’d love to see your hearts, if you care to share them!
Have you heard about the people that are displaying hearts in their windows as a show of love and support for each other during this pandemic? It’s a nice way for kids when going for a drive in the car or a walk with their parents to have something to look for. I heard about it on Facebook and there is a group you can join to learn more about it. The group is called Heart Hunters. https://www.facebook.com/groups/326431341651785/about/
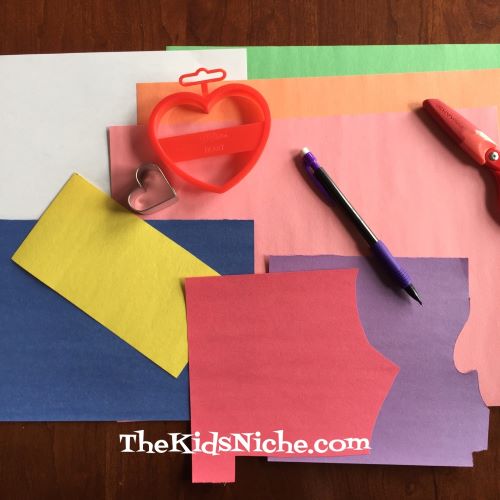
It seems like a fun project to get involved in, so I gathered up some construction paper, heart shaped cookie cutters, a pencil, scissors and tape and got to work!
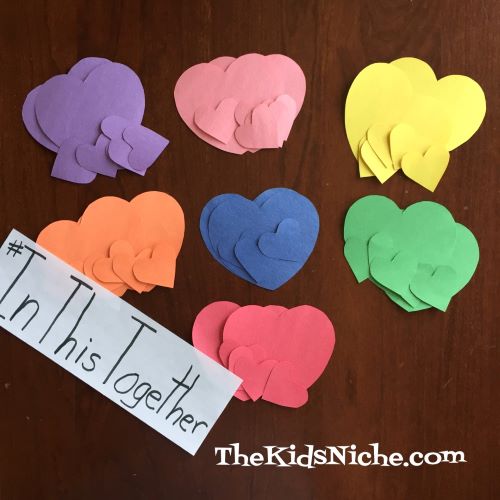
I used several different colors of paper to make my display bright and colorful. I made 2 sizes of hearts by tracing around the heart shaped cookie cutters and then cut each one out with my scissors.
I put my design in a window facing the road. I had trouble getting a clear picture because of the sunshine and the overhang on our roof. But now its going to rain so I’ll have to go with this picture.
I kept my design pretty simple but there are some AMAZING and complicated displays on the Heart Hunters Facebook page so be sure to go join and check it out. You can also add a photo of your heart display too. 🙂 Have fun making hearts!! We’re #InThisTogether!