We’ve Been Canning Red Beets Again

Late summer is the time of year we process the red beets we grow in our garden boxes. Do you know where red beets come from? Do you like to eat red beets? Since I shared this experience with you last year, I’m sharing last year’s post again for anyone that might have an interest in learning more about this yummy healthy vegetable. Here we go! 🙂

You’ve probably seen red beets and even eaten them. I’m guessing you bought them from the store in a can like this:

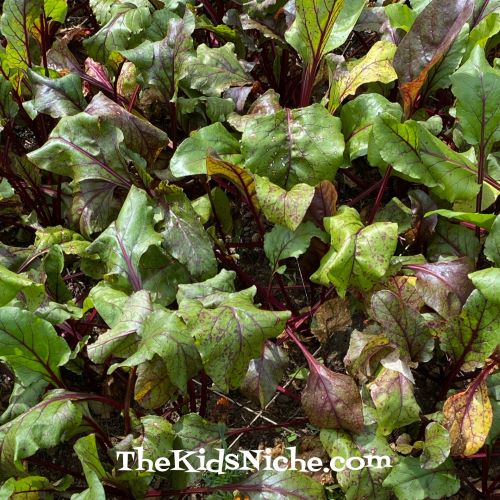
But do you know where red beets come from? Have you ever seen a red beet plant? We grew our own red beets this year in one of our garden boxes. (The orange flowers you can see are Marigolds which can help keep bugs away from the red beet plants.)

The red beets grow under ground and then they are dug or pulled up. Here’s a closer look at the plants and what you can see above ground.

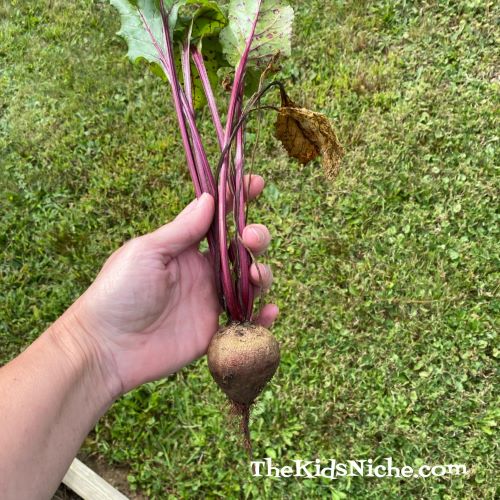
This is what one red beet looks like when it’s taken out of the ground.

A raw red beet is hard and is best eaten cooked. There is a process to follow if you want to cook red beets. First you cut off the top leaves, but it’s important to leave about 1-2″ of the stem intact. And you don’t cut off the roots. If the roots or the stem are cut off, the color will bleed out of the red beet when its cooked.

We sprayed the red beets outside with the water hose in order to remove the biggest part of the dirt from them. Then they were taken into our kitchen and put in the sink.

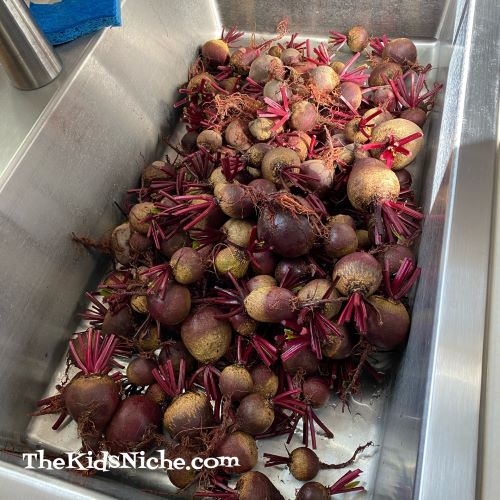
Next they are washed by hand and put into a large pot.

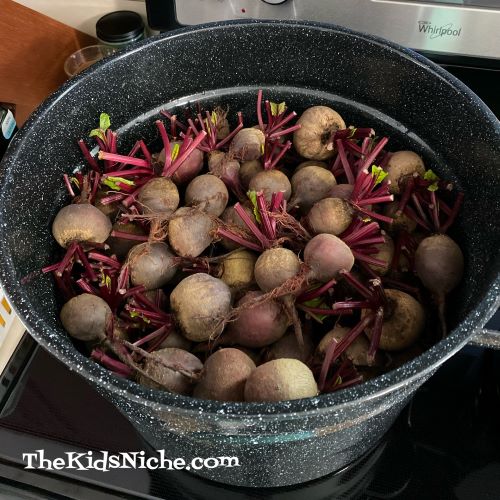
Water is added to the pot so that the red beets are all covered with water.

The water is brought to a boil and the red beets are cooked until the skin of the red beet will slide off the outside of the beet. The beets are then put into a large pan of cold water so they can cool. Once they are cool enough to be handled without burning your hands, each beet is gently “squeezed” and the skin, the root and the stem will slip right off.

And ta dah, there is your red beet ready for eating or canning into jars.

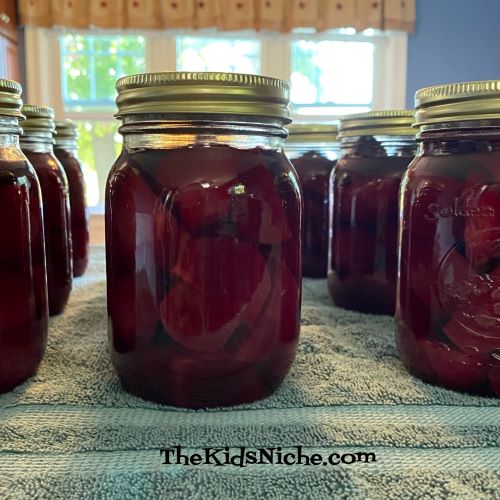
We canned or preserved our red beets so we will be able to eat them all through the winter time. In order to can the beets, they are cut into smaller pieces.

The red beets are packed into special glass canning jars and some salt and boiling water is added. A two piece set of a metal lid and a metal ring and placed on the top of each jar. Then the jars are processed in a pressure canner for a while. When the right amount of time has passed, the canner slowly cools down and once the pressure is gone, the jars of beets can be removed. As the jars cool, the metal lid will seal and that is what makes it safe to keep the red beets for a longer time on a shelf.

That is an abbreviated version of the canning process, so if you ever can red beets yourself, be sure to follow the instructions that come with your pressure canner. 🙂 Now you know where red beets come from! I hope you’ve enjoyed learning more about red beets!

5 Ways to Reuse Magazines For Some Learning Fun

Do you wonder what to do with your magazines once you’ve read them? If you have children or grandchildren, save them for some learning fun! Or donate them to someone who has young children and share these great ideas with them. All you need for these learning projects is a used magazine that can be cut up, some paper, a few markers or crayons, some glue and scissors.

#1.)There are a few ways you can do these projects, but let’s start with “Animals”. On a blank piece of paper, write the word “Animals” at the top. Then let the kids go through the magazine and cut out any pictures of animals that they find. This is good for recognition of a particular item and great practice for those motor skills!

The cutting part will go better if you tear the entire page out before the kids start cutting. Here are the animals I found in my magazine…

Have the child glue the pictures onto their “Animals” paper. Now is a great time to chat about what animals they found, how many of each animal there is, what color they are, which one is their favorite and even some discussion about the differences between the animals. For instance, the 3 cats in this example all have different colored eyes. Fun fact! 😉

#2.) Following the same idea, you could have the kids do a page about 1 particular color. I chose the color red. Letting them choose what color to look for makes it more fun for them.

#3.) The next idea is to pick one letter and look for things that begin with that letter. And to keep an eye out and cut out the letter itself. I went with the letter “F”…flag, forks, flowers, fruit, food and fence. 🙂

#4.) You can also follow this same idea but use numbers. Have the child find 1 of something, and 2 of something else, and 3 of another thing…you get the idea…1 flag, 2 cats, 3 dogs, etc.

#5.) Now let’s work on letter recognition. Write each letter of the alphabet on a piece of paper and have some markers or crayons handy.

Have your child go through the magazine and find each letter of the alphabet. When they find a letter, let them cross that letter off their piece of paper.

If they would like to color in the letter in the magazine, let them do that. Or circle it…whatever they want to do to mark it.

Now you have 5 fun suggestions of ways to help your child learn while reusing old magazines! And you never know what fun fact or yummy sounding recipe you might come across for yourself. 😉

Oh, the Things You Can Learn With Buttons!

Hi everyone! We’re back and so glad to have our electricity and internet back today after some strong thunderstorms moved through yesterday. Did you miss us? 😉

There are so many fun (and educational) things you can do with a simple bag of buttons! Let’s talk about some today! An egg carton will come in handy while playing with the buttons.

You’ll need some buttons that are the same kind and the same color. I can’t remember where I found these buttons but I think it was either Joann Fabrics or Walmart. If you’d like to use little containers to store your buttons in after the playing is done, I found these at the Dollar Tree store.

And yep, they come with lids.

My first suggestion is to dump the bag of buttons out on the table…

…and let your kids sort them into the little sections in an egg carton. The action of picking up each button is good for practicing fine motor skills and matching colors.

You can count how many buttons there are of each color. Or practice making numbers…

…or letters.

You can ask your child to count out a certain number of buttons of a certain color. For instance, count out 10 yellow buttons.

Depending on the age of your child, you can practice some addition problems by showing all the ways 2 numbers can add up to 10.

As a reward for counting and doing letters and numbers, give your child a bit of free time to make his/her own designs out of the colored buttons. Remember, all designs are GREAT and should be appreciated by others and not criticized. 😉

You can ask your kiddo to make something in particular. For instance, make a square using blue buttons.

Or make a square using blue buttons and put 1 yellow button inside the square.

You can make a pattern and have your child continue making the pattern. Orange, yellow, blue, green and pink…

Or make a line of the pattern and have your child add a few more matching lines.

I hope you will also be a good sport and let your child ask YOU to have a turn by doing the activity they suggest for you! 😉 I’m sure you will even think of more fun things to do with buttons than the ones I’ve shared here. Have fun and sneak a little learning in there too! 😉

Learning In Quarantine

With lots of kids out of school now due to the Covid-19 “social distancing” and quarantines, moms and dads are looking for educational things their kids can do at home. Cool websites with educational themes seem to be popping up all around. I will try to share the ones I come across in order to help keep our kids’ minds sharp on their extended Spring breaks and provide some fun while we’re all staying home.

The Cincinnati Zoo and Botanical Garden has a very interesting Facebook page you’ll want to check out. They have started sharing a Facebook Live video called Home Safari each day at 3:00pm EDT. Monday’s video was about a hippo named Fiona.

There is also a fun quiz you can do and you’ll find the answers in the hippo video. Completing the quiz gets you entered into a drawing to win 4 tickets for a visit to the Cincinnati Zoo after they reopen. Each day they will highlight a different animal that calls the Cincinnati Zoo home. Here is a link to their Facebook page. https://www.facebook.com/pg/cincinnatizoo/posts/?ref=page_internal

Another really fun looking website that will keep the kids entertained and all their brain cells working is the Scholastic Learn at Home site. https://classroommagazines.scholastic.com/support/learnathome.html

Here’s the little blurb you’ll see on their website:

“Even when schools are closed, you can keep the learning going with these special cross-curricular journeys. Every day includes four separate learning experiences, each built around a thrilling, meaningful story or video. Kids can do them on their own, with their families, or with their teachers. Just find your grade level and let the learning begin!

-The Editors of Scholastic Classroom Magazines.

To begin, choose a grade level. Then you’ll find books to read right on the website, videos to watch and activities to do. There are currently 5 days worth of things to do, but they will be adding more until there are 20 in total. Looks like a lot of fun!

Enjoy these fun websites! I’ll pass more onto you as I find them! Stay in, enjoy being each other and wash your hands!! LOL 😉