A Simple Tree for Kids to Draw

Hi there! Welcome to a new week of fun things for kids to do! Today I want to show you a way for kids to draw a cool tree.

All you need is a piece of paper and a brown crayon and several different shades of green crayons. You might want to start out with a smallish sized piece of paper, say, around 6″ x 9″. A full sheet of paper for this tree could take quite a while to finish and therefore lose your child’s attention.

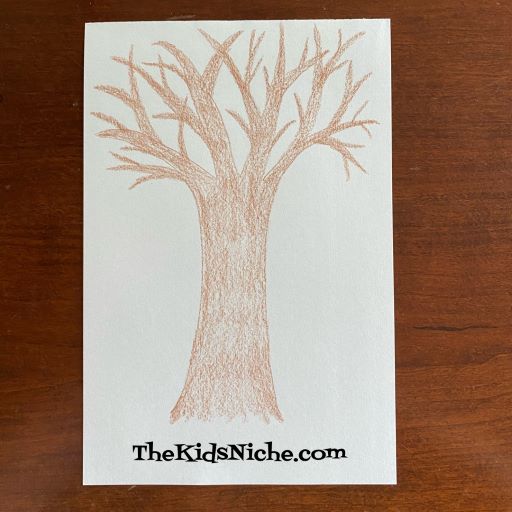
Grab your paper and your brown crayon and here we go! Start by drawing the outline of a tree with a few main branches.

Color the tree trunk and branches with your brown crayon.

Add a few branches to each of the main large branches on your tree.

Then add a few more smaller branches to the medium sized branches you just drew. It’s fine if your branches overlap each other.

Switch to a green crayon. Color small little patches all over the tree branches. Don’t cover the entire tree because you will switch and use a few more shades of green to fill up your tree with leaves.

Switch to the second shade of green crayon and make some more small patches of green.

Continue adding small patches using as many shades of green crayons you have. Green color number 3…

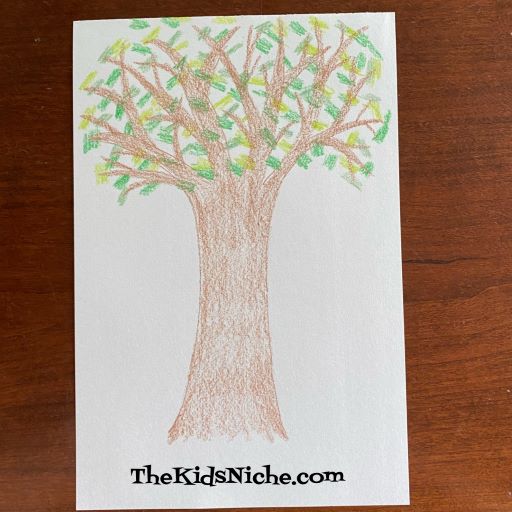
Green color number 4…

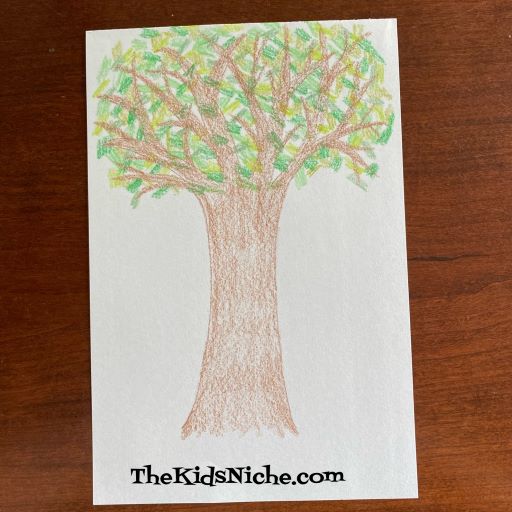
And number 5… If you don’t have 5 different colors of green, just use as many different greens as you have. Continue making leaves until your tree is as full as you would like it to be.

Your tree can be finished now or you can add a few more details. Maybe you would like to lightly add some different shades of brown to your tree trunk and branches. Or maybe you would like a hole in your tree trunk for some animals to nest in. Some green grass around the bottom of the tree would be great.

Using a red crayon, you could add some tiny little red circles to your tree for apples. πŸ™‚

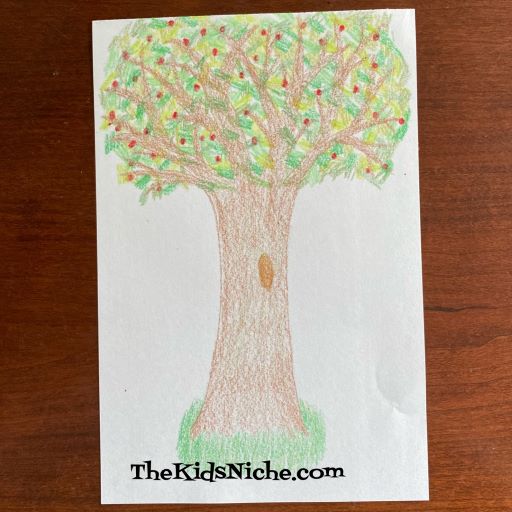
And your tree looks wonderful! Great job! Remember, all the gazillions of trees in the world and none of them look exactly like another. πŸ˜‰ Your tree is unique and is as wonderful as you are! πŸ™‚ Have fun and maybe draw a whole forest of trees! πŸ˜‰

Fun With Perler Beads!

Have you ever done a project using Perler beads? I have seen them for years but I finally tried a small kit and found out they are actually pretty neat! If you haven’t tried them yet, I’ll give you an overview of how they work. Here is the cute Star Wars kit that I bought and tried:

(Isn’t “Baby Yoda” adorable?!) This is everything that was inside this kit (minus the paper bowl): 225 beads (enough to make 2 “Baby Yoda”), a pegboard, instructions and ironing paper. You will also need an iron. I used the paper bowl to contain the beads and keep them from running away. πŸ˜‰

Follow the instructions for where to begin placing the colored beads on the pegboard.

Keep putting beads on the peg board by following the pattern in the instructions.

Adding a few more beads…it’s starting to take shape!

And there he is! All the pegs are in the correct order! We’re ready for fusing!

Heat your iron to a medium heat. Place the pegboard on a solid heat-safe surface. I used a wooden cutting board.

Cover the beads with the ironing paper – very important! Your iron should not touch the beads directly. Using a circular motion, iron over the beads and ironing paper for 10-20 seconds. When ironed properly the beads will still have an open center.

Set a heavy book or something similar on your project while the beads cool down to prevent it from warping. Peel the ironing paper back slowly to check that the beads have fused together. If there are still loose beads, iron over them a second time. (This happened to me.)

After the beads are sticking together, carefully remove the design and turn it over. Again, cover it with the ironing paper and iron the second side. Remember to place the heavy object on top again to prevent warping. The pegboard and ironing paper are reusable.

Tah dah! Your project is finished! πŸ™‚

You could slip a thin string or thread through one of the holes if you’d like to hang your project up. Perler beads come in soooo many colors and there are kits of all types available! Be sure to look for a fun Perler beads project the next time you are in your favorite craft store! Have fun! πŸ™‚

Sun Catcher Fun!

Have you ever made a sun catcher? They are fun and simple to make and look so pretty hanging in the sun! I found these supplies for the project at our local Walmart store: you will need sun catcher paint pens, suction cups with a hook and, of course, an unpainted sun catcher.

Open the pack of sun catcher paint pens and select your first color. I began with pink for the kitten’s nose and the inside of her ears. Squeeze a very small amount of pain onto the sun catcher.

Use a toothpick to pop any bubbles you see in the paint and to help spread the paint around.

Keep adding paint in your desired colors to your sun catcher.

I wanted my kitten to have a white face but the sun catcher wasn’t divided into a section there, so I painted in the gray area of the face first and then let the sun catcher dry overnight.

The next morning, I added white paint into the section I left open. And after drying for a few hours, this kitten was ready to be given to our grandson as part of his birthday present. The sun catcher was painted to look like his cat, Chloe. 😊

I also enjoyed painting a turtle sun catcher to give to our son who has a turtle for a pet.

Added green and purple paint…

And several more colors to finish her! I think she turned out pretty cute! Put the hook through the hole in the top of the sun catcher and use the suction cup to attach it to any window. (Or a turtle’s aquarium!) Watch the sun shine through! πŸ˜ƒ

There are lots of different sun catcher shapes at Walmart and they are probably also sold at craft stores. Have fun making some sun catchers of your own and catching some sunshine with them! πŸ˜ƒ

Kids Summer Crafts on Sale at Joann’s!

If you are looking for some small craft kits for your kids to do this summer, stop in at your nearest Joann craft store! They have some great prices on some fun looking kits!

These are a few items included in the 60% off sale:

#1.) Melty Bead Kits. There were at least 3 designs to choose from. (Yep, they look very similar to the Perler beads.)

#2.) Scratch Art Kits. There are 6 in this package and it includes the utensil used to do the scratching.

#3.) Color-in Puzzle Kit. There are 2 sets in the package plus some markers for coloring.

#4.) Plaster Magnet Kit which includes a brush and paints. There were a few designs to choose from.

#5.) Wood Coloring Kit. These sets includes 3 markers and a few little gems.

I also saw a couple different types of terrarium grow kits that were 70% off! Normally they would sell for $29.99, but are on sale for $8.99! Wow!

If you like the Makit & Bakit kits, they have some cute ones on clearance for $2.47.

Hop on over to your nearest Joann’s for some great summer bargains that will keep your kids entertained! πŸ™‚

Storms + Wind = No Electricity. Now What to do With the Kids??

We had some strong storms roll through our state on Monday evening this week and a LOT of people have been without electricity. (Including us…for about 44 hours.) Some are still out. That means no TV, no Xbox and soon all the electronics run out of battery. And the kids are home…and they are BORED! Now what??! Here are a few suggestions that might entertain the kids for a while so you don’t pull all your hair out during the first hour of no power. πŸ˜‰

#1.) Coloring pictures. Yep, drag out the boxes of crayons and coloring books and color some pictures. Maybe you “need” some new pictures to hang on the refrigerator or maybe Grandma and Grandpa need some pictures in the mail. πŸ™‚

#2.) Play some card or board games. The more people that play the more fun it will be.

#3.) Read some books. Let the kids pick out their favorite book and read it together. Or read a story to them that they haven’t quite mastered reading for themselves.

#4.) Do some simple crafts. Maybe not painting, if you don’t have water available for cleanup. πŸ˜‰

#5.) Draw some crazy monsters. All you need is paper and markers or crayons. Some wiggly eyes can add to the fun.

#6.) Play with Lego!

#7.) Give your pets some extra love and attention. Maybe play tug-of-war with your dog or trail a piece of yarn for your cat to chase.

Or maybe play Qwirkle with your cat! Lol πŸ˜‰

#8.) Play the “connect the dots” game…only need paper and pencils or pens. Make 100 dots on the paper. Each person draws one line and then it’s the next person’s turn. If you complete the 4th side of a box, that becomes your box and you write your initial in the box. Complete the most boxes and you win.

#9.) Play with Dominoes. You can play the actual game of Dominoes or just have fun building with them and/or knocking them down again.

#11.) Make your own board game. Let the kids design their own board game, even if the rules are a bit wonky and constantly changing. πŸ˜‰ They will feel 10 feet tall when you play their game with them.

#12.) Matching game. Find several pairs of items and mix them up for your kids to match up the pairs.

So the next time your electricity goes out, don’t despair! You can definitely find things to keep the kids occupied with no electricity needed! If you are currently without power, I feel your pain! Hang in there!

Let’s Make Super Soft Cloud Dough

Sorry to be away for a few days. I was feeling under the weather and we also lost a close friend to leukemia. So not the best days recently, but today let’s do something fun and make some amazing cloud dough! This was my first time to make cloud dough and I will say that I like it better than regular homemade play dough. Cloud dough is so soft! Best part is, there is no cooking!! πŸ™‚

And it is so super easy to make and you only need 2-3 ingredients. You’ll need some lotion and some cornstarch and if you want to add some color to it, you will also need food coloring.

Grab a bowl, a spatula, some measuring cups and some wax paper or parchment paper and let’s get started!

All the recipes that I looked at called for using twice the amount of cornstarch as you use for lotion. For example, 1/3 cup of lotion to 2/3 cup of cornstarch or 1/2 cup of lotion to 1 cup of cornstarch. Pour the lotion into the measuring cup (I used the 1/2 cup size) and then put it into your mixing bowl. Use your spatula to get all the lotion out of the cup and into the bowl.

Next add a few drops of food coloring, in the color of your choice. I went with blue.

Using your spatula, mix the 2 ingredients together.

Add the measured cornstarch to the bowl next and stir slowly so the cornstarch doesn’t “poof” all over everything. πŸ˜‰

When your cloud dough is mostly mixed together, dump it out onto a piece of parchment paper or wax paper and knead it together.

If it seems a little too sticky, you can add a little more cornstarch. Keep kneading until it is smooth and soft.

That’s all there is too it! Now the fun really begins!

You can break it into smaller pieces and roll them into balls. (No, I don’t think you should throw these balls in the house!)

Pinch off a piece and roll it between your hands to make a long thin piece. One thing you can do with long skinny pieces is to make a smiley face.

Use an old rolling pin to roll your cloud dough flat and then use cookie cutters to cut out fun shapes.

I think you’ll be glad you tried this easy recipe for cloud dough! If you made enough dough, I bet your kids will let you play too! πŸ˜‰

Store in an airtight container. Since this is my first time making cloud dough, I’m not sure how long it will keep. One person said, if it starts to feel dry, add a little more lotion and work it into the cloud dough and it will be good as new.

Hope you have a ton of fun! πŸ™‚

Yes, I Went to Dollar Tree Again…

Ok, I have a confession to make. I’m hooked on finding fun things for kids at the Dollar Tree stores! I met a lady today that was buying items for a vacation trip to the Outer Banks and she had a cart load of stuff! What a great way to save some money!

So let’s look at my find for today…a sticker book, but a different kind of sticker book. Sticker book puzzles.

In this book you use the numbered stickers to make 4 pictures.

You pick a numbered page and a page of numbered stickers. Sticker #1 goes on the #1 spot on the numbered page, then #2, etc.

This book is all about Mermaids but there was at least one other type about Carnivals. Check your nearest Dollar Tree store for what’s available close to you! πŸ˜ƒ

Fun Crayola Felt Flowers Kit

Welcome back to The Kids Niche! So glad you’re here! πŸ™‚

Today I want to share a super fun felt flowers craft kit that I found at the Dollar Tree store. I thought it was a nicely done kit, especially for $1.25!

You can make 4 felt flowers from each kit. Here is what is included in the kit:

To get started, a few of the parts need to be punched out. They came apart easily for me.

I would like to suggest that before you go any farther that you take a couple of minutes to trace around all the flower parts on a piece of paper so you will have patterns to make your own flowers later.

Now for the fun part! πŸ™‚ Each flower needs a set of matching flower pieces. 1 plain solid color piece and 1 plain solid color piece that has adhesive on the back side with a piece of white paper covering it.

Sort the pieces into 4 groups so you know which pieces you want to put together into 1 flower.

I started by putting the smaller flower piece with the face on it onto the front of a larger flower piece that has the white paper backing on it. Remove the paper backing from the face piece and press the piece onto the bigger flower piece.

Take the other matching big flower piece (the one without the paper backing) and lay it down on the table. Take 1 pipe cleaner and lay it on top of the flower piece for the stem of the flower.

Carefully remove the paper backing from the large flower piece that has the face on it, line the 2 big flower pieces up and press together. Once the adhesive touches something else, it doesn’t come back off very easily.

Last step is to remove the paper backing from one leaf and fold it in half around the stem to form a leaf.

That’s all that goes into making 1 flower. πŸ™‚ Repeat the process for the other 3 flowers and you’ve finished the kit!

Aren’t they so cute?! I just love them! Find a small vase or glass to display them in around your house. πŸ™‚ These would be cute flowers to help the kids make for mom or grandma, etc.

I hope these kits are available at your local Dollar Tree store! Happy flower making! πŸ™‚

Keeping Your Sanity With Kids in the Car

Summer is almost here and school is almost done for this year! Are you planning to take a vacation with your family this summer? Do you dread the long rides in the car with a bunch of kiddos? If so, I saw something at a Dollar Tree store today that might make your ride a bit easier! Bingo Games! There were 3 styles available that I saw.

#1.) Vehicle Bingo

#2.) Roadside Bingo

#3.) Road Sign Bingo

Each set includes 2 dry erase Bingo boards and 2 markers with an eraser on the end. My guess is you cross off each item as you see it while you are traveling. First one to get all items in a row marked off is the winner! Could be a great way to get the kids looking out the windows instead of at which sibling might have β€œtouched” them or breathed on them or done some equally annoying thing. πŸ˜‰ I think it’s easily worth the $1.25 for a little more sanity on your trips in the car!

Crafting an Easy Octopus

Let’s talk about octopus today and then I’ll show you how to make one with a few craft supplies. I bet you know quite a bit about an octopus already. Like do you know how many “arms” an octopus has? Yes, eight! Wow, do you think it would be cool to have 8 arms?! Is the body of an octopus soft or hard? It’s soft, so soft in fact that they can alter their shape so that they can squeeze through small spaces. How many eyes does an octopus have? It has 2 just like we do and they have excellent eyesight! Octopus are actually quite intelligent too. How do octopus protect themselves from predators? One way is to camouflage themselves into their surroundings so its hard for their enemy to see them. Another way is by expelling “ink” which is a dark colored substance and that gives them some time to swim quickly away. Did you know that when an octopus swims, it’s “arms” extend behind them? So, what do you think? Are octopus pretty cool? I think so too! Now let’s craft an octopus! πŸ™‚

You will need 2 pipe cleaners (or chenille stems), 1 pom-pom, 2 wiggly eyes, a pair of wire cutters or strong scissors and some glue.

To begin, use the wire cutters to cut the 2 pipe cleaners in half so you have 4 pieces.

Arrange the pipe cleaners into a star pattern like in the picture below.

Wrap 1 of the pipe cleaners once around the group to hold them all together.

Curl each end of the pipe cleaners up a little bit for the octopus’s arms.

Put some glue in the center of the pipe cleaners…

…and place the pom-pom in the center. Push it firmly down into the glue and hold it in place for a few seconds.

Glue the 2 wiggly eyes to the pom-pom and your octopus is complete!

Find a fun place to display your octopus. Hmm, do you suppose an octopus would be good at playing the piano since it has so many arms? Haha! Yes, we are just being silly now but it’s fun to think about an octopus playing a piano! πŸ˜‰

I hope you had fun learning a few facts about octopus and that you will have fun making your own! πŸ™‚