Easter Chicks Made From Fruit Cups

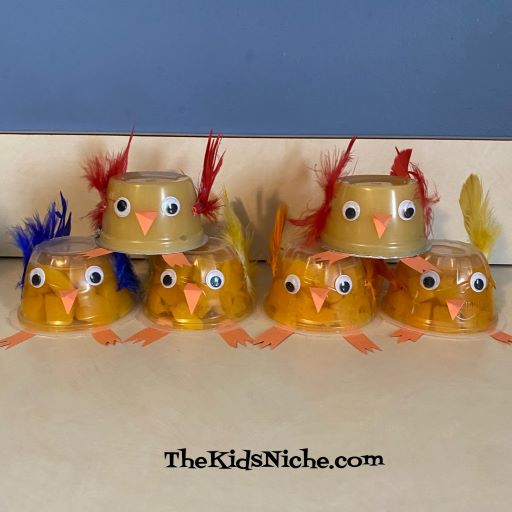
Hello again! The grandkids have gone back home with their mom and dad and it’s very quiet at our house again. We had a wonderful week of fun and just enjoying being together. 🙂 But now it’s time to share some more fun with you! One thing we made while the grandkids were here was some Easter chicks.

You will need some fruit cups, some orange construction paper, some fake feathers, some wiggly eyes, a pencil, scissors and glue. We found out by trial and error that using a glue gun works the best and keeps everything in place better than regular Elmer’s glue.

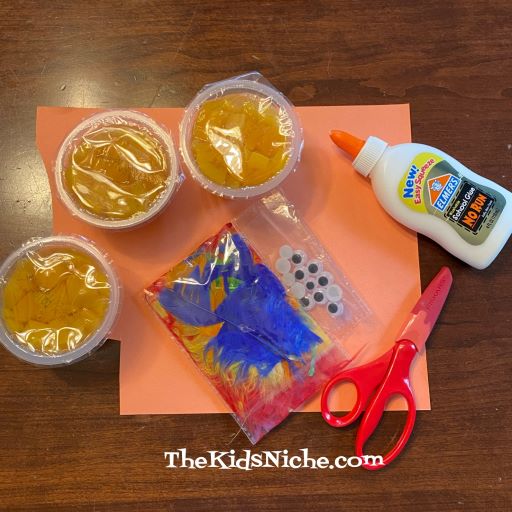
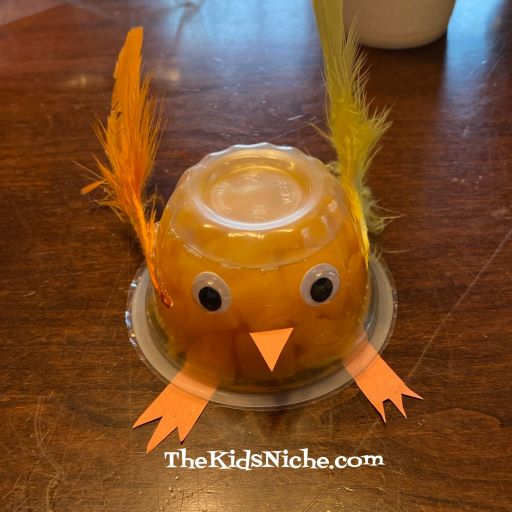
We used peach cups but mandarin oranges would be about the same color.

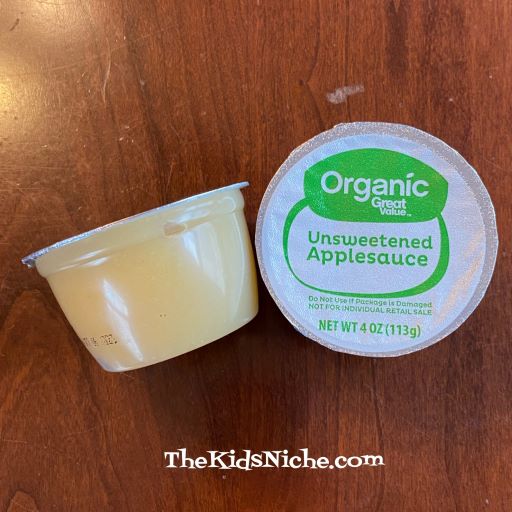
Applesauce cups work fine too and we did use a couple of those.

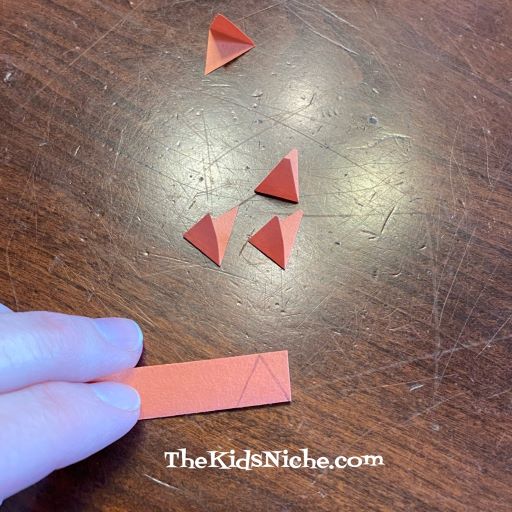
Fold a small piece of orange construction paper in half. Draw a triangle on the paper with one side of the triangle being on the fold. Cut out the triangle. This will be the chick’s beak.

Draw and cut out from the orange paper 2 chicken feet for each chick.

Glue the beak on the side of the fruit cup. And glue the 2 feet onto what is usually the top of the fruit cup. For this project, we’ll use the fruit cup upside down.

Glue on 2 wiggly eyes just above the beak. Glue a feather on each side of the fruit cup. You will definitely need to use a glue gun for the feathers.

That’s it! Your Easter chick is finished! 🙂

Whether you make one or a whole flock of chicks, I hope you will have fun making them! And have fun eating them! 😉

We’re Busy Having Fun!

You might not see many posts from me this week because we are busy having fun!! 😃 Some of our grandkids are staying with us this week so we are seeing what we can get up to together! We built a dinosaur…

Played Play-doh…

We’re watching some water beads grow.

There was a lot of laughing going on while playing some games on the Switch.

Played with some dominoes…

A late leprechaun left some gold pieces hidden around the house for the kids to find.

Some of us (ok, all of us!) were tired after staying up late last night. Lol

This fella put together a mini blocks set. Boy, the pieces are tiny!! 😳

It looks pretty cool now!

And that was all just today! 😃😂 Hope you are having a great week too!

Another Pipe Cleaner Flower

How about an easy, super quick pipe cleaner flower to cheer us up on this gloomy day? This little project takes 2 pipe cleaners the color you would like your flower to be and half of a green pipe cleaner for the flower stem. I chose pink for my flower.

Cross the 2 pink pipe cleaners in an “X” and use one end of the green pipe cleaner to wrap tightly around the spot where the 2 pink pipe cleaners meet.

Starting at the end of one of the pink pieces, roll up the pipe cleaner to the center where they all meet. It kind of reminds me of the way a snail’s body might look.

Do the same rolling with the second pink piece…

And then again with the 3rd and 4th pink pieces.

Finally you can bend each flower “petal” that you just rolled up to make it look more like a 3 dimensional flower.

You can make several flowers like this and have a bouquet of flowers or you can wrap the stem part around your wrist for a fun flower bracelet. I used one to hold the 2 handles of a bag together.

It’s a quick, easy, fun and looks great when you are done project! 🙂 Have fun making flowers!

Draw a Very Cool Dragon with Guide-Dots

I came across a Facebook ad today that I think is worth telling you parents/grandparents about. It’s called Guide-Dots. I am NOT affiliated with them in anyway, but they offer a free trial of their product and I found it quite fun to do. Yes, they are trying to sell you something (which looks pretty cool) but you can just do the freebie if that is all you are interested in. If you give them your name and email address, you can participate in the free trial. I think most kids will find it quite fun and entertaining. Here’s a link to the free trial:

You’ll start out with a pdf to download and print the page out.

Yes, there are 5 dots printed on the page. These are used as starting points for the dragon drawing. There are instructional videos that you follow to learn how to draw and color the dragon. Ms. Cindra leads you through each step and then you have time to do your drawing or coloring step before moving on to the next step. Here we have 2 dragon eyes! 😉

Part of his head…and look at those teeth!

And now we’ve made the dragon, though just a pencil drawing so far.

Using some markers to begin coloring the dragon.

And finally finished up with some crayons.

It’s a fun project that will keep the kids busy for a little while. And if you are so inclined, you can sign up to purchase more projects from the company. Enjoy! 🙂

It’s a “2” Day ! 2-2-22!

Today is February 2, 2022 and that makes for a very cool looking date! 2-2-22! This calls for a day of 2’s!

See how many things you can do today that involve 2 of something. 🙂 Here are a few ideas to get you started!

Eat 2 pieces of toast.

Or maybe eat 2 pieces of eggs.

Read 2 books!

Practice writing the number 2.

Or for kids that are a little older, practice counting or writing numbers by 2’s.

Play 2 games.

Play with 2 toys.

Rusty thought playing with 2 toys looked like fun! 😉

Make 2 crafts.

Eat 2 pieces of candy! Yum! 😉

Hug 2 stuffed animals.

Build 2 Lego sets.

I’m sure you can think of more things to do in 2’s! Like wearing 2 socks and 2 shoes! 🙂 And if you go outside today, it might be a good idea to wear 2 gloves or 2 mittens. You can exercise by doing 2 jumping jacks and 2 sit ups. I hope you have a wonderful 2-day! 🙂

It’s National Lego Day!

WHEEHAW! National Lego is a day to celebrate! Dust off those Lego sets and start building! 🙂

Lego sets are fun whether they are a big set or a very small set.

While Lego sets may seem to be on the expensive side, when you consider all the time that will be spent playing with them and all the different things that can be made from one set, it turns out not to be as expensive as it might seem at first.

Lego sets make great gifts! Here are some happy smiles from Christmas. 🙂

(Yes, that is a candy cane in his mouth.) Lol 😉

Building Lego is good for relaxation and also for mental stimulation. Did you know Lego even sponsors corporate retreats for adults? Sign me up! 🙂 There are Legoland theme parks (on my bucket list!), a Legoland Discovery Center in Tempe, AZ and lots of Lego retail stores you can visit. There are such things as Lego clothing, backpacks, bags, video games and Lego movies.

It can be fun to collect themed sets of Lego.

And it’s so fun to look forward to new Lego sets each year!

Be sure to check out all the fun at Lego.com! Have a great National Lego Day! 🙂

Making Large Flowers With Pipe Cleaners

Since we had a pipe cleaner project for a little older group of kids on Monday, I thought it would be nice to do an easier pipe cleaner project for younger kids today. They might need some help holding the pieces together until the final wrap, but after that they can create to their heart’s content!

You will need a total of 7 pipe cleaners…5 for the flower petals, one for the stem and one for the center of the flower. I chose to use red for the petals, green for the stem and yellow for the center. Feel free to use whatever colors your child picks out! 🙂

The stem piece will be in the center of the petals.

For each petal, fold the pipe cleaner in half loosely as shown, making the 2 ends meet.

Place the ends in line with one end the end of the stem.

Continue bending and adding petals, placing them around the stem.

When you have all 5 petals lined up, it should look something like this:

Now take your pipe cleaner for the center and begin wrapping it around the bunch of ends.

Wrap it around and around the group of ends and try to cover up the ends so you don’t see any other colors.

Now comes the fun part! Bend each flower petal up and then design your flower! 🙂

The petals can be shaped in many ways. Here are a few ideas to get you started:

Nicely rounded and oval shaped.

Put a little bend in the end of each petal.

Rounded petals that overlap each other. This one makes me think of a pansy!

Pointed skinny petals.

Petals bent in the middle to look like hearts.

For this flower, I bent the petals in half and looped the end over the yellow center of the flower. Then twisted the 2 pieces so they looked like smaller petals.

I’m sure you can come up with even more ideas! This is a simple but fun project for people of all ages. For older kids or adults, you could cut the pipe cleaners in half and make smaller flowers. I hope you’ll give this project a try! Maybe if we concentrate on making pipe cleaner flowers we can forgot how cold it is outside! 😉 Stay warm!

Super Cute Tiny Teddy Bear Made With Pipe Cleaners.

I found this oh, so adorable little teddy bear while I was looking through Pinterest. I had to see if I could make him look as cute as the instructions showed him and I think my second try turned out pretty well. 🙂 I didn’t have ribbon that was really thin enough so my bow might look a little bit big for him, but he’s still adorable.

This would be a fun project for kids that are a little older, say maybe starting around 8-10 years old. You only need 1 pipe cleaner per bear plus a little bow and 3 seed beads and some glue. The bears are pretty little which adds to their “cuteness factor”. They fit in the palm of your hand.

Here is a link to the Pinterest page with a video that shows you how to make the teddy bears.

Or here is another one that has written instructions and pictures in case you want to see things a little slower than the video. 😉

I hope you and your kids will give these fun little bears a try!

Uncooked Peanut Butter Fudge

Oooo! Do you love peanut butter?? How about some homemade peanut butter fudge?

I came across this recipe again the other day that my aunt shared with us quite a few years ago. I have fond memories of helping to make this peanut butter fudge when I was still a child at home. Though we often made it at Christmas time, this recipe is good for any time of year.

It only calls for 4 ingredients and there is no cooking involved. It does take some kneading by hand but that’s a great way for your kids to use up some of that excess energy! 😉 You will need 1/2 Cup of peanut butter, 1/2 Cup Karo corn syrup, 3/4 Cup powdered milk and 3/4 Cup powdered (or confectioners) sugar.

First put the peanut butter into a medium sized bowl.

Add the Karo corn syrup and stir together. If you have younger children helping, this is a good part for them to do.

Next add the powdered milk.

And finally add the powdered sugar.

Stir the ingredients together as best you can and then knead with your hands.

Turn the mixture out onto a clean countertop and knead together until all the ingredients are mixed in. You can divide the fudge among the kids helping so each can do some of the kneading.

Spread it into a pan or cookie sheet to the thickness you like. I think my mom spread it more on the thin side, maybe so we 6 kids got to have a piece or two without getting totally “sugared up”. 😉

Cut into pieces. Running the knife under hot water occasionally can help with the cutting process.

The pieces will stick together so you might want to store them so they don’t touch each other. You can do layers with wax paper in between the layers. Or the way we used to do it was to tear off some rectangular pieces of wax paper…

Place a piece of the fudge in the center…

Fold the long edges in overlapping each other…

And then twist the ends closed.

And there you have it! A fun treat for the family and hopefully your kids used up some of their extra energy! 😉 Enjoy!

The Cutest Lego Set Ever!

There is a new Lego set out and I honestly think it must be the cutest set I’ve ever seen! It’s the Year of the Tiger #40491. This set has 193 pieces and is rated for ages 8+. I found it at Walmart for $9.99. Take a look at this:

It is even cuter when you make it!

This is what you’ll see when you open the box. There’s even a printed envelope for storing the extra pieces.

3 bags of Lego pieces and the instruction booklet are included.

You literally start building from the bottom up. 😉 There’s his back legs and part of the body.

He’s got front legs now.

Building on up…

Can you guess what part this is?

If you said his nose and mouth, you are right! 🙂

It’s rather hard to see without eyes, so it’s a good thing they were next!

Now working on his back…

Check out this awesome tail! It’s moveable!

Of course, he needs some ears too! And they also move!

There’s a little platform to put together for him to sit on.

And there you have it! All done!

This set was super fun to build and it’s just so cute! 🙂 I hope you can find one at your local Walmart store (or somewhere else) and have a great time building a new tiger friend!