Valentine Tissue Paper Heart

Are you ready for another fun Valentine’s Day project? Let’s make a really pretty 3-D heart!

You will need some construction paper, red tissue paper (or the color of your choice), scissors, glue, a piece of string and a pencil with an eraser.

You will need to cut approximately 75 little squares of the red tissue paper. I cut mine about 1 1/2″ square. They don’t need to be perfect because the paper will be “scrunched up”. Any smaller than that could be difficult to work with. If you have a cutting mat and a rotary cutter, this part will go much quicker, but scissors work fine. 🙂

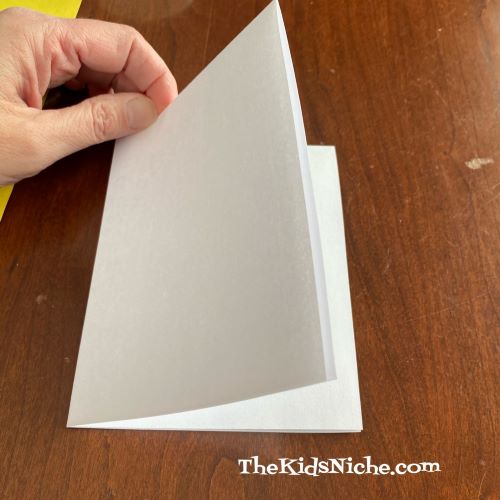
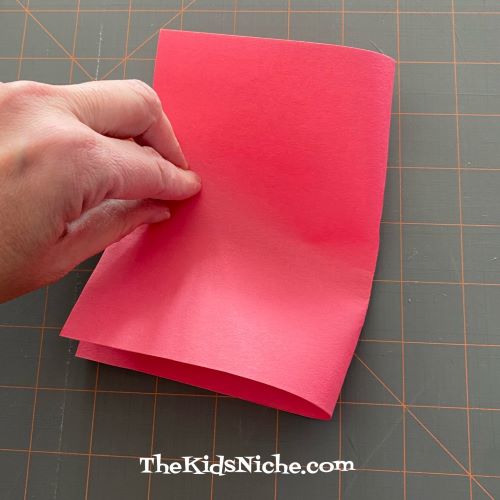
Take HALF of a sheet of construction paper and fold it in half.

Drawing on the folded edge, draw half of a heart shape.

Sorry, that’s rather hard to see. Cut out the half -heart shape and you will have a whole heart when you unfold it.

Set aside but save the piece that looks like a heart stencil for a project we will do another day. 🙂

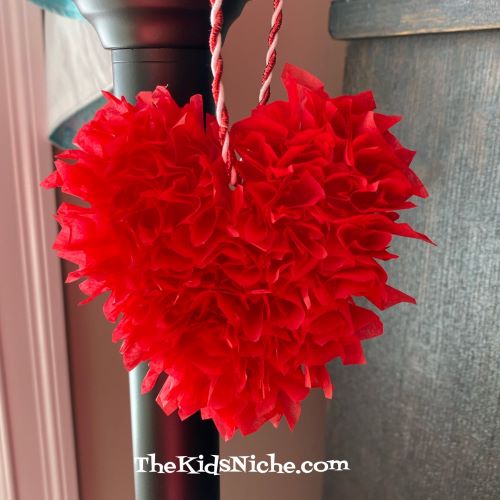
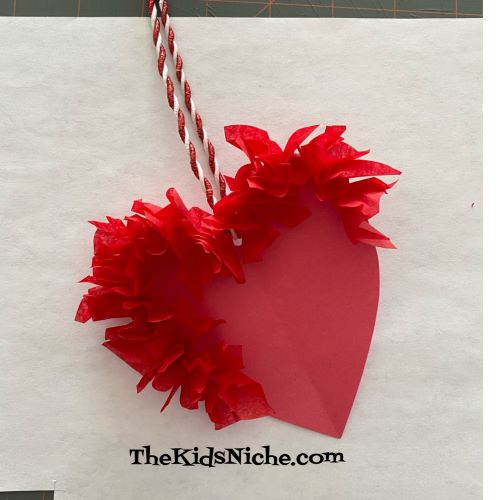
Your finished heart can be added to a card, have a magnet attached to the back or be made to hang up like an ornament. If you would like your heart to hang as an ornament, now is the time to add a hole at the top. Go ahead and put your string through the hole because it will be harder to do later. (I found that out the hard way!)

You are now ready to start using the tissue paper squares. Take 1 square and your pencil with an eraser.

Place the pencil eraser in the middle of the square of tissue paper.

Wrap the tissue paper down around the pencil end.

Apply a very small amount of glue to the tissue paper at the end of the pencil eraser.

While holding the tissue paper onto the pencil end, place the tissue paper onto the heart you cut out. Start out close to the outside edge of the heart.

Hold in place for a few seconds, then carefully pull the pencil out leaving the tissue paper on the heart. Continue adding more pieces of tissue paper in the same way.

Keep adding…you’ve got the hang of it now!

The closer together you put the tissue paper pieces, the fuller your heart will look. Try to get the pieces right up against each other where they attach to the heart. If you like, you can just make an outline of the heart with the tissue paper.

I like it better when the entire heart is filled up. It will take a little more time but it will be worth the effort.

You did it! Isn’t that a pretty ornament to decorate your house for Valentine’s Day? I think it would be really pretty to use more than one color of tissue paper. If you used red, white and pink, wouldn’t that look nice? I hope you’ve enjoyed this Valentine activity! I’d love to see your hearts, if you care to share them!

It’s February! That means Valentine’s Day!

We made it through January 2021! Whoohoo! Welcome to February! What is the most fun thing that happens in February? I think it’s Valentine’s Day! I hope we can share lots of ideas of fun things to do that center around Valentine’s Day. Today’s fun is an activity making a Valentine’s Day card involving pears! Pears? Yep, pears! 🙂 You’ll need 1 piece of white paper, (printer paper is fine) 1 piece of yellow paper or a yellow crayon or marker, glue, some markers or crayons and a pencil.

Let’s start by folding the white paper in half.

Then in half again the other direction.

This is your card base.

Using your yellow paper, lightly draw 2 small pear shapes and 1 larger pear shape. The larger pear shape needs to fit on the front of your card.

Cut out your pear shapes and get ready to put your card together. 🙂

Glue the large pear onto the front of your card. You can draw a face, arms and hands, legs and feet or anything else you want to do to make your “pear” person. Here is how I did mine.

Now add the words “You are “pear”-fect!” 🙂

Now open your card and glue the 2 smaller pears onto the right hand page. You can give them arms and legs and a face and whatever else you would like to add. Then write the words, “We make a great “pear”.

Decorate the rest of your Valentine’s card and save it to give to that special someone on Valentine’s Day! Hope you had fun making this “pear”-fect card! 😉

Drawing Eloise the Elephant

We haven’t drawn anything in a while so let’s do another drawing activity today! We’ll start with some simple shapes and we’ll end up with Eloise the Elephant! 😉

Grab a pencil and eraser, a piece of plain paper, a black pen or thin writing marker and something to color with. Here we go! Start by drawing a nice fat oval laying on it’s side.

Add another smaller oval which will be the elephant’s head.

Elephants are known for their trunks so let’s draw a trunk for Eloise next.

Add 2 small curved lines to better connect the head and body and make a neck area.

Now you can erase the lines of the 2 ovals that are between the 2 little curved lines you just drew.

Draw an ear. Then erase the lines that are inside the ear area.

Add just the top part of the second ear…it’s behind the elephant from our viewpoint so we can only see a small portion of it. Also draw in an eye, the bottom part of the mouth and 3-4 lines on the trunk.

Let’s move down and draw in 4 legs. Only 2 legs are seen completely from this viewpoint so draw in 2 legs using a rectangular shape. Then add 2 more legs that you can only see part of. Make the 2 legs that are on the other side of the elephant’s body a little shorter than the 2 on our side.

Erase the lines of the body that are on the 2 legs we can see from this side of the elephant.

It’s time for her tail!

Add some toes on her feet and some lines on her legs to show her wrinkly knees.

If you would like the outline of your elephant to be darker and more permanent, you can use a black pen or a marker that draws a fine line and trace back over what you’ve drawn.

After you are very sure that your ink is dry, you can gently erase any leftover pencil markings that are showing up. Test a very small spot first to make sure the ink won’t smear. That’s what I did, but you might not be able to tell the difference in these pictures.

Get out your coloring supplies and give Eloise some color! 🙂 And you’ve done it! Eloise is now ready for any adventure you can dream up!

I hope you’ve had fun drawing an elephant with me! Of course, you can name your elephant something different from Eloise. 😉 If you really enjoyed today’s activity, you can draw a whole herd or parade of elephants!

Clearance Prices on Kids’ Crafts at Michaels!

Are you always on the lookout for sale prices on things for your favorite kiddos? (Aren’t we all?) I wanted to share some great prices at Michaels craft stores for some kids’ crafts. I don’t know how long these prices will be in effect but they are available as I’m writing this post! Some items they show on sale are “in-store pickup only” but some items are available for shipping directly to you. If you want to go directly to their website instead of looking at some suggestions I have, here is the link:

https://www.michaels.com/shop-categories/kids/807060409?pmid=onclearance

Here we go! Color Zone Wooden Suncatchers Stained Glass Effect Kit. Regular price $4.99, Clearance price $1.99.

Artsi Dino Dig. Regular price $4.99, Clearance price $1.99.

Artsi Puff Paints. Regular price $4.99, Clearance price $1.99.

Sparkle Magic 3D Gemstone Mosaics Besties Kit. Regular price $4.99, Clearance price $1.99.

Color Zone Cling-Eez Perfect Pals Paint Kit. Regular price $4.99, Clearance price $1.99.

Color Zone 3D Scratch N’ Color Kit. Regular $4.99, Clearance price $1.99.

Mine 2 Design Fashion Sketchbook. Regular price $4.99, Clearance price $1.99.

Those are just a few of the cool items in the Clearance sale at Michaels craft store. Check it out for yourself and see what goodies you can find! If for some reason the link above doesn’t work, go to michaels.com and in the search box, type the word “clearance” and then click on the “Kids” tab. Happy shopping! 🙂

$1 UniKitty Lego Fun!

Are your kids crazy about Lego? It’s super fun to build and it’s good for eye hand coordination, patience, building skills, organization skills and so much more. It’s a great hobby that kids and adults can enjoy. It’s a great activity for spending quality time together. I found a super deal on UniKitty Lego at our local Barnes & Noble store. Little packaged Lego building sets that make 1 UniKitty normally priced at $3.99 were on sale for $1.00 each! The cashier told me that the prices on these are set by each store so check your local Barnes & Noble to see if they have the UniKitty sets for $1.00. Look for a sticker on the display box that says “Cheap! $1”.

Ok, I have to confess…I am a Lego fan myself. I bought one of these cute UniKitty’s back before Christmas, but last week I ended up buying 5 more. Haha! Cheap entertainment, right? Of course, I could say I bought them for my blog… 😉 Let me show you which ones I ended up with out of 6 packages. First is the one I bought before Christmas.

Here’s what one set looks like right from the bag.

In the process of building…

And finished!

Out of 6 bags, I actually ended up with 3 of this one! Haha! I think I needed someone else to pick the bags for me! 😉

The next one looked like this…

And done!

At first, I thought it was mad but then I noticed the little z’s on each side of its mouth and I think it’s just sleeping. Guess how many of this one I ended up with? Two! (See? I really did need some help picking out the right bags!)

So that was my cheap fun for the day! 6 UniKitty Lego sets…the directions are rather sparse but you can look at the enclosed paper and see how to put them together. So if you are around a Barnes & Noble store and your kids (or you!) like Lego, you might want to pop in and see if they have this great sale too!

Snag a Free Sticker!

Do your kids love stickers? How about getting them a free bunny sticker from Annie’s?

Annie's Logo. Yellow Annie's lettering with purple background and a bunny in a yellow circle

There are 5 stickers to pick from – one per family please.

Various Sticker

Just fill out the form, pick which sticker you’d like to have and write in the UPC number from an Annie’s product. You should receive your sticker in the mail in a month or little more. Easy peasy!

A rectangular, hot pink tie-dyed sticker with Bernie in the center. He's wearing a headband and making a peace sign with his paws. It reads "Don't panic, it's organic"

Thanks to Freebies4Mom for sharing!

The post 🐰Free Annie’s Sticker of your choice appeared first on Freebies 4 Mom.

Monday Funday!

Let’s start this week’s posts off with a day of riddles! Everyone likes riddles, right? Even if sometimes they are what my mom used to call “groaners” because they are so silly they make you groan. 😉

#1.) What belongs to you but your friends use it more than you do?

Answer: Your name!

#2.) What has a tail and a head, but no body?

Answer: A coin!

#3.) What has keys, but no locks; space but no rooms; you can enter but you can’t go inside.

Answer: A keyboard!

#4.) What kind of room has no doors or windows?

Answer: A mushroom!

#5.) What is orange, wears a green hat and sounds like a parrot?

Answer: A carrot!

Hope these riddles tickled your funny bone and made you grin! 🙂

After-Christmas Blues, Anyone?

When all the hustle and bustle and excitement leading up to Christmas has passed, do the After-Christmas Blues show up at your house? Sometimes taking a break from all the “new” toys and kits that arrived on Christmas Day, can be a help. Try going back to some of the “old” crafts they’ve done before but haven’t thought about in a while. New toys and things will seem more fun again after the kids have had a little break from them. There is comfort to be found in the tried-and-true. Here are a couple of suggestions of things we’ve done on here before but might be fun to pop out for the kids again.

#1.) Making paper snowflakes. It’s still obviously winter and cold outside so how about doing a craft with snowflakes that don’t make your fingers cold when you play with them. Follow this link to this project: https://thekidsniche.com/2019/12/12/do-you-want-to-make-snowflakes/

#2.) You can even make a snowman with your paper snowflakes. https://thekidsniche.com/2019/12/16/do-you-wanna-build-a-snowman-from-paper-snowflakes/

#3.) Hide and Seek Snacks. Try making up a fun snack in little cups and hiding the cups for the kids to find. Look for that post here: https://thekidsniche.com/2020/01/07/hide-and-seek-snacks/

There are over 200 posts here on my blog so I hope you can find some fun things to do with your kids to help everyone get back on an even keel again. Those new gifts will look even better afterwards! Have fun! Hugs to all of you! 🙂

Craft Stick Snowflakes

Are you looking for something to occupy the kids while they are off school for Christmas break? Here’s a super easy but fun way to make some great snowflakes. Our grandkids made these and shared these pictures with us. 🙂 (Thanks, Megan!)

They used colored craft sticks, glue, glitter glue and curling ribbon. If you only have the plain craft sticks you could add an extra step and paint them first. If you don’t have glitter glue, regular craft glue and glitter will work too.

Glue the colored or painted craft sticks together into a snowflake pattern. As you can see from the pictures, there are several ways you can glue them together.

After the glue has dried a little, use the glitter glue to decorate your snowflake. Or if you are using glue and glitter, put drops or lines of glue on the craft sticks and then sprinkle glitter over it. Gently shake the snowflake to let the extra glitter fall off.

Tie a piece of curling ribbon onto the snowflake and hang your snowflakes up for everyone to enjoy.

If you open a pair of scissors and pull the ribbon across the blade part of the scissors, the curling ribbon will curl up and look pretty. You can do this to some extra pieces of curling ribbon to add a little more pizazz to your snowflakes. Hope you enjoy making craft stick snowflakes!! 🙂

Felt Mitten and Stocking Garland

Are you looking for a craft to occupy your kids? May I suggest this easy and fun garland made from felt mittens and stockings? You’ll need some paper to draw a pattern on, a couple colors of felt, craft glue, scissors, some string or twine and a few small decorative snowflakes, buttons or winter items (optional). Here’s what my finished project looks like:

You can make your garland as long as you like using as many mittens and stockings that you want to make. Let’s get started!

First, draw a pattern for your mitten and stocking. Mine are around 4 1/2″ to 5″ long and around 3 1/2″ wide. I also made a pattern for the top white part for both the mitten and stocking.

Cut the pattern pieces out.

Gather your felt pieces. You can use whatever colors you like. I used only red, white and blue for this example. If you are making a lot of mittens or stockings, you might like to have more colors available.

If your felt is a thick type, you could use just one thickness of felt for each mitten or stocking. The felt I have is the thinner variety and rather see-through so I cut out 2 pieces for each mitten and stocking. Cutting 2 of each also makes the stocking able to have something small and light inserted inside it. (Like maybe a candy cane.) I cut 2 topper pieces for each mitten and stocking too.

I folded my felt over and just held the pattern piece in place while I cut around the outside edge of the pattern. You could trace around the pattern or cut each piece separately, depending on what works best for your kids and for the thickness of the felt you have.

It will be easier to cut the topper pieces if you cut a little section of felt away from the rest of the piece of felt first.

Cut a little strip of felt for the loop to hang your mitten or stocking from. You will fold it in half and glue the end pieces together.

If you are using just one layer of felt for your mitten or stocking, you can skip ahead and just glue the white topper part to the colored part of the stocking or mitten. If you are using 2 pieces, grab your glue and let’s put these together now.

Spread a line of glue along the outside edge of your stocking but not across the top edge. And put a dot of glue on each side in the place where the loop goes.

Add the second piece on top of the glued one and press firmly together, holding for a few seconds while the glue starts to set up.

Spread another line of glue and put the first white piece of topper at the top of the stocking. Turn the stocking over and spread another line of glue for the second piece of topper. Hold for a few seconds again.

Now for the best part, decorate your stocking! Glue on any little snowflakes or stars or buttons you might have. Or spread a little glue and sprinkle on some glitter. Gently shake off any extra glitter.

Follow the same directions for the mitten. Glue around the outside edge but not on the opening side of the mitten. Add your loop in now. (I forgot to add my loop now and I had to add it in later. Oops!)

Add the second layer and press together. Spread a line of glue for the first topper piece and add it on.

Flip the mitten over and spread glue for the second topper piece and add it. Press together for a few seconds.

Decorating time!

Ta dah! My mitten is complete!

Make as many mittens and stockings as you would like to get the length of garland you want to hang up. The last step is to thread your string through the loops of the stockings and mittens…and have an adult help you hang it up for all to enjoy!

I hope you have enjoyed our craft project and you will have lots of fun making stockings and mittens to give your house a warm, holiday feeling! 🙂 Happy holidays!