A Warm Project to Start 2020

Happy New Year! We are off and running already with 2020! I have lots of fun things in store for our new year so I hope you will stick around to enjoy them! I often think of January as a cold month, so let’s do a fun project that will also help keep you warm! Let’s make a scarf! Don’t know how to knit or crochet? No problem! Have you seen the soft fluffy yarn made with loops? There are several brands that produce it but here is an example of one:

The first time I saw it, I wondered how in the world you could knit it with knitting needles or crochet it with a crochet hook, but then I found out you don’t need either of them! All you need besides the yarn is your FINGERS! There are several ways to ‘knit’ this yarn, but I’ll just show you one way today. Let’s get going!! Here’s what the yarn looks like close up…

It’s just a row of loops. The first thing you need to do is count over the number of loops you need for the width you want your scarf to be. We’ll go with 8 loops.

To start knitting, take the 9th loop and pull it through the 8th loop from the back to the front.

Take the next loop (in this case it’s the 10th one) and pull it through the 7th loop.

Great! Now you have 2 loops done in your first row.

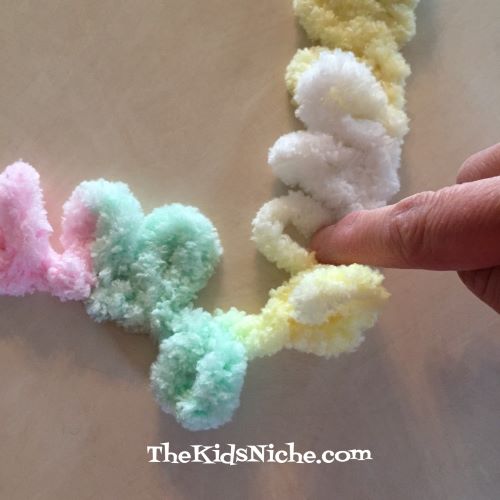
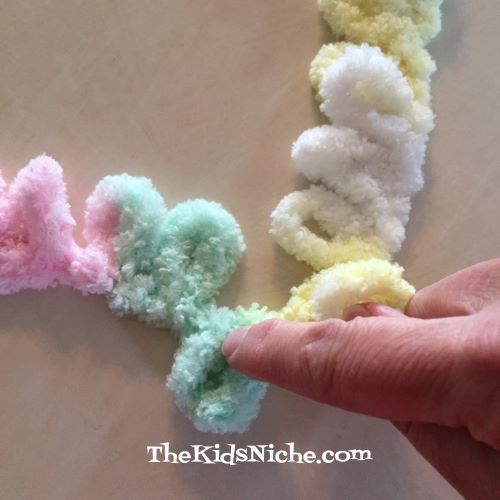
Continue going back down your original 8 loops by pulling the next loop on the yarn strand through until you have done that for each of your 8 loops. This is what it will look like.

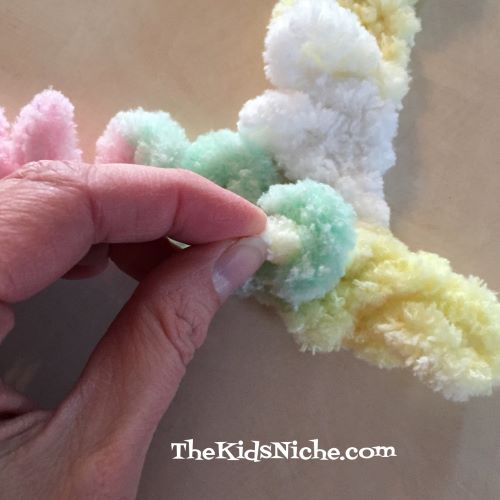
Always be careful to match up the next loop on your scarf with the next loop on the yarn strand. Now you are ready to go back across your scarf from left to right, continuing to pull loops through. Take the next loop (green where my finger is) through the first loop on the second row of your scarf (also green in this example).

That’s all there is to the knitting part. Just keep working your way back and forth across your scarf, continuing with pulling loops from the yarn strand through the loops on your scarf.

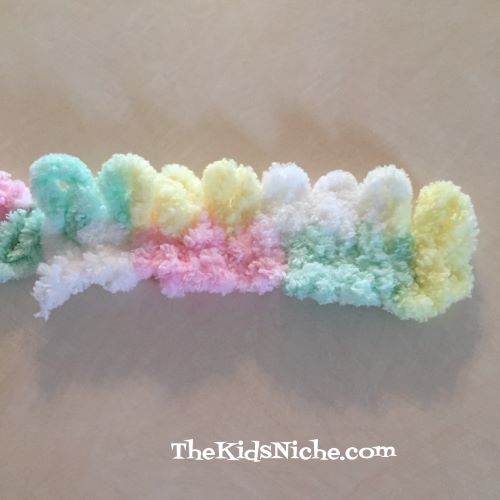
After a few rows it will begin to take shape and you will see your scarf developing!

Continue knitting until your scarf is as long as you would like it to be. Once your scarf is the desired length, you can bind off to put an end on your scarf. Here is a scarf in a different set of colors to show you how to bind off at the end. Stop knitting so that your yarn strand is coming out the left side of your scarf.

Now go back to the top loops on the right side of your scarf. Take loop number 7 and pull it through loop number 8.

Then take loop number 6 and pull it through loop number 7.

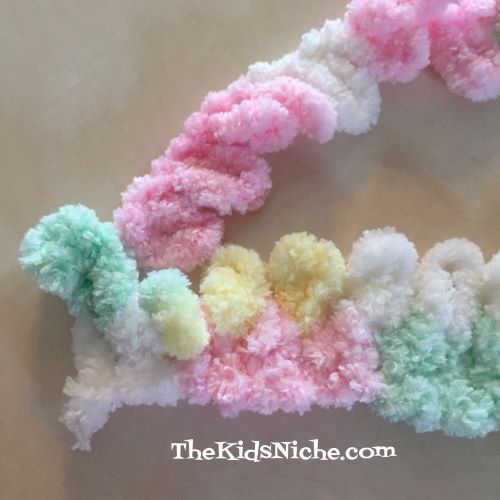
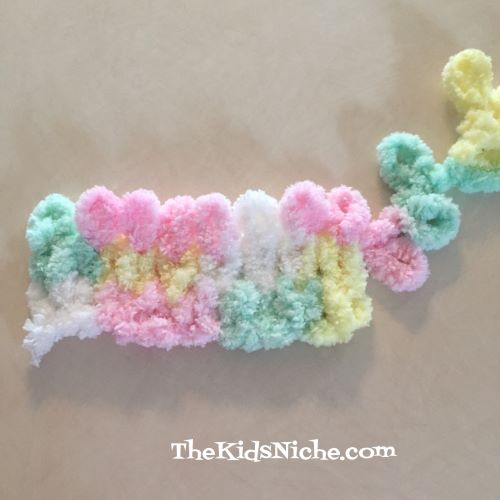
Continue working your way across your scarf in the same manner. See how it is making less loops and putting a finished edge on your scarf?

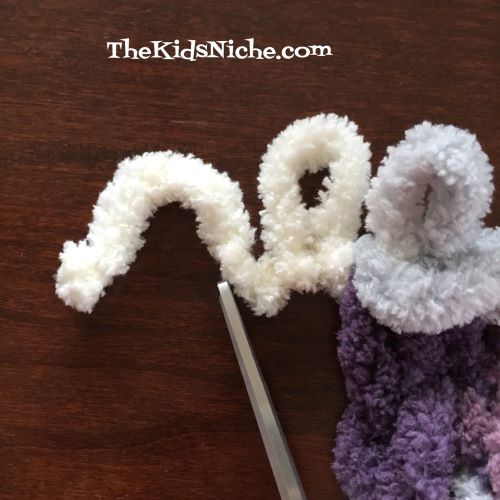
Continue knitting until you have just one loop left. Now it’s time to cut the yarn strand off from your scarf. Cut on the bottom leaving 2 extra loops on the strand for finishing your scarf.

Take your scissors and carefully cut right at the bottom of each of the 2 extra loops.

This will open up the 2 extra loops and make 1 long strand of yarn.

Take the long single strand and pull it through the last loop left on your scarf.

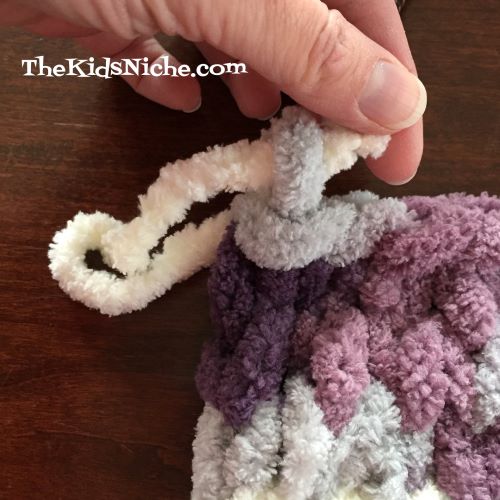
Pull it down snuggly but not so tightly that you make your scarf look misshapen. Weave the end back through your scarf a few times to secure it. You can use a large needle to do this or just use your fingers.

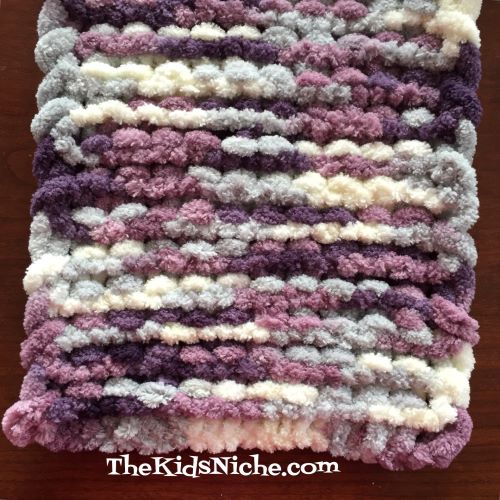
Trim off the extra yarn strand. And tah dah! Your scarf is ready to wear and keep you toasty warm! This is my finished purple, gray and white scarf. It is soooo soft!

The front and back of your scarf will look a bit differently but that’s the way this kind of knitting works, and it’s all good! Here is the front side…

And this is the back side…

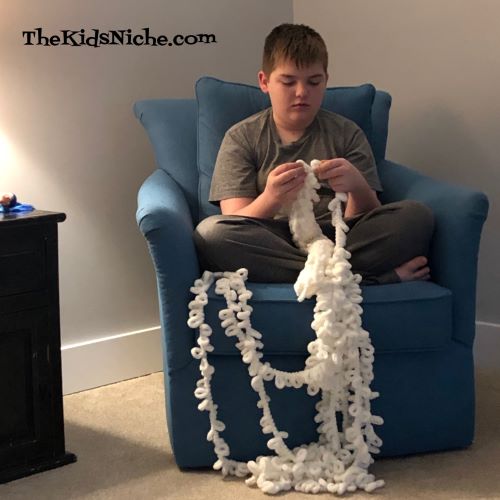
I taught my grandson how to make this type of scarf on New Year’s Day and he really enjoyed working on it. In fact, his whole family then went to the store to buy yarn so they could all make one! Haha! Be careful because this type of knitting is addictive! 😉

Do You Wanna Build a Snowman from Paper Snowflakes?

Making a snowman is always fun but here is a new little twist that I think you will like! On December 12, 2019, I showed you how to make paper snowflakes. If you missed that post, you can find it here: https://thekidsniche.com/2019/12/12/do-you-want-to-make-snowflakes/

Here are some of the snowflakes I made that day.

Paper snowflakes are the foundation for our snowman craft for today. You’ll need a piece of colored paper for the background and some white paper for the snowman. I chose blue construction paper for my background.

You’ll need 3 squares cut from the white paper. I made mine slightly different sizes since a snowman’s body is usually bigger than his head. I used a 4″ square for the bottom part of the snowman, a 3 1/2″ square for his middle and a 3″ square for his head. Using only the 2 larger squares, make them into snowflakes. ( https://thekidsniche.com/2019/12/12/do-you-want-to-make-snowflakes/) Cut the smallest square into a circle for the snowman’s head.

Glue the bigger of the 2 snowflakes to the bottom center of your background paper.

Next, glue the second snowflake on for the snowman’s belly.

Now draw your snowman a face on the white circle.

Glue the snowman’s head above the 2 snowflakes on the background paper.

Decorate your snowman in the way you want him to look. I cut a little square and a skinny little rectangle from black construction paper to make my snowman a black hat.

I drew 2 arms with a marker and made them look like sticks for my snowman’s arms.

To finish off my snowman, I used 2 pieces of red ribbon to make a scarf.

All done! Isn’t he a handsome fellow? I hope you had fun making a snowman with paper snowflakes! 🙂

Do You Want to Make Snowflakes?

I don’t know if Elsa and Anna would be impressed, but we can have fun making our own snowflakes too! 😉 And we can stay warm while doing it! All you need is a piece of paper and a pair of scissors. I used a piece of white printer paper to make mine. Here we go! First, you’ll need to make a square from your paper. All you have to do is fold one corner over across to the opposite straight side and make a triangle…look at the picture for help to understand what I mean.

Cut off the extra paper with your scissors so you just have the triangle left. (If you open the triangle, you’ll see that you now have a square piece of paper.)

Now fold the triangle in half from left to right…or right to left. 😉

Turn the triangle around so the longest edge is at the bottom. Then fold the right side over about 1/3 of the way…

Then the left side over to meet the right side edge. If the sides don’t quite meet evenly, go back and move the first fold a little and try again.

Now trim off the extra to make a triangle.

Cut designs all around the edges but don’t cut all the way across. Leave some of the fold on both sides. Take a look at the type of cuts I made on mine. Small children may need some assistance with this step as the thickness of all the paper can be a bit hard to cut through.

Carefully open your paper up and you’ll see the beautiful snowflake you made!

Isn’t that awesome?! They say there are no 2 snowflakes alike so every one you make will look a bit different and that’s just the way it should be. Let’s look at another one I made…first you can see the type of cuts I made…

And now look at the pretty snowflake!

You can make different sizes of snowflakes just by starting with a different size square piece of paper. Look at this little one I did!

And here’s what it looks like opened up.

I hope you found this to be another fun winter project! Make as many as you can and decorate your house with snow that won’t melt any time soon! 🙂

Cookie Cutter Decorations

Happy December! It’s already feeling like winter and Christmas is coming fast! Let’s make some quick and easy decorations to spruce up your house for the holidays! Grab your favorite winter time/Christmas cookie cutters and some construction paper, a pencil and a pair of scissors and let’s get started! Here are the cookie cutters I found that we have on hand at our house.

Get a sheet of paper, any color you like or just plain white, and a cookie cutter and a pencil. Place the cookie cutter on the piece of paper and trace around the outside edge with your pencil. Try to hold the cookie cutter very still so your lines meet up just right.

Lift the cookie cutter off the paper and make sure you have a complete shape drawn on your paper.

You can color the shape right on the paper and maybe add a few more shapes to fill in the space. Or you can use a pair of scissors to cut out the shape. I cut out 3 different size star shapes on 3 different colors of paper.

You can use the shapes separately or you could do something like I did and glue them together to make one colorful star.

Paper shapes can be left just the way they are or you can color them with crayons or markers for some extra color and designs. Here are a few I did to give you some ideas to get you started. A gingerbread man made on white paper and colored with crayons…

A green Christmas tree shape using markers to color in decorations…

And a pair of blue mittens colored with markers.

You can leave your decorations just one thickness of paper, or you can put two matching pieces together by gluing the back sides together. I added a piece of thread before taping the pieces together so I have a loop to hang my mitten. (I used double-sided tape instead of glue.)

And there we have our first batch of decorations! 🙂

Here are a few suggestions for more ways to decorate your shapes: you can use Elmer’s Glitter Glue which is colored glue with the glitter already mixed in it.

Another idea is to use regular white glue (that dries clear) and some crayon shavings. Start by spreading glue over your shape in the place you want to put the first color…

Then sprinkle tiny crayon shavings over the glue and lightly press in place.

It’s ok if you sprinkle on a little more than you need because you can gently pick up your shape and let the excess fall off onto a piece of paper. Then you can save those bits for another shape.

If you would like to use a second color, put more glue on your shape in that spot. I added glue in lines to make the mitten look like it has stripes.

Sprinkle your second color on the glue. I added yellow crayon shavings and again, very gently pressed them in place.

Now gently lift your shape and let the excess fall back onto a sheet of paper so you can save it for later.

What I like to use even better than crayon shavings is glitter! I used some holographic blue glitter and it was sooo pretty! Make your design on your shape with regular white glue like we did with the last shape.

Sprinkle on the glitter…

And gently lift your shape and let the extra glitter fall off onto a piece of paper like before. Isn’t that so pretty?!

After you make your decorations, have an adult help you hang them up for everyone to enjoy! Add a string to use for hanging or maybe just a piece of tape or double sided sticky tape. You could also use your shapes to make a card to mail to a friend or relative to wish them a Merry Christmas! I hope you have fun making your house beautiful! 🙂