A Change-up For Lunchtime Fun

Do your kids get tired of eating sandwiches for lunch? Or do your kids not really like bread? Try this fun idea just to change things up a bit. Sometimes all we need is a little something out of the ordinary to cheer us up. Gather up your lunchmeat slices, cheese and condiments and let’s liven up lunch! 🙂

Lay a slice of lunchmeat on a cutting board. Depending on the size it is and the age of the child that will be eating it, you may want to cut the slice in half.

Spread your child’s favorite condiment on the meat. I went with mustard on one half and Ranch dressing on the other half.

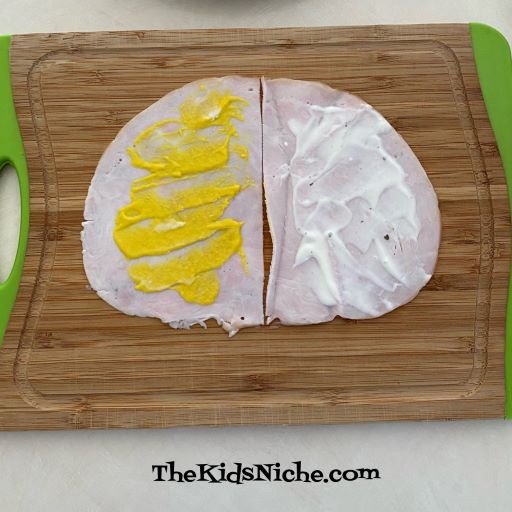
Top this with a yummy slice of cheese. I used Swiss cheese and Smoked Cheddar for my example.

Starting at one side, roll the meat and cheese up together.

As you might notice, the right side of my meat slice was pretty thin and so it fell apart as I tried to roll it up. Solution – if your lunchmeat is sliced thin, use 2 pieces of meat together.

You can stop here and have “rollups” for lunch or you can take it a step further and cut the rollup in smaller pieces.

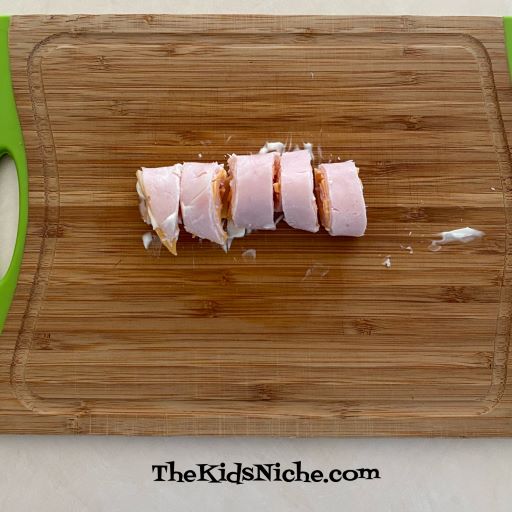
If your child is old enough to safely use toothpicks, stick one toothpick into each piece of sliced rollup to hold it together.

Add a slice of tomato or a few baby carrots or some fruit in the center of the circle and lunch is ready to be served! 🙂

As always, adapt this suggestion to fit your child’s age and your family’s situation. I hope changing up lunch helps to brighten your day! 🙂

Make a Quiet Learning Book

There are times when you need something quiet to entertain your children. Perhaps when you go to a funeral or church or the doctor’s office, etc, it’s nice if the kids can do something quiet. If you have a notebook handy, you can make a quiet learning book fairly easily. The quiet book can, of course, be tailored to your child’s age.

Here are a few suggestions for pages you can make for your child to do.

1.) Match the capital letters. Have your child draw a line between the letters that are the same. The size of the notebook you have will determine how many letters you can fit on a page. You can do a few letters or the entire alphabet.

2.) Match the numbers.

3.) Draw lines to match the simple shapes.

4.) Match the capital letters with the lower case letters.

5.) Draw a line between the matching stickers.

6.) Draw a line between the stickers that are the same TYPE of thing. For example, the 2 kittens, even though the stickers are not of the same kitten.

7.) Draw lines to connect the matching words.

8.) Draw lines to match the colors.

9.) Draw the same picture on the bottom of the page.

10.) Draw the same shape beside each shape on the left.

11.) Draw another caterpillar like this one.

You’ve got the idea now and I’m sure you will think of other pages to make that your child will enjoy doing. There’s no reason that a quiet time can’t also be a time of reinforcing some learning! 🙂

More Cool Crayons!

If you have been following me for very long, you know that I love crayons! And I love finding new kinds and colors of crayons. Soooo here’s another box of Crayola crayons that I am enjoying! Presenting Crayola Colors of Kindness Crayons!

The outside of the box shows you the colors of the crayons that are inside the box.

Just look at all those gorgeous colors! 🙂

Each crayon has the words “Colors of Kindness” on it.

Then each crayon has 2 names! One is a…well, we will call it the “kindness name”. There are fun names like “breathe deep”, “life is gouda”, “you’re so a-peel-ing”, “kind to the core” and “have a scoop of fun!”

If you roll the crayon over just a bit, you’ll find the other name. Like “turquoise blue”, “macaroni and cheese”, “banana mania”, “granny smith apple” and “pink sherbert”.

Here are a couple of my favorite names: “oatmeal”. 😉

“robin’s egg blue”. Such a pretty color!

And just one more…”inchworm”. Haha! Did that make you think of a little green inchworm? 😉

You and the kids can have fun reading all the great names on the crayons and then enjoy coloring a great picture with these amazing Color of Kindness crayons! 🙂

I’ve Got the Giggles!

Do you ever get to the point in a day where everything seems funny? When I was a kid still living at home with my parents, we called it being “slap happy”. Sometimes it happens when we are really tired but sometimes it just seems like lots of things “tickle your funny bone”. So here’s a few things that at least made me smile and some that made me giggle and some that even made me laugh out loud. 😂 I hope they will brighten your day and the giggles will spread from my house to your house too!

Little Red Rusty Hood! “Moooooom! I don’t want to wear this scarf!” (Yes, I know it looks like the toy box exploded in the background!)

The dog’s favorite thing that comes in a Bark Box now! 🤣

Super Easy, Super Fast Snack!

Hello again! 🙂 Sorry I’ve not posted much for a few days! It’s been a rather crazy time here with a few small crisis thrown in lately, but I hope to be back to posting more next week.

So are you ready for a super easy, super fast snack idea? Here it is: tortilla chips and cheese! Bring out of bag of tortilla chips…

Open a jar of cheese dip…

Put some cheese dip in a little bowl and warm it for a few seconds in the microwave.

Put them together and chow down! Yum!!

Are you drooling yet? 😉

If that isn’t flavorful enough for your taste buds, add a little salsa too!

Voila! You’ll have a very yummy snack in a matter of just a couple of minutes! 🙂 Enjoy!

Magical Creatures Sticker by Letter Book

If you are looking for a FUN way for your kids to reinforce learning those pesky letters of the alphabet, here’s an idea that will seem like it’s all fun and no work! I found this book at our local Barnes & Noble store, but I see that it is also available online at the Barnes & Noble website and also on Amazon. Only $8.00! It’s called Magical Creatures Sticker by Letter Book.

Each magical creature has a page with the outline of the creature. Each outline is divided into smaller spaces and each space has a letter of the alphabet on it.

There is a corresponding sticker page for each creature and each sticker has a letter of the alphabet beside it.

You put the stickers on the outline by matching the letters.

It’s interesting to watch the creature gradually take shape.

And ta dah! It’s finished! 🙂

The picture pages are perforated so you can tear them out to share or hang them up to be admired. Our granddaughter has one of these books and it’s great for a little quiet time fun. 🙂

Adding Something Special to Your Care Packages for Kids

Do you have grandchildren that live some distance away from you that you like to send special little packages to in order to keep in touch with them? We do and so today I want to share a little idea with you that can add a little extra fun to your packages but doesn’t cost anything extra. This is a package that I sent to 2 of our grandkids today:

When they open the box, the first thing they will see is this note:

(Rusty is our dog and he loves the kids!) Under the yellow tissue paper they will find this package:

So my idea to make things more interesting is to wrap each little gift in tissue paper (or other paper) and give the child something to do before they can open each package. Their first package involves a hunt for letters and then arranging the letters in alphabetical order. Once they complete that they can open the package and get the prize inside. (This prize is 2 bottles of bubbles.)

The next packages in the box look like this:

The kids will need to follow the instructions in order to open their packages. The things they need to do are just silly little things that will hopefully make them giggle. For instance, hopping like a bunny or kangaroo and meowing like a cat or mooing like a cow. 😉 (These packages contain a dress for our granddaughter and a tee shirt for our grandson.)

Next they will find a package from Rusty that has them acting like a dog. 😉 (There are 2 books in a series inside.)

The last 2 packages have our granddaughter identifying colors…

…and our grandson solving a simple math problem. (I realized the colors in this picture didn’t work right AFTER I had already mailed the package to the kids! So no do-overs!) These little packages contain a Colorforms (reusable stickers) set for each.

In case you can’t read it, this package says “Cohen, What is 5 + 5? That was too easy, wasn’t it?” 🙂

By adding a little silly activity to each package, it makes the unwrapping take a little longer. And you can be reinforcing their skills without them even realizing it. You can have them dance or sing or jump or run in place or any number of a million things. Being silly is fun for everyone and will hopefully bring out extra smiles and the giggles. 🙂

Making Frozen Pudding Popsicles

Hello again! I’m back after a few wonderful days away. Summer is winding down here in Ohio, but we are still having some very warm days! So having some cold drinks and cold treats on hand is just the thing we need! Have you ever made frozen pudding popsicles? They really are quite yummy! All you need is a box of your favorite flavor of instant pudding, some milk and some popsicle molds OR paper cups and plastic spoons or wooden craft sticks.

Follow the directions on the instant pudding box to find the correct amount of milk needed to make pudding. (This size box needed 2 cups of milk.) Add the milk and the pudding mix to a bowl.

Whisk together.

Quickly fill the popsicle molds with the pudding before it sets up completely.

Add the tops of the popsicle mold set and make sure they are on snugly.

Or if you are using paper cups, put a portion of pudding into each cup. I used 9oz. cups when I tried this, but I think 5oz. cups would be a better size.

Add a plastic spoon or a popsicle stick to each cup.

Pop your popsicles into the freezer and let them freeze for a couple hours. They won’t come out too well if they aren’t frozen solid.

Once they are frozen, it’s time to enjoy!

Run some warm water on the outside of the plastic popsicle mold and then squeeze it to help loosen the popsicle from the mold. Slide the popsicle mold off and mmmm, start nibbling on your frozen pudding popsicle!

Someone has started enjoying this one! 😉 Who, me?? Yep, you got me! The chocolate pudding popsicle tastes great!

If you used the paper cups, carefully run some warm water on the outside of the cup, being careful not to get any water inside the cup on the popsicle. Again, squeeze the sides of the cup until the popsicle slides out.

I also tried this idea using a ready-made pudding cup.

I removed the top covering and inserted a plastic spoon. Then I popped it into the freezer.

I used the warm water and squeezing method just like I did for the other pudding popsicles and it worked fine for this kind of pudding too.

Now you have another idea to try to help refresh and cool your family during these last warm days of summer! Enjoy your frozen pudding popsicles! 🙂

Crayola Confetti Crayons

Have you tried the Crayola Confetti Crayons yet? They really are quite fun! I found them at a Walmart store. I would say they are an inexpensive box of fun!

As you can see from the writing on the box, there are 24 crayons included. The box also says “Bursting bits of color! Each Crayola Confetti Crayon has specks of color inside for surprising streaks and a party in every crayon!”

The crayons have some pretty awesome names too! Like party fish…

Or meteor shower or new year’s eve or rain drops… It’s fun just reading the name on each crayon!

Take a look at all the crayons that look mostly white.

Buuuut….surprise!! Look what it looks like when you start coloring with them!

Pretty cool, right?! Coloring is so much fun because you don’t know when a streak will show up or what color the streak might be! 🙂 Can you see the colorful streaks in this picture?

Let’s look a little closer…look at the colors in this bird.

You can see the streaks in the girl’s skate and in the green bush and the colorful flowers.

The colors look much better in person, of course! 😉 Crayola Confetti Crayons are a lot of fun in one small box! 🙂