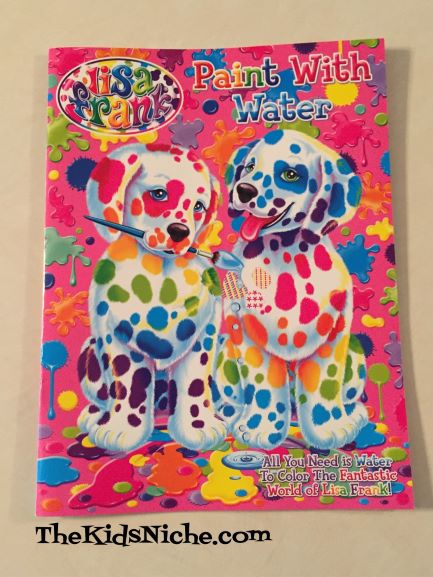
Do your kids love to paint but you cringe just thinking about all the mess it will make? I hear you!! There is another kind of painting that doesn’t make a mess and that’s painting with water books!
Our kids loved to paint with water at my parents’ house and then at our house. Now our grandchildren paint with water at our house. 🙂
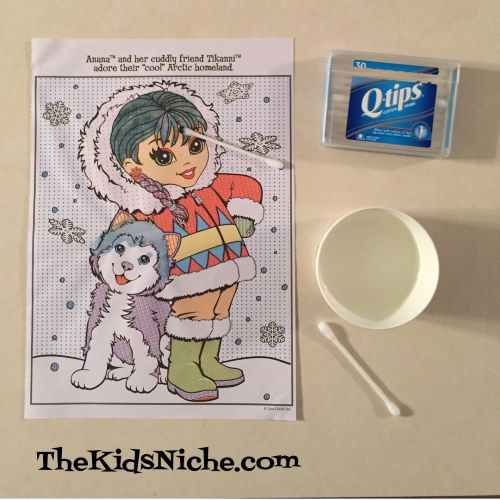
The paint color is already on the pages of the book. All you need is a bit of water to bring it to “life”. Just tear out the page your little one wants to work on, get a little bowl with some water in it, and either a small paintbrush or Qtips. We prefer the Qtips because they are very cheap to buy and can be thrown away when the project is finished. If the artist is the enthusiastic sort, you might want to put a layer of newspaper under the picture being painted. 😉
While this type of book might not be as popular as they once were, they are still available. I found some on Amazon and also some online through Walmart.com. If you have an Ollie’s Bargain Outlet store, check there.
We currently have 2 beautiful painted pictures hanging on our refrigerator, compliments of our grandkids. 🙂
There are other types of painting books that use water, but we’ll leave those for another day. 😉
Are you having trouble getting your kids to eat enough “good-for-them” food? Do they love milkshakes? Then here’s a suggestion to try! Fruit smoothies! Fruit smoothies are so versatile and quick and easy to make! Only a few ingredients are needed to make them and you can make them so many ways.
I most often use my Ninja Professional blender for the job but a regular blender should work fine. When making a bigger batch, I use my VitaMix blender. The smoothie pictured above is a Pina Colada Smoothie which I had for breakfast yesterday. Mmmm! I took 1 banana, several chunks of frozen pineapple and coconut milk and blended it all together until smooth. Very refreshing! Its great to use some of your ingredients in the frozen state as that helps your drink be nice and cold and tasty. But you’ll also need a liquid in order for your smoothie to be drinkable and so it will mix together nicely. There are many books written on the subject and tons of places online to find recipes but you really can just throw together whatever sounds good to you. Here are some ideas to get you started:
For the liquid: coconut milk, almond milk, regular cow’s milk, rice milk, apple juice, grape juice, pineapple juice, orange juice, cranberry juice, pomegranate juice, iced green tea, etc
For the frozen fruit: blueberries, strawberries, raspberries, peaches, pineapple, assorted berries, cherries, etc
Other tips: Adding kefir or yogurt is great too and helps give the smoothie a creamier texture plus adds in more goodies for little bellies. If you prefer to use fresh fruit instead of frozen, you can add some ice cubes to help make your smoothie cold enough. Try freezing the liquid ahead of time in an ice cube tray and pop those in with fresh fruit.
For anyone that is feeling a bit braver, or whose kids like vegetables, add in veggies too! Carrots are a great one to start with. Frozen kale adds lots of nutrition and isn’t all that noticeable in the flavor. We have used frozen broccoli before or even fresh lettuce, but you can definitely taste them in the smoothie. There are also all kinds of green veggie powders you can add or even protein powders. A touch of cinnamon, vanilla or honey is great too.
Drinking it out of an awesome cup is always fun too! And with a straw! 😉 You really can make smoothies in soooo many ways! They’re great for grown-up kids too! Give it a try and let me know what you (and your kids!) think!
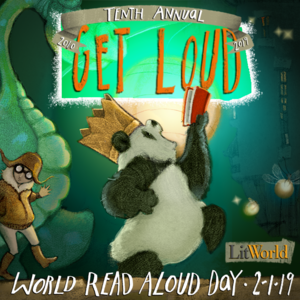
Today is World Read Aloud Day! I actually didn’t know about this until I saw a friend’s post on Facebook but today is the 10th annual celebration. Reading aloud to children is SUCH a good thing for them! I loved reading aloud to our children and its something my husband and I did often when our kids were little. I believe it helped them become better readers themselves. And since our grandchildren came along, we love reading with them too. Oh, the places you can go with a book! I hope to use this blog to share some of our favorite stories!
So take some time today with your favorite little people to read a story or two together. Children also benefit when they can spend time reading TO an adult. Young kids love to be read to by older siblings, mom or dad, Grandma and Grandpa, aunts & uncles…you get the picture! Grab that blanket, snuggle up with that special kiddo and sail off together into a fantastic adventure! For more information about World Read Aloud Day head over to this website: http://www.litworld.org/wrad/
Mine will go out in the mail tomorrow. If you made some to send to Nat, please share your pictures with me! I can see me needing to make a few more for my 5 year old granddaughter and her dolls! 😉 Have a good Thursday!
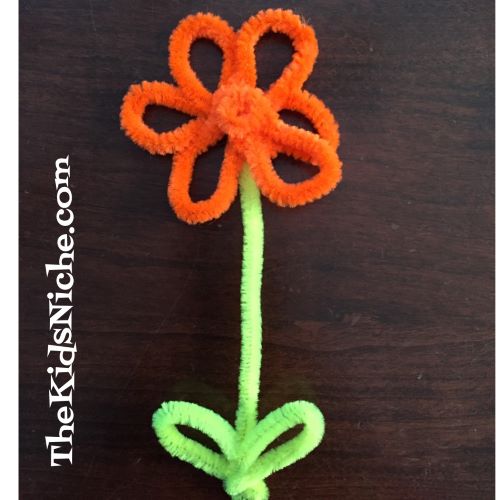
BRRRR!! It’s COLD here today!! Temperatures are below zero and the windchill is down to between -35 to -40!! It’s a stay-in-the-house-don’t-stick-your-nose-outside kind of day! All our local schools are closed and even some colleges and businesses. This calls for some indoor fun! Today it takes shape in the form of pipe cleaners or as some folks call them, chenille stems. They are very inexpensive for a pack, come in all sorts of colors and they will provide hours of fun! My current pack has 5 different colors in it.
They are made with a wire down the center of the soft fuzzies, so one word of caution – the ends can be a bit sharp sometimes. I like to bend the ends over just a little to prevent any pokes to little fingers. (Or big fingers!) Hand a few to the kids and see what they come up with. Sometimes I find the best response to what they make to be “Oh, wow! That is so cool! Can you tell me about it?” (Rather than saying, “Umm, what in the world IS that?!”)
Since Valentine’s Day isn’t far off, how about making some hearts?
Circles are always neat! I took 2 colors and twisted them together, bent them into a circle and then twisted the ends over each other to hold the shape.
Circles are great for bracelets…
Grab a few bottles or funnels or anything a circle will fit over the top on and have a game of Ring Toss. Each player can make their circles in the colors of their choice and they will be able to tell which ones are theirs.
Speaking of circles, take a single pipe cleaner and thread letter beads on it to make a special word or a name.
Stick people can be pretty entertaining. This is just a simple one, but you could add other things to your person like a hat or purse or umpteen other things.
Little prince and princesses will love to wear a crown! It doesn’t have to be perfect or fancy…if you say its a crown and you put it on their head, they will most likely think its awesome!
Isn’t Rusty so handsome modeling this one?
Of course, a prince or princess needs a scepter to wield! And a scepter can be made many ways.
Flowers are usually a hit too. You can make several flowers so the kids can present Grandma or Mom with a bouquet they made just for her. Grandmas like flower bouquets. 😉 This would be a cute Mother’s Day idea!
Once you get started making pipe cleaner “wonderfulness”, you will come up with more and more ideas of things to make. Remember, we’re not looking for perfection here, but for fun! Enjoy! Now I’ll head back to my blanket and warm drink! 🙂
It’s a wonderful thing to teach children to care for others and to do what they can do to help out or to lift another’s spirits. I came across this page through something I saw on Facebook, and Nathalia’s story has really touched my heart. I’d like to share her story here:
Nathalia’s Story
This is Nathalia, our friend and superhero, who has been a part of the Love Your Melon family since her journey began. Nat was diagnosed at age 12 with Osteosarcoma, a rare form of bone cancer. Due to recent findings, she only has a few more weeks left. Nat has been an inspiration for our team and everyone that she’s met.
We’ve had the pleasure of being surrounded by Nat’s bubbly and contagious personality. Nat is creative and artistic and enjoys art projects during her spare time as well as drawing fashion sketches. In an incredible act of selflessness, Nat handmade mini yarn beanies for our team at Love Your Melon. These have served as inspiration for us, reminding us of Nat’s determination and creativity even through the toughest time imaginable for a teenager.
Over these next few weeks, we want to show Nat how much the Love Your Melon community supports her and we need your help to make as many of these mini beanies as possible for her.
Beanies for Nat
#BeaniesForNat is an expression of our gratitude and honors her creative passion. The campaign starts now with all of the instructions here on how to make them and where to send them below. For every shipment of one or more mini beanies sent for Nat by February 4th 2019, we will send back one Love Your Melon Beanie to the return address provided in the shipment. We also encourage you to send notes of kindness and strength for Nat and her family with your shipment of mini beanies. Please make sure to include a name and return address with your mini beanie contribution.
Attn: Beanies For Nat 226 North Washington Ave Suite 300 Minneapolis, MN 55401
Nathalia holds a special place in our hearts and we encourage the rest of the Love Your Melon family to help us support her in her fight against this horrible disease. All beanies sent in will be made into an art piece for Nat and her family.
Thank you for your support and for joining the story.
Use these hashtags on Facebook or Instagram to share your creative process of making your mini beanies and tag us and your friends so we can spread this movement and inspire others. #BeaniesForNat #LoveYourMelon
Supplies You’ll Need
paper rolls (toilet paper roll, kitchen towel rolls, etc.)
yarn in many colors – we recommend a worsted weight acrylic yarn
scissors
tissue paper
Step 1:
Start by cutting the yarn into threads – you’ll need plenty of long threads of equal length. We recommend cutting to lengths of 8” for your yarn, and then cutting your paper roll to between 0.75” and 1” in height.
Step 2:
“Fold” the yarn threads in half and push the looped side through the paper roll. Fold the two loose ends over the other side of the paper roll and thread into the loop. Pull tight into a knot.
Step 3:
Repeat this step until the entire paper roll is covered with these looped yarns. Once complete, you will have to push all the yarns inside the paper roll. We recommend twisting the yarns together, and pushing through – see diagrams for reference.
Step 4:
Roll a piece of tissue paper into a ball and stuff into the “beanie.” This will help you get the perfect hat shape and keep the yarn in place.
Step 5:
Using a separate thread, tie a tight knot around the top of the threads to create the pom beanie. Trim the pom at the top using your scissors to round it out.
We appreciate your support for Love Your Melon, and for taking a part in #BeaniesForNat
Me, again. Sorry, I can’t seem to find a way to include her picture. You can see all the details here: https://loveyourmelon.com/pages/beanies-for-nat (You might have to copy/paste to open the website.)
Here is my first mini beanie:
I hope Nat’s story will touch your heart too and you’ll be moved to become involved in making and sending beanies of your own. It would be a fun project to do with children and let them feel the warm fuzzies that come from doing a little something to brighten Nathalia’s day. Time is of the essence…love and hugs to all of you today!
Do your kids ever get hungry/grumpy while you are grocery shopping? Here’s a neat thing that I discovered at our local Kroger store. They offer a free snack of fruit for kids!
I think that’s pretty great! Wish they had offered that when my kids were little!
One of my favorite memories from my childhood is baking cookies with my mom. I remember when I learned to roll dough into little balls. Some got rolled in sugar, some we added drops of water to the tops, others we rolled in a cinnamon-sugar mixture and more got “smashed” with a fork to make a crisscross on them. My mom had one recipe that we called “Christmas Cookies” because at Christmas time mom added extra flour to the dough so they could be rolled out and cut with cookie cutters. My siblings and I loved to add the colored sugar, candy sprinkles, red cinnamon candies or tiny silver balls to our masterpieces. We often had a limit of how many we each were allowed to decorate so that everyone got to do their fair share as there were 6 kids in my family. That same brown sugar cookie recipe was used all through the year, but mom would divide it into 3 parts – one for making plain cookies, the 2nd for adding raisins and the 3rd for chocolate chips. I can still see us kids hanging out in the kitchen with mom while the cookie factory was in operation! Sweet memories!
So yes, my suggestion for today is to make cookies with your favorite kiddos! Let them help with getting out the needed utensils, measuring ingredients, cracking eggs (maybe into a separate cup!) and dumping ingredients into the mixing bowl. And especially let them learn to roll the dough into balls if that’s what your recipe calls for. Yep, your kitchen will likely be a disaster afterwards but they will love making cookies with you and you will be creating special, special memories!
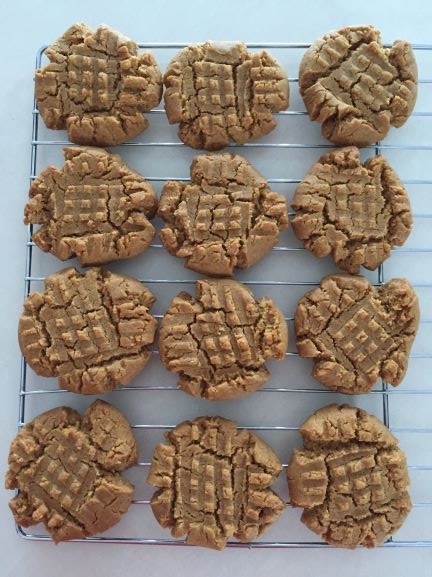
My hubby and I have both been hungry for Peanut Butter cookies lately so today I decided to try making some in a new way. I’ve been seeing recipes for Peanut Butter cookies that use no flour. After reading several, I came up with my own version. They are good! (I know, that sounded like I am shocked, didn’t it? That doesn’t say much for my cooking abilities, does it?! ha!)
Flourless Peanut Butter Cookies
With a mixer, blend 1 C. peanut butter with 1/2 C. white sugar and 1/4 C. brown sugar. Add 1 egg, 1 teaspoon of baking soda and 1/2 teaspoon vanilla. Mix well. Preheat oven to 350 degrees. Roll dough into medium sized balls and place on a cookie sheet covered with parchment paper. Use a fork to press the dough down making a crisscross pattern on top of each ball. Bake for 9-10 minutes. Allow to cool on the cookie sheet for 3-4 minutes before transferring to a wire cooling rack to cool completely. Store in an airtight container. Since this is the first time I’ve made them, I’m not sure how long they will keep. I only got 17 cookies out of my batch so you’ll probably want to double or triple the recipe!
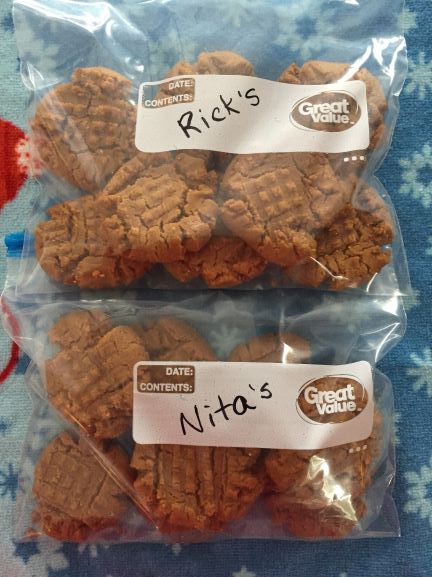
NOW…if your husband is anything like mine, you may want to do what I did in the following picture.
As I often tell my hubby, “I trust you with my life, but I don’t trust you with my cookies!!” LOL