Little Easter Bunny Bucket

Coming at you today with another cute Easter craft! This one needs the use of a glue gun so it might not be a good craft for the wee ones. But it would be really cute for you to make them for the kids. 🙂

You will need a small white bucket (I found this one at the Dollar Tree store), 1 white chenille stem (aka pipe cleaner), a small piece of white cardstock, a pink marker or crayon, 2 large wiggly eyes, 1 small pink pom pom, scissors and a glue gun with a glue stick.

You’ll begin by cutting the white pipe cleaner into 4 even pieces. (Sorry for the bad lighting and that the pipe cleaner doesn’t look white. It really was white! Lol)

Continue with your project by cutting a small strip of cardstock paper between 1-2″ wide. I cut off the end of a full size sheet of cardstock (8.5″ x 11″).

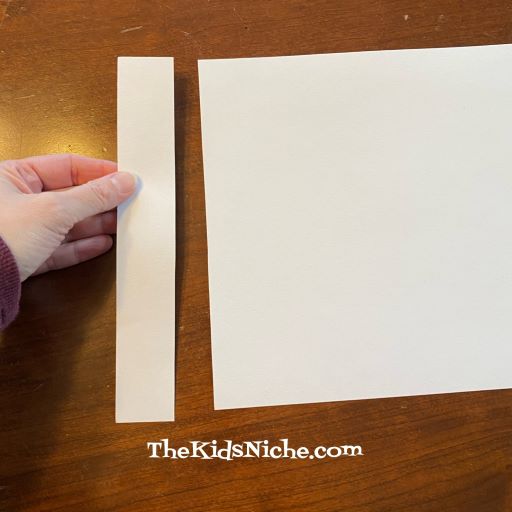
Cut the strip in half and place the 2 pieces together so when you cut the paper, you will cut both pieces at the same time.

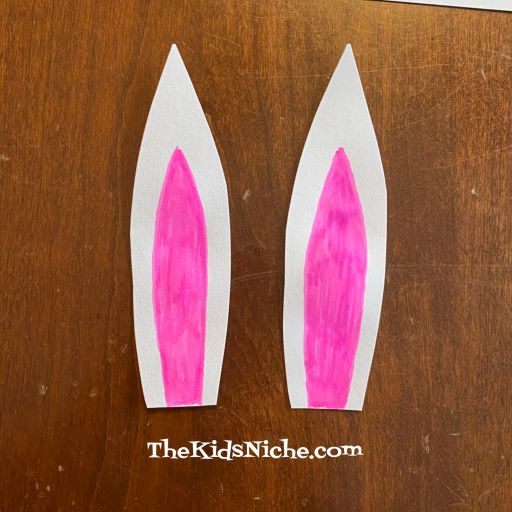
Cut out the shape of a bunny’s ear. You should end up with 2 ears the same.

Next color the inside of each ear pink, leaving a white edge on the outside.

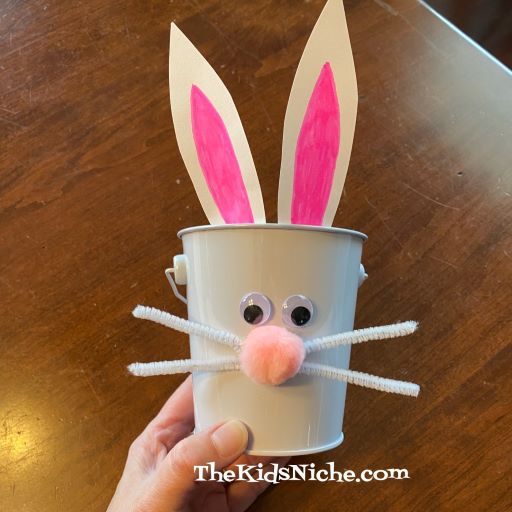
Now it’s time to glue things together! Start by gluing on the 2 wiggly eyes on the plain side of the bucket.

Glue on the pink pom pom for the bunny’s nose.

Put some glue on one end of each piece of the white pipe cleaner and tuck the end under the pom pom. These are the bunny’s whiskers.

Glue the bottom of each ear to the front inside edge of the bucket.

Draw on the bunny’s mouth with a marker. You’ll probably need to use a permanent marker so the mouth doesn’t wipe off.

And your bunny is ready to be filled with Easter goodies! 🙂

I hope you’ll have fun making these little Easter bunny buckets and that your kids will be tickled to receive them! 🙂

Easy Foam Easter Bunny From Dollar Tree

Easter is coming closer! Are you looking for some fun Easter crafting ideas to do with your kids? Be sure to check out your nearest Dollar Tree store! Today I want to share with you an adorable little bunny kit I found there.

This is a very easy kit to put together with the kiddos. It’s made with foam stickers. Be sure to save the little picture that shows you where each piece belongs. Here’s what you’ll find inside:

First I punched out the pink glittery pieces which are 2 pieces for the inside of the bunny’s ears, a little pink nose and a pink tummy. Then I added his eyes.

Next I did his mouth and bow tie.

It’s time to stick 2 pink spots on for his cheeks.

Now there’s just the 2 pieces of the carrot left to do. I suggest peeling off only the top part of the backing for the carrot so you won’t have an entire sticky piece hanging there.

Put the top of the carrot onto the bunny’s hand.

Lastly, put the green carrot top onto the top of the carrot. And you’ve finished your adorable bunny! 🙂

Find a cute place to put him to help decorate your house for Easter! 🙂 Hope you can find these bunnies at your local Dollar Tree store!

Washcloth Animals – #1 – Bunny

Have you ever made an animal out of a washcloth? This week I’ll be sharing how you can do just that and how to make 3 different animals. Today’s craft is making a bunny from a washcloth.

This can be a fun project for kids to do or we’ve even made these for baby shower favors. They are cute, cuddly and easy to make. Depending on the age of the child the bunny is being made for, you can decide on how many details you want to add. You’ll need 1 washcloth, 1 rubber band and a piece of ribbon. Other things you might want to use include 2 wiggly eyes, a small pompom, a medium sized pompom and some glue. Lay the washcloth flat on the surface you’ll be working on.

Grab one corner of the washcloth and take fold it across to the opposite diagonal corner so you have a triangle.

Starting at the point across from the long side, begin rolling the washcloth tightly until you’ve formed one long roll.

Fold the roll in half…

Holding the 2 strips together fold them the other direction.

Can you see where the bunny’s ears will be? Take a minute now and make sure the 2 sides look about even on the end of the fold. This will be the bunny’s face.

Holding the “ears” back, put a rubber band around the “face” end.

Now you can fluff up the bunny’s ear and make sure the face part looks rounded.

Tie a piece of ribbon around the neck area to hide the rubber band.

Your bunny can be finished now or you can continue on to add a few more details. You can glue on 2 wiggly eyes.

A little pompom can be glued on for a nose.

A medium sized pompom can be glued on for a tail.

And there you have it! Your adorable bunny is finished and ready for some hugs!

I hope you enjoyed making a bunny from a washcloth! Be sure to check back on Wednesday when we’ll be making a teddy bear from a washcloth! 🙂