Painting Little Spring Pots

I hope you had a wonderful Easter weekend! If you look out the window here today, you would think it was April 1st instead of April 18th because it looks like we got an April Fool’s joke played on us outside! We have snow! Ok, yes, snow is pretty and all that, but we are ready for Spring now! 😉 So let’s do a cute Spring project painting little clay pots and pretend we don’t see the snow.

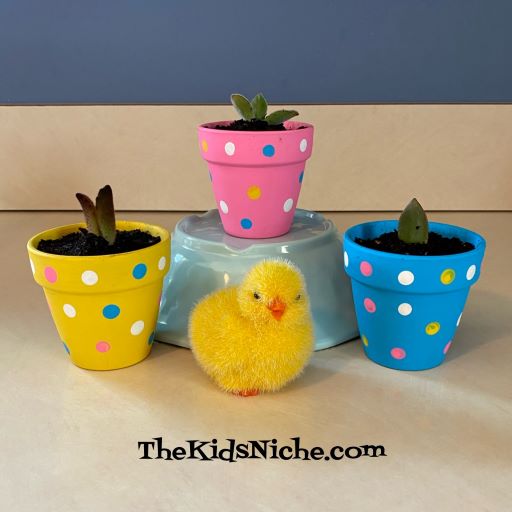
I found a pack of 3 small clay pots at the Dollar Tree store and decided they would be cute painted for Spring with some succulents planted in them. So go grab some little pots, some paint, sponge brushes and some newspaper to protect your surfaces.

I chose yellow, pink and blue for the main colors for my pots.

I painted the outside of the pots plus I painted part of the way down inside the pot.

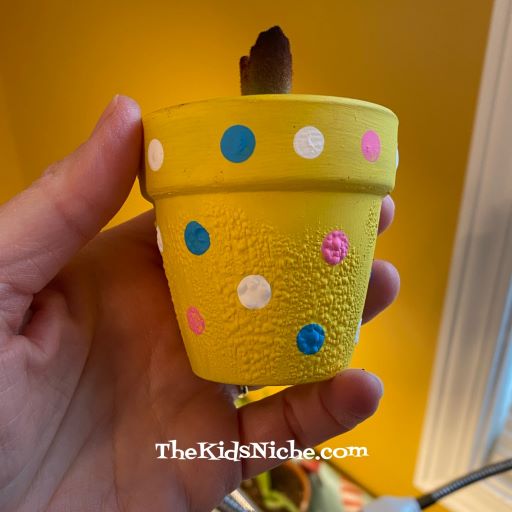
Using the eraser end of a pencil, I painted dots on the outside of each pot in contrasting colors.

I painted 1 coat on 2 of my pots but I painted a second coat on the yellow pot. I think I didn’t need to do that.

A word of caution – allow your pots plenty of drying time before adding plants! I didn’t let my yellow pot (that had 2 coats of paint) dry long enough before I added my succulent and the paint bubbled up because of the moisture in the dirt.

Check your local Lowe’s or Home Depot stores or a greenhouse for some little plants to add to your beautiful little pots.

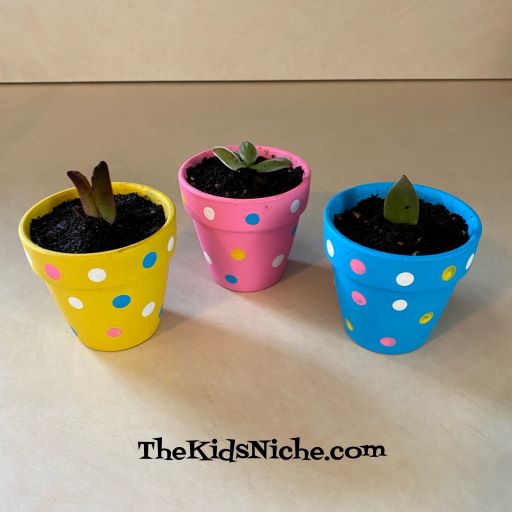
And there you have it! Bright and colorful painted pots to cheer you or someone else up! Spring is just around the corner! 🙂

Pretty Easter Egg Craft for Kids

Easter is only a few days away now! Are you looking for another simple craft to do with the kids? Here’s a great one that I shared last year, but it’s so pretty it’s bears repeating! 🙂

You’ll need a few colors of tissue paper, a piece of white paper, a pencil and glue. A computer and a printer will make it easier but isn’t necessary. To begin…draw the shape of an egg on the piece of white paper. Or do like I did and go to:

https://www.firstpalette.com/printable/easter-eggs.html

You can print out an egg for free. How nice is that?! (Thank you, http://www.firstpalette.com !)

Draw some light lines on your egg to divide it into sections. Begin with your first color of tissue paper and tear it into strips. They DON’T need to be perfect or the exact same size.

Next tear the strips into smallish pieces. Again, no need for perfection here!

Apply some glue to a small area of the first section of your egg.

Take one of the ripped pieces of tissue paper and wad it up into a little ball. Yep, squish it up! Then press it down into the glue. This picture is 3 balls.

Continue making paper balls and gluing them onto the egg shape. Press them close together so there isn’t much of the white paper showing through. I changed colors for each section but you can make your design however you like. Here is the first section done in red.

Then I did a section in yellow.

Next was light green.

Orange…

Light blue…

Pink…

Darker blue and yellow…

And finally red again to finish. 🙂

Doesn’t it look great? You can make lots of different colors and designs for as many eggs as you want to make. Have fun! 🙂

Making Candy Pretzel Rods

Here’s a fun quick project you can do with the kids to welcome Spring! Or for some extra fun for Easter…pretzel rods dipped in candy and coated in sprinkles!

You will need a bag of Wilton Candy Melts (I used yellow but there are other colors available), some wax paper or parchment paper, pretzel rods, a microwave safe mug and some candy sprinkles.

Put some candy melts in a microwave safe mug or cup.

Melt in the microwave according to the package directions.

Dip the pretzel rod into the melted candy. Tipping the cup sideways some can help to get the candy farther up on the pretzel.

Let the excess candy drip back into the cup. While holding the dipped pretzel over a clean bowl, drop/pour the candy sprinkles over the melted candy part of the pretzel.

After you have added the sprinkles, lay the pretzel on a piece of wax paper or parchment paper. The candy will gradually harden again or you can place the dipped pretzels in the refrigerator for 5-10 minutes.

And that’s all there is to it! 🙂 You can arrange the pretzels on a plate or in a cup or vase and share them with your family and friends. Sweet and salty mixed together is a great combination! Yummy!

Little Easter Bunny Bucket

Coming at you today with another cute Easter craft! This one needs the use of a glue gun so it might not be a good craft for the wee ones. But it would be really cute for you to make them for the kids. 🙂

You will need a small white bucket (I found this one at the Dollar Tree store), 1 white chenille stem (aka pipe cleaner), a small piece of white cardstock, a pink marker or crayon, 2 large wiggly eyes, 1 small pink pom pom, scissors and a glue gun with a glue stick.

You’ll begin by cutting the white pipe cleaner into 4 even pieces. (Sorry for the bad lighting and that the pipe cleaner doesn’t look white. It really was white! Lol)

Continue with your project by cutting a small strip of cardstock paper between 1-2″ wide. I cut off the end of a full size sheet of cardstock (8.5″ x 11″).

Cut the strip in half and place the 2 pieces together so when you cut the paper, you will cut both pieces at the same time.

Cut out the shape of a bunny’s ear. You should end up with 2 ears the same.

Next color the inside of each ear pink, leaving a white edge on the outside.

Now it’s time to glue things together! Start by gluing on the 2 wiggly eyes on the plain side of the bucket.

Glue on the pink pom pom for the bunny’s nose.

Put some glue on one end of each piece of the white pipe cleaner and tuck the end under the pom pom. These are the bunny’s whiskers.

Glue the bottom of each ear to the front inside edge of the bucket.

Draw on the bunny’s mouth with a marker. You’ll probably need to use a permanent marker so the mouth doesn’t wipe off.

And your bunny is ready to be filled with Easter goodies! 🙂

I hope you’ll have fun making these little Easter bunny buckets and that your kids will be tickled to receive them! 🙂

Easter Egg Hunt Ideas

Hello, everyone! It’s been one of those weeks today but I wanted to at least share a quick Easter egg hunt idea that I came across.

Another idea for keeping the egg hunt more evenly divided is to write names or the first letter of the child’s name on each egg. For instance, all of Bradyn’s eggs would have a “B” on them. The kids can only pick up the eggs that have their letter on them. We’ve used this idea for a couple of years now and it works pretty well. 🙂

Hope those suggestions help you! I’m off and running once again…😉

Easter Basket Ideas From Dollar Tree

If you still need some ideas of fun things for the kids’ Easter baskets, head to your closest Dollar Tree store! The one I was in the other day had lots of things left and some of them look pretty cute! I wanted to share with you a few things I found and hopefully they will be available at your local Dollar Tree store too.

Easter bunny erasers. These guys are so cute!

Easter designs on pencils.

Scratch and find the bow-tie bunny.

Ice cube trays shaped like a bunny’s head. I think you could use these for making candy too.

Or there were ice cube trays of the bunny’s bottom! LOL If you use these for making candy, you could stick a tiny marshmallow on for the tail! 🙂

Glitter putty in an Easter egg.

2 different kinds of bubbles.

2 colors of Play-doh in the same cup.

Lots of soft and cuddly stuffed animals! So cute!

They also have things that aren’t made just for Easter but would still work great in an Easter basket. Like this “play clay” hair salon. We had a similar one in a Play-doh set and the kids had a blast with it.

There were little figurines that would fit inside a plastic Easter egg and some Silly Putty that always comes in an egg. And of course, they have LOTS of candy and plastic eggs for sale. 😉 Hope you can find just what you are looking for to fill those Easter baskets!

Easter Chicks Made From Fruit Cups

Hello again! The grandkids have gone back home with their mom and dad and it’s very quiet at our house again. We had a wonderful week of fun and just enjoying being together. 🙂 But now it’s time to share some more fun with you! One thing we made while the grandkids were here was some Easter chicks.

You will need some fruit cups, some orange construction paper, some fake feathers, some wiggly eyes, a pencil, scissors and glue. We found out by trial and error that using a glue gun works the best and keeps everything in place better than regular Elmer’s glue.

We used peach cups but mandarin oranges would be about the same color.

Applesauce cups work fine too and we did use a couple of those.

Fold a small piece of orange construction paper in half. Draw a triangle on the paper with one side of the triangle being on the fold. Cut out the triangle. This will be the chick’s beak.

Draw and cut out from the orange paper 2 chicken feet for each chick.

Glue the beak on the side of the fruit cup. And glue the 2 feet onto what is usually the top of the fruit cup. For this project, we’ll use the fruit cup upside down.

Glue on 2 wiggly eyes just above the beak. Glue a feather on each side of the fruit cup. You will definitely need to use a glue gun for the feathers.

That’s it! Your Easter chick is finished! 🙂

Whether you make one or a whole flock of chicks, I hope you will have fun making them! And have fun eating them! 😉

Funny Friday!

Here we go with another round of riddles to tickle your funny bones! 🙂

#1.) How did the hammerhead shark do on his test?

Answer: He nailed it!

#2.) What do you call dog magician?

Answer: A labra-cadabra-dor!

#3.) What did the Dalmatian say after eating lunch?

Answer: “That hit the spot!”

#4.) Why do sharks live in salt water?

Answer: Because pepper water makes them sneeze!

#5.) What did one potato chip say to another potato chip?

Answer: “Shall we go for a dip?”

Happy Friday! Hope those riddles made you smile! Have a good weekend! 🙂

Making a St. Patrick’s Day Leprechaun!

Happy St. Patrick’s Day! 🙂 Did you remember to wear green? I hope nobody pinches you if you forgot! Today’s post is about making a leprechaun out of a paper plate! Sound fun? Let’s get started!

You will need a small paper plate that is blank on the back, some orange yarn (I couldn’t find solid orange yarn), glue, scissors, a peach or tan crayon, a black marker, green construction paper, a set of large wiggly eyes (or draw your own eyes) and some scraps of black, yellow and orange construction paper.

You will create your leprechaun on the BACK of the plate. Depending on how you look at the pictures, you might think we used the front, but we didn’t. 😉 Use the peach or tan crayon to color the back of the plate. It’s rather hard to see in the picture because the color is so light, sorry.

It’s time to make the leprechaun’s hat. Using the green construction paper, cut out a simple hat.

Use a strip of black paper to add a band to the hat.

Now we’ll make the buckle for the hat. Cut a square from the yellow paper that is a little bit larger than the height of the black band. Cut a small square from the black paper that is smaller than the yellow square. Glue the black square in the center of the yellow square.

Glue the buckle in the center of the black band on the hat.

To glue the hat onto the leprechaun’s face, apply glue to the top portion of the plate where the hat will touch.

Press the hat onto the plate.

Next cut 2 eyebrow shapes from the scrap of orange paper. Glue them on just below the bottom of the hat.

Glue on the wiggle eyes or draw on some eyes with the black marker.

Now draw on a bit of a nose and a mouth.

Cut a bunch of yarn pieces around 3 1/2 – 4″ long. You will need a lot of them! Lol This bunch is just a start. 😉 I used 102 pieces of yarn.

Put a small line of glue on the plate where the leprechaun’s chin would be. Lay the ends of the pieces of yarn on the glue, lining them up evenly.

Continue adding pieces of yarn until the leprechaun’s beard is as full as you want it to be.

And you’re finished! Great job! Your leprechaun is now ready for St. Patrick’s Day! Better keep an eye on him because leprechauns can be pretty sneaky and they love to play tricks on people! 😉 Happy St. Patrick’s Day! 🙂

Making a Super Simple Shamrock and a Four-Leaf Clover

St. Patrick’s Day is tomorrow! Do you decorate your house in green four-leaf clovers and shamrocks? Maybe some leprechauns and pots of gold? Here is a super simple way to make some greenery for tomorrow! All you need is a piece of green paper, a green pipe cleaner, scissors, a pencil and some tape. Start by making a square piece from the green paper.

First we will make a four-leaf clover. Fold the green square in half.

Then fold the paper in half the other direction.

Use your pencil to draw a heart shape on this little folded square. Keep the folded side at the bottom.

Use your scissors to cut on the line you just drew.

Open the paper up and you have a four-leaf clover! 🙂

Turn your four-leaf clover over and tape the pipe cleaner to the back side.

Turn the four-leaf clover right side up again and there is your finished project! Great job! You can go on to color or decorate it if you want to.

Now, using the same idea as we did for the four-leaf clover, we can make a shamrock with just a couple of cuts with the scissors. Cut on the fold lines and remove one heart shape.

There is your shamrock! Tape the pipe cleaner to the back to have a stem for your shamrock. If you would like to, you can cut on the folds where the heart shapes meet, but only cut about half way. Then the leaves on your shamrock can separate a little.

I hope you will have lots of fun making four-leaf clovers and shamrocks for St. Patrick’s Day! 🙂