Read to Your Littles
Hello again! (Sorry I didn’t get a post up yesterday but I wasn’t feeling too well.) Have you seen the loopy yarn in the stores and wondered what in the world you do with them? Take a look here! This project today is done using the Off The Hook Magic Yarn (Emoji). I found it on clearance at Joann Fabrics store for only $3.97.

If you “knit” (using just your fingers) in the right way, you will have an emoji face when you are finished. Super cute! Let’s begin! Remove the paper wrapper from the yarn and look for the “start here loop” which is a different color from the rest of the yarn.

Count out 26 loops, not counting the “start here loop”.
Take a hold of the 26th loop…
…then take the 27th loop and pull it through the 26th loop.
Keeping the long line of loops in front of the row you counted out, continue following the line and pulling a loop through each loop in your first set of 26 loops.

In this next picture, you can see that 2 loops are done.

Continue pulling loops through as you work your way back across the row.

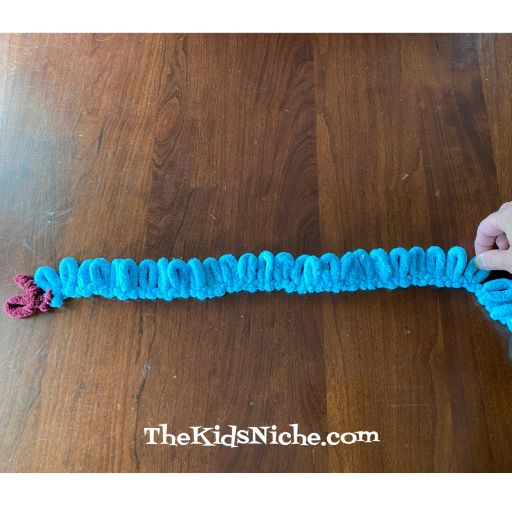
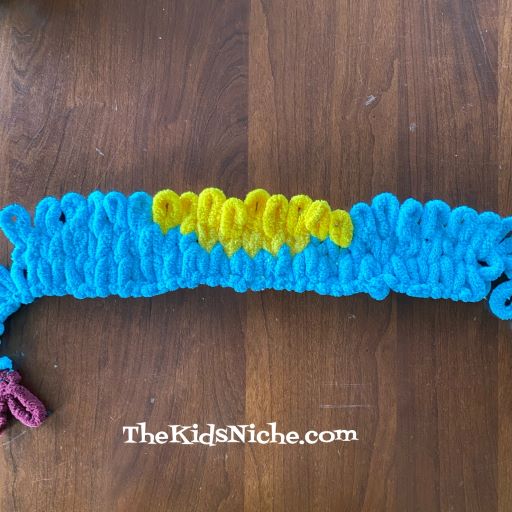
Stop pulling the loops through when you have done 21 loops. The extra 6 loops will be used at the end.

Now it’s time to work on the second row. Place the yarn back across in front of your work. This will make it easier to keep track of which loop is the next one in line. It’s important not to miss any loops. Your picture will start to take shape as you work…if you keep the loops in the correct order.

Another row is done! At the end of each row, count and make sure you have 21 loops in that row. (I had 22 loops one time so I had to go back and gently pull the loops back out until I found my mistake and corrected it.)
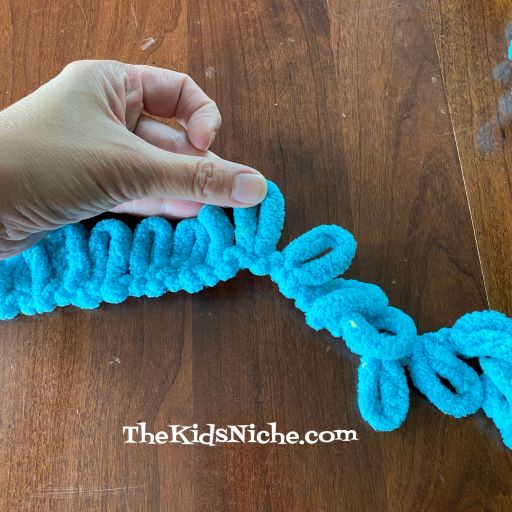
The pattern is starting to show up as we keep doing rows of loops! 🙂

A couple more rows finished…
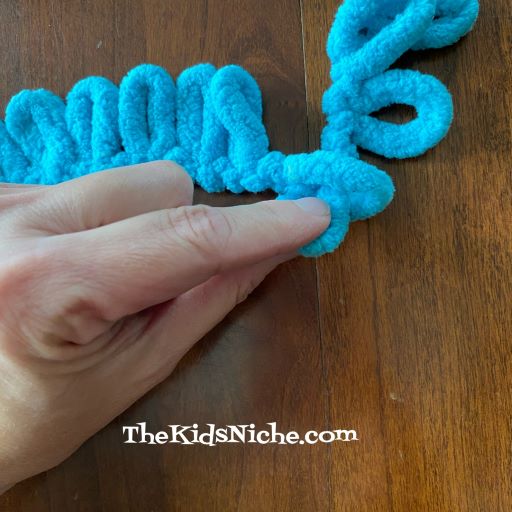
Another way to help make sure you are staying on track is to look at the backside of your work and make sure there aren’t any loops sticking out the back. If there are, just back up to the loop and find where you went wrong and fix it.

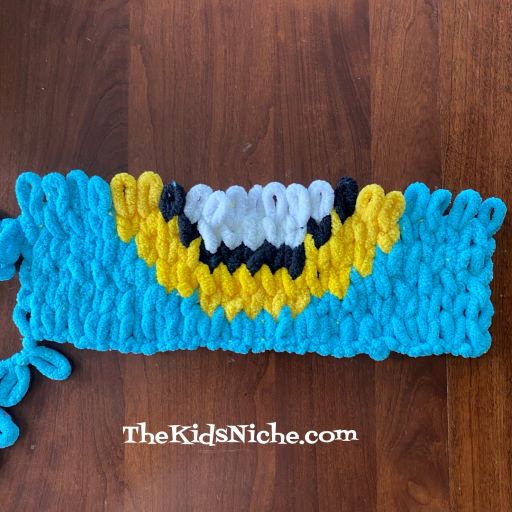
Making more progress! You can see the mouth now.
Looks like the eyes are forming!

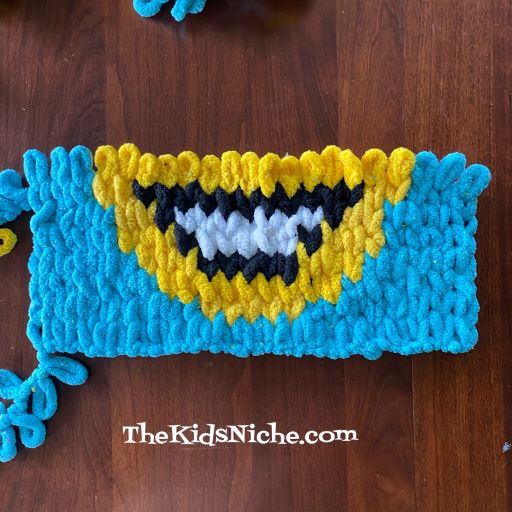
There! You can see the emoji! This point is after 16 rows are done.

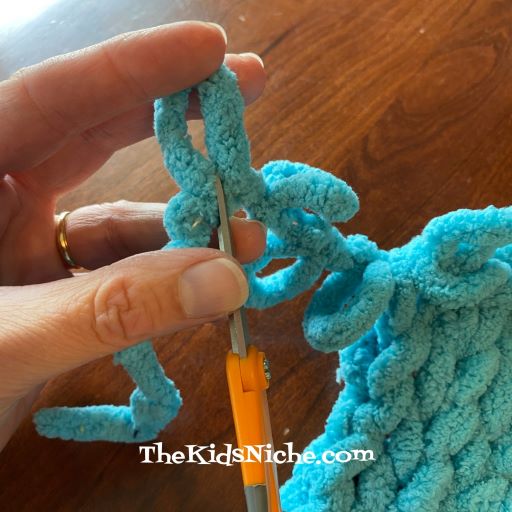
Now it’s time to start binding off with this row. To start, pull 2 loops through just as you have been doing.

Take loop #2 and pull it through loop #1.


Make a 3rd loop in this row like you were doing.
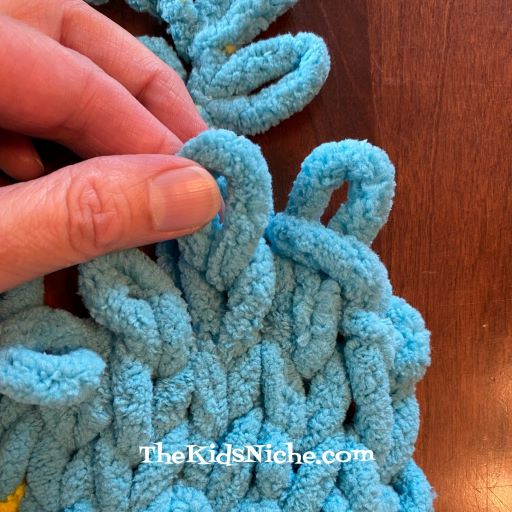
And then pull loop #3 through loop #2. See how you are making a finished edge with no more loops sticking up?

Continue working in this manner until you have gone completely across your work and have just 1 loop left.

Now looking at the extra 5 loops at the top of your work, carefully cut at the bottom of each of the 5 loops so the yarn will open up into one longer string.

Do the same thing with the extra 6 loops at the bottom of your work.

Back to the top string…flip your work over and then feed the string through the 1 remaining loop.
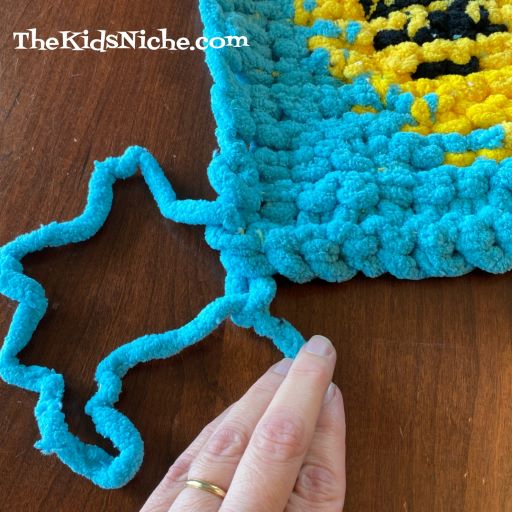
Pull it snug and then weave the extra yarn into the backside of your work to anchor the string. Repeat the weaving in step with the bottom string.

After you have woven the ending strings in through several places, you can cut off the extra.
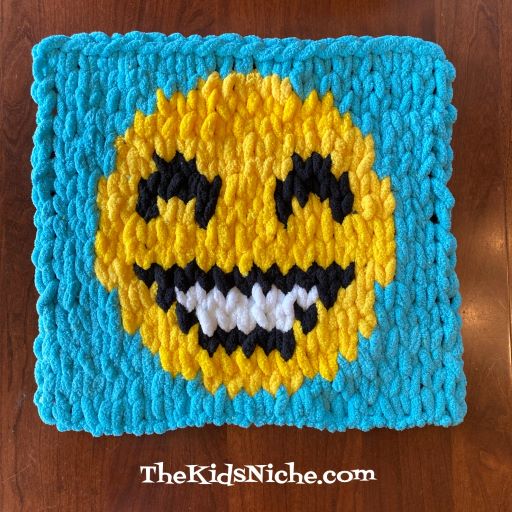
And there is your finished project!! Great job! Now you have a fun smiling emoji to hang up, maybe in your bedroom.
I hope you’ll give this project a try! Happy “knitting”! 🙂
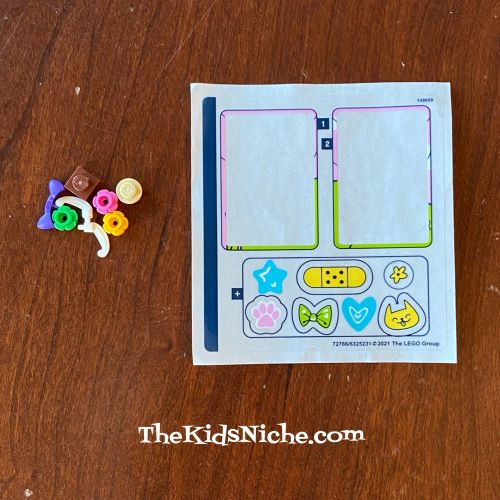
I’ve seen the cute Lego Friends Animal Cubes in the stores but I hadn’t bought one until recently when I found it on sale. These things are cute!! The little characters that come in them are girls so I suppose this toy is meant to be more for girls than boys. If you’ve wondered what all you get in a cube, I’ll show you today what came in the one I have…Stephanie’s Cat Cube.
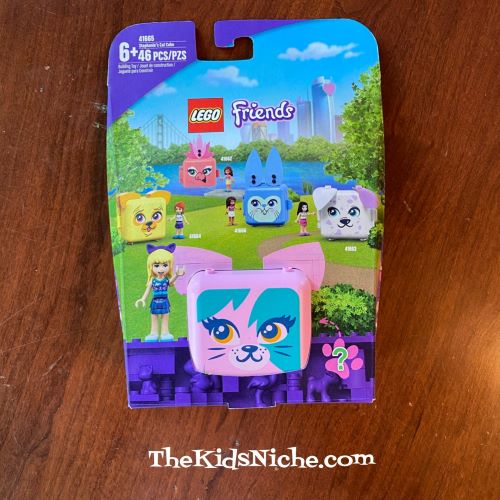

First let me say, that each cube comes with a surprise animal. The package tells you what kind of animal it is such as a cat, but the color is a surprise until you open the little package inside. When you take the contents out of the cardboard packaging, this is what you’ll see:

The directions for building are included and when you open them up and open up the bag with the building pieces in it, this is what you have:

But you also need to open the cube because there are more things tucked inside of it.

Ready to start building? I think it helps to lay all the pieces out on the table with like colors together.

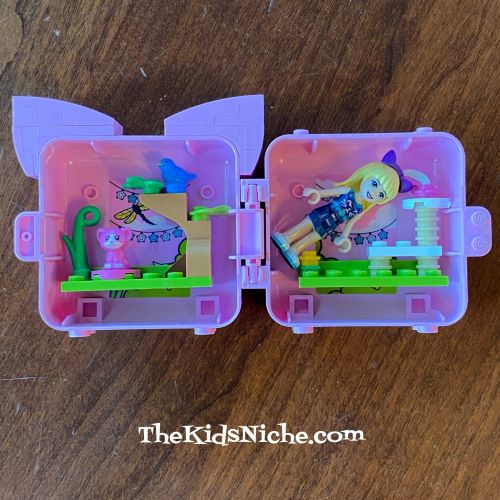
Let’s put Stephanie together first.

Follow the step-by-step directions to put the Lego pieces together. Oh, let’s open the mystery box and see what our surprise kitten looks like!

I got a tiny pink kitten! Sooo cute! 🙂

There are 2 stickers that go inside your cube and you make some ears that go on the outside of the cube.

Aaaand here we are, all put together and ready to play!

There are a few extra pieces of Lego included (in case some get lost) and there are a few more stickers that you can put wherever you like.
I’ll show you where I put my extra stickers. A couple of them on the top of the cube…
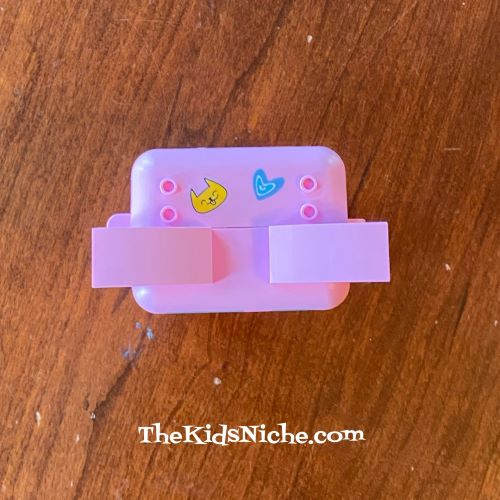
And 5 on the back of the cube. Pretty cute, aren’t they?

When you are done playing and it’s time to put your cube away, you will need to take the “put together” pieces out of the slots they slide into when standing upright. If you lay them inside the cube, you will be able to close the cube with your pieces safely tucked inside.
There are a few more Lego Friends Animal cubes available to buy in stores. (And now I want them all!) The regular price seems to be close to $9.99 but there are a few on sale on Amazon (for a limited time it says!) for $8.00 and $8.50. I saw some on Ebay with higher prices so look for those at least around $10.

When looking for these animal cubes online, I found that there are also other types of the Lego Friends cubes. Such as a fashion cube, a gaming cube, a shopping cube, a soccer cube, a play cube, a swimming cube and likely a few more.
I hope this post will help you learn just what these Lego Friends Cubes are like and perhaps you’ll want to buy some for your favorite girl! (I am not affiliated with any stores that sell these. Just sharing my thoughts!) 🙂
Hello and welcome to a new week at The Kids Niche! Today we’ll talk about a super easy and simple matching game. The first way we played it was using buttons we had around the house. (If you don’t have buttons, its ok…keep reading please.) Pick out several button pairs so you have 2 that match. Lay them out on the table or counter and mix them up.
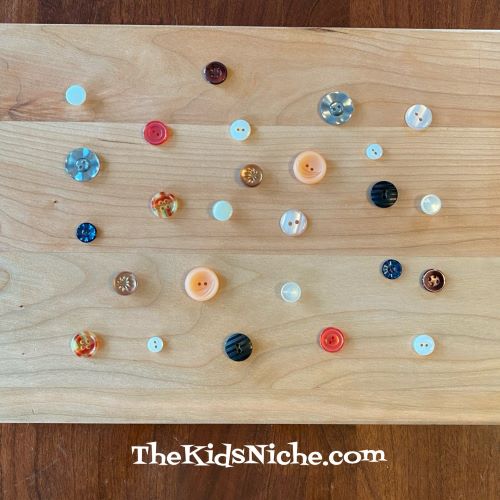
The age or ability of the children playing can determine how many sets of two you use. Let the children match the button pairs up. If there is more than one child playing at a time, they can take turns finding matches. There isn’t really a winning person in this activity, but everyone wins when all the matches have been made!
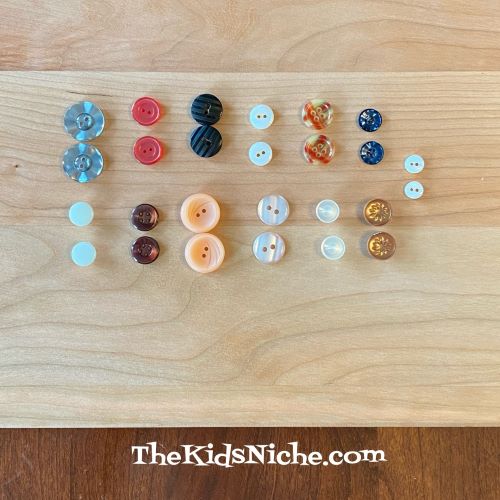
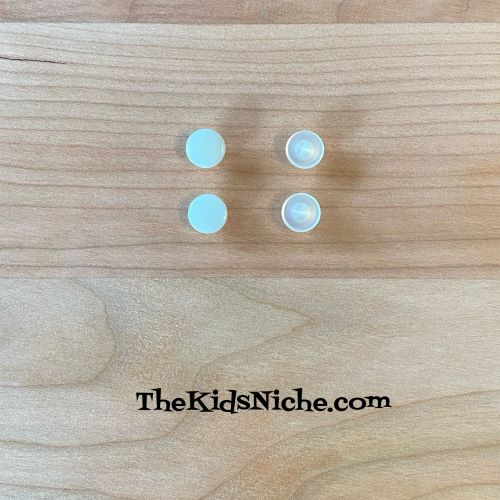
Also depending on the age of the kids playing, how hard you make the matches. For instance, these two sets of buttons look very similar. But one set is white and the other is shiny.
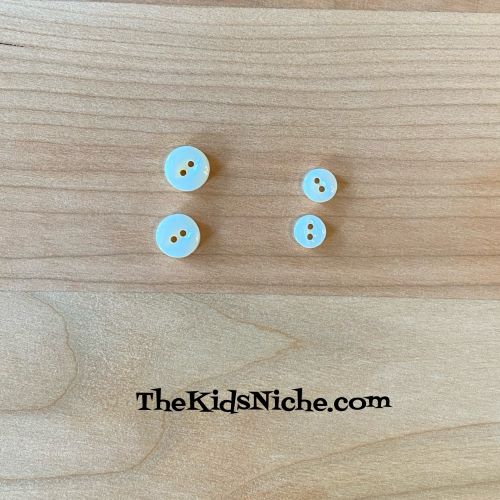
These two sets of buttons look the same except they are different sizes. Be careful of using too small of sizes for the younger kids because we don’t want anyone putting things in their mouth and choking on them!
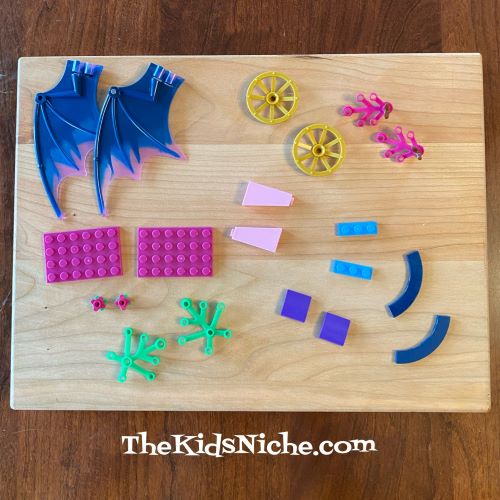
Maybe you don’t have buttons at your house? Lego pieces work great for this activity too. Follow the same instructions that we used for buttons.

All matched up!! Good job!
You can use whatever items you might have around the house. Maybe crayons or blocks or hair barrettes. The idea is just to have things that you have two of for the kids to sort out the pairs. I hope you and the kids have fun trying out this game! 🙂
This has got to be one of the coolest kids’ experiments that I’ve tried! (Yes, I’m easily impressed!) It’s quite simple to do and doesn’t take much to do it, but it has a lot of WOW factor! Grab a plate that slopes in towards the center a little (plain white is best if you have one), some M&M’s candies or Skittles candies and a some water. Here we go! This is the plate I used:

A few M&M’s…
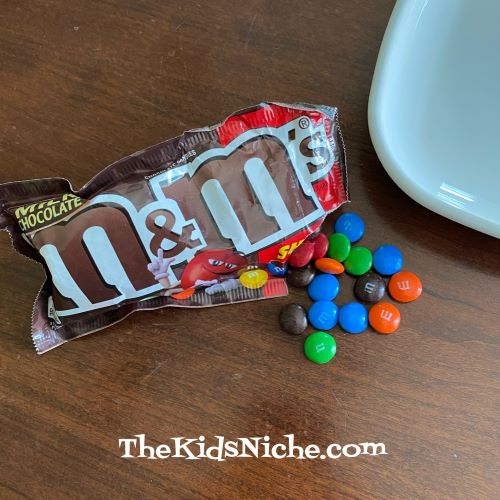
Line the outside edge of the plate with the candies. I suggest alternating the colors for the best effect.

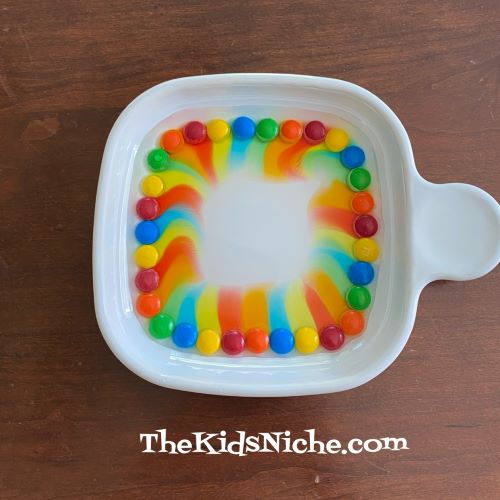
Slowly pour water into the center of the plate.

Keep pouring the water until the candies are mostly or completely covered.

The magic is beginning to happen…can you see it? Look at the red and orange candies…

Now you can see it, can’t you?! 🙂

Here comes the rainbow!!
You don’t need to touch or move anything. The rainbow happens all by itself!

Almost touching in the middle!
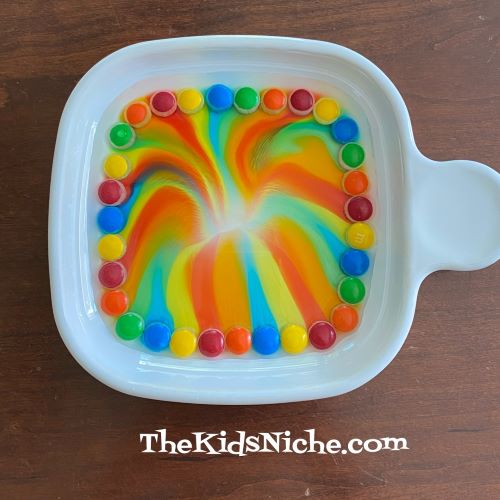
Ta dah!! How cool is that?!

I’m guessing you are hearing a lot of “ooo’s” and “ahh’s” about now! 🙂 It’s a very simple but quite entertaining experiment! Hope you have fun trying it! I know I did! 🙂
Welcome to another week of fun with The Kids Niche! Today we’re making a crazy hair octopus! Won’t you join us? 🙂

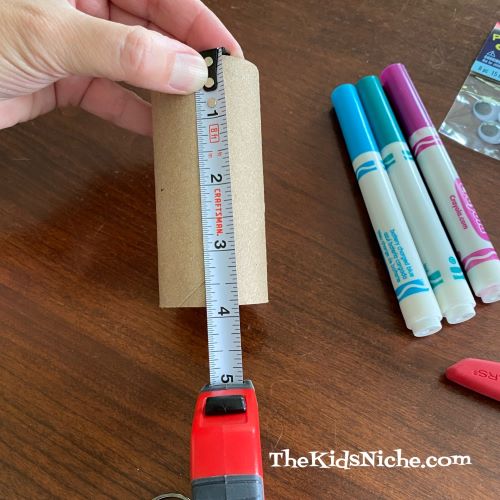
Just some simple supplies are needed for this project…an empty toilet paper roll, 2 wiggly eyes, some markers or crayons, some yarn, glue, a pencil, a ruler and a pair of scissors.

Let’s start by working on the octopus body. Measure up about 2″ and make a pencil mark all around the toilet paper roll.
Next, make a small mark on one end of the roll and a second mark that is about half way around the roll on the other side. Can you see the 2 little marks?

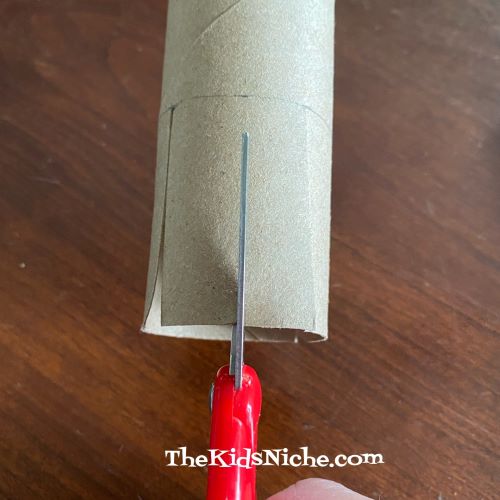
Using your scissors, cut on one of the little marks straight up until you reach the 2 inch line.

Turn the roll around and make another cut the same way on the second small mark. Next cut the two pieces in half so you have 4 sections on that end of the toilet paper roll.

Cut each of the 4 sections in half so that you end up with 8 sections.
What part of an octopus has 8 pieces? It’s legs, right? The 8 sections will become the 8 legs on your octopus. 🙂

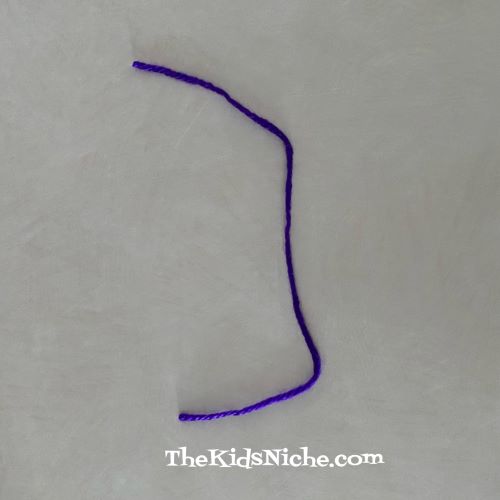
Let’s switch to working on the crazy hair part now. We will be making a pom-pom for the crazy hair. Cut a piece of yarn around 6-7 inches long and lay it out on a flat surface like a table or countertop.
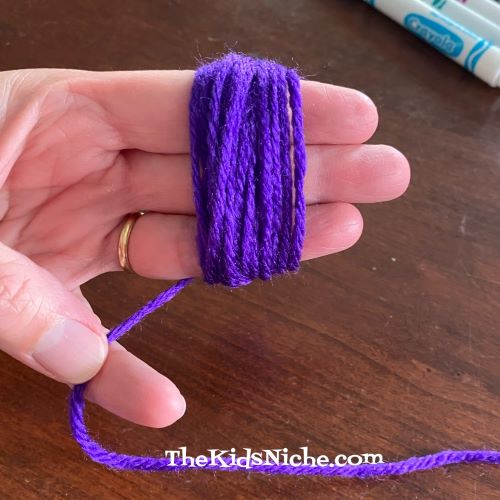
Now take the end of yarn that is still attached to the skein/ball of yarn you are using and place it across your hand like in this picture:

You will now be wrapping the yarn around your hand approximately 50 times. You can use 3 fingers for an adult or wrap around a child’s whole hand.
After you’ve wrapped the yarn 50 times, cut the end of the yarn you were wrapping with. Carefully slide the wrapped yarn off the fingers, keeping it together in a bunch and lay it on top of the first piece of yarn you cut. The wrapped bundle should be placed on the piece of yarn so its approximately in the center of the wrapped bundle.
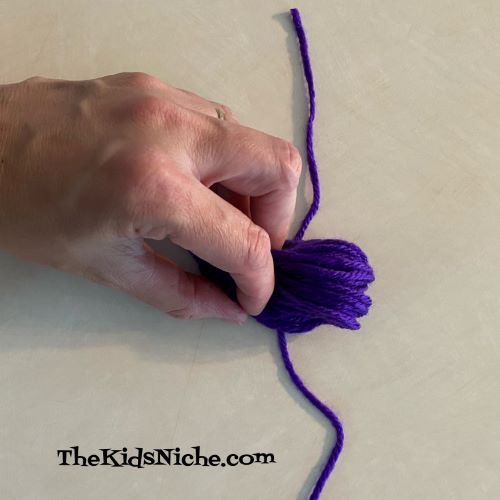
Using your first piece of yarn, tie it in a knot around the wrapped bundle. You will have loops on both sides of the knot.

Use your scissors to cut through the loops on both ends.
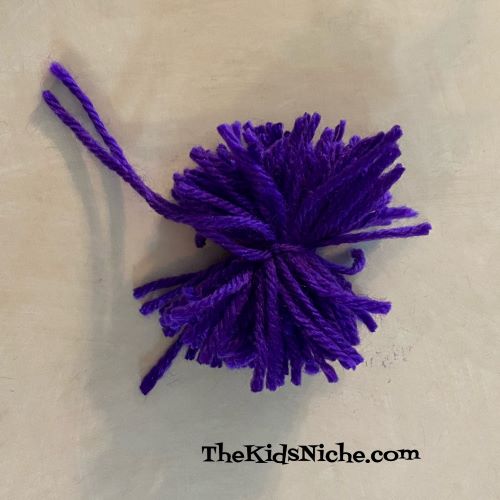
Using your fingers, fluff the pom-pom until it resembles a ball shape.

Trim any pieces of yarn that are extra long and sticking out.

Let’s go back to the octopus body now. Using your markers or crayons, color the entire outside area of the toilet paper roll.

Using your pencil, carefully roll each of the 8 leg sections (one at a time) up around your pencil.
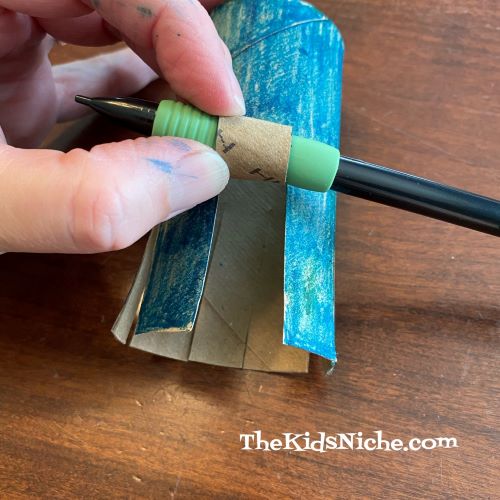
Slide the pencil out and unroll the leg as much as you like.
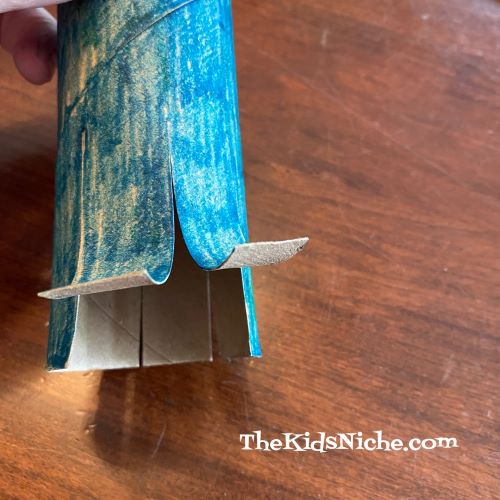
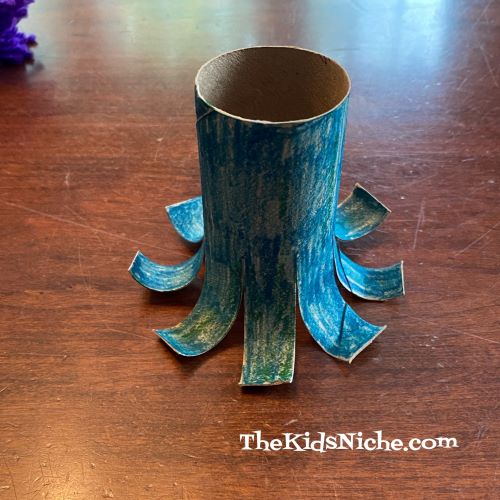
After rolling each of the eight legs, your octopus might look something like this:
Glue on the 2 wiggly eyes.
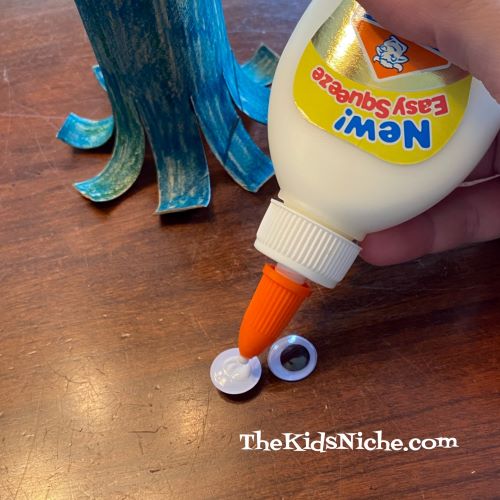
Your octopus is taking shape! 🙂

Put a line of glue all around the top edge of your octopus.

Place the crazy hair in place and hold for a little bit while the glue starts to set up.

Give your octopus a smile with a marker!

And your crazy hair octopus is finished! 🙂 Great job! Find a nice place to put him/her so everyone can enjoy seeing him/her! I hope you had fun making your crazy hair octopus!

During a quick stroll through my local Joann Fabric Store on Monday, I discovered some crazy good sale prices! Some of the craft kits for kids (not all of them) were on clearance and then they were 35% more off the clearance price! Whoohoo! I only had time to grab a few of them but I wanted to share them with you.
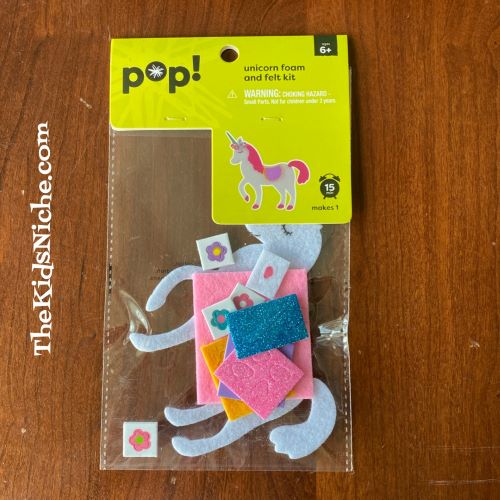
#1.) Pop! Unicorn Foam and Felt Kit. This is the kit that I showed you in another post but it’s even cheaper this time. Got it for $1.61.
#2.) Makit & Bakit Flip Flops Kit. This one was on sale for $0.96! (We are going to make this one soon so be sure to check back!)

#3.) Little Makers Rub On Art Kit. This kit was on sale for $1.28. There was a similar set with different pictures too.

#4.) Little Makers Foam Mosaic. There was more than one type of this one too. On sale for only $1.61.

There were more kits on sale but I didn’t have much time to be there. And items may vary at each store, of course. I’m not sure how long this sale on a sale is available but you can find some cute craft kits for kids at really great prices! Ruuuuuun to your nearest Joann Fabric Store! 😉
Spring has officially arrived in the United States! But the weather keeps going back and forth between warm and cold and some days it gets us down in the dumps. Let’s see if we can tickle our funny bones and cheer ourselves up! Try out these riddles and see if they make you smile. 🙂
#1.) Why is April the cleanest month?
Answer: Because April showers!
#2.) Why was the rabbit happy?
Answer: Because some-bunny loved him!
#3.) I fly high in the sky, but I don’t have wings. I have a tail, but I’m not a bird or an animal. I love windy days. What am I?
Answer: A kite!
#4.) What flowers like to kiss?
Answer: Tulips! (Two lips)
#5.) What falls down but never gets hurt?
Answer: The rain!
#6.) When is the letter A like a flower?
Answer: When a bee (B) comes after it!
Are you smiling? I am! Which riddle is your favorite? Be sure to try these out on your friends and family! Keep smiling! 🙂
How about some drawing fun today? Owls are such awesome animals that I think it would be great fun to draw one. As the title of this blog post tells you, I named my owl Owlvin. (Of course, you can name your owl something totally different.) Grab a piece of paper and a pencil and let’s start with a nice plump oval shape which will be the owl’s body.

Next we’ll add a wing on each side of the body.

Add 2 circles towards the top of the oval for eyes. And put a little black dot inside each circle.

Draw a triangle for a nose and add a little mouth.

Let’s add a couple of little tufts at the top of his head.

Now you can add a little tummy.

Draw 3 toes on each side for his feet.

A few lines can be added to make him look more like he has feathers.

Once you have the drawing just the way you want it, you can go over all the lines with a black pen or fine line black marker.

After the ink is completely dry, you can very lightly use an eraser to remove any leftover pencil marks that you can see. Last but not least, give your owl some color.

All finished! Great job! What color is your owl? And what did you decide to name him or her? I hope you’ve had fun learning to draw owls! 🙂
It’s Monday Funday and I have a nice inexpensive craft to tell you about today. I found a cute unicorn suncatcher at Walmart the other day…only $0.97!! (My guess is that some other craft stores likely have them too.) That is the regular price, not a sale price. 🙂

One thing to note is the picture shows 4 colors on the unicorn while there are actually only 3 paints. But it looks cute anyways, so I didn’t find that to be a problem. I suggest laying out some newspaper or paper towels before letting the kiddos start painting. The paint is fairly thin but I think that is because this is a suncatcher and you want the light to be able to shine through.

There weren’t any instructions but here’s what I did: the suncatcher is smooth on one side and has ridges on the other. I painted on the side with ridges. I stirred each paint with a toothpick when I was ready to use it. I also used the toothpick to paint the really small areas. I started with the blue/teal paint.

You can paint the unicorn any way you like. I’m just showing you how I chose to do it. Next I painted with the purple paint.
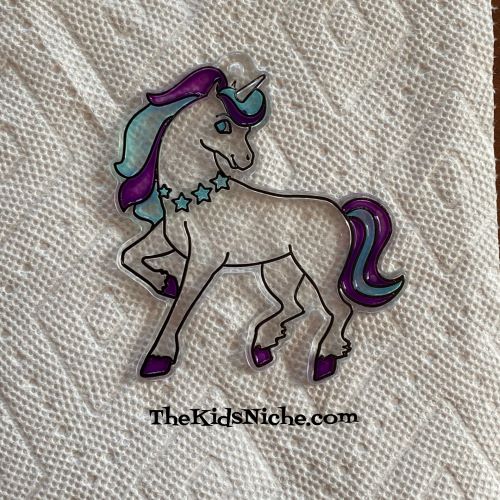
And finally I used the pink paint.

Here it is against a better background.
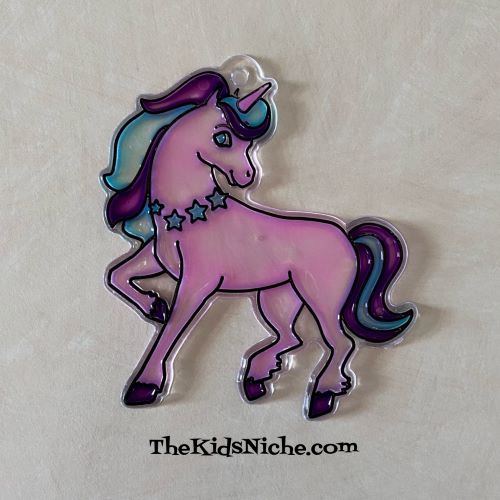
And here it is with the light behind it.

I thought it was a rather fun project for kids for only $0.97! And there was some paint leftover. I’m pretty sure you can also buy the unpainted suncatchers at Walmart (not in a kit). So you might be able to make 2 suncatchers for $0.97! 😉
