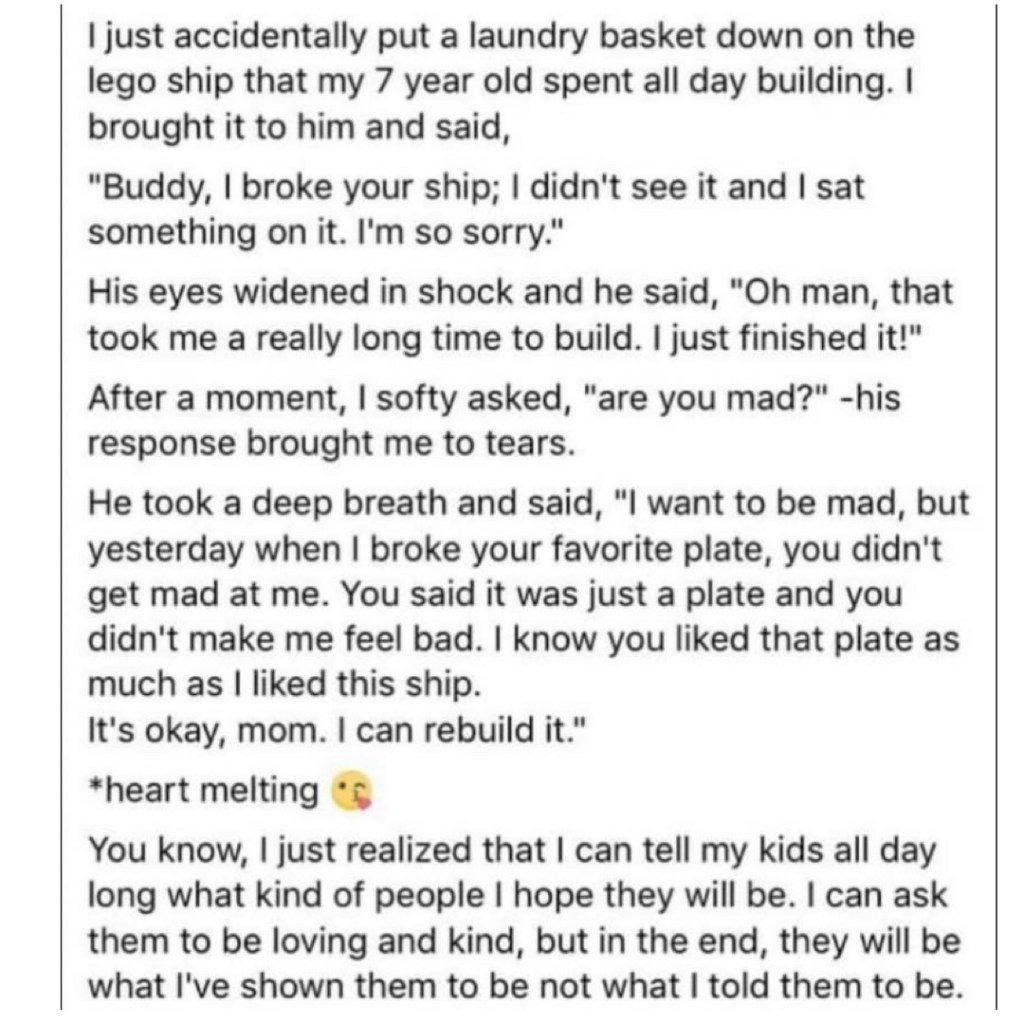
I saw this on Facebook and thought it was worth sharing. 🙂
I saw this on Facebook and thought it was worth sharing. 🙂
Well, we are almost half way through October so I’m guessing you are thinking about Halloween. Do you decorate your house for Halloween? Do you dress up and go trick or treating? Do you have a Halloween party? It seems like Halloween is more popular than ever if you look at all the Halloween items for sale in the stores. I’ll try to add some Halloween ideas here on the blog to help get you in Halloween Mode! Let’s start off with some Halloween riddles for kids! 🙂

#1.) Why do ghosts never lie?
Answer: Because you can see right through them!
#2.) What kind of music do mummies like?
Answer: Wrap music!
#3.) What do you call a skeleton who sleeps all day?
Answer: Lazybones!
#4.) What fruit does Dracula like?
Answer: Neck-tarines!
#5.) What musical instrument do skeletons play?
Answer: A trom-bone!
#6.) What kind of pants do ghosts wear?
Answer: BOO jeans!
#7.) How do you fix a broken jack-o-lantern?
Answer: With a pumpkin patch!
#8.) How are vampires like false teeth?
Answer: They both come out at night!
#9.) What do you call a ghost that gets too close to a fire?
Answer: A toasty ghosty!
#10.) When is it bad luck to see a black cat?
Answer: When you are a mouse!
Haha! I hope these Halloween riddles made you giggle! 🙂
There is an amazing lady that created Cake Pops and she is called Bakerella. She makes the most amazing treats! I love to see the ideas she comes up with. She shared a post about 14 Frightfully Fun Halloween Treats and they are awesome! I just have to share them with you.
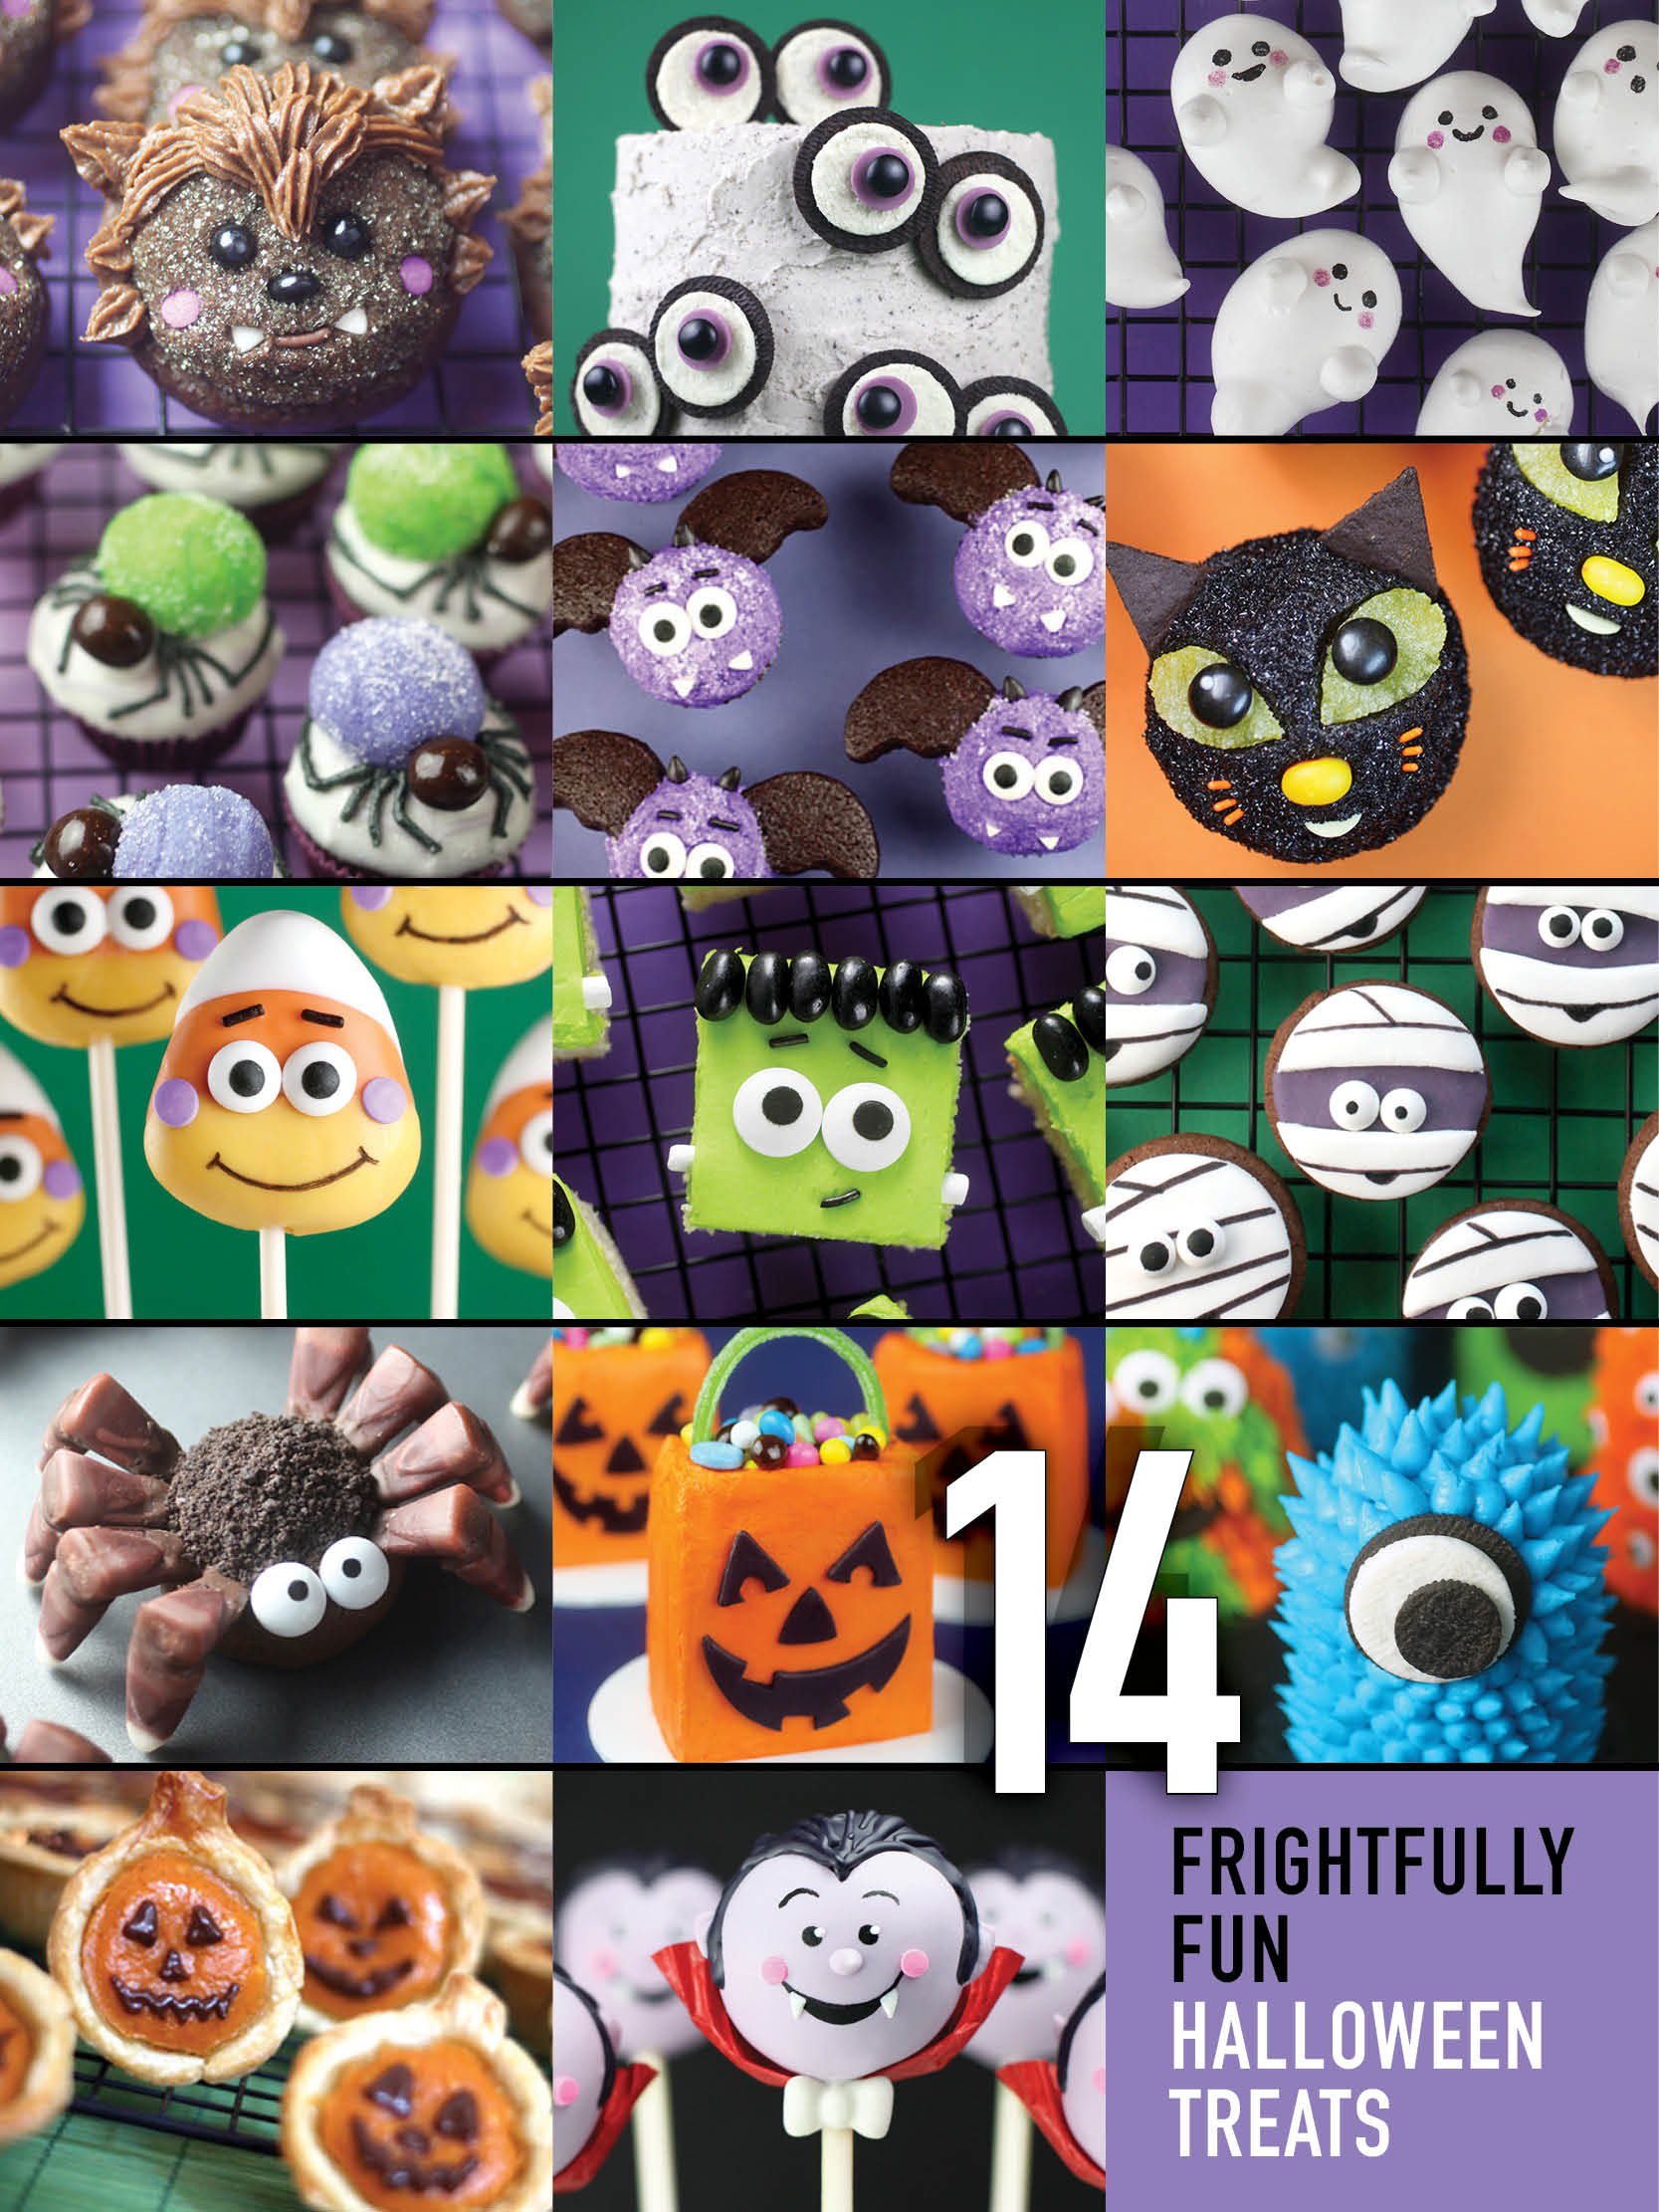
Aren’t they adorable?! Now you just need to narrow it down to which ones you want to make for Halloween! 😉 Here is the link to her website:
https://www.bakerella.com/frightfully-fun-halloween-treats/
You will find lots of other fun treats to make on her website. Enjoy! 🙂
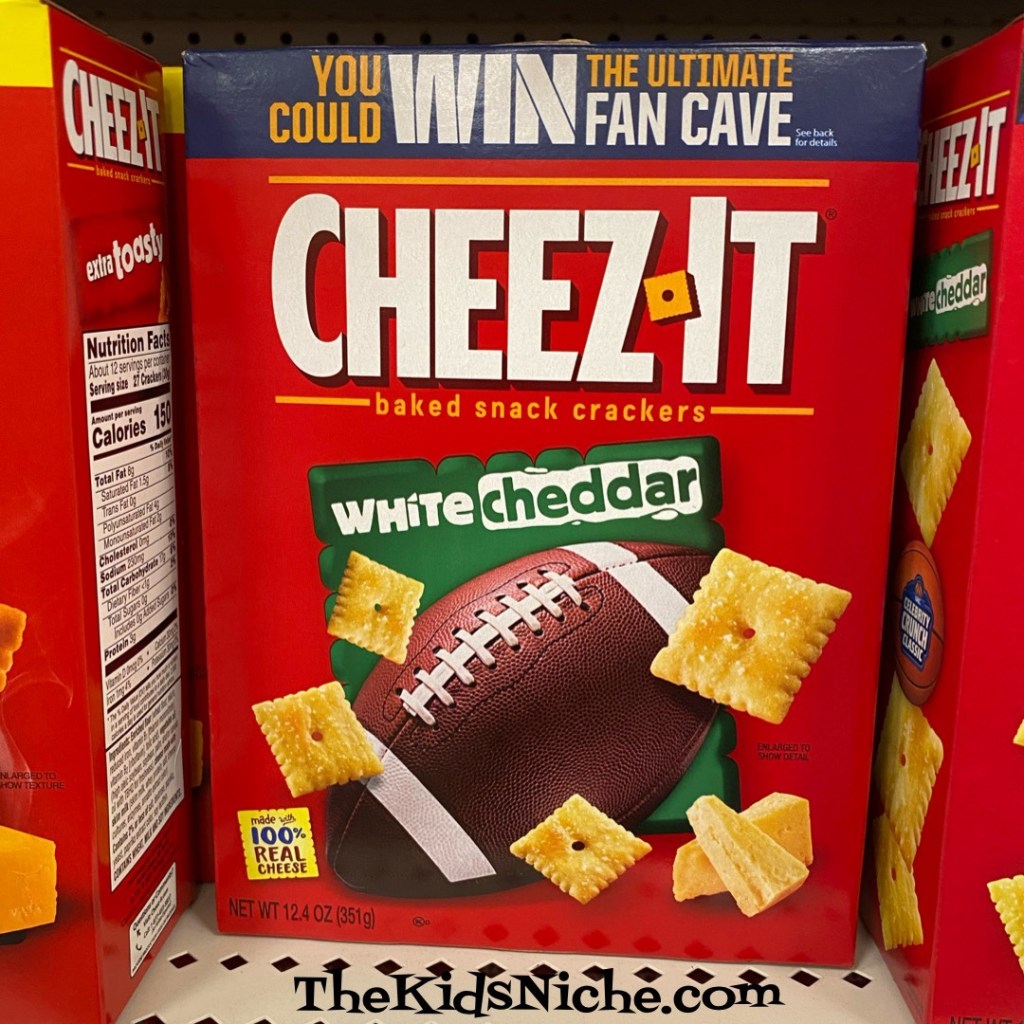
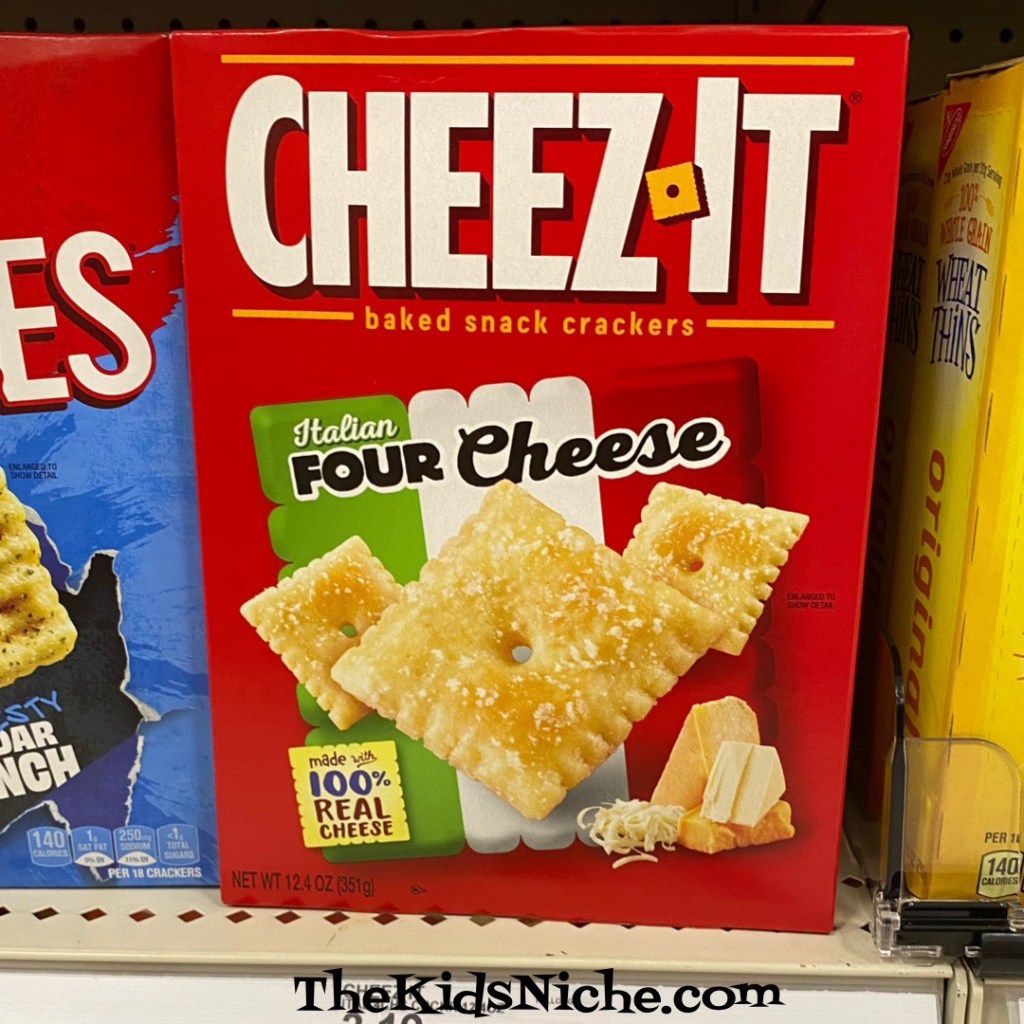
Hello again! Have you ever noticed how many flavors of Cheez-it crackers there are in the grocery store? There are a BUNCH! For our Taste Testing Tuesday today, let’s take a look at some of the types and flavors there are.
So first there were the Original Cheez-it crackers. These were around when I was younger and they were the only flavor available.

I don’t know what order the flavors were added but here are some more of them.
White Cheddar
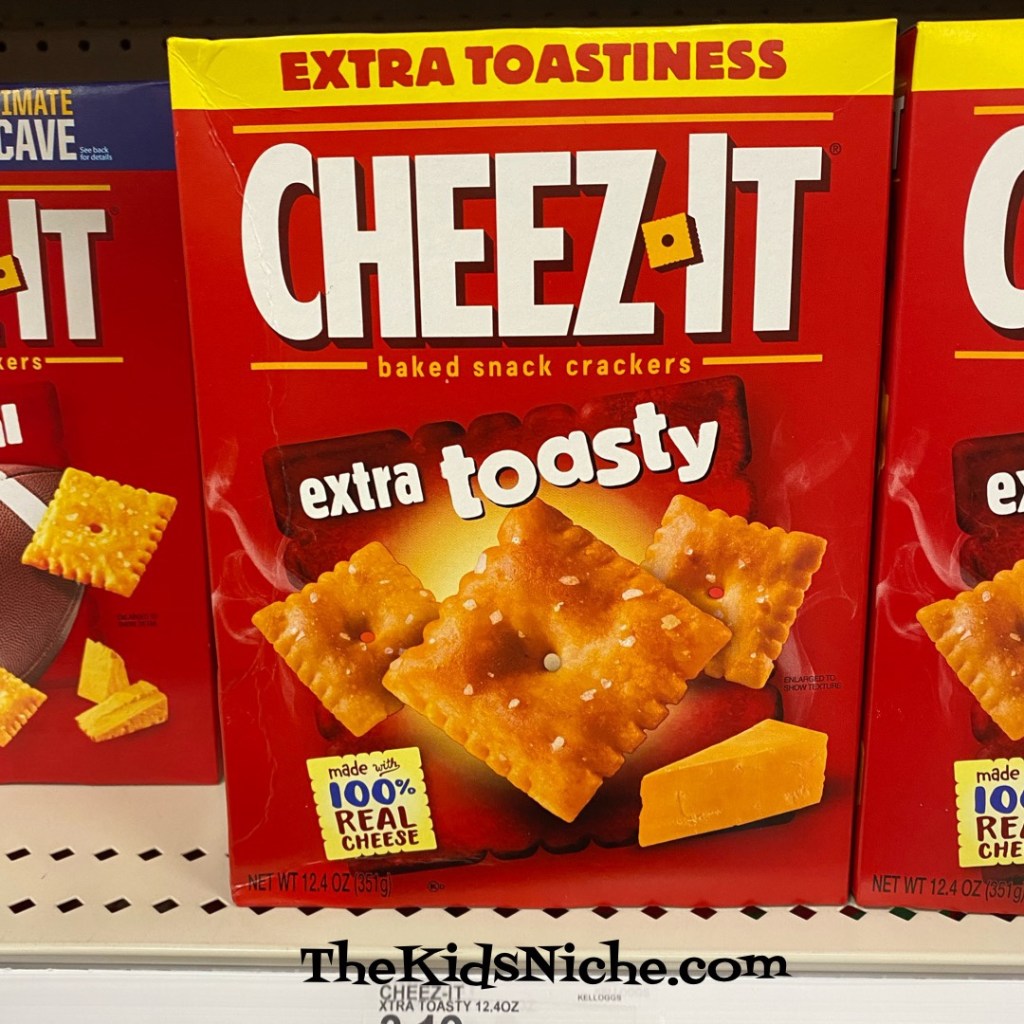
Extra Toasty. I have to say these are my favorite! I remember when I used to find an overcooked cracker in the original flavor box and would wish they were all that way! 🙂
Hot & Spicy. These might light up your mouth a bit!

Cheddar Jack

Italian Four Cheese. I haven’t tried this one yet but I think I will soon!
The Cheez-it website shows some more interesting sounding flavors but I haven’t seen them in our local stores. Like Extra-cheesy, Pepper Jack, Cheese Pizza and Buffalo Wings. Here’s one that looks like a lot of fun!

Which ones will your family use for a taste test? I hope you have fun and you find some new favorites!
Happy Columbus Day! How many times have you heard the saying, “In 1492, Columbus sailed the ocean blue”? 😉 I know, I know…now there is a lot of disagreement about what Christopher Columbus did or didn’t do, but one thing I think we can safely say is he was an explorer. So to celebrate Columbus Day today, let’s help the kids become explorers!
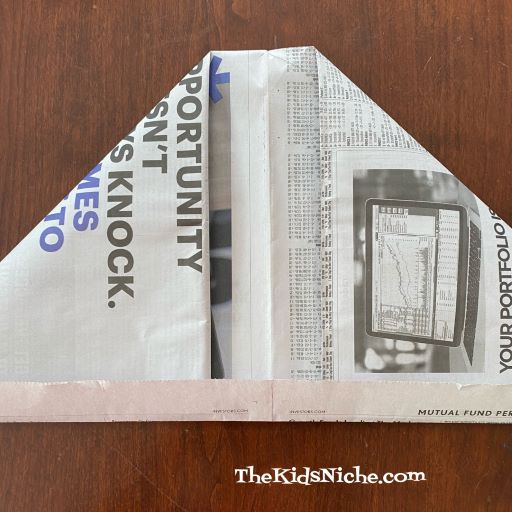
The first thing an explorer needs is a cool hat, right? 😉 I’m going to show you how to make a cool explorer’s hat out of paper. I am using a piece of construction paper so you can see more clearly how to make it, but you might want to use something bigger like newspaper. Just depends on how big the person’s head is that you are making it for.
To start, I got a piece of green construction paper.

Here’s how to make your hat. Fold it in half the long way.

Open it back up.

Now fold it in half the other way.

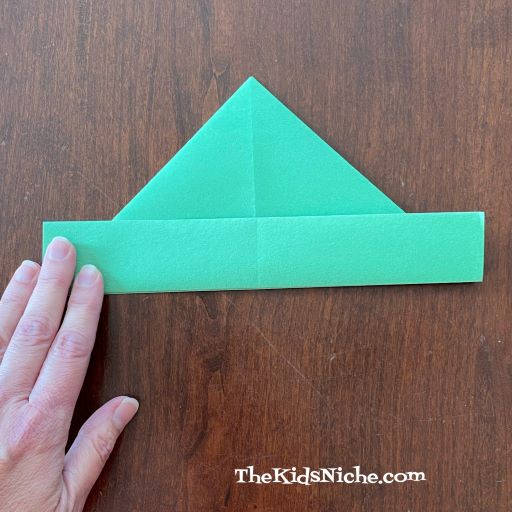
Leaving the paper folded, fold in one top corner of the paper to the middle line so it looks like a triangle.
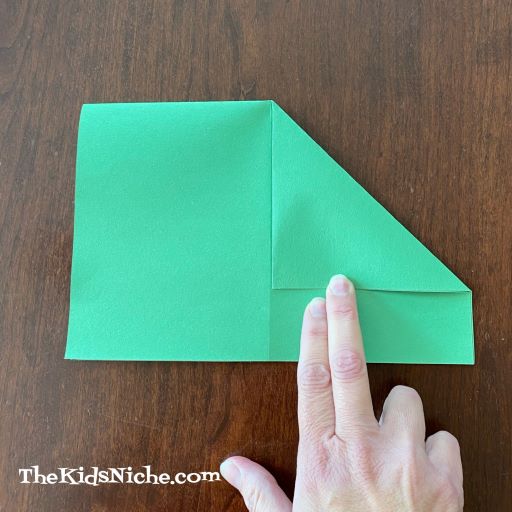
Now do the same thing on the other side.

Fold one side of the paper’s straight edge up so the fold is at the bottom of the triangles.

Turn the paper over.

And fold the other side up the same way.
Your hat is done! Pull it open at the bottom folded edge.


This little guy was happy to be a model for your new explorer’s hat. 🙂

As I already mentioned, you can use different sizes of paper to make different sizes of hats. Here is the one I made with construction paper, one made with a single sheet of newspaper and one made with a full sheet of newspaper.

For the full sheet of newspaper size, you might need to let your triangles not meet in the middle so that you still have paper left over to fold the edges up.
Barbie and Ken thought it would be fun to be explorers too!

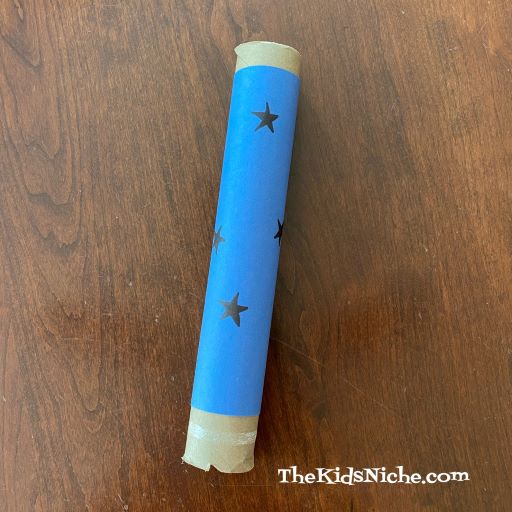
What else does an explorer need to go exploring? Maybe a spyglass? Let’s make one of those too! All you need is an empty paper towel or toilet paper roll, a piece of paper and markers or crayons.
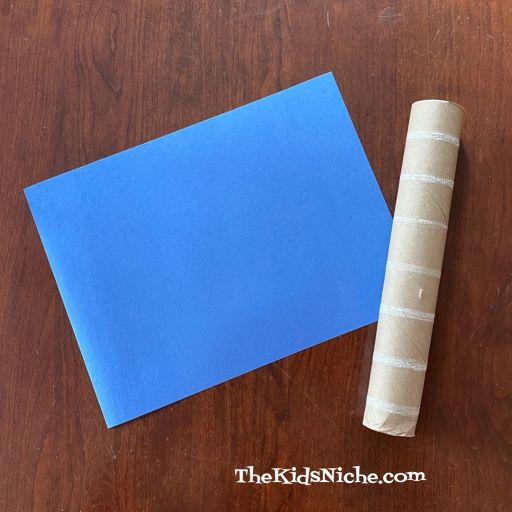
Cover the tube with the construction paper if it has a lot of glue marks on it like this one does. Use glue or tape to hold it in place. (I used tape because it doesn’t need drying time.)

Let your kids decorate their spyglass with markers or crayons.
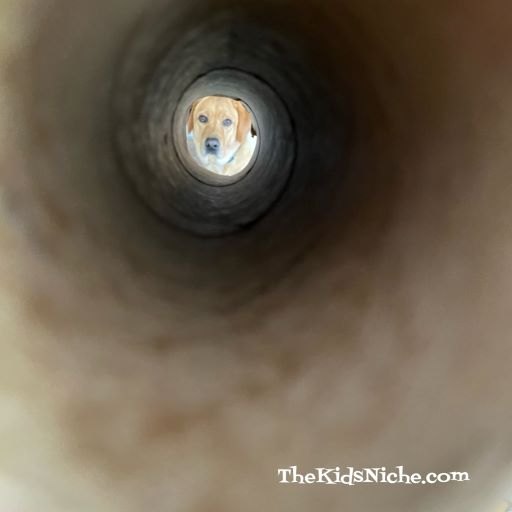
You are now ready to be an explorer!! What does an explorer do? Well, they put their explorer hats on and walk around the house or outside and they look through their spyglass to see what they can spy! They use their imagination to discover a new land. Be careful because you never know what kind of strange animals you might find!
Also watch out for things like carpet that might have quicksand or lava! You might need to jump from rug to rug in order to not get sucked in! 😉 I hope your new hat and spyglass will make exploring a ton of fun!
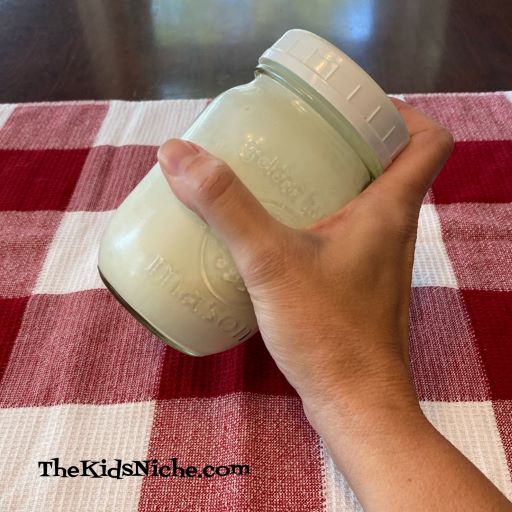
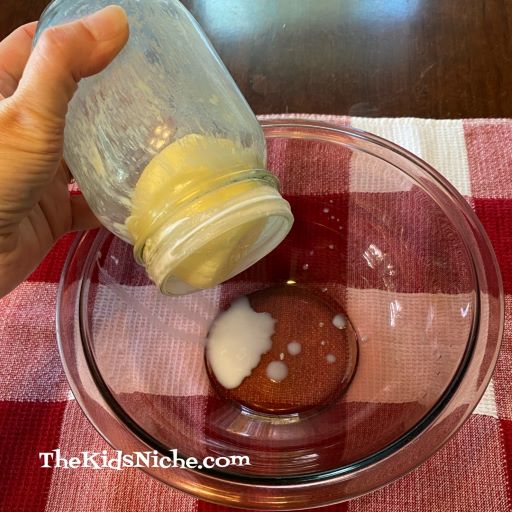
Happy Friday! Are you looking for a fun project that you can do with the kids this weekend? How about making your own butter? It’s simple to do and the kids will be quite impressed that they can make butter instead of only buying it at the store. All you need is a glass jar (I used a pint size) and some heavy cream. If you like salted butter, then you’ll need a bit of that too.

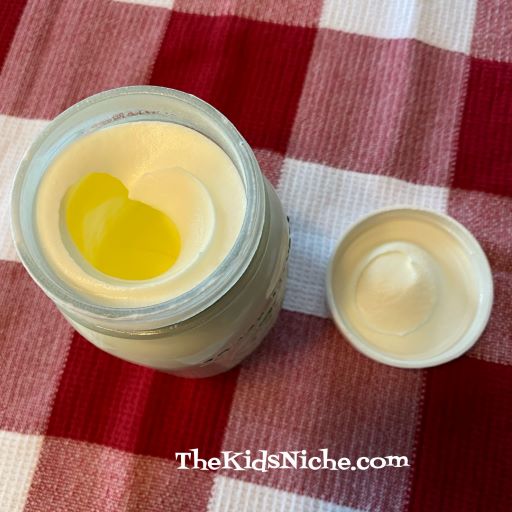
Fill your jar no more than half full of the heavy cream.

If you are using salt, add it now. Try maybe 1/4 teaspoon of salt to around 1 cup of heavy cream.

Put the lid on the top and start shaking the jar. Yes, shaking the jar. It’s good to shake it hard but make sure you have a good grip on it!
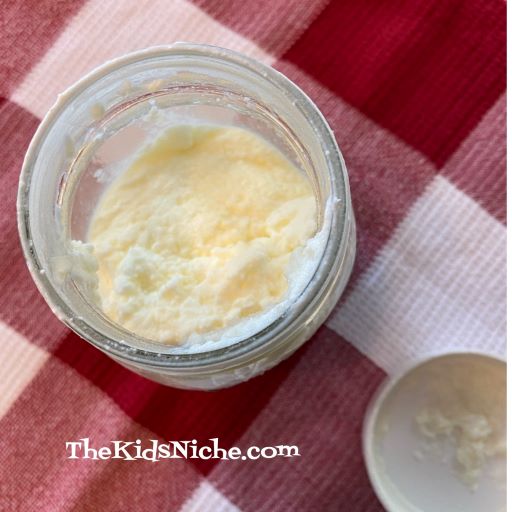
It will take several minutes so shake for around 2 minutes and then look to see if anything is changing. Then put the lid back on and shake for another couple minutes. The more people you have involved the better as each one can take a turn with the shaking. (My arms got tired doing it all by myself! Haha!) After 6-8 minutes (this can vary depending on how hard you are shaking the jar) you will have what looks like whipped cream. You’re not done yet! Back to shaking! 😉
The next time you look, it might be looking like this picture and your jar will seem to be pretty full. Don’t quit yet! Keep shaking!

Ah ha! The cream is changing even more! Now it looks like you have less in your jar, but really your butter is starting to form and you are making buttermilk.
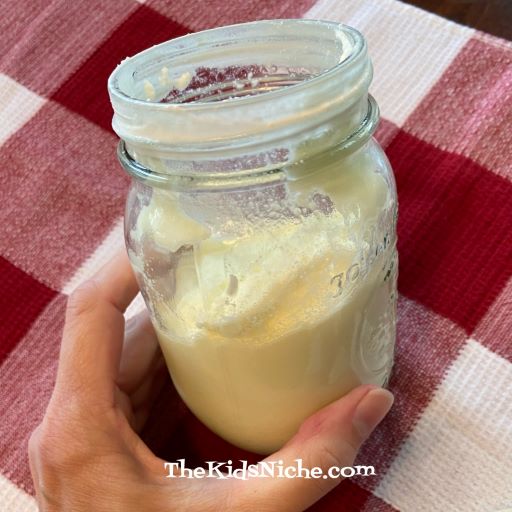
Keep shaking and the butter will start to collect together and you will have a watery liquid in the jar too. That’s the buttermilk.

Shake hard for another 30 seconds or so. And then open the lid. Now pour the buttermilk into a bowl or glass to save for another use…maybe in making buttermilk pancakes!

You’ve made butter!! 🙂
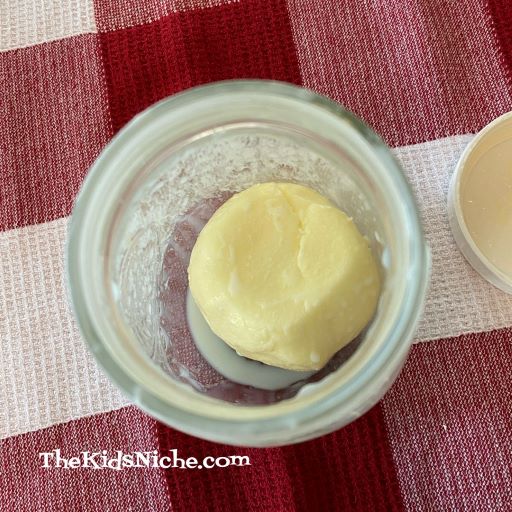
Put your clump of butter into a medium sized bowl. You may have to use your fingers or a spoon to get it out of the jar.

Get some cold water and pour it over the butter.

Roll the butter around in the water a little to get any remaining buttermilk off of your clump of butter.

Pour this water off and discard it. Continue rinsing the butter until the water remains fairly clear. Now put your butter in a container for storing.

Grab your favorite kind of bread and butter a slice with your homemade butter! Mmmmm! Isn’t that delicious?

Congratulations! You have successfully made your own butter! 🙂 Share some with your family and friends. They will be impressed to learn that you know how to make homemade butter! Enjoy!
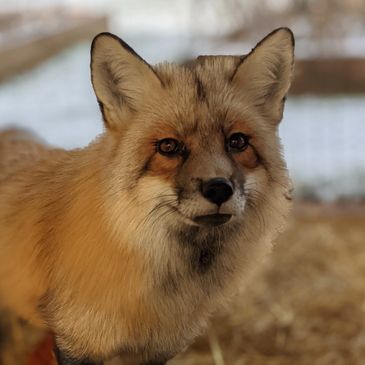
Today’s post is a post of a different sort than what I usually share. I learned yesterday about a place called Walking Wild Fox Rescue and Wolf Dog Sanctuary. I don’t know these folks or have any connection with them, but I read an article about what they are doing in a magazine our electric company sends us. According to the article, Molly and David Schulz, “rescue and save foxes and wolf dogs from unfortunate surroundings and give them a safe, healthy home to live for the rest of their lives.” I have never heard of anyone doing this so I found it very interesting and I thought you might too.

They have a website where you can read more about what they are doing and see pictures of the foxes and wolf dogs that they have. You can learn about where the foxes were rescued from and more about their stories and how they ended up at Walking Wildlife Rescue. The website address is: https://walkingwildrescue.org/
This is Fiddle.
.jpg/:/rs=w:365,h:365,cg:true,m/cr=w:365,h:365)
Here is Russel.
And this is Nala.
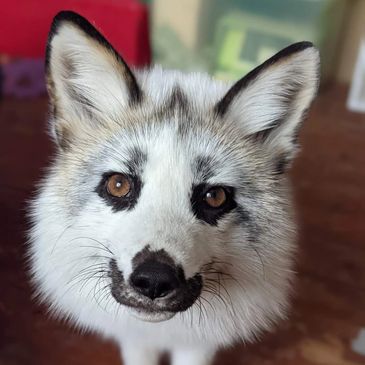
I didn’t know foxes came in so many colors! All pictures are from their website. I think you will find it interesting to take a look and they could use your support, if you are so inclined. This is a great thing to show to your kids so they can learn about the animals too and about people that are doing what they can to help them. 🙂
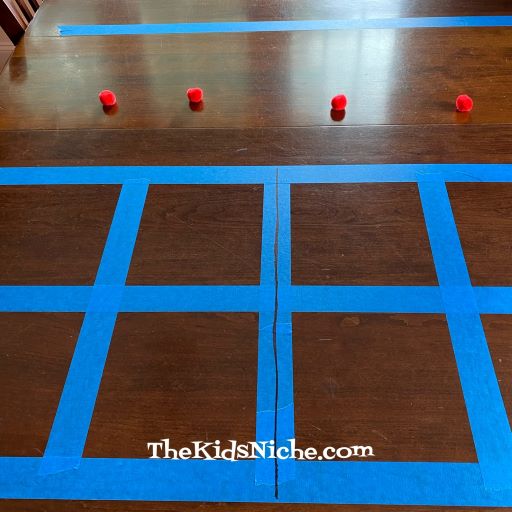
Do you ever wish you had something NEW the kids could do without going out and spending a ton of money? What if there was a game that takes some really simple supplies that you likely have on hand already? This game can be played with just some simple pom poms, drinking straws and either some painters tape or strips of paper and scotch tape. And a table or floor to play on. 😉

The basic idea of this game is to use a straw to blow the pom poms to a certain place. This game can easily be adapted for young kids to adults. I suggest each person has their own straw and 4 differently colored pom poms but the number of pom poms can vary. Let’s start out with the simplest way to play and then move on to harder ways.
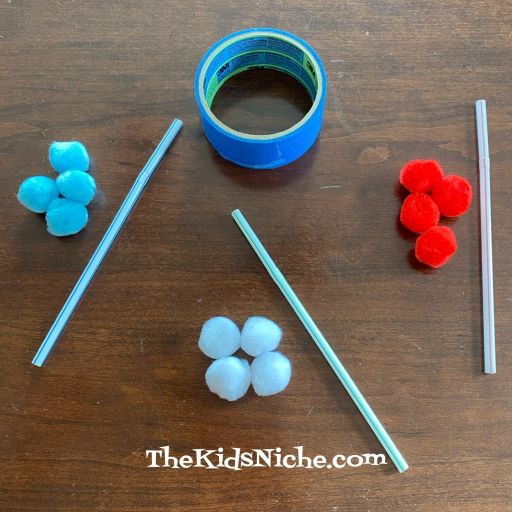
To set up the game, begin by placing a strip of painters tape across the table, close to one end but allowing 6″ or so of the table open on the very end. I suggest painter’s tape because it should come back up easily and not hurt the table. If you don’t have painters tape, you can use a strip of paper and tape it down with scotch tape.
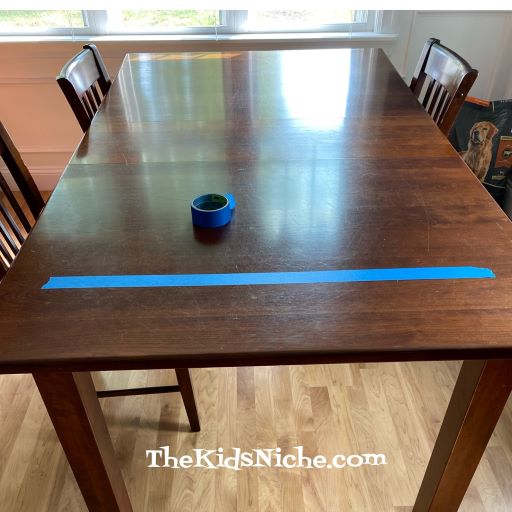
Next place another strip further down the table…maybe 12″-15″ away.

Now you are ready to play the easiest version of the game. Player #1 takes his/her pom poms and puts them on the end of the table by the first piece of tape.
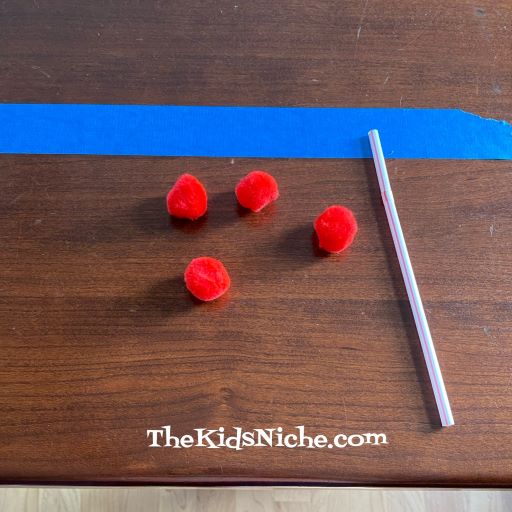
Using their straw, player #1 blows through the straw while aiming the straw at a pom pom.

See how the pom pom has moved past the first line?

Keep blowing each pom pom until all 4 pom poms have crossed the line further down the table. NO HANDS ALLOWED!! 😉

If you want, two players can go at the same time.

You can decide on what rules of the game you want to use. For instance, can the players help each others pom poms across the line or must each player do their own? If the pom pom is blown off the table, does it go back to the starting point or can it be placed back on the table close to where it fell off? The ages of the players can determine how hard you want this game to be.

Now, let’s make it a little bit harder. Put a piece of painter’s tape down the center of the 2 strips already on the table. When each person takes their turn, they must keep all of their pom poms on their side of the tape. Add a third piece of tape even farther down the table for the finish line.

Now I added a piece of tape on the outside edges on both ends. (This is a side view.) At this level the players also cannot blow their pom poms outside the side edge or that pom pom must be placed back at the beginning. Players can race against each other or each player can be timed and the player with the fastest time is the winner. You can make this level be that all 4 pom poms must be together in the first “box” before they are blown on across the table past the finish line.

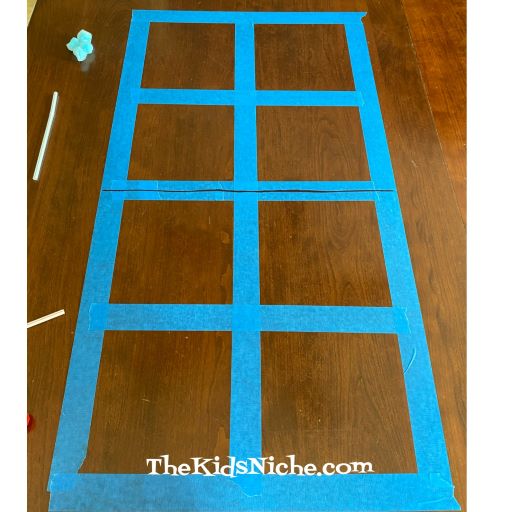
Ok, it’s getting harder now! Place more tape on the table so that each side has 4 small boxes. I drew a line down the center for a reminder to stay on your side. (Another side view)
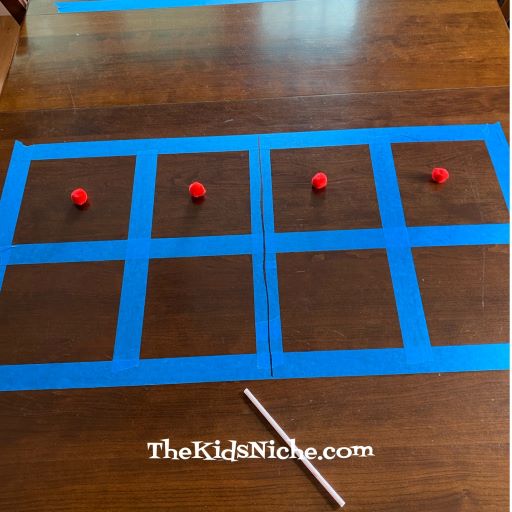
This level can be that each player must have 1 pom pom in each of their 4 squares at the same time before they can move on toward the finish line. (Side view)

Or you can choose which squares the pom poms must be in to be able to move on. Like in this picture, 2 pom poms in the 2 squares that were picked.

Here is another version where one player plays at a time and you time each player. One pom pom must be inside each square in the first row.

Then each pom pom must be blown into a separate square on the second row.
Next, all 4 pom poms must be in the space in front of the finish line before…
…all pom poms are blown past the finish line. An extra rule would be that pom poms cannot be left sitting ON the tape…they must be inside the appropriate area. Again, decide what happens if a pom pom is blown off the table…start over or put it back where it fell off? 😉

Here’s another angle to decide before you play…where do the balls start from? Do they all have to be together in a line?

Or can they be placed more strategically across the starting area?

One more idea for you…give each player 4 pom poms of 3 colors. And make them follow the last game I described but 1 pom pom of each color must be blown into each square before moving on to the next step!

I’m sure you can come up with even more ways to play this game! Start out easy and gradually increase the difficulty. You can also give players a set amount of time to finish. For example, they have 30 seconds to blow the pom poms across the finish line. I hope these ideas will spark some ideas of your own and you will have a ton of fun with just some pom poms and drinking straws! 🙂
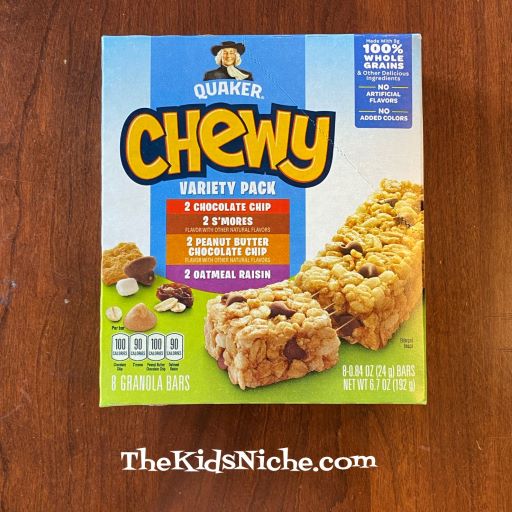
Another Taste Testing Tuesday is under way! Today we’re trying Quaker Chewy Granola Bars. I found one box with 4 different flavors in it. And there are 2 bars of each flavor. 🙂
Before we begin, you might want to draw a simple chart to record what everyone thinks during your Taste Test.
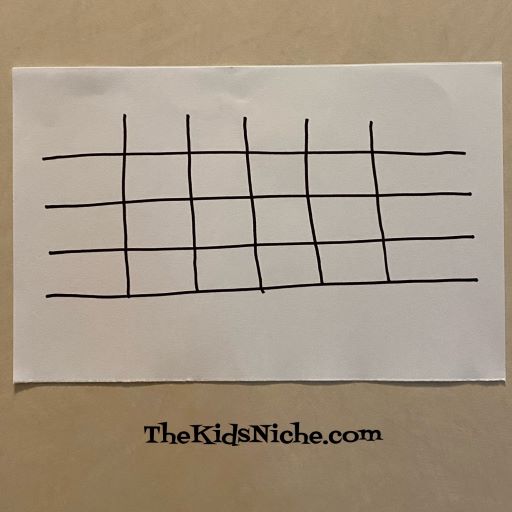
Write each participant’s name down the left hand side and the names of each kind of granola bar across the top. Draw a smiling face for “Yum!”, a straight face for “It’s ok.”, and a frowning face for “No, thanks!”
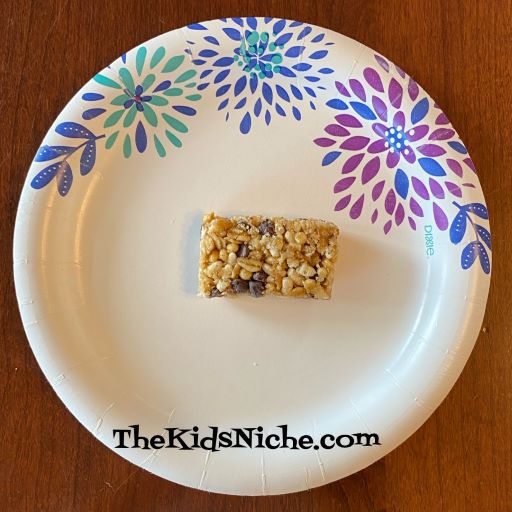
You can decide how big of pieces to break the granola bars into depending on how many people are involved in your taste test or how old the participants are. This is a picture of a fourth of a bar and a half of a bar. I decided to use half bars so they are easier for you to see them.

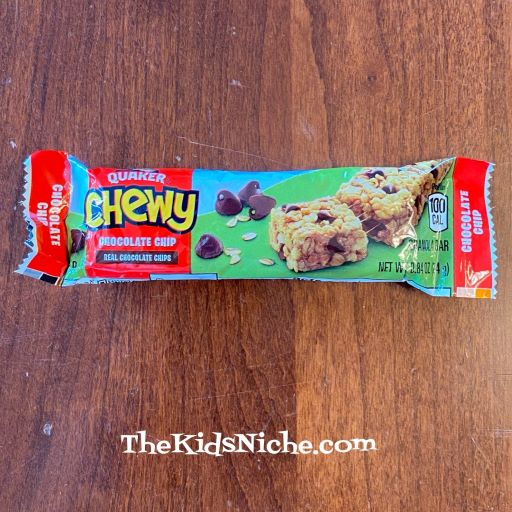
#1.) Chocolate Chip. Are you a chocolate chip fan? My husband loves them, but I prefer milk chocolate.
#2.) S’mores. Does this one make you think of campfires and making your own s’mores? If you look close, you can see little marshmallow bits in this flavor.


#3.) Peanut Butter Chocolate Chip. Whoever discovered that peanut butter and chocolate go together was a genius, right?! This kind has tiny little peanut butter chips in them. Spoiler alert…this one is my favorite. (I love Reese Cups!)


#4.) Oatmeal Raisin. This one makes me think of homemade oatmeal raisin cookies. Mmm!


And there you have it! Put a piece of each kind on a plate for each taste tester.

Let the tasting and the voting begin! Which is your favorite? Which is your least favorite? Which one got the most smiley faces? I hope your family will have fun taste testing chewy granola bars! 🙂
Hello again! Gather around, all you budding scientist! Let’s do a fun experiment today. It’s an experiment that has been around for a long time, but is always fun to show to kids. You’ll need the following items: some vinegar, some baking soda, an empty water bottle, a balloon and a funnel.

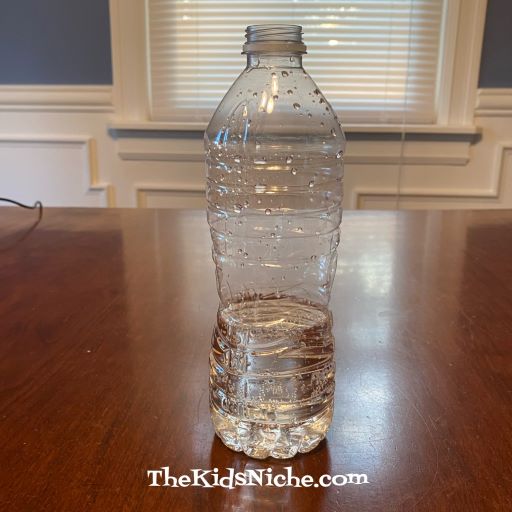
The idea of this experiment is to show that you can blow up a balloon by making a chemical reaction. No blowing involved! 😉 Begin by filling the empty water bottle about 1/3 of the way up with the vinegar.
Insert the end of the funnel into the opening of the balloon. You might need to stretch the balloon a bit to get it on.

Put 2-3 spoonsful of baking soda in the funnel and shake it down into the balloon.


When you are finished with that step, remove the balloon from the funnel.

This next step is important. Stretch the opening of the balloon over the opening of the water bottle, BUT make sure to keep the balloon hanging down so that none of the baking soda falls into the bottle! Look at the next picture to help you understand what I mean.
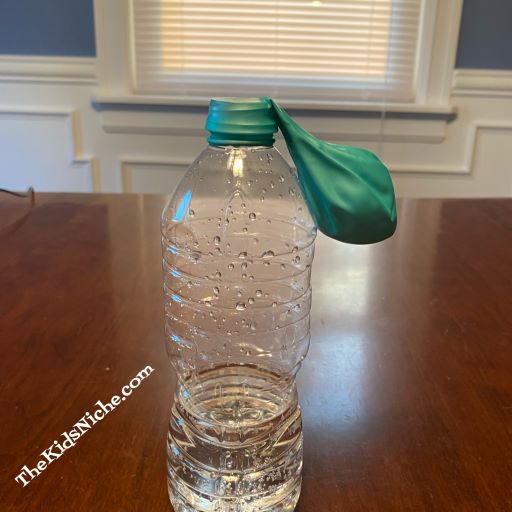
Pull the balloon down over the bottle opening so it is completely sealed by the balloon. After you are sure the balloon is on the bottle, slowly pour the baking soda in the balloon into the bottle. It will begin to fizz – this is the chemical reaction! Your balloon will start to inflate!

As the reaction in the bottle continues to take place, your balloon will grow bigger.
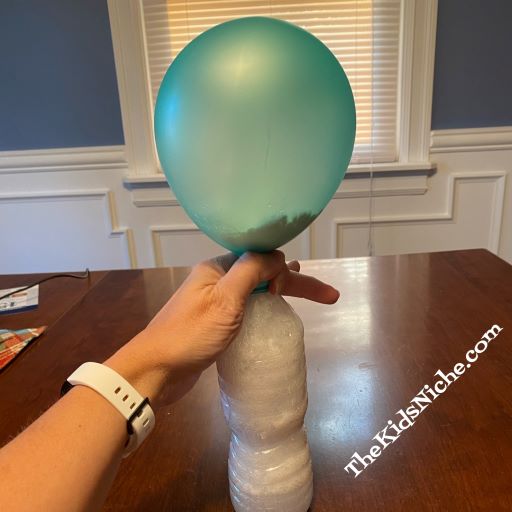
And bigger!

And BIGGER! As you can see, I was afraid to let go of the balloon on the bottle! LOL I could just imagine it coming off and flying all over my kitchen and dining room!

So why did the chemical reaction happen? Well, the baking soda is a base and the vinegar is an acid. When they are combined, the reaction gives off a gas called carbon dioxide. That’s what inflated your balloon. 🙂 After most of the fizzing reaction was over, I did get brave enough to let go of the balloon finally. 😉

I hope you have fun trying this experiment! Congratulations on being a scientist today! 🙂
