Taste Testing Tuesday #48 – Goldfish Crackers (Bonus games!)

Hi everyone and welcome back for another Taste Testing Tuesday! Today we’ll be tasting Goldfish. Waaaaait a minute!! Do we eat goldfish?? Yuck! Let’s try that again! Today we’ll be tasting Goldfish CRACKERS! Oh, that sounds like a much better idea!! We are testing 4 different flavors of Goldfish crackers today but there are more flavors available. Check your local store to see what they carry.

Let’s look at the 4 flavors we chose to try today.

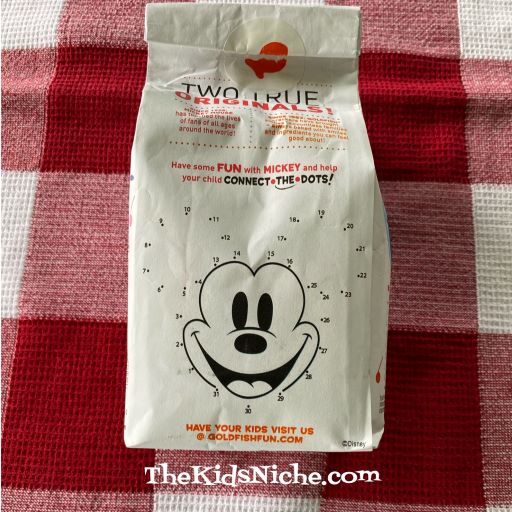
#1.) Mickey Mouse Special Edition Cheddar.

These are super cool as they have the shapes of goldfish but also the shape of Mickey Mouse’s head.

#2.) Parmesan

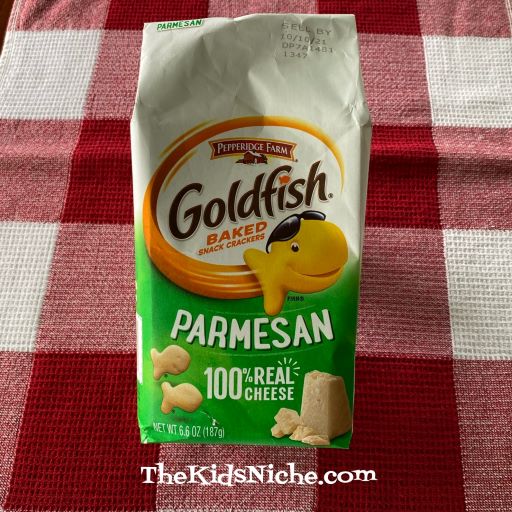
These little goldfish are a very light, almost white color. They ARE pretty cute, aren’t they?

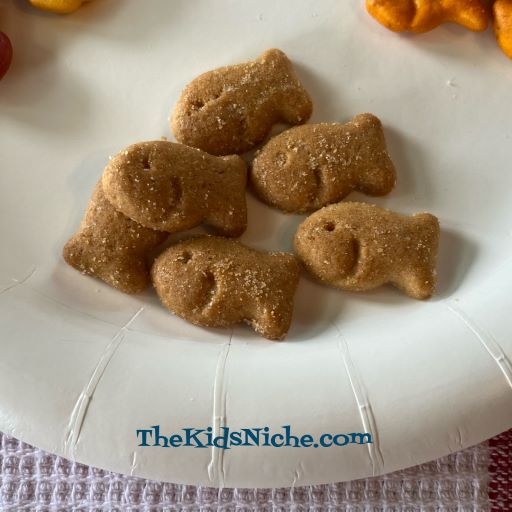
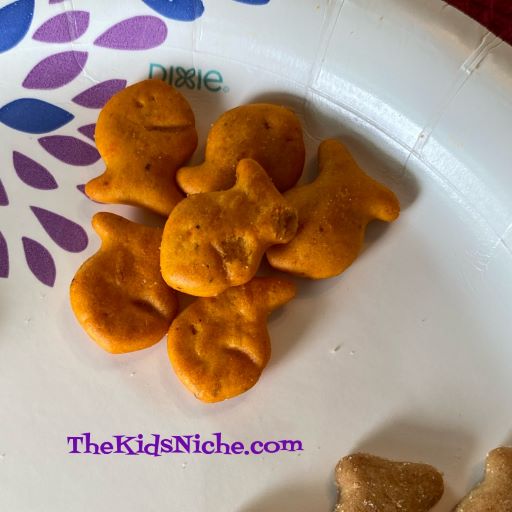
#3.) Vanilla Cupcake.

These goldfish are brown in color but oh, so yummy in flavor! Mmm!

#4.) Pizza

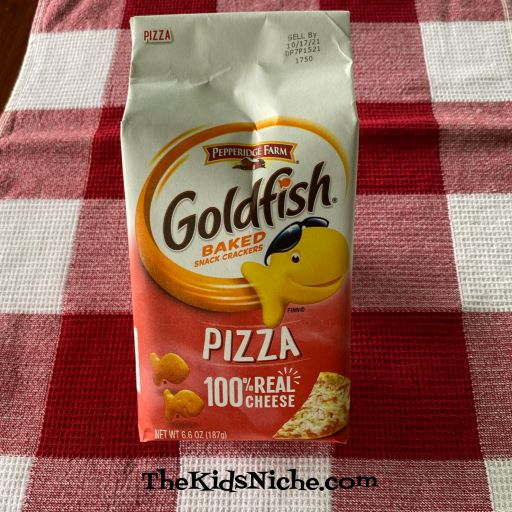
Who doesn’t like pizza, right?!

Here we go with our taste testing! Put at least 4 of each flavor in front of each person.

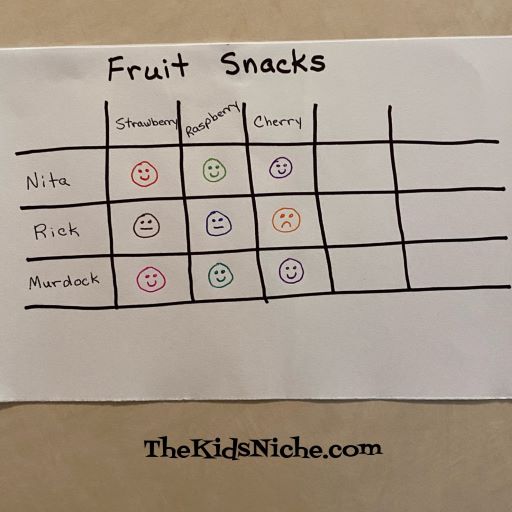
To go along with your taste test, make up a simple chart to record what everyone thinks of each flavor. Something like this works great.

Draw a face in the corresponding box that shows what you think of that flavor. A smiling face means “Yum!”, a straight face means “It’s ok.” and a frowning face means “No, thanks!” Look at the chart in the next picture and you can tell who likes the Vanilla Cupcake Goldfish crackers. 😉

There is also a place on our chart for you to write in which flavor is your favorite. 🙂 If you taste test the special edition Mickey Mouse cheddar goldfish crackers, there is a fun dot-to-dot activity on the back of the package that you can do.

And now for the bonus game! Take a few of each flavor of goldfish crackers and mix them up on a plate. One person closes their eyes and takes 1 goldfish. Be sure someone else sees which type of goldfish they picked up. Now the person eats the goldfish and guesses which flavor it was. How many can you get right?

Whatever flavors of goldfish crackers you decide to try, I hope you have fun doing this taste test! Have fun telling people that you ate goldfish and watch what their reaction is! 😉

Where Do Green Beans Come From?

If you live in a big city, you may not have seen where green beans come from except for a can of green beans, like this one, or a bag of frozen green beans from a grocery store.

If you live in the country, your family might grow green beans in your garden just like our family does. So for those of you who’ve never had the chance to experience growing your own green beans, I’d like to give you a peek into what that looks like. It all starts with preparing an area of dirt or a garden box so you have a place to plant the green bean seeds. You will see green bean seeds in lots of stores in the spring time. There are different types of green beans, but this is the kind we are growing this year.

Here’s a closer up picture of the seeds.

We planted our green bean seeds on May 25th this year and they grew into large plants that look like this:

If you gently move the leaves aside and look underneath, you can see green beans growing there! And they are ready to pick!

I picked a bunch of the green beans off the plants and brought them inside our house.

The way I learned to prepare green beans is to start by laying a piece of newspaper across your lap and add a small pile of beans to it.

Here’s what a fresh green bean, straight from the garden, looks like:

Notice that the bean has a little pointy portion that sticks out on each end. We snip or break both ends off.

Then we snap or break the bean into several pieces. The number of pieces it’s broken into depends on how long the bean is. Here’s about the size we break them into:

Our big pile of green beans yielded this amount of snapped green beans:

The next thing that happens to the green beans is to put them in a dishpan with water and gently scrub them a little between your hands to get them clean.

Now it’s time to cook them! We put them in a large pan and add some water and put the pan on the stove and turn the heat on. We cook them until they soften to our desired tenderness, which might vary from one person to the next.

I’m not sure these pictures actually show the difference, but the beans will change color somewhat as they cook.

The green beans are finally ready to eat! How do you like to eat your green beans? I like them with butter melted on them and sprinkled with some salt! Yum!! They are also very delicious cooked with some ham.

If you have never done your own green beans from “scratch”, I’d like to suggest you look for some fresh green beans in your grocery store or at a nearby farmer’s market. It’s a great experience for kids and adults to prepare their own fresh green beans. (Mind you, after you’ve done several bushels of green beans at one time, it does get rather tiring! Been there, done that! Lol) I hope you’ve enjoyed this glimpse into fresh green beans straight from the garden! 🙂

Make Your Own Matching Card Game

How’s your day going? I hope ok! Today I want to share a super simple way to make your own matching card game. You know, the little cards you line up face down and you turn 2 over at a time and see if they match? Yep, those. 😉 Only a few supplies are needed such as a piece of cardstock or sturdy paper, a ruler, a pencil, a pair of scissors and some stickers.

I used a piece of maroon colored cardstock (8 1/2″ x 11″) and made 12 cards for the game. First you’ll draw lines on the paper to mark the cards into even squares. If you use the same size of paper, your squares can be 2 3/4″. You’ll have just a little bit of extra paper down one side to cut off and discard. (I couldn’t seem to get a good picture of the lines on the paper.)

Cut the squares apart.

Separate the squares into pairs of 2 cards each. You’ll be making 6 sets of matching cards from one piece of paper. Feel free to make more!

Sort through your stickers to find 6 sets of matching stickers.

Make a set of cards by placing 1 sticker on each card, making sure there are 2 identical cards.

And your cards are made! You’re ready to play! Turn all the cards face down and mix them up, then line them up in 3 rows of 4 cards each.

The first player turns over 2 cards. If they match, he/she takes the match and turns over 2 more cards. As long as the player is finding a match, their turn continues. If they don’t find a match, the cards are turned face down again and play moves onto the second player.

A match!

6 matched sets is probably enough for small children, but you might want to make more for kids that are a little older. So easy to make and so simple to play! I hope you’ll have fun making your own game AND playing it! 🙂 Thanks for stopping by!

Taste Testing Tuesday #47 – Fruit Snacks

One thing that most kids seem to like is fruit snacks! They come in many different brands, shapes and flavors. So which one tastes the best? We need to do a Taste Test to find out! For today’s Taste Testing Tuesday, we tried the Great Value Organic Fruit Smiles.

These come in 3 flavors…strawberry, raspberry and cherry.

And just look how cute they are! 🙂 It’s food that smiles back at you!

#1.) Strawberry. This flavor is the lightest colored one in the package.

#2.) Raspberry. Raspberry are the medium colored ones.

#3.) Cherry. The cherry ones are the darkest color.

Make sure everyone has at least one of each color/flavor. You might need to do a little swapping of flavors because each little package is not exactly the same as the next one. We had 3 of each flavor for each person.

Make a quick and simple chart so you can record what each person thinks of each flavor. Something like this chart works well.

Write each person’s name down the left side and the names of each flavor across the boxes at the top.

As each person does a taste test on each flavor, have them draw a face in the corresponding box. A smiling face means “Yum!”. And straight face means “It’s ok”. And a frowning face means “No thanks!”. Here is how our taste test went at our house:

Can you tell who liked the fruit snacks? And who didn’t like them? (Yea, Rick is not really a fan of fruit snacks.) 😉 I wonder what brand and flavors and shapes your fruit snacks will be? I hope you find your favorite! 🙂

Finger Painting Fun!

Grab some newspaper to cover your table and a smock or old shirt to cover the kids and let’s have some fun finger painting! I have fond memories of finger painting when I was little . 😉 I found this inexpensive set of finger paints at Walmart for $4.34.

Yep, they are washable!

There are 6 colors in the set.

I also found some white construction paper for $1.47. (Why do packs of construction paper never have white in them?!)

Don’t forget your most important utensil – damp paper towels for cleaning up! LOL

Newspaper, smock or old clothes, paint and paper…looks like we’re ready to go!

Select your first color…I decided to start with green. There is another kind of plastic lid inside the first lid.

Flower stems and leaves are the beginning of my painting. Just trying something super simple that kids can do. 😉 You need a very small amount of paint on your finger at a time!

Now for some flower petals…

Let’s add a yellow dot to the center of the flowers, a sun in the top corner and some blue streaks in the sky.

Of course, you and the kids can paint anything you want! No brushes needed! You can put a small amount of each color on a styrofoam plate that the kids can dip their finger onto while they are painting. You never know, this might be the beginning work of a future great artist! Have fun!

Freebies on Friday!

What could make a Friday better than finding some FREE stuff you can get?! (Ok, not having to work today probably tops that for most people!) But how cool is it to get some free things for you and your kids? Pretty cooooool! So here are a couple of things you might want to get:

Free Printables and Worksheets from Carson Dellosa Education. These free printables can help your kids keep things fresh in their minds throughout the summer. They have printables for language arts, math, reading, social studies, science, etc. Follow the link below to check it out.

Schoolgirl Style: Sprinkle Kindness Like Confetti Door Décor Free Printable

Do you and your kids love nature? Or would you like to get them more interested in nature and growing things? Here is a place to order some FREE wildflower seeds from Airwick. Planting seeds and watching their own plants grow is a wonderful experience for kids and adults! Check it out here:

https://www.airwick.us/mission/seeds-giveaway

Thanks go to Freebies4mom.com for sharing these goodies! 🙂

Off the Hook Magic Yarn

Hello again! (Sorry I didn’t get a post up yesterday but I wasn’t feeling too well.) Have you seen the loopy yarn in the stores and wondered what in the world you do with them? Take a look here! This project today is done using the Off The Hook Magic Yarn (Emoji). I found it on clearance at Joann Fabrics store for only $3.97.

If you “knit” (using just your fingers) in the right way, you will have an emoji face when you are finished. Super cute! Let’s begin! Remove the paper wrapper from the yarn and look for the “start here loop” which is a different color from the rest of the yarn.

Count out 26 loops, not counting the “start here loop”.

Take a hold of the 26th loop…

…then take the 27th loop and pull it through the 26th loop.

Keeping the long line of loops in front of the row you counted out, continue following the line and pulling a loop through each loop in your first set of 26 loops.

In this next picture, you can see that 2 loops are done.

Continue pulling loops through as you work your way back across the row.

Stop pulling the loops through when you have done 21 loops. The extra 6 loops will be used at the end.

Now it’s time to work on the second row. Place the yarn back across in front of your work. This will make it easier to keep track of which loop is the next one in line. It’s important not to miss any loops. Your picture will start to take shape as you work…if you keep the loops in the correct order.

Another row is done! At the end of each row, count and make sure you have 21 loops in that row. (I had 22 loops one time so I had to go back and gently pull the loops back out until I found my mistake and corrected it.)

The pattern is starting to show up as we keep doing rows of loops! 🙂

A couple more rows finished…

Another way to help make sure you are staying on track is to look at the backside of your work and make sure there aren’t any loops sticking out the back. If there are, just back up to the loop and find where you went wrong and fix it.

Backside of work

Making more progress! You can see the mouth now.

Looks like the eyes are forming!

There! You can see the emoji! This point is after 16 rows are done.

Now it’s time to start binding off with this row. To start, pull 2 loops through just as you have been doing.

Take loop #2 and pull it through loop #1.

Make a 3rd loop in this row like you were doing.

And then pull loop #3 through loop #2. See how you are making a finished edge with no more loops sticking up?

Continue working in this manner until you have gone completely across your work and have just 1 loop left.

Now looking at the extra 5 loops at the top of your work, carefully cut at the bottom of each of the 5 loops so the yarn will open up into one longer string.

Do the same thing with the extra 6 loops at the bottom of your work.

Back to the top string…flip your work over and then feed the string through the 1 remaining loop.

Pull it snug and then weave the extra yarn into the backside of your work to anchor the string. Repeat the weaving in step with the bottom string.

After you have woven the ending strings in through several places, you can cut off the extra.

And there is your finished project!! Great job! Now you have a fun smiling emoji to hang up, maybe in your bedroom.

I hope you’ll give this project a try! Happy “knitting”! 🙂