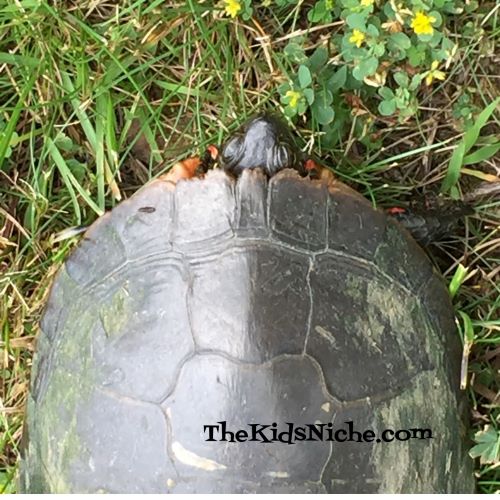
Today I was walking across the yard with our dog, Rusty, when he stopped suddenly and started sniffing something. Then he jerked back and growled a little. When I got closer to where he was, I was surprised to see that we had an unexpected visitor in our yard! Can you guess what it was?
He carries his house with him wherever he goes. He’s dark green on the outside…has 4 legs and a tail. He’s hiding but I bet you can tell what he is by looking at his house. It’s a…..
TURTLE!! I bet you guessed that right, didn’t you? Let’s take a little closer peek at him…
Well, hello, Mr. Turtle! (Or maybe it’s Mrs.?) In this next picture you can see what size he was compared to the size of my foot.
Peek-a-boo! 😉
As long as we were close to him, he stayed all tucked safely inside his shell. But when we walked away he moved on across the yard. It brought some excitement to our day! Thanks for visiting us, Mr. Turtle! 🙂
Today I have another fun and easy cake recipe that’s great for kids to make. Yes, believe it or not, the name of this cake is actually Wacky Cake! It’s been a favorite in my family as far back as when I was a child. I know…all those eons ago… 😉 My older sister, Susie, is the one I remember making it most often. I think they call it Wacky Cake because you mix it up and bake it all in the same pan.
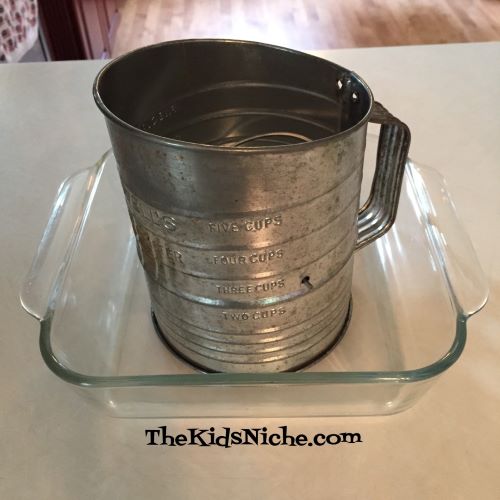
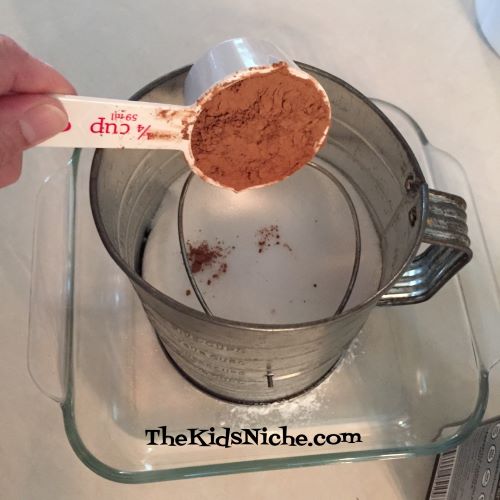
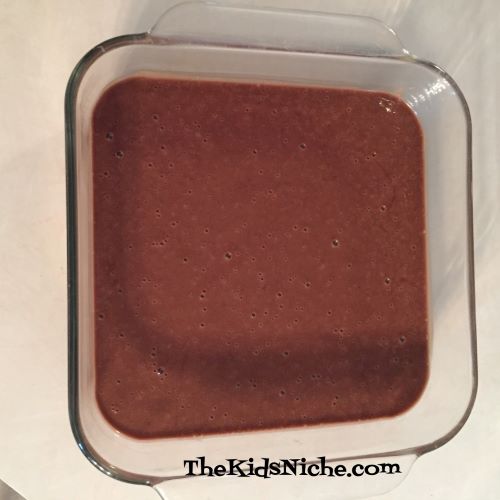
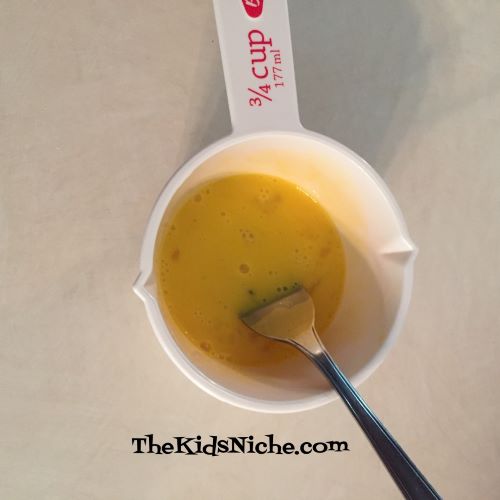
Oooo! Doesn’t that chocolate cake look amazing?! Let’s get on with making it so you can soon be EATING it! Here’s what you’ll need: 1 C. white sugar, 1 1/2 C. flour, 1/2 teaspoon salt, 1/4 C. cocoa, 1 teaspoon soda, 1 Tablespoon of vinegar, 1 teaspoon of vanilla, 1/3 C. oil and 1 C. cold water.
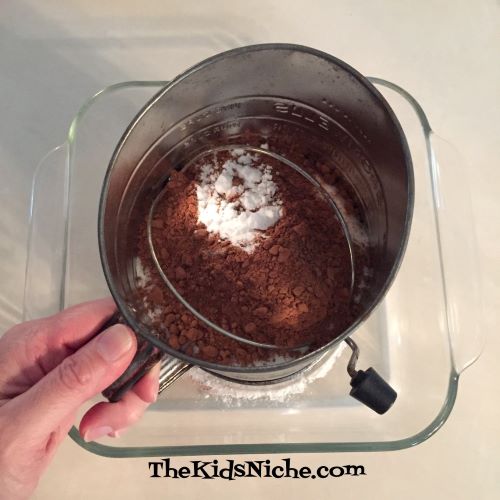
If you have a flour sifter, it will make the next part extra fun. I’ve never met a kid that didn’t like using a sifter. 😉 If you don’t have a sifter, it’s fine without one.
Grab an 8″ x 8″ pan and your sifter, if you have one, and measure all the dry ingredients into the sifter. No need to grease the pan.
If using a sifter, let the kids take turns turning the handle and making the dry ingredients sift down into the 8″ x 8″ pan.
If you’re not using a sifter, just add all the dry ingredients to your pan.
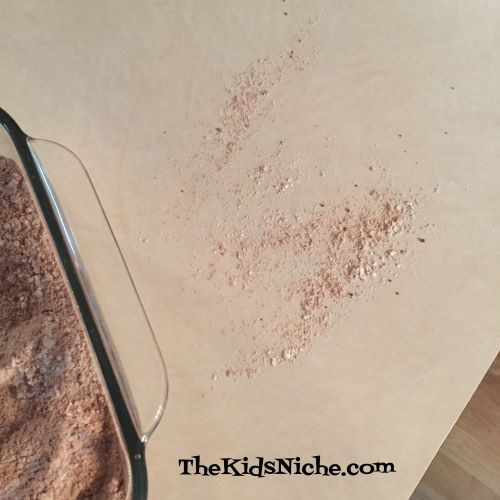
Mix GENTLY with a spoon. Try to curb the enthusiasm level of the stirring or you will do what I did and end up with dry ingredients outside of the pan. Oops! Haha!
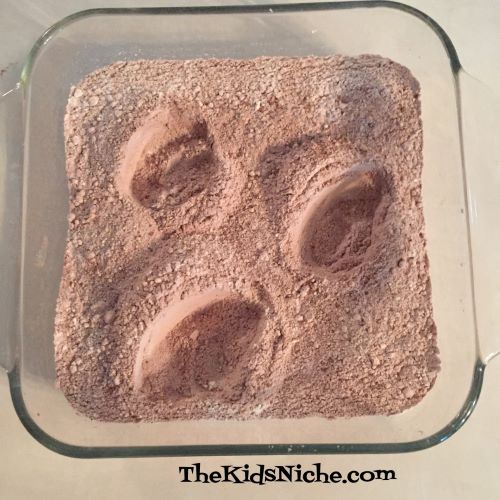
After you finish mixing the dry ingredients, make 3 holes in the mixture. (Maybe that’s another part of the “Wacky”.)
Put the vanilla in the first hole, the vinegar in the second hole and the oil in the third hole.
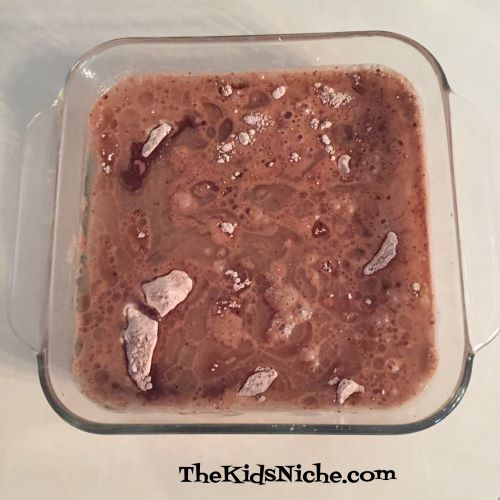
The vinegar will probably fizz up when it comes in contact with the baking soda and kids usually think that’s pretty cool. Pour the water in next.
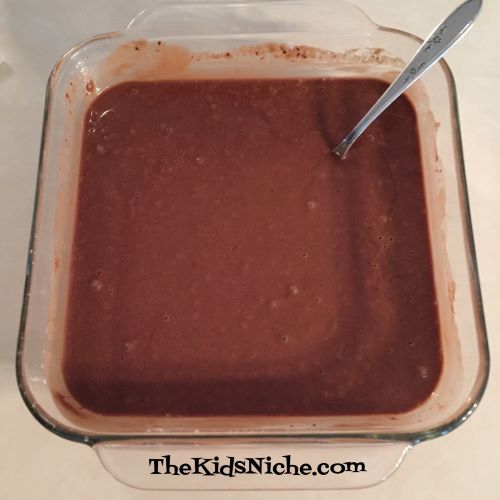
Time for more GENTLE stirring. 😉 Stir until the ingredients are mixed together and fairly smooth.
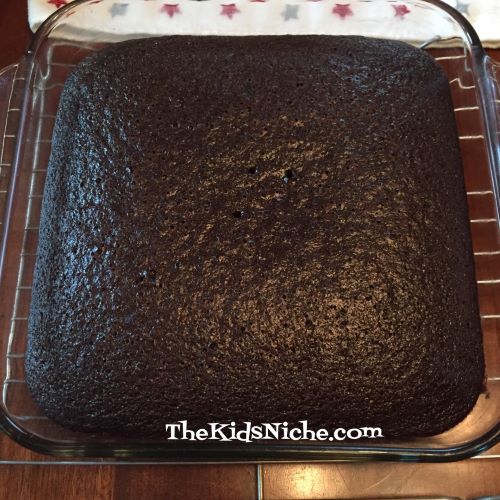
I like to take a paper towel and wipe off the upper inside edges of the pan, just to make it look nicer after it’s baked.
Bake at 350 degrees for 30-35 minutes. Your house will smell lovely! Stick a toothpick into the center of the cake to test and see if the cake has cooked all the way through. Your toothpick should come out clean when the cake is done.
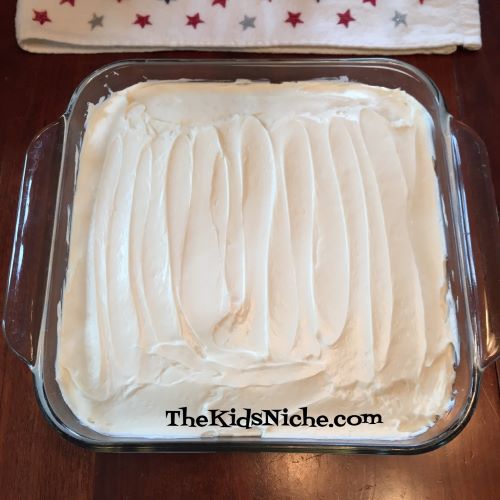
Allow the cake to cool completely before frosting with your favorite frosting. I “cheated” and used a can of frosting. 😉
I suggest spreading the frosting in one direction rather than back and forth or the top of the cake might lift off.
If you have some sprinkles on hand, you can add them on top while the frosting is still wet. (Sprinkles make everything better, right?)
Don’t you just want to eat some right now?? Wacky cake goes great with vanilla ice cream!
I hope you and your kids will have fun making Wacky Cake together! And I hope you will enjoy eating one of our favorite family recipes. Thanks for stopping by!
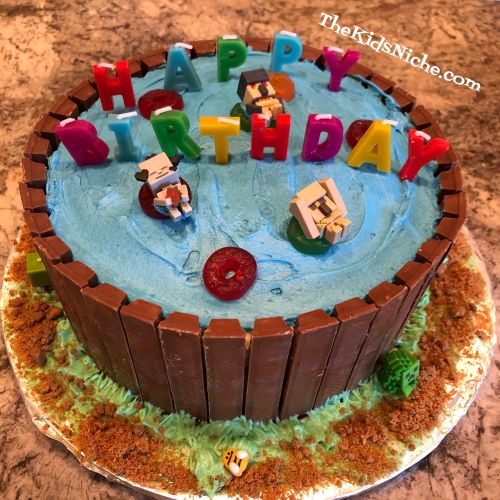
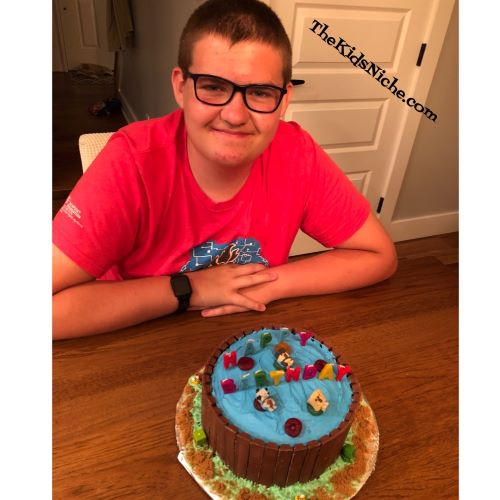
Are you looking for a fun cake idea for a summer birthday? Look no further! Our grandson had his birthday yesterday and his mom made him a really cool cake! Our daughter, Megan, is quite talented at making cakes and I just have to share this one with you. Hunter asked for a swimming pool birthday cake. (Whaaat?) Yep, and his mama did it!
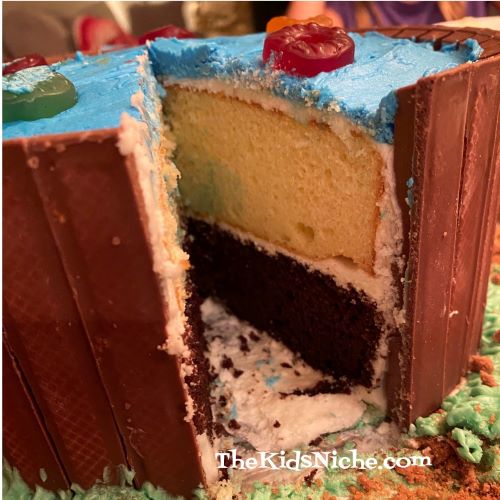
Isn’t that awesome? 🙂 The cake started out with one layer of French Vanilla cake and a second layer of Chocolate Fudge cake.
Ooops, I almost drooled on my keyboard! 😉 The outside of the pool is Kit Kat candy bar pieces. Some blue frosting for the water, some Lifesavers candy (Get it? Lifesavers in the pool…) with Minecraft characters floating in them plus some graham cracker crumbs around the bottom and this is one cute cake! I think it turned out great and I think Hunter looks like he thinks so too. 🙂
This would make a great cake for someone you know and it doesn’t require any unusual items to make it. I only wish I was close enough to help them eat it! haha! Happy Birthday, champ! 🙂
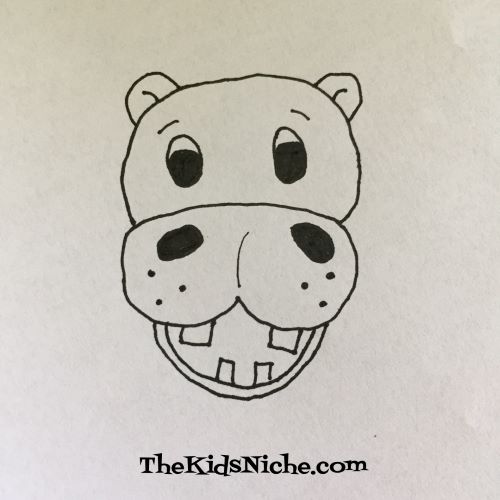
Hello and welcome to another fun drawing post here at The Kids Niche! Today let’s try drawing Bubbles and Juan the Hippos. Doesn’t he/she look friendly and excited to meet you? 🙂 You will draw the hippos the same until the end when you can decide if you want to draw Juan (a boy) or Bubbles (a girl)…or both! 🙂 My grandsons named these hippos for me! 🙂 Thanks, Hunter and Kendan!
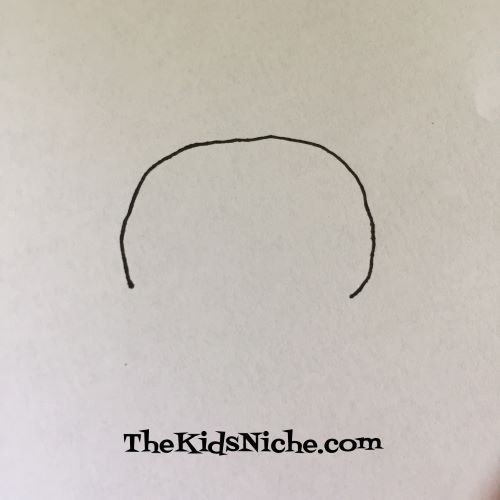
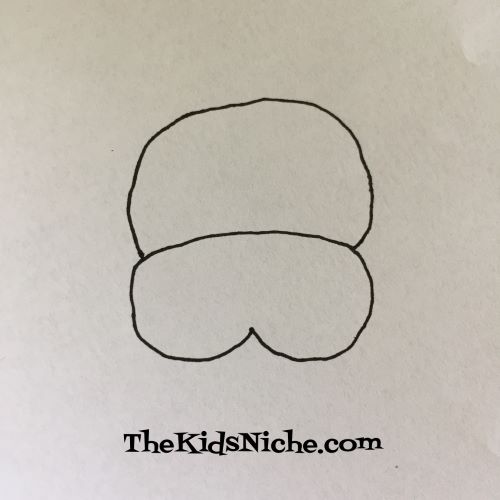
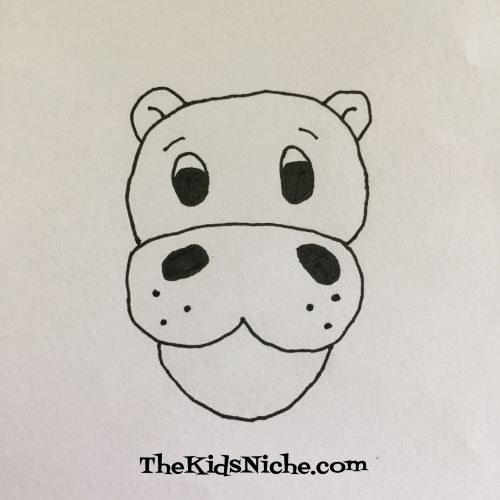
Grab a piece of paper and a drawing utensil and let’s go! Starting with the top of her head, draw part of a sideways oval.
Next draw the area that will be Bubbles’ nose. Almost like another sideways oval but one side dips in.
Next is the area for her mouth.
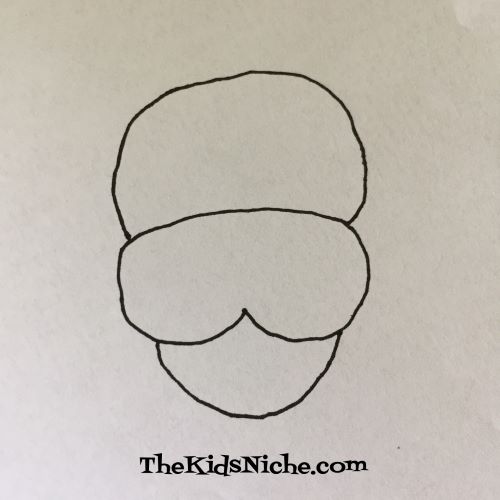
She’s looking a little odd so far, isn’t she? So let’s start adding some things that will make her look like a hippo! We’ll add 2 small ears on the top of her head…and a little line inside each ear.
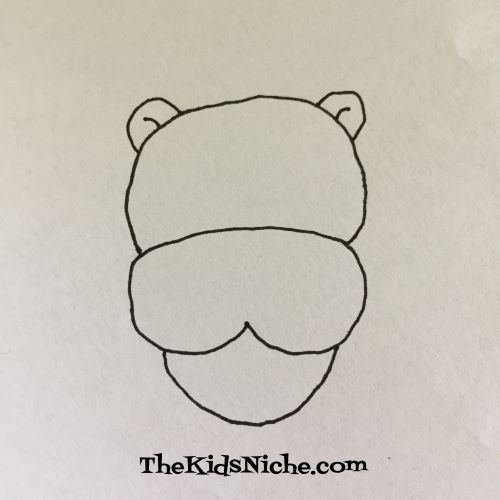
Next, draw 2 eyes and 2 little marks, 1 mark above each eye.
Now let’s draw in the details of her nose. Add 2 ovals and color them in for her nostrils. Add 3 dots close to each nostril.
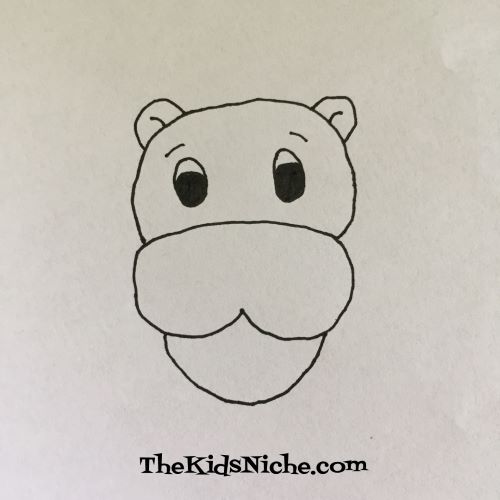
Bubbles is looking much better, but we need to draw her mouth yet. Draw a second curving line close to the first one at the bottom. Add 4 teeth…or however many you want Bubbles to have. And lastly, add a line down the middle to divide her nose a bit.
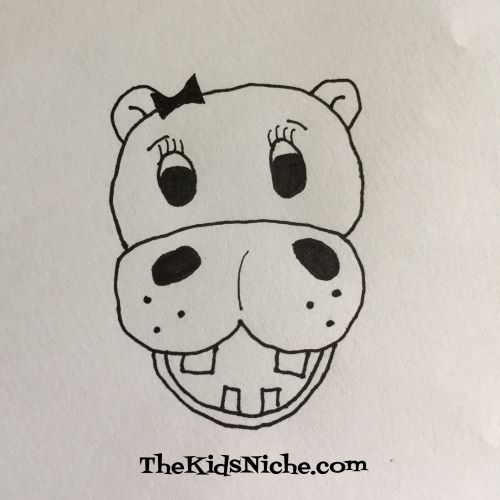
Great job! Now you can draw a hippo! The finishing touches to make Bubbles, is to add eyelashes to her eyes and a bow on her head.
To make Juan the Hippo, you can add a hat to the top of his head. This hat even has a feather added.
Thanks for joining me today to have fun drawing hippos! 🙂
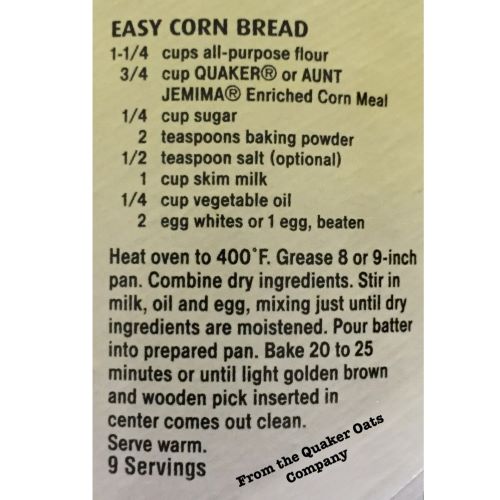
Are you looking for simple recipes that kids can help make? Or for older kids, even make on their own? This is a great recipe for yummy cornbread that comes from the Quaker yellow cornmeal canister. It’s been a favorite in our family for a long time. This recipe works great if you want to make it dairy free by just using water instead of milk.
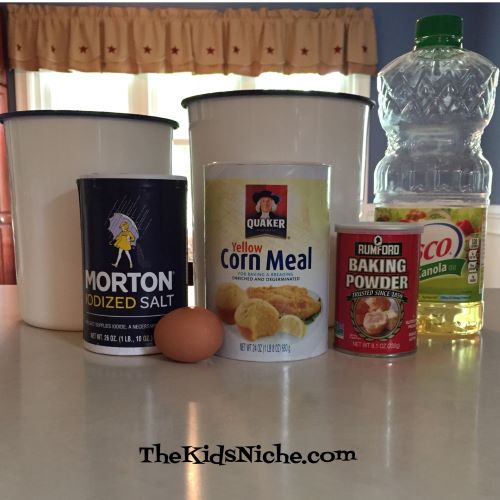
Gather up your ingredients…flour, cornmeal, sugar, baking powder, salt, milk OR water, oil and an egg. Preheat the oven to 400 degrees and grease an 8 or 9″ baking pan.
Put all the dry ingredients together in a bowl.
Mix together.
Break the egg into a cup and beat it with a fork.
Add the milk or water, oil and the beaten egg to the dry ingredients.
Stir together with a spoon and pour into the greased pan.
Bake 20 to 25 minutes or until golden brown and a toothpick inserted in the center comes out clean.
We like to eat cornbread with butter and maple syrup or molasses. It goes great with soup! If you need more cornbread, this recipe works well when doubled and baked in a 9″ x 13″ pan. Just extend the baking time…start checking to see if it’s done at 30 minutes.
Baking with kids is a great learning experience for kids and a way to spend some quality time together. And the cornbread tastes great too! 😉 Enjoy!
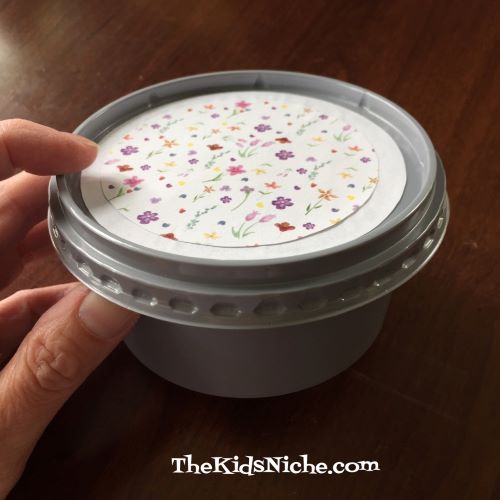
Hello! Hope things are going well for you! Today let me show you a couple more fun ways to re-purpose things you might have around your house into some entertainment for the kids. This first one I have to show you is using and empty…and washed…plastic container that had spinach and artichoke dip in it. (Oooo, that’s making me hungry!)
The outer plastic wrap came off very easily for me.
The sticker on the lid however, didn’t come off so I simply cut a circle out from a white piece of paper and glued it on top.
Then I cut a slightly smaller circle out of a piece of scrapbook paper and glue it on top of the white paper circle.
Your project can be finished here or you can add a piece of ribbon or duck tape around the side of the container. You’ll want to glue it in place.
And there you are! Another great little container for storing special treasures inside!
Item #2 on today’s blog post is super simple! Do your kids like to play outside in the warm weather and use squirt guns on each other? (Or on an unsuspecting parent or grandparent! Ha!) But you really don’t want to pay the price for squirt guns? Save up a few dish soap bottles or spray bottles…make sure they are washed out and rinsed well. Fill them up with water and let the kids have a grand time spraying each other to cool off! (That actually sounds really good for today – it’s currently 92 degrees with the “real-feel” temperature of 95. Whew!)
Hope these suggestions spur you to do something similar for a fun project today! 🙂
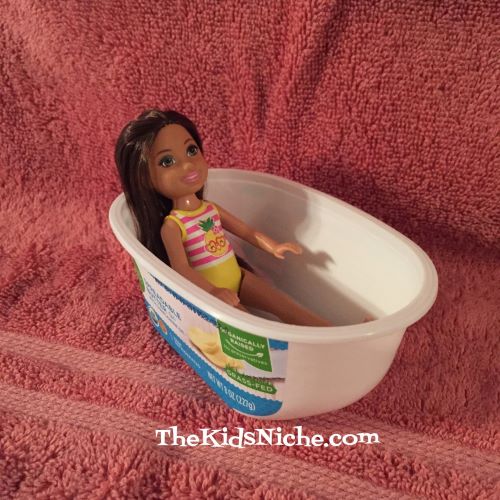
Are you into repurposing or recycling things? It’s a great way to save some money and make something fun at the same time. The definition of repurposing is “to give a new purpose or use to”. Today let’s do just that with 2 items you might find around your house. The first item is a plastic spreadable butter container.
After we finished using the spreadable butter that came in this container, I looked at the bottom section of it and thought, “That looks like a great bathtub for a doll!”. First wipe it out with a paper towel, then wash in warm soapy water and dry. This doll fits in very nicely!
If you want to make it look a little better, you could add some duck tape around the sides to cover the label. Alas, we’re fresh out of duck tape so I couldn’t do that this time. Add a little soap and water, stir it up until you have some bubbles and presto! A nice bubble bath for your little ones favorite doll. 🙂
Look at her smile! Doesn’t she look like she is enjoying her bubble bath? 😉
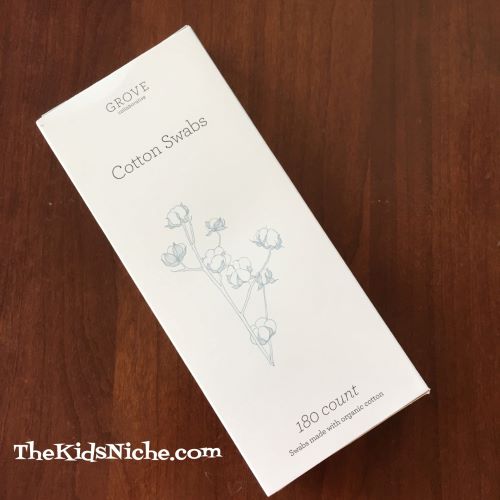
Now for the second repurposing project for today…a Q-tip box. (You may call them Cotton Swabs.) This is the type of box where the inside tray slides out either direction.
You’ll need a piece of paper to cover the outside of the box. Printed or plain will do. Measure the length of the box. Write down the number so it’s easy to remember. Then measure each side around the box and add the numbers up. Add another inch so you can overlap the paper in the back and glue or tape it together. Mark out the size of paper you need of the BACK side of the paper so your lines won’t show on your box. Cut on the lines.
Grab your glue or double-sided tape. Wrap the paper around the box, bending and creasing the paper at each edge so the paper fits smoothly all around the box.
Tape or glue the overlapping edges together on the backside of the box.
And you’re done! Find some special treasures to keep inside. I’m using this one to store some Barbie doll shoes and accessories.
Shoes in one end and other fun items in the other end.
These could have a gazillion uses! Have fun! Check back soon for more repurposing fun! Thanks for visiting! 🙂
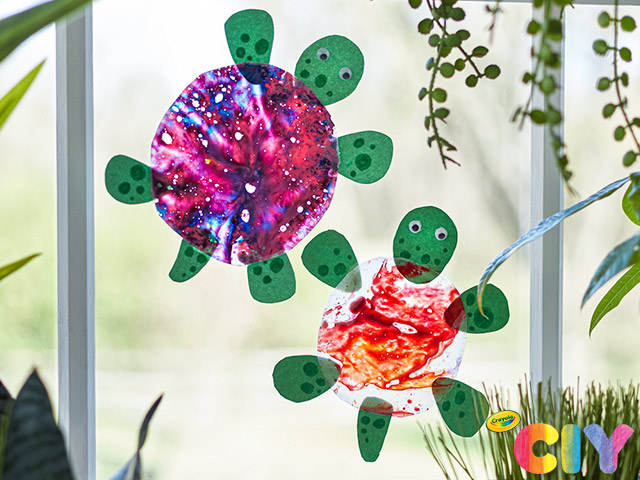
Wow, it’s been raining for DAYS here and it’s getting tiring! I went looking for something fun to do to cheer ourselves up and I came across this adorable craft on the Crayola website – Turtle Suncatchers!
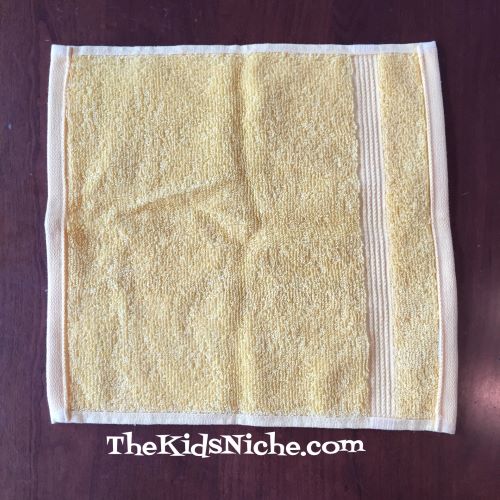
So let’s make one more washcloth animal! This little chick is quite adorable and fun! You’ll need 1 washcloth (a yellow one makes him super cute), 1 regular size rubber band, a piece of ribbon or twine, 2 wiggly eyes and a small piece of orange construction paper.
Lay the washcloth out flat on your work surface.
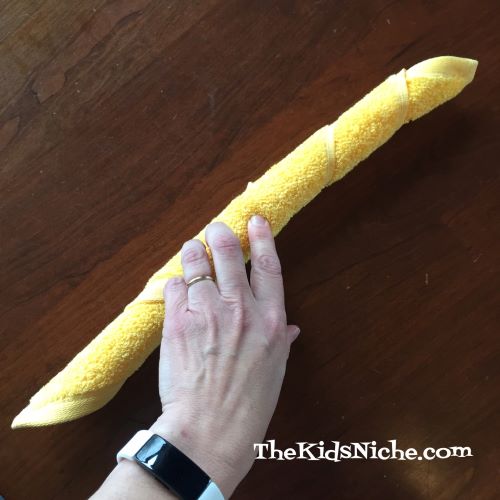
Starting at one corner and working across on the diagonal, roll the washcloth up tightly into one long thin roll.
The place where the end of the washcloth is in the center, you will want to make sure it gets folded inside with the next step.
Fold the rolled up washcloth in half.
Bend one side down so that the tip reaches the bottom or is just slightly longer.
Fold the second side down in the same manner.
Squeeze the top part a bit to make a rounded head and wrap the rubber band around it several times.
Glue on the 2 wiggly eyes.
Tie a piece of ribbon or twine around the chick’s neck to cover the rubber band.
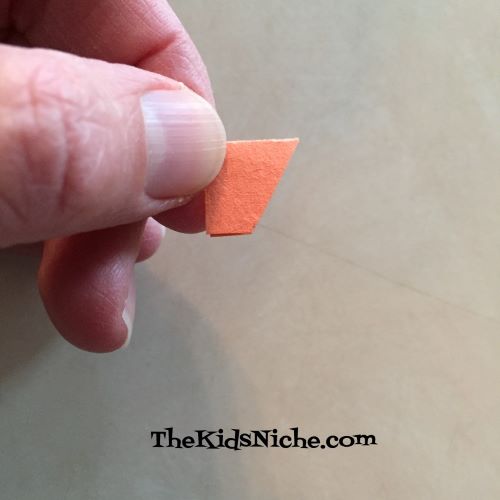
Using the orange construction paper, cut a rectangular piece about 1 inch by 1/2″.
Fold it in half.
Keeping the folded edge on top, cut from the center of the bottom up to the top outside edge on both sides so you end up with a triangle.
Open the triangle and you have a beak for your chick.
Glue the beak in place and your adorable little chick is done! 🙂
Thanks for visiting my blog! I hope you’ve had fun making washcloth animals with me! 🙂 Tune in next week to see what other kinds of fun things we’ll be doing!
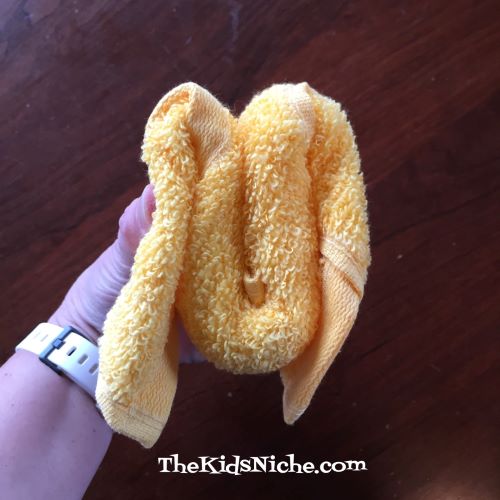
It’s time for another edition of making washcloth animals! Our first washcloth project was making a bunny. If you missed that project and would like to check it out, you can find it here: https://thekidsniche.com/2020/05/11/washcloth-animals-1-bunny/
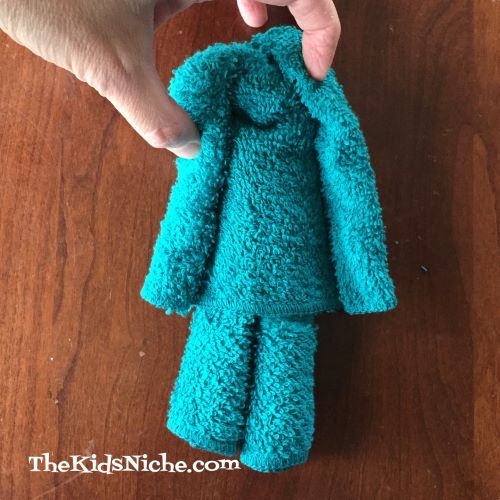
Today’s washcloth animal is a cute bear. Let’s get started! You’ll need 1 washcloth, 1 regular size rubber band, 2 tiny rubber bands and a piece of ribbon. If you want to, you can also add 2 wiggly eyes and a nose and mouth made from felt.
Lay the washcloth out flat on your work surface.
Begin rolling from one side and roll to the middle of the washcloth.
Then roll the opposite side to the middle too.
While holding each end of the rolled washcloth, twist one end over.
While keeping the washcloth from unrolling, bend the twisted end down about 3/4’s of the way.
The bottom 2 rolls become the bear’s legs. Open the top part just enough to place the top 2 rolls along each side for the bear’s arms.
Using the larger rubber band, pinch the washcloth in to make a neck and head and wrap the rubber band around as many times as you can.
Now pinch up a little bit of the washcloth on each side of the head to make 2 ears. Wrap a tiny rubber band around each one to hold it in place.
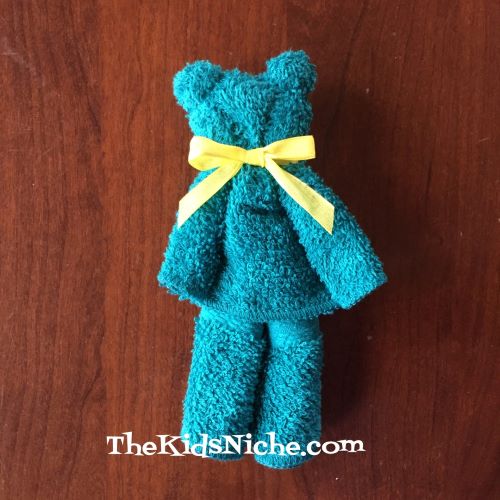
Tie the piece of ribbon around the neck to cover the rubber band.
Ta dah! Your bear can be finished now. Or you can add some wiggly eyes or even make a nose and mouth from felt. I like the look without the eyes better but here’s what it looks like with eyes so you can decide which way you like better.
I hope you found this project fun! 🙂 Be sure to check back on Friday for Washcloth Animal #3!