I went on another trip to a Dollar Tree store to check out what might be new for some Christmas/Winter fun. I found this felt gingerbread man kit that I thought was cute and is simple enough for even the little kids to do with a little help with gluing.
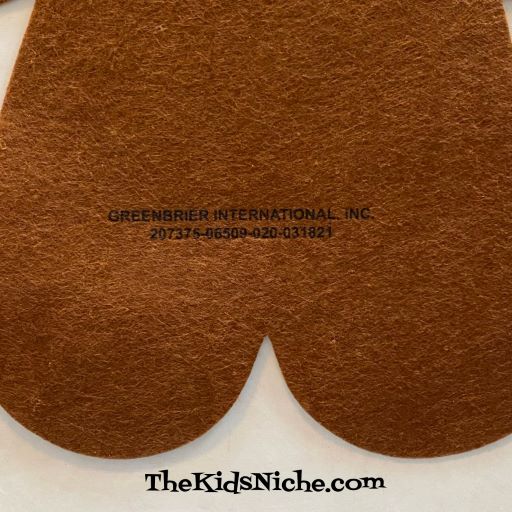
I know you can’t tell from the picture, but this guy is big! He measures about 15″ tall by about 11″ wide. 🙂 Since I bought him at a Dollar Tree store, he only cost $1.25 plus tax. Pretty cheap fun, right? All you need besides the kit is some glue. Be sure to save the small picture of the finished gingerbread man to use as your guide in putting him together.
One tip before you get started…you might like to make a pattern for each felt piece before you glue them together and then you can make as many gingerbread men as you would like to make. 😉
Here’s what is inside: felt shapes for the gingerbread man, eyes, nose, mouth, cheeks, snowflakes and rickrack.
The eyes and mouth punch out from the black piece of felt.
And the light green piece of felt punches out into 4 pieces of rickrack.
Please note that there is a wrong and a right side to the gingerbread man. One side has printing on it so that will, of course, be the back side.
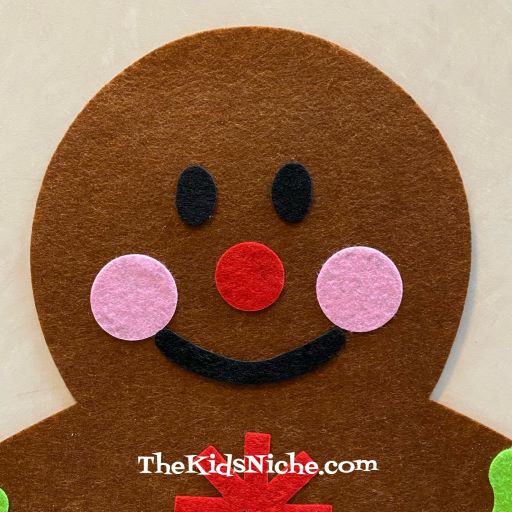
Grab your glue and let’s put this guy together! 🙂 I started by gluing on his eyes, nose and mouth.
Add his cheeks and snowflake buttons down the front.
Glue the 4 pieces of rickrack on his arms and legs and your gingerbread man is finished! 🙂 Note: the rickrack pieces didn’t quite reach from side to side on his arms and legs but it looks cute anyway.
You can add a magnet or a piece of string to the back of your gingerbread man if you would like to be able to hang him up. Check your nearest Dollar Tree store for this simple and cute gingerbread man felt kit! Have fun! 🙂
I found a couple of felt craft kits at the Dollar Tree store and wanted to share this idea with you. At just $1.00 for each kit, you can craft with up to 5 kids! Pretty good price, right?! So here’s the 2 kits I found:
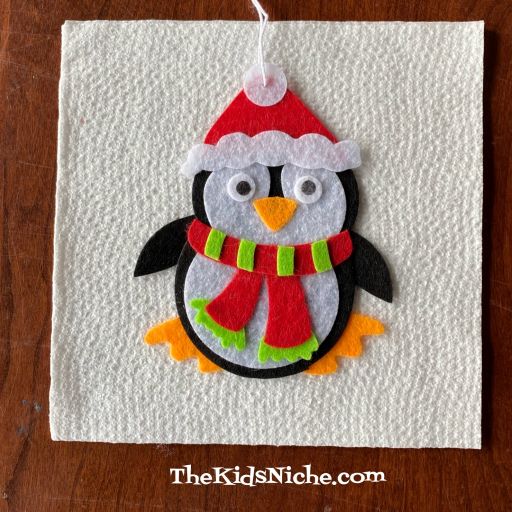
Let’s look at the penguin felt ornament kit first.
This little guy is so cute!
When you open the package, you will find 5 individually packaged kits.
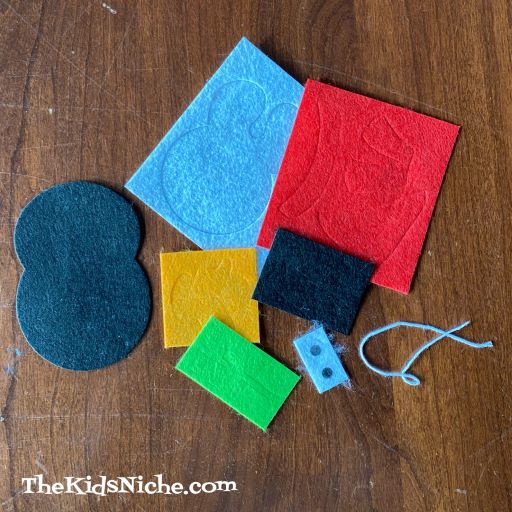
In each individual package, you will find this:
The felt pieces for making the penguin have been punched and for the most part you can gently pull them apart to get the pieces ready to use. Have a pair of small scissors handy in case any pieces need a little help getting free.
Once all the pieces are separated, you are ready to put your penguin together. I would recommend using a craft glue like Tacky Glue instead of Elmer’s glue. I used the Elmer’s glue when making my penguin and I had some trouble getting the pieces to stay together. I switched to the Tacky Glue.
There weren’t any instructions included in the package, but you can figure out how to put the penguin together by looking at the picture on the front of the package. (Remember, this kit only cost $1.) 😉 And here is my finished penguin! I think he’s a cutie!
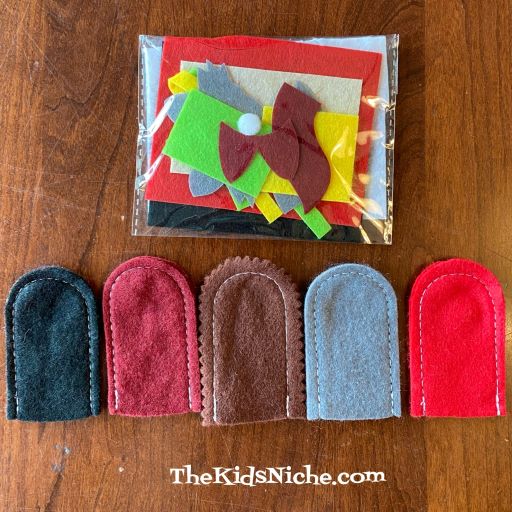
Now let’s look at the second kit I bought. This kit is for making animal finger puppets.
They are cute too!
I had more difficulty getting these felt pieces separated and I did resort to using a pair of scissors at times. Also this package did not have the kits divided into separate kits already, so you will have to figure out which felt pieces go with each finger puppet. It’s rather like making a puzzle. 😉
Here they are separated into the pieces for each animal. I didn’t go ahead and make the puppets because I wanted to save them for a fun project for some kids I know. 😉
These kits might be a little too difficult for really young children but I’m sure ages 7 or 8 and up will enjoy making them. I’m not sure if the felt pieces will stick together well enough to be used as finger puppets, but they would definitely make some very cute ornaments to hang around your house. 🙂 Mark these down as 2 more fun projects from Dollar Tree! 🙂
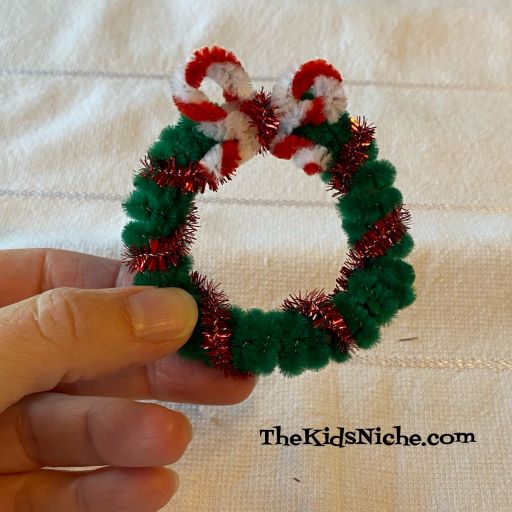
As the title of this post tells you, today I want to show you how to make a fun Christmas Wreath using only pipe cleaners (or chenille stems). Aren’t they cute?
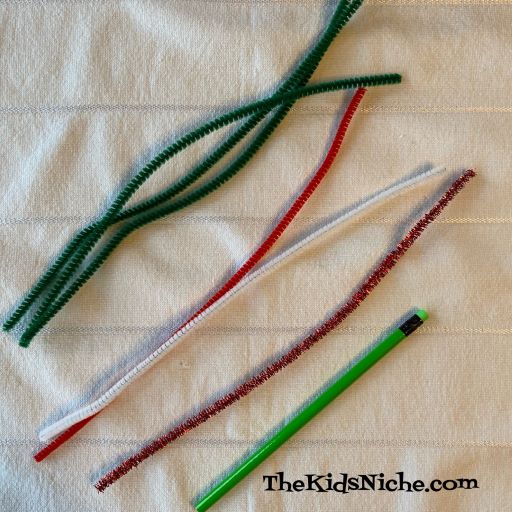
All you need are pipe cleaners in a few colors…3 green, 1 white, 1 red and 1 sparkly and 1 pen or pencil for wrapping some of the pipe cleaners.
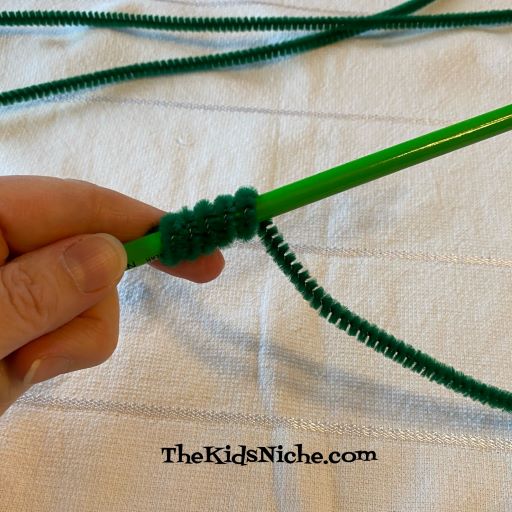
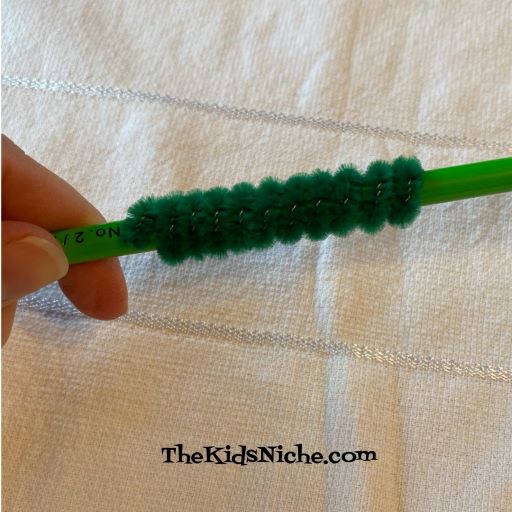
Begin by wrapping 1 green pipe cleaner around the pen or pencil. Make sure both ends are wrapped around the pencil so it’s all uniform.
Continue wrapping until you’ve used the entire pipe cleaner.
Slide the wrapped pipe cleaner off the pencil.
Wrap the other 2 green pipe cleaners in the same way.
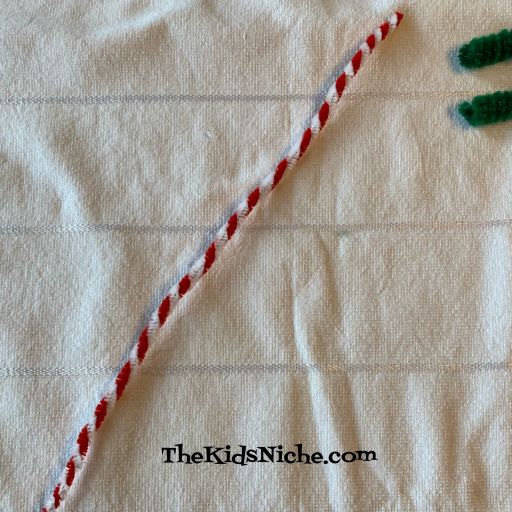
Next, take the red pipe cleaner and the white pipe cleaner and while holding one end of each together, begin twisting them.
Continue twisting to the other ends of the pipe cleaners. It will look like the stripes on a candy cane. 🙂
Take the red and white twisted pipe cleaner and slide a green spiral onto it.
Slide the other 2 green spirals onto the red and white pipe cleaner too.
You will now bend the red and white pipe cleaner into a circle and the green part will begin to look like a little wreath.
Give the red and white ends a twist to hold your wreath in a circle.
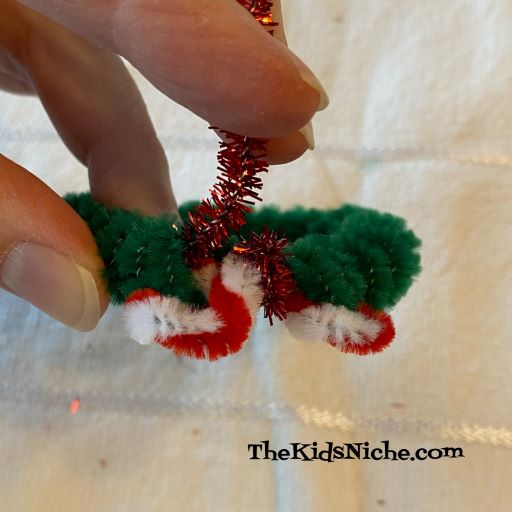
Now to make the red and white bow. You will not actually tie a normal bow. Just bend a loop off to the left side and let the tail cross to the opposite side.
Take the other tail and bend a loop on the right side, letting the tail cross over to the left.
Now you’ll need to wrap a piece of pipe cleaner around the center of the bow to hold it in place. If you have a scrap piece of pipe cleaner in a matching color you can use that. Or use the end of your sparkly pipe cleaner.
Take the ends to the back side, twist them together and clip the ends short.
Your wreath could be finished now or you can use the sparkly pipe cleaner to fancy it up a bit.
Stick one end of the sparkly pipe cleaner into the back of the wreath spiral end by the back of the bow.
And then wrap the sparkly pipe cleaner around your wreath in wide wraps, leaving spaces so there is some sparkle all around the wreath.
Once you have used up the sparkly pipe cleaner, tuck the end into the green part of the wreath so it isn’t seen. And you have finished your first pretty little wreath! 🙂
You can experiment with other colors like blue and white to make more pretty wreaths. I hope you’ll enjoy this latest Christmas craft project! 🙂
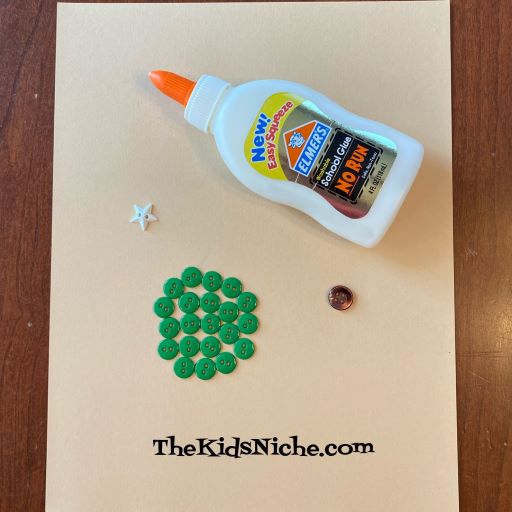
Hi there! Today we’re making another Christmas craft using buttons. Yep, it will be a Christmas tree! What’s nice about this project is that there is an easy version for younger kids, but also a more challenging version for older kids or even adults. 🙂 You will need some green buttons, 1 brown button, 1 star button (or sticker or cutout), a piece of cardstock and glue.
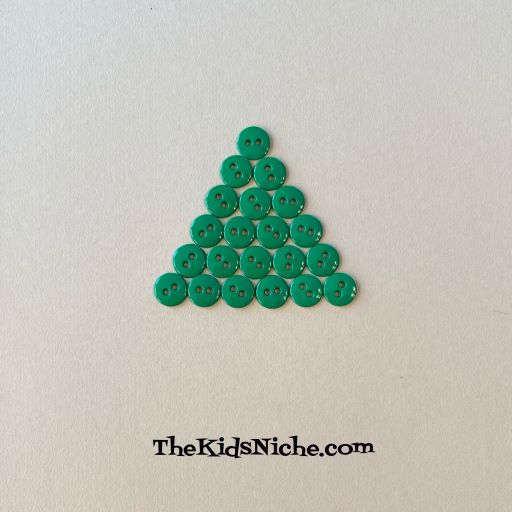
Start making your Christmas tree by laying 1 green button in the first row, then 2 green buttons in the second row, and 3 green buttons in the third row. Look at the following picture to see how to place the buttons. You can glue the buttons down as you go or get them all in place and then go back and glue them.
Continue in this manner, adding 1 more green button for each new row until you have laid out 6 rows of buttons.
Add the brown button at the bottom in the center for the trunk of the tree. And put the star above the top button.
And there is your Christmas tree! 🙂 How cute is that?!
Next, I’ll show you version #2, which is still a simple version, but uses different colors and only 5 rows of buttons. This time you’ll need 6 red buttons, 9 green buttons, 1 brown button and 1 star.
Row #1 is 1 green button. Row #2 is 2 red buttons. Row #3 is 3 green buttons. Row #4 is 4 red buttons. And finally row #5 is 5 green buttons. Add the star to the top and the brown button for the trunk at the bottom. And this tree is done! 🙂
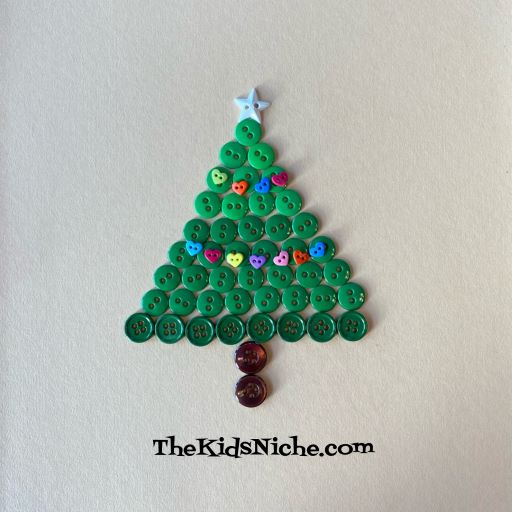
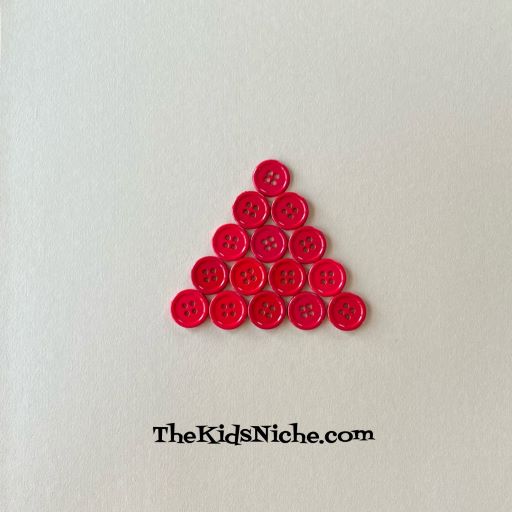
For the last (harder) version for today, make the tree part with all green buttons and add in as many rows as you’d like to make the tree larger. The tree shown here has 9 rows of green buttons. I used slightly different shades of green for my Christmas tree. I used 2 brown buttons for the trunk of this larger tree.
If you would like to decorate your tree, make sure all the tree buttons are glued in place and have had a chance to dry before continuing. I had some tiny heart shaped buttons that I used to make it look like 2 strings of lights on my tree.
Or you can place your decorations randomly around the tree for this effect.
You could also use bits of pretty yarn or thin ribbon to decorate your tree. So whatever skill level your kids are at, I hope they can have fun making their own Christmas tree! 🙂
I hope you all had an amazing Thanksgiving holiday and weekend! I’m sorry I didn’t get to post last week but things were pretty crazy here! I’m here now and I have an adorable craft for you today. I’ll show you how to make Santa’s hat using buttons and a pom pom. 🙂
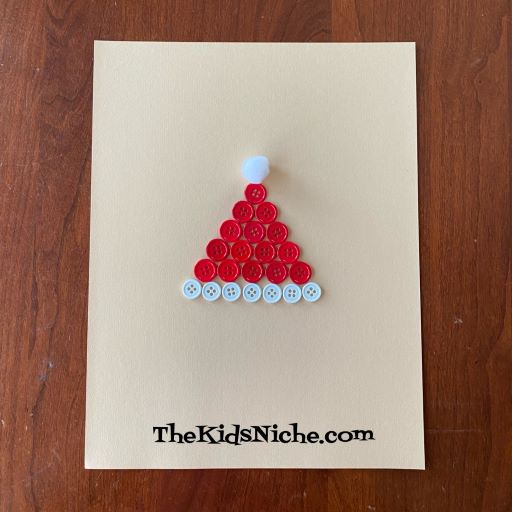
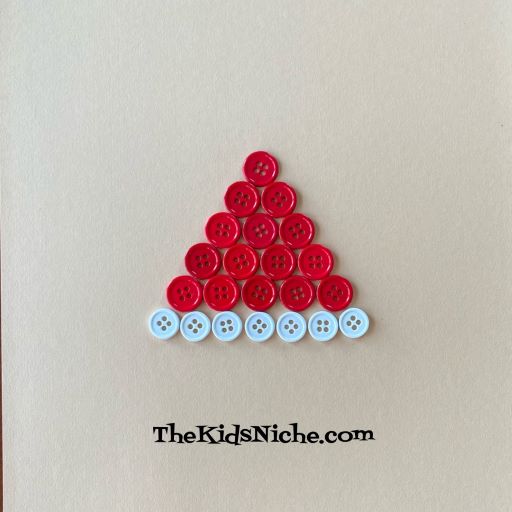
You’ll need an off white or darker colored piece of cardstock, approximately 15 red buttons and 7 white buttons and 1 white pom pom. And glue to hold it all in place. The number of buttons will vary according to the size of buttons you use and how large you want to make your Santa’s hat.
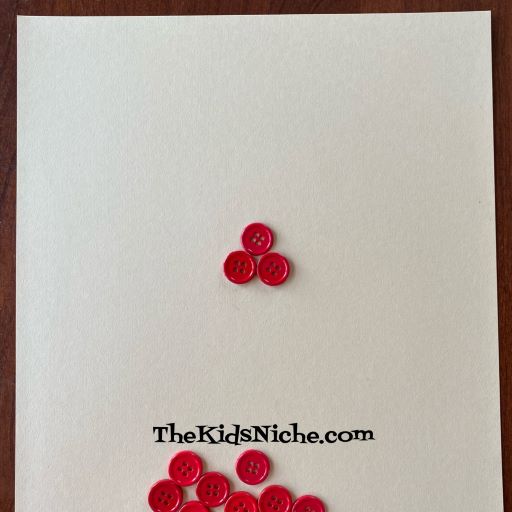
Start by placing 1 red button toward the top of your piece of paper. In the second row, place 2 red buttons. You can glue the buttons down as you go or go back and glue them down after you have them all in place.
Row 3 will have 3 red buttons, row 4 will have 4 red buttons and row 5 will have 5 red buttons. Your Santa’s hat should look like this so far.
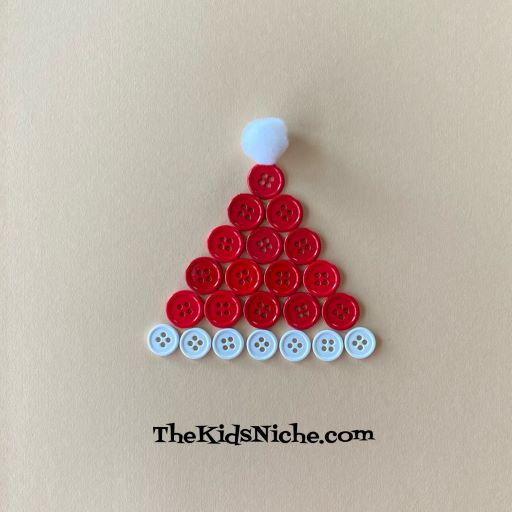
Now it’s time for the white buttons. They will go in row 6 along the bottom to be the white edging on Santa’s hat.
Add your white pom pom to the top and you’ve finished making your Santa’s hat! Great job!
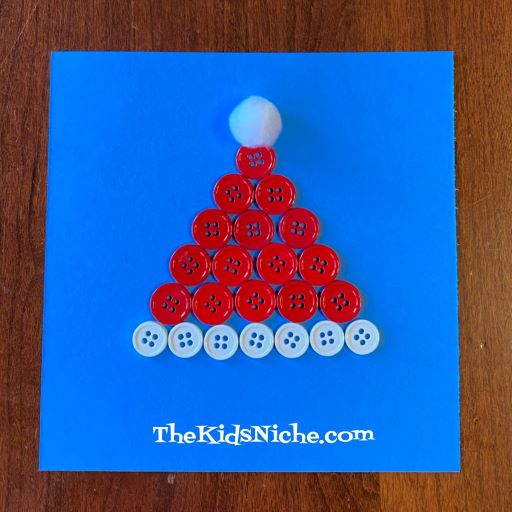
I wanted to use the darker brown craft paper for my background, but I didn’t have any on hand. I would suggest using a darker color of cardstock than I did for mine because the white of the hat will show up better. Here it is on green:
And one more time using a blue background.
Which way is your favorite? I think I like the blue background best. 🙂 You can make Santa’s hat as a decoration to hang up or make it on the front of a card for a special Christmas card. Whatever you decide to do, I hope you will have fun making a Santa’s hat from buttons! 🙂
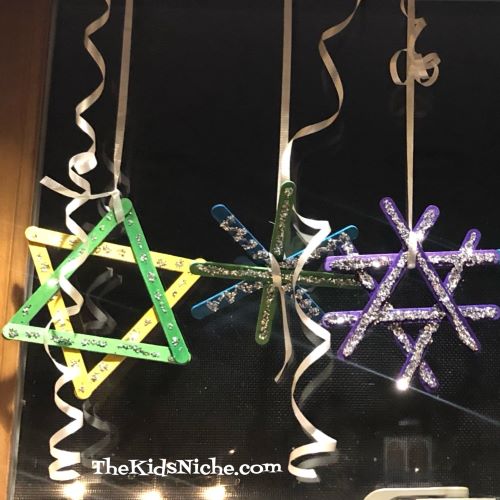
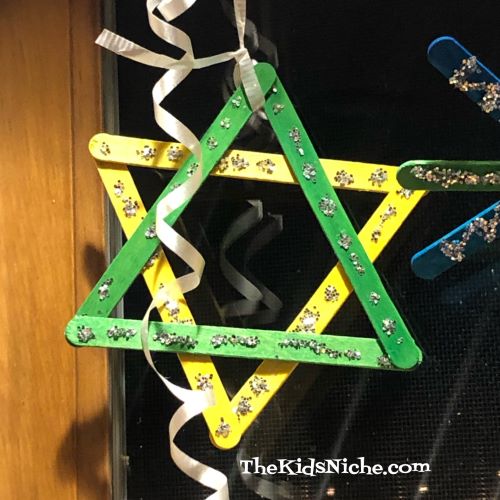
Are you looking for something to occupy the kids while they are off school for Christmas break? Here’s a super easy but fun way to make some great snowflakes. Our grandkids made these and shared these pictures with us. 🙂 (Thanks, Megan!)
They used colored craft sticks, glue, glitter glue and curling ribbon. If you only have the plain craft sticks you could add an extra step and paint them first. If you don’t have glitter glue, regular craft glue and glitter will work too.
Glue the colored or painted craft sticks together into a snowflake pattern. As you can see from the pictures, there are several ways you can glue them together.
After the glue has dried a little, use the glitter glue to decorate your snowflake. Or if you are using glue and glitter, put drops or lines of glue on the craft sticks and then sprinkle glitter over it. Gently shake the snowflake to let the extra glitter fall off.
Tie a piece of curling ribbon onto the snowflake and hang your snowflakes up for everyone to enjoy.
If you open a pair of scissors and pull the ribbon across the blade part of the scissors, the curling ribbon will curl up and look pretty. You can do this to some extra pieces of curling ribbon to add a little more pizazz to your snowflakes. Hope you enjoy making craft stick snowflakes!! 🙂
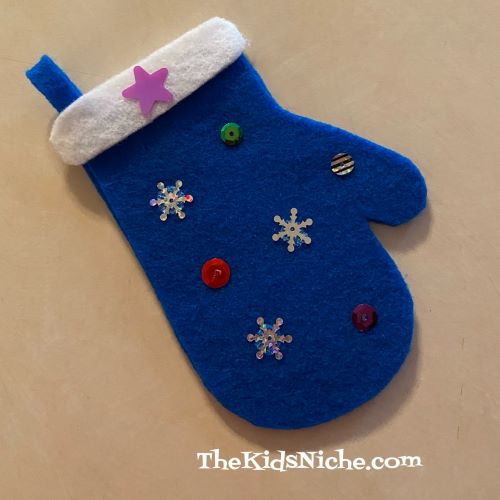
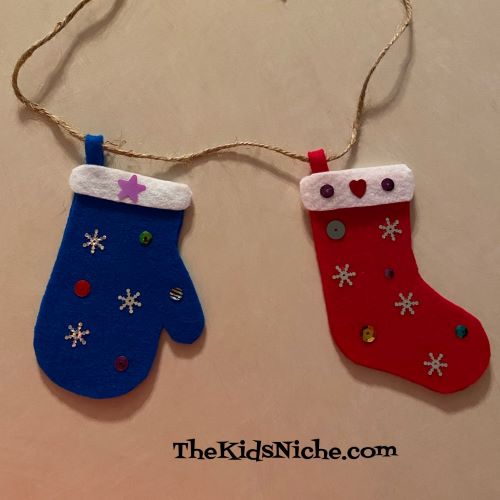
Are you looking for a craft to occupy your kids? May I suggest this easy and fun garland made from felt mittens and stockings? You’ll need some paper to draw a pattern on, a couple colors of felt, craft glue, scissors, some string or twine and a few small decorative snowflakes, buttons or winter items (optional). Here’s what my finished project looks like:
You can make your garland as long as you like using as many mittens and stockings that you want to make. Let’s get started!
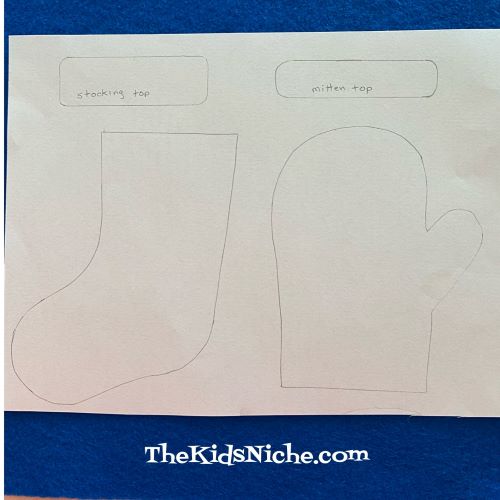
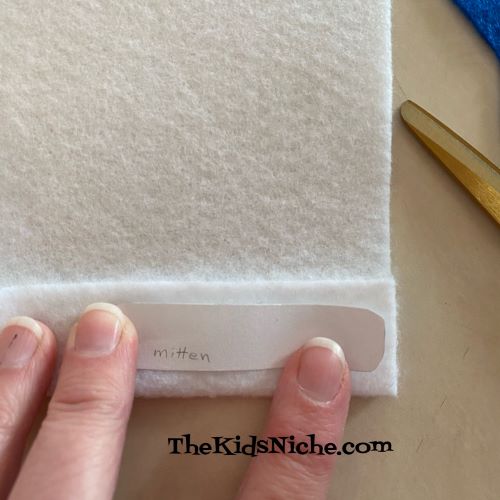
First, draw a pattern for your mitten and stocking. Mine are around 4 1/2″ to 5″ long and around 3 1/2″ wide. I also made a pattern for the top white part for both the mitten and stocking.
Cut the pattern pieces out.
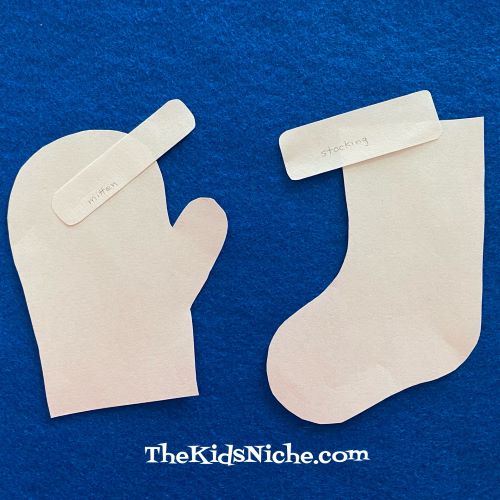
Gather your felt pieces. You can use whatever colors you like. I used only red, white and blue for this example. If you are making a lot of mittens or stockings, you might like to have more colors available.
If your felt is a thick type, you could use just one thickness of felt for each mitten or stocking. The felt I have is the thinner variety and rather see-through so I cut out 2 pieces for each mitten and stocking. Cutting 2 of each also makes the stocking able to have something small and light inserted inside it. (Like maybe a candy cane.) I cut 2 topper pieces for each mitten and stocking too.
I folded my felt over and just held the pattern piece in place while I cut around the outside edge of the pattern. You could trace around the pattern or cut each piece separately, depending on what works best for your kids and for the thickness of the felt you have.
It will be easier to cut the topper pieces if you cut a little section of felt away from the rest of the piece of felt first.
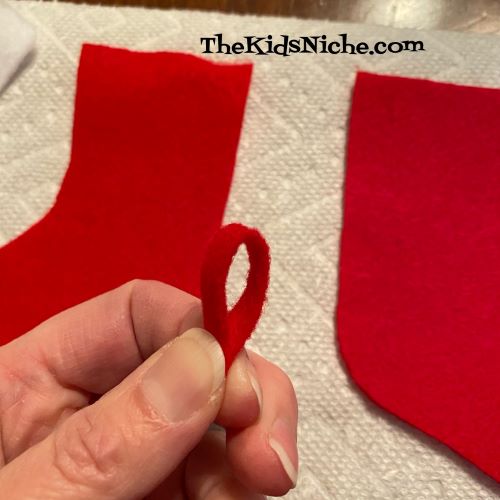
Cut a little strip of felt for the loop to hang your mitten or stocking from. You will fold it in half and glue the end pieces together.
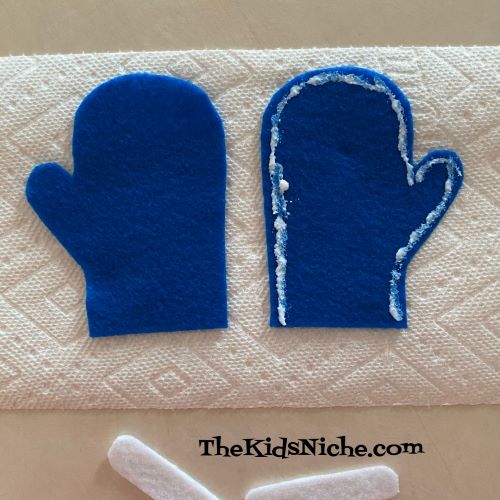
If you are using just one layer of felt for your mitten or stocking, you can skip ahead and just glue the white topper part to the colored part of the stocking or mitten. If you are using 2 pieces, grab your glue and let’s put these together now.
Spread a line of glue along the outside edge of your stocking but not across the top edge. And put a dot of glue on each side in the place where the loop goes.
Add the second piece on top of the glued one and press firmly together, holding for a few seconds while the glue starts to set up.
Spread another line of glue and put the first white piece of topper at the top of the stocking. Turn the stocking over and spread another line of glue for the second piece of topper. Hold for a few seconds again.
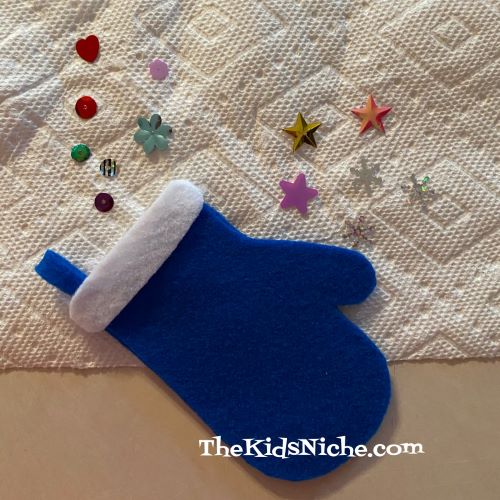
Now for the best part, decorate your stocking! Glue on any little snowflakes or stars or buttons you might have. Or spread a little glue and sprinkle on some glitter. Gently shake off any extra glitter.
Follow the same directions for the mitten. Glue around the outside edge but not on the opening side of the mitten. Add your loop in now. (I forgot to add my loop now and I had to add it in later. Oops!)
Add the second layer and press together. Spread a line of glue for the first topper piece and add it on.
Flip the mitten over and spread glue for the second topper piece and add it. Press together for a few seconds.
Decorating time!
Ta dah! My mitten is complete!
Make as many mittens and stockings as you would like to get the length of garland you want to hang up. The last step is to thread your string through the loops of the stockings and mittens…and have an adult help you hang it up for all to enjoy!
I hope you have enjoyed our craft project and you will have lots of fun making stockings and mittens to give your house a warm, holiday feeling! 🙂 Happy holidays!
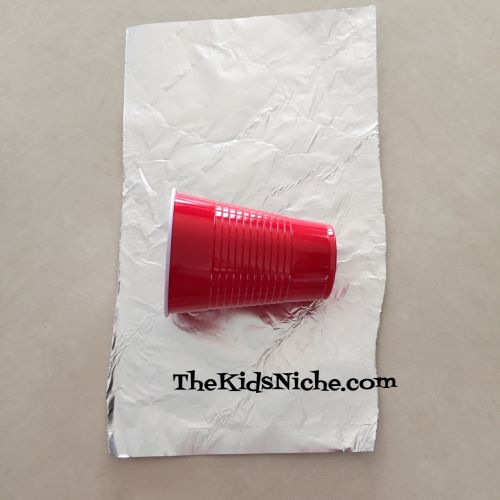
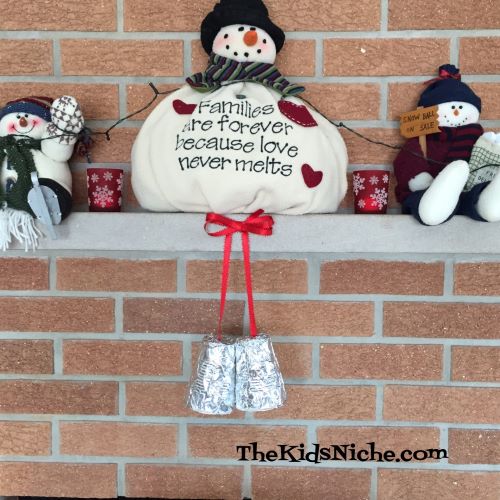
Long ago when I was little, we did a Christmas craft that was my favorite Christmas decoration to make…Christmas bells! I was always so proud of the bells I made and my mom would let me hang them around our house. Its another quick and easy craft, so let’s gather up the few supplies we need and get started! Grab some foil, some disposable cups and some ribbon. When I was a child, we made these using the 5 oz. Dixie paper cups but since I didn’t have that size on hand, I used the 9 oz. plastic cups.
Tear off a piece of foil a little bit bigger than your cup.
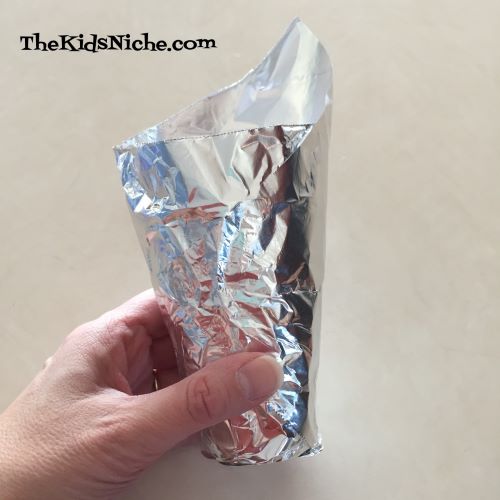
Starting at one end, wrap the foil around the cup. I started at one end and rolled the cup slowly while forming the foil to the cup.
Next press the foil flat up against the bottom of the cup and also tuck it down inside the cup.
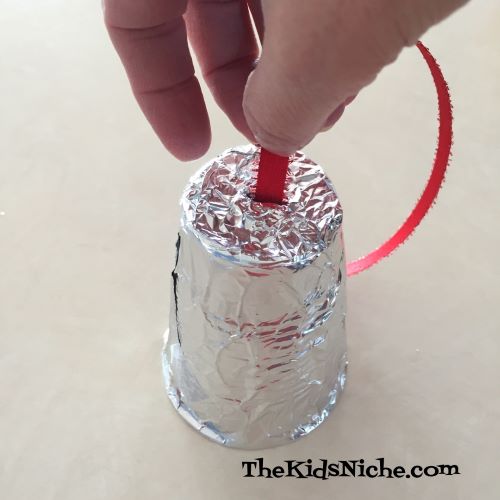
An adult should do the next step…cut a slit in the bottom of the cup for the ribbon to go through.
Cut about a 12 inch piece of ribbon. Thread one end in through the slit.
Pull the piece of ribbon on the inside until you can reach it enough to tie a knot in the end. This will keep the ribbon from pulling out the top of the bell.
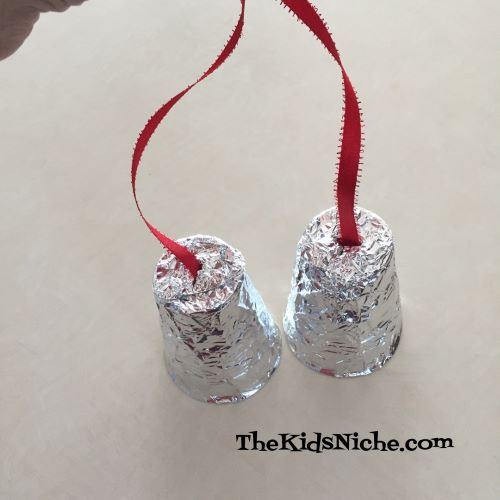
I made 2 bells and then tied them together at the top end of the two ribbons.
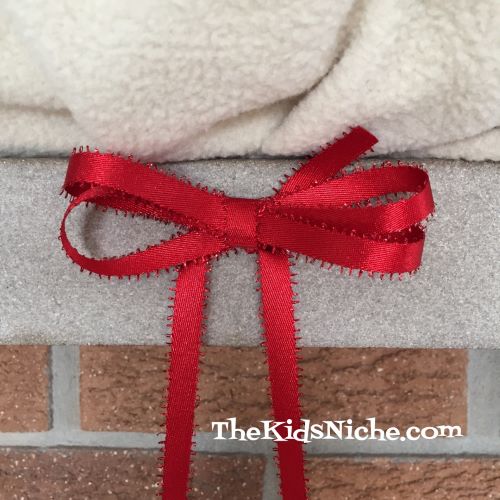
You can hang them as they are or make a bow to add on where the two ribbons are tied together.
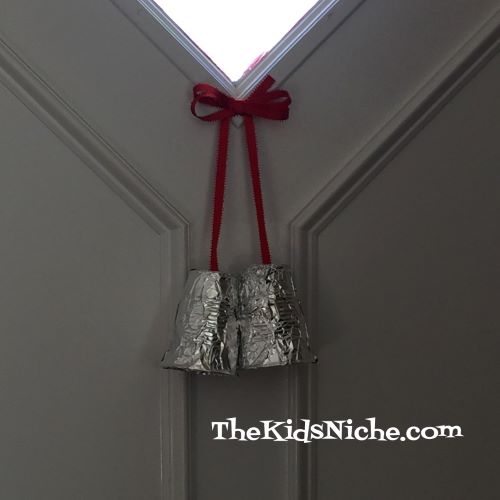
You’re done! Now find a great place to hang your Christmas bells. They look great hanging on your front door.
Or maybe you’ll find a nice place for them on your fireplace mantel.
Wherever you choose to hang them, I hope they make your house look merry and bright! 🙂