A Different Use for Fidget Poppers

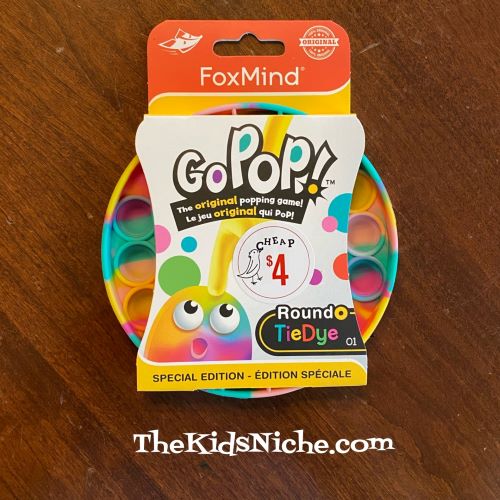
Hello again! Wow, this is a really busy time of year here and I have missed sharing ideas with you! But here’s a really fun idea of something different to do with those fidget poppers. (Yes, the ones the kids love popping, but get on mom and dad’s nerves after a while.) The poppers are available in lots of stores, but I found this cool one at a Barnes & Noble bookstore…on clearance.

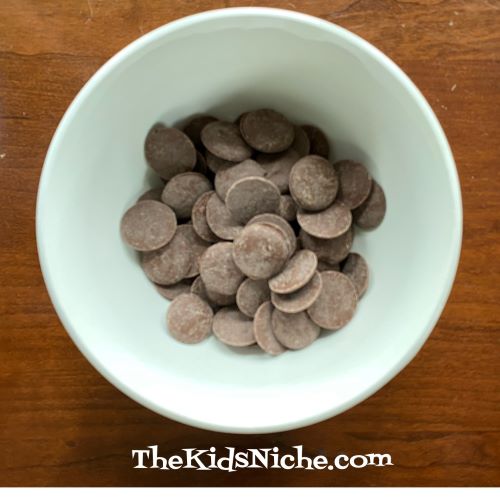
For this project, you will also need some regular size M&M candies and some chocolate. I used the chocolate melting wafers but you could also use chocolate chips and add a bit of coconut oil when melting. But I’m getting ahead of myself! Start by washing the popper and then pushing all “bumps” in the same direction.

Place 1 M&M candy in each “hole”.

Place some chocolate…I used the wafers…in a microwave safe bowl and microwave according to the package directions until they are completely melted.

Pour the melted chocolate over the M&M’s in the popper, spreading it to cover and fill the whole popper.

Place in the refrigerator until the chocolate has hardened. Once the chocolate is solid again, begin removing the entire piece of chocolate by pulling gently around the edge of the popper until the chocolate is loose around the entire popper edge. Turn the popper over onto a plate and carefully pull the chocolate out of the popper.

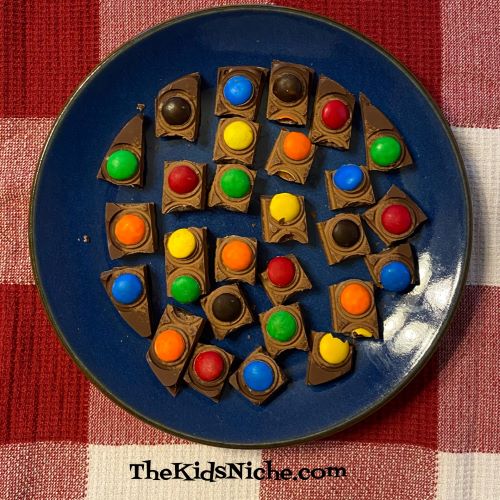
How cool is that?! 🙂 Now you can break the candy into strips along the lines left by the popper mold.

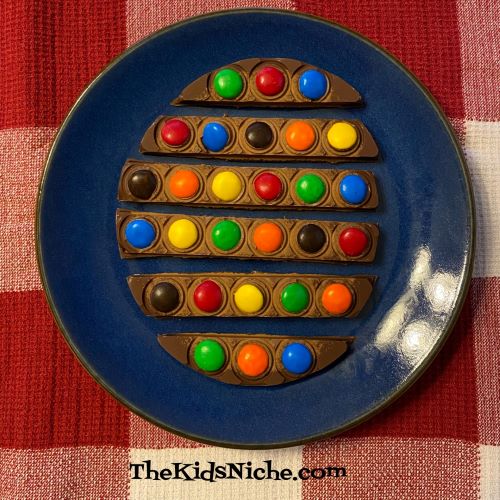
I also broke the strips into pieces of 1 or 2 candies. That’s all there is to it!

Wash the popper again and it’s ready for some more popping! 😉 And you can enjoy a yummy treat while popping! 😉

More Funny Jokes & Riddles

This cold and dreary day is depressing, but we will make ourselves laugh by telling some jokes and riddles! 😉

#1.) What is gray, has a tail and a trunk?

Answer: A whale on vacation!

#2.) What do you get if you cross a fish and a Harley?

Answer: A motor pike!

#3.) What do you call an annoying bear?

Answer: Un-bear-able!

#4.) What is a rabbit’s favorite game?

Answer: Hopscotch!

#5.) What happened when witches adopted a friendly dog?

Answer: He went from wags to witches!

#6.) What dog always knows what time it is?

Answer: A watchdog!

#7.) Why did the frog go to the dr.?

Answer: Because he felt jumpy!

#8.) What big reptiles ate lemons?

Answer: Dino-sours!

I hope you are grinning after reading those jokes and riddles! Now go try them out on someone else! 🙂

Silly Fun With Wiggly Eyes

I had a streak of orneriness the other day and decided it would be fun to stick some wiggly eyes around the house and wait for someone to notice them. 😉 What are wiggly eyes? The cute little plastic eyes where the black part of the eye moves around. They are black and white but can also be colored.

I put a small piece of double-sided tape on the back of each eye. A word of caution…be careful not to stick them on anything valuable in case the tape would leave some sticky residue behind or tear paper.

This is what my husband saw when he wanted to fry some eggs. (Yes, he thought it was funny. He’s a good egg.) 😉

It’s not every day that the coffee pot looks back at you!

Here are a few other places that I put wiggly eyes…

In the fruit crisper drawer in the refrigerator…

On a potted plant…

Inside a bathroom cupboard…

On my hubby’s hat…

On an insulated cup…

On the bathroom scale…

And on the piano. (I didn’t use any tape for this one. I just laid the wiggly eyes on so they would stay in place.)

Did any of those pictures make you grin? 😉 It’s a simple and inexpensive way to have some fun. Who knew a pack of wiggly eyes could be so fun? 🙂 Give it a try yourself!

Mini Picket Fence Craft

The calendar says it’s officially Spring (even though it doesn’t feel like it outside where we live) so it’s time to do some Spring crafts for kids! Today we made a mini picket fence that is really so cute! This could be a great Mother’s Day gift for a child to make with some assistance from an adult.

You will need 7 craft sticks, some craft glue, some miniature flowers and a butterfly or bug puffy sticker or button.

You can use the craft sticks as they are or they would look really cute painted white. Start with 2 sticks and place 2 dots of glue on each stick at the same place on the 2 sticks.

Slide the 2 sticks apart and place another craft stick horizontally across the top and one across the bottom onto the glue dots. Try to keep the sticks straight so they form an even rectangle.

Allow the glue time to dry before moving to the next step. Once the glue is dry and your fence can be moved without the sticks moving, turn it over. Place 3 dots of glue in even spots across the top and 3 dots across the bottom stick.

Lay 3 craft sticks vertically on the dots of glue, as shown in the following picture.

Allow the glue to dry again until all the sticks will stay in place. (For a quicker project, you could use a glue gun, but craft glue is safer for younger children.) Once the fence is dry, turn in back over so the front side is up and decorate it by gluing on miniature flowers and a butterfly.

You can add a magnet to the back for hanging. Or add a piece of twine by gluing each end of the twine to the top sides of the back of the fence.

Or glue both ends of the twine to the backside of the middle vertical stick.

That’s it! Now you have a cute mini picket fence to display around your house and make you think of warm Spring days! 🙂

Goofy Pets

Sometimes our pets do silly things, don’t they? Just for fun today, we’re taking a look at some crazy things we’ve caught some of our family’s pets doing. And what we think they might have been thinking… 😉

#1.) “Look out! This is a crazy alert!”

#2.) “It was so nice of mom and dad to set up this grow light so I can work on my suntan.”

#3.) “How dare you put my toy away in my toy box?!”

#4.) “Play ball!” (Cutest ball player ever!) 😉

#5.) “Catch me if you can!”

#6.) “What’s the best way to attack the cat? On the count of 3, you go right and I’ll go left.”

#7.) “It’s time to do the laundry.”

#8.) “I have my own personal taxi!”

#9.) “Why is there a chipmunk on my head?”

#10.) “All tucked in and ready for bed.”

#11.) “Do I look pitiful enough for you to give me some treats? Pleeeeeease?!”

#12.) “You have exactly 3 seconds to take this costume off of me.”

#13.) “Whew, that was a wild birthday party!”

#14.) “No, you may not have your crockpot case back. This is now my domain.”

#15.) “It’s the Easter Puppy!”

#16.) “Bow to your Queen, you peasants!”

#17.) The most popular Bark Box for dogs ever.

I hope you’ve had fun looking at these silly pet pictures! 🙂 Hug your pet and give him/her pats from me! 🙂

Time for Giggles!

Hello again! Wow, things have been crazy busy around here lately! Hope you are all doing well and that the weather is slowly warming up where you are! We’ve had a few wonderful days and it feels so nice to be outside in some sunshine! Anyway, hopefully I will be able to get a few more posts up here soon. 🙂

Let’s do some more jokes and riddles now!

1.) What do you get if you cross a rooster and a crocodile?

Answer: A croc-a-doodle-doo!

2.) What do bumble bees chew?

Answer: Bumble-gum!

3.) How do camels hide in the dessert?

Answer: They wear camel-flage!

4.) How do cows do math problems?

Answer: They use cow-culators!

5.) Where do sheep go on vacation?

Answer: To the Baa-hamas!

6.) Why are goats considered rude?

Answer: They keep butting in!

7.) Where do pigs keep their money?

Answer: In piggy banks!

8.) What did the leopard say after eating?

Answer: “That hit the spots!”

Hope those made you grin and giggle! Have a great Friday and a wonderful weekend! 🙂

Easter Bunny Ice Cubes

If you are looking for some simple ideas for Easter fun, you might want to try making some Easter Bunny ice cubes!

I found this cute ice cube tray at a Dollar Tree store.

If you turn it over you can see the bunny faces more clearly. One side of girl bunnies and one side with boy bunnies…so cute!

I added some red food coloring to some water…

And poured the red water in the girl bunnies side.

…and some blue food coloring in water for the boy bunnies side.

I suggest you put the ice cube tray on a cookie sheet before placing it in the freezer for a couple of hours until the ice cubes are frozen solid.

The ice cube tray is quite bendable which makes it easier to get the ice cubes out of the tray after they are frozen.

That’s all there is to it! Now you have some super cute bunnies to keep your drinks cold on Easter. 😊😃

Easter Basket Ideas From Dollar Tree

Easter is only a few days away now and if you are still looking for some goodies for those Easter baskets, here are a few things I spotted at a Dollar Tree store. They have LOTS of plastic eggs for sale! 😉

I found this cute little Kitty in my Pocket surprise packet that has 1 kitty inside.

Looks like there are 10 different kitties.

My package had a cute brown kitty inside. 🙂

I’m not exactly sure what this “wack-a-pack balloon” is, but it looks like you “wack” the flat package and it swells up into a balloon that has a message on it.

Then there are some cute Easter notepads.

And some glitter putty…

Some cups for dying/coloring eggs…

A wooden Easter egg to paint or color…

Some Softee Dough kits…(like Play-Doh)

And some magic towels that come in a small round package, but swell up when you put them in water and they become a small towel or washrag.

Of course, they also have lots of Easter candy! Hope these ideas will be a help to you for filling up the kiddos Easter baskets! 🙂

Happy National Crayon Day!

So what are you doing for National Crayon Day today? 😉

I have loved crayons ever since I was a little girl! And now there are more colors and kinds of crayons than ever before! Like Metallic and Neon…

Or Colors of Kindness…

Confetti…

Glitter…

Pastel…

Pearl…

Uni-crayons…

Cosmic…

And who can resist a big box of 96 crayons?! Wow! 🙂

So whatever crayon colors or styles you like, I hope you’ll get out some crayons today and have some fun coloring! 🙂

Boing! Boing! Bouncing Characters!

Hello and welcome to The Kids Niche once again! 🙂 Today we’re going to put a little bounce in your step! Or maybe a little bounce into some fun characters that you make yourself. Ready, set…let’s go!

You will need some strips of paper…approximately 1″ wide and at least 7″ long, but they could be a little different from that and still work. Construction paper or scrapbook paper works great. I used some paper that was printed on both sides, but that isn’t necessary. Then you’ll need some scraps of paper, glue or double-sided tape, markers, scissors and a pencil.

Begin with the 2 strips of paper.

Put a small amount of glue or double-sided tape on the bottom edge of one strip.

Place the second strip at a right angle to the first one on top of the tape or glue.

Now you will fold the strips of paper across each other…one at a time…keeping them straight to the corner.

Continue folding the strips until you come to the end of the strips.

This is a side view of what it should look like.

Here we are at the end of the strips.

Fold the last bits over and glue or tape in place.

Another side view…this is the part that makes the bounce. It’s rather like an accordion.

Now let’s make the character’s face. Start by cutting out a circle from your scraps of paper. I used a very small cup to trace around.

Draw a silly face on the circle.

Put some glue or double-sided tape on the top of the accordion piece.

And stick the circle on top.

Put your bouncing character on the tabletop and press it with your finger. It will bounce up and down. 🙂

I also made a bouncing cat by folding 2 more strips of paper together. I cut out an orange circle and 2 orange triangles.

Draw a cat’s face on the circle, color in a bit of the ears and glue or tape it together.

Tape it onto the bouncing part you made and you’re ready to play with your bouncing friends!

I hope you’ll have fun bouncing these guys all over the house! 😉