You might not see many posts from me this week because we are busy having fun!! 😃 Some of our grandkids are staying with us this week so we are seeing what we can get up to together! We built a dinosaur…
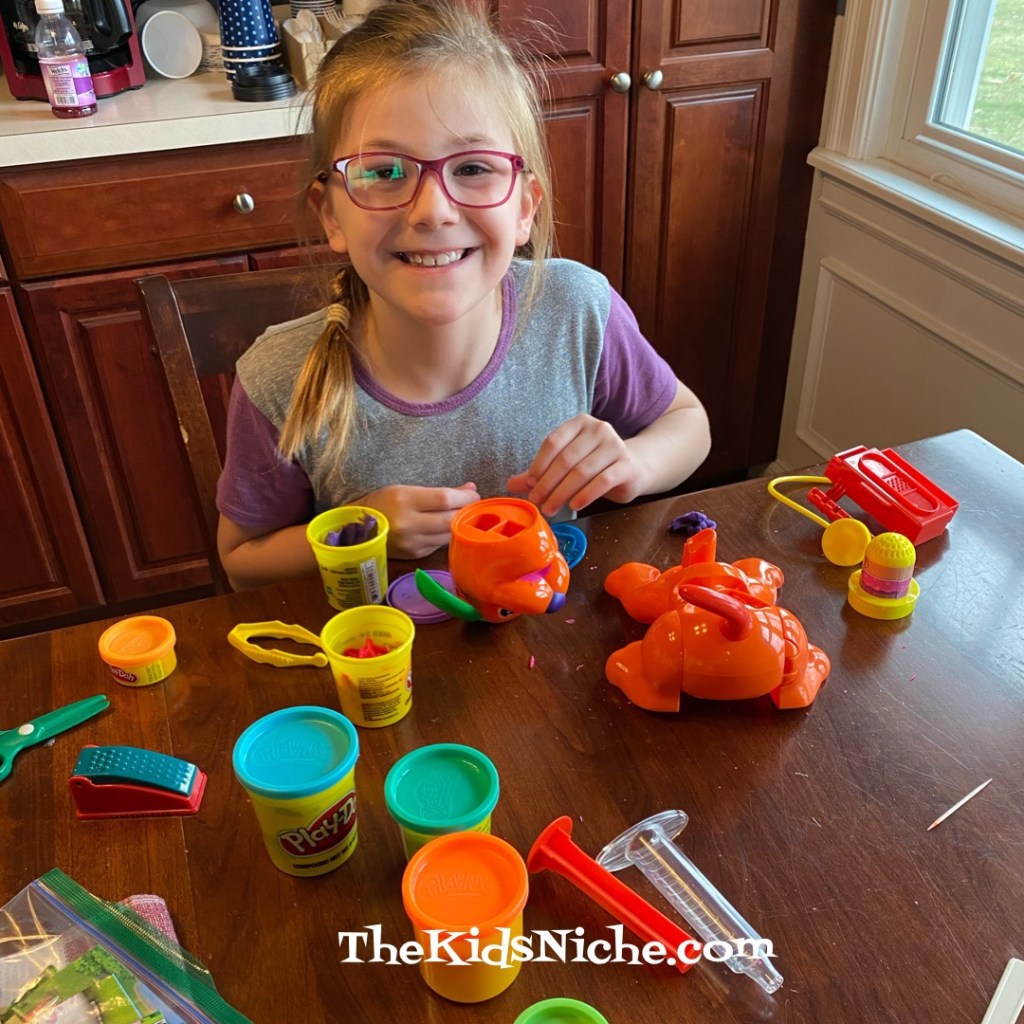
Played Play-doh…
We’re watching some water beads grow.
There was a lot of laughing going on while playing some games on the Switch.
Played with some dominoes…
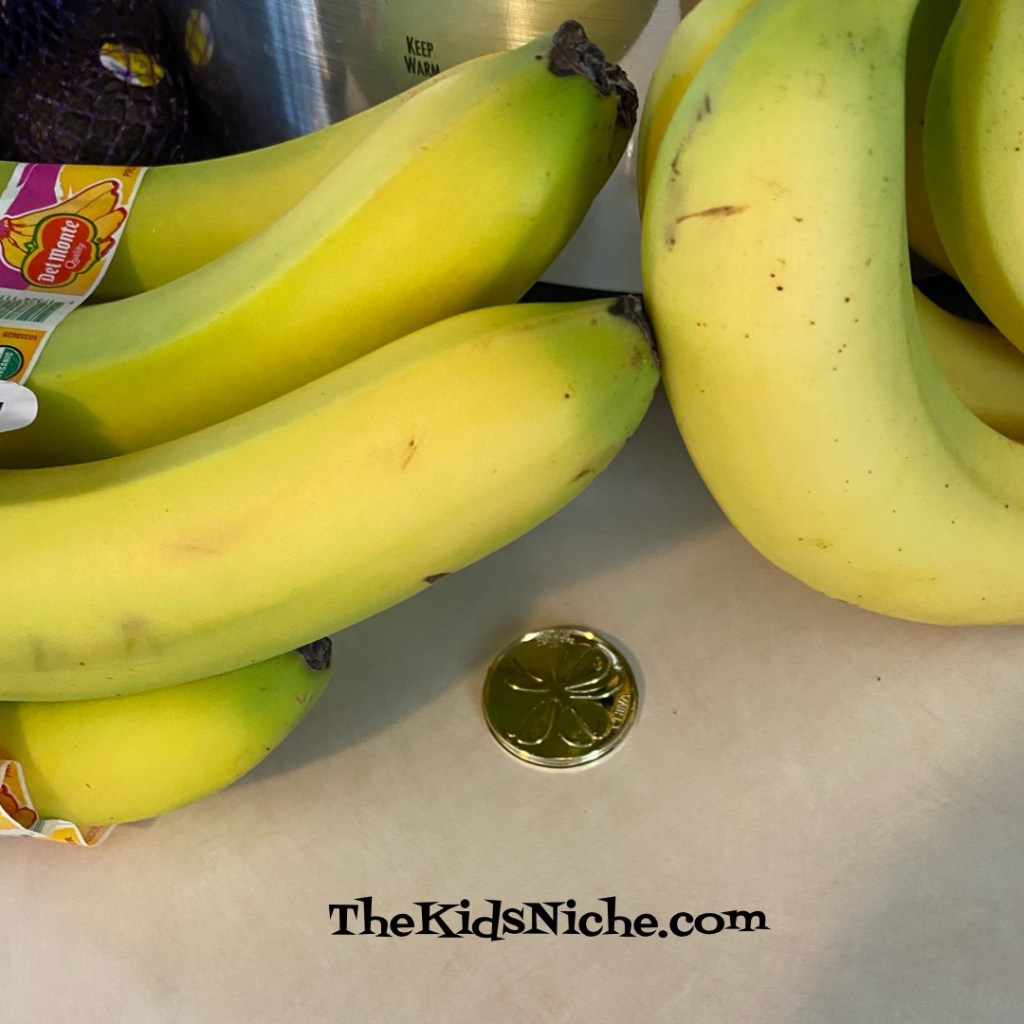
A late leprechaun left some gold pieces hidden around the house for the kids to find.
Some of us (ok, all of us!) were tired after staying up late last night. Lol
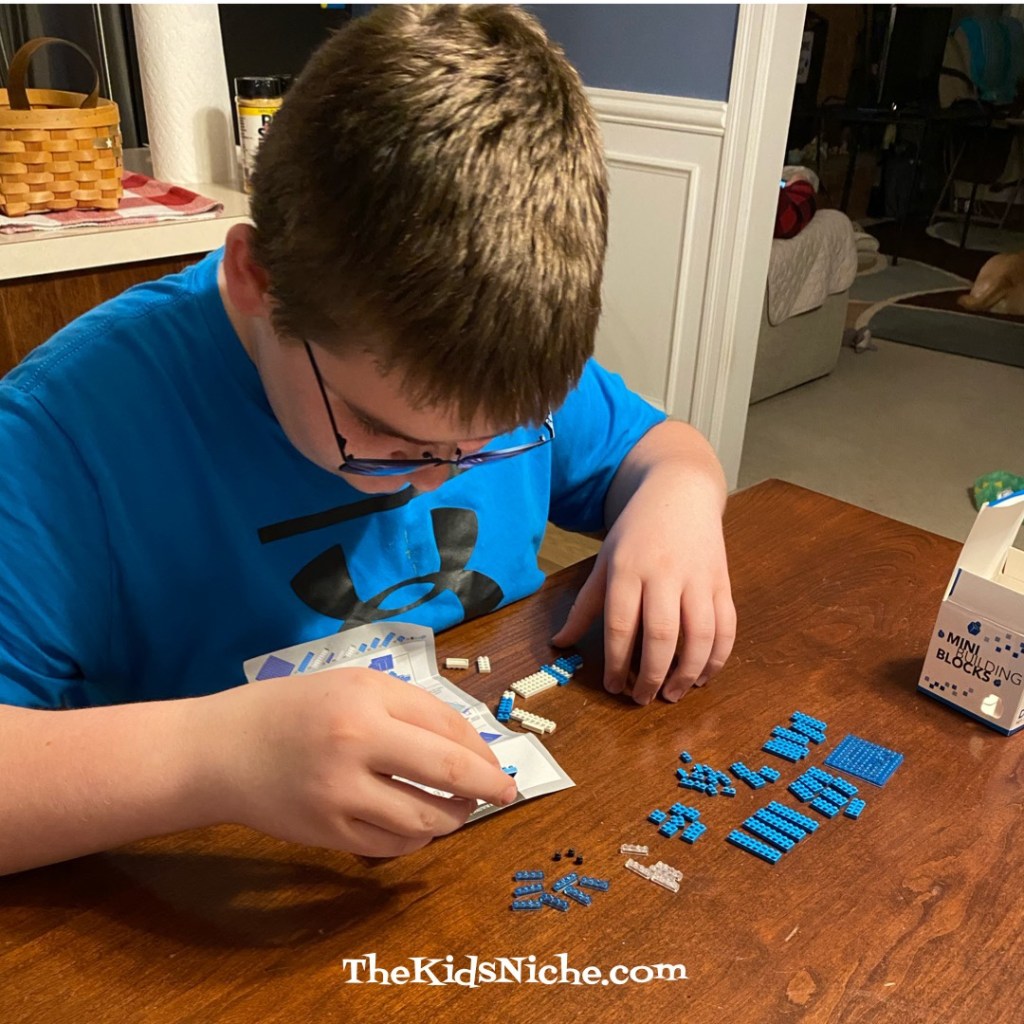
This fella put together a mini blocks set. Boy, the pieces are tiny!! 😳
It looks pretty cool now!
And that was all just today! 😃😂 Hope you are having a great week too!
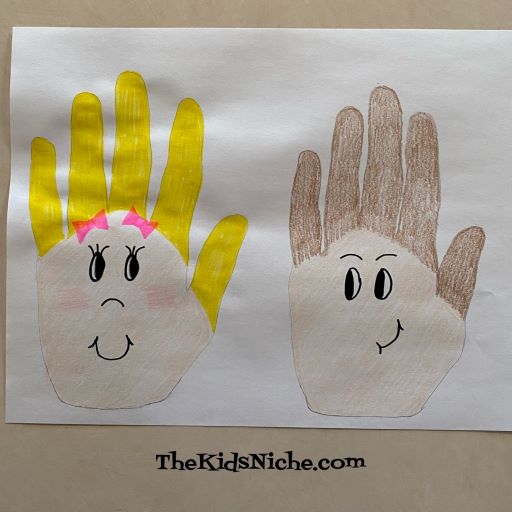
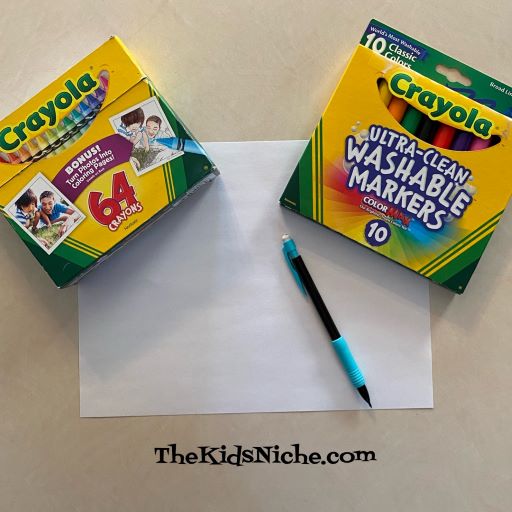
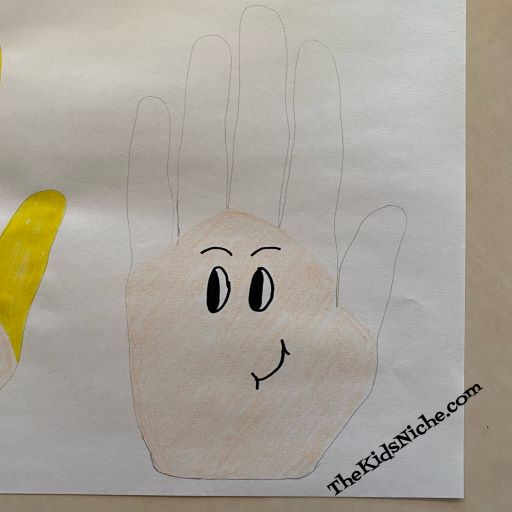
Have you ever traced around your hand with a pencil and paper and turned that hand into a picture? One popular way is to make a turkey at Thanksgiving time. But today we’re making some new friends by tracing around our hands and coloring them in with crayons or markers.
All you need is a piece of paper, a pencil, crayons or markers and your hand. 😉
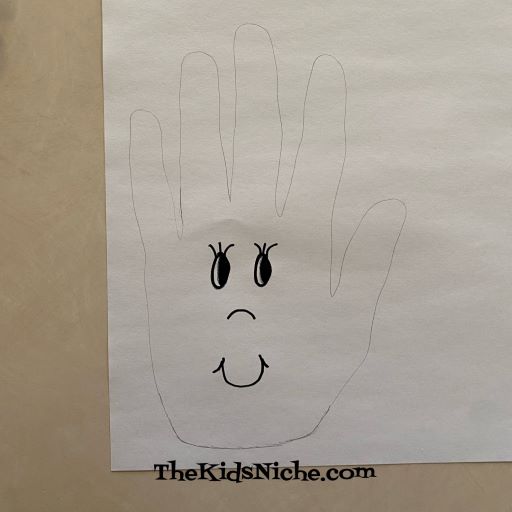
Start by placing one hand on the paper and using your other hand to trace around your entire hand and in between each finger with the pencil.
This will be a girl so draw a sweet girl’s face.
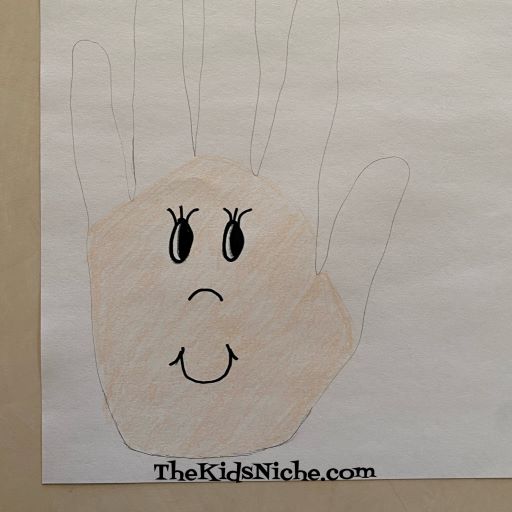
I used a Peach crayon to color her face.
I chose blond hair for my girl and colored her hair…or the fingers…with a yellow marker. (The marker did make the paper bump up for some reason.)
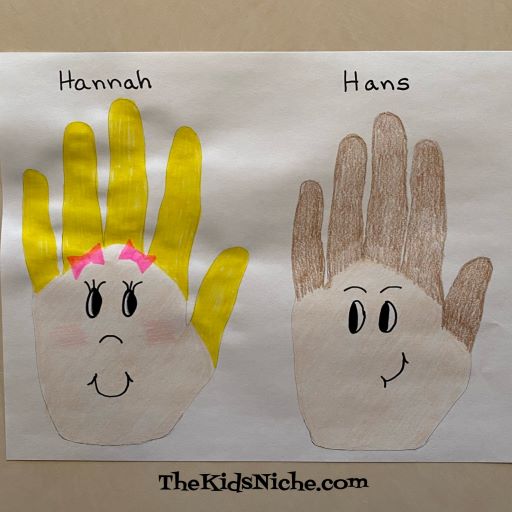
Add a couple of bows to her hair and a little pink color to her cheeks and you’re finished. I’d like you to meet Hannah. 🙂
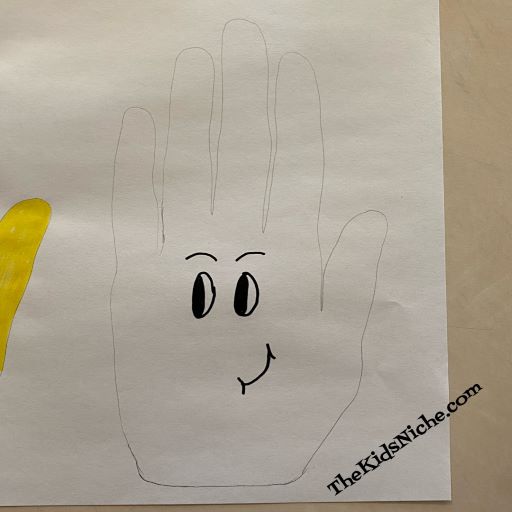
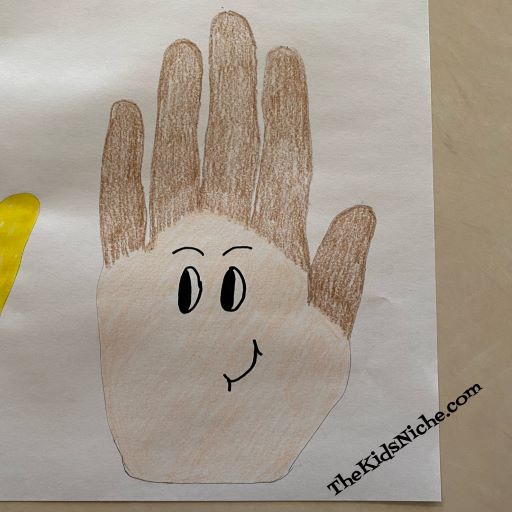
Hannah would like to have a friend, so let’s make a boy too. Trace around your hand again on the other side of the paper. Or on a new sheet of paper if the first one is out of space.
Draw an ornery face…boys are rather ornery, aren’t they? 😉
Color his face in with a crayon…I used Peach again.
Color in his hair. I decided to give my boy brown hair. And ta dah, he is finished too! Now I would like you to meet Hans. 😉
And there you have 2 new friends…Hannah and Hans. (Get it? Hannah and Hans made from hands? Haha!) 😉
I hope you will have fun drawing some Hand Friends! 🙂
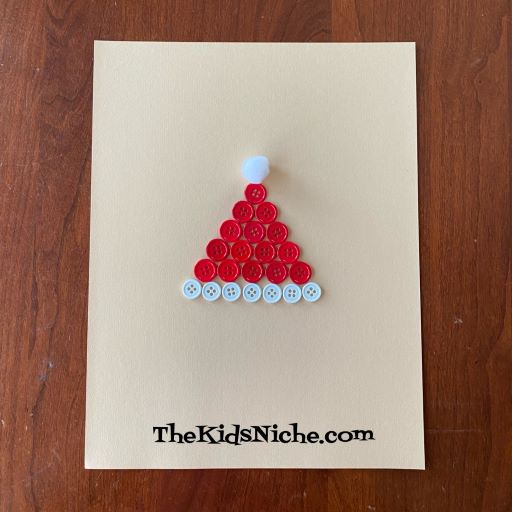
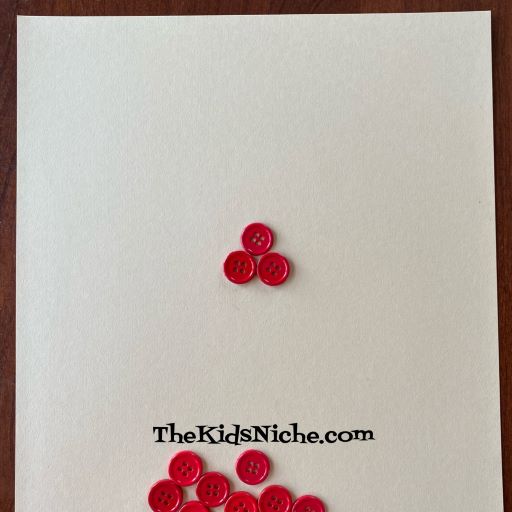
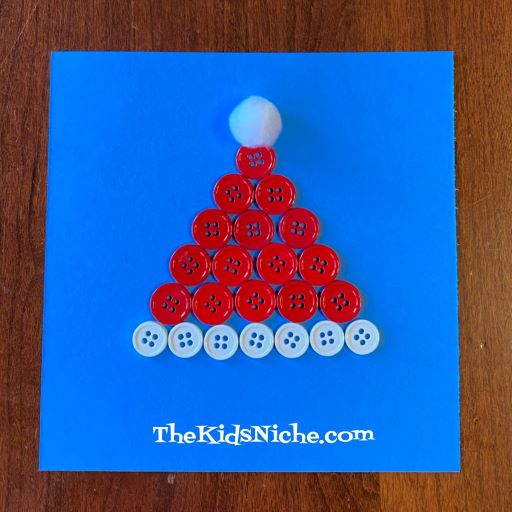
I hope you all had an amazing Thanksgiving holiday and weekend! I’m sorry I didn’t get to post last week but things were pretty crazy here! I’m here now and I have an adorable craft for you today. I’ll show you how to make Santa’s hat using buttons and a pom pom. 🙂
You’ll need an off white or darker colored piece of cardstock, approximately 15 red buttons and 7 white buttons and 1 white pom pom. And glue to hold it all in place. The number of buttons will vary according to the size of buttons you use and how large you want to make your Santa’s hat.
Start by placing 1 red button toward the top of your piece of paper. In the second row, place 2 red buttons. You can glue the buttons down as you go or go back and glue them down after you have them all in place.
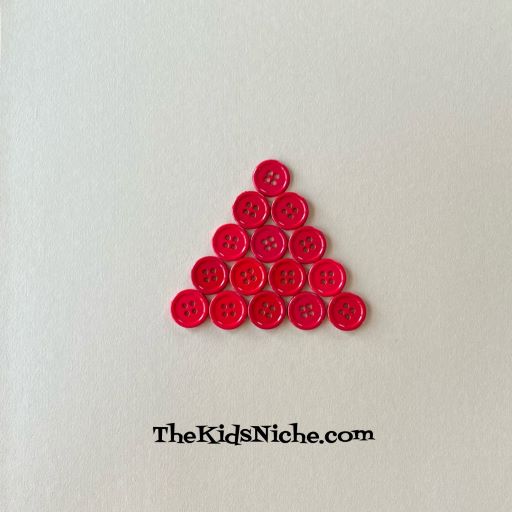
Row 3 will have 3 red buttons, row 4 will have 4 red buttons and row 5 will have 5 red buttons. Your Santa’s hat should look like this so far.
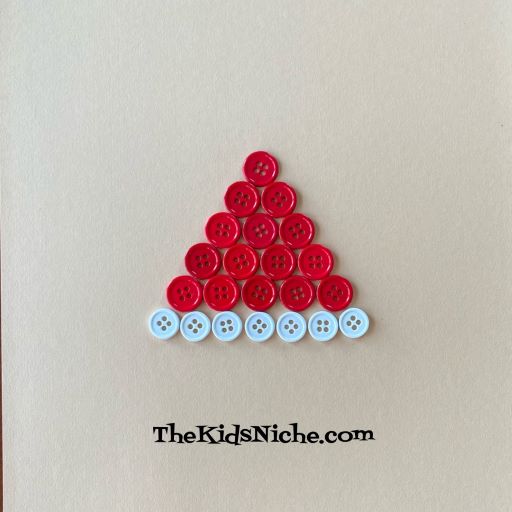
Now it’s time for the white buttons. They will go in row 6 along the bottom to be the white edging on Santa’s hat.
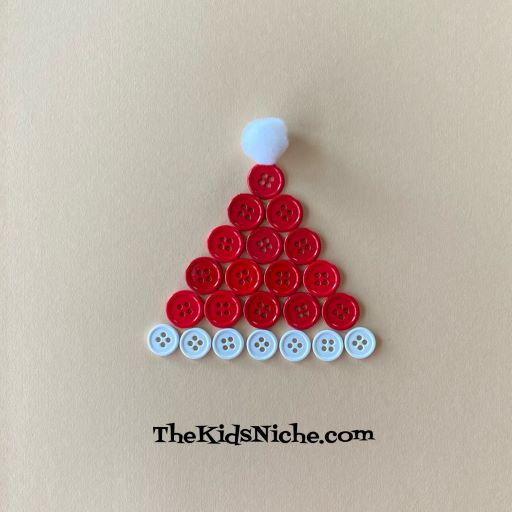
Add your white pom pom to the top and you’ve finished making your Santa’s hat! Great job!
I wanted to use the darker brown craft paper for my background, but I didn’t have any on hand. I would suggest using a darker color of cardstock than I did for mine because the white of the hat will show up better. Here it is on green:
And one more time using a blue background.
Which way is your favorite? I think I like the blue background best. 🙂 You can make Santa’s hat as a decoration to hang up or make it on the front of a card for a special Christmas card. Whatever you decide to do, I hope you will have fun making a Santa’s hat from buttons! 🙂
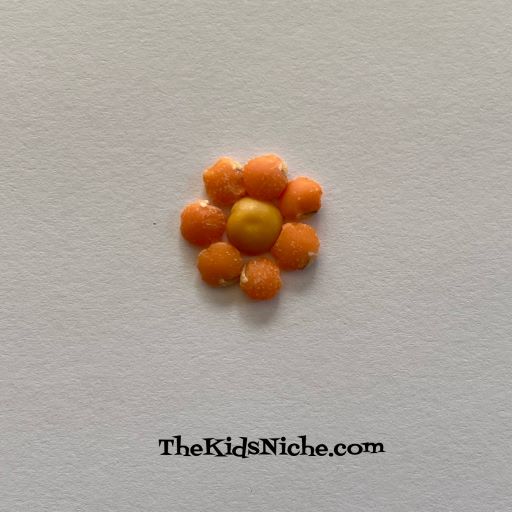
This is a fun and easy activity that your kids may have done in school. We did it way back in the dark ages when I was in school. 😉 All you need is a piece of paper, some dried beans, lentils, seeds, rice, etc and some glue. A pair of tweezers and/or a toothpick might come in handy. I used some leftover lentils and rice mixture I had from making a batch of soup.
I suggest you choose the size of your pieces according to the age of the kids making a picture. For instance, the size I used is easily bumped out of position so you have to be careful and take your time. Larger beans for younger kids might be a good idea.
All you do is arrange the dried items in a pattern to make a picture and glue them in place. It can be a “real” item or just a pattern that the kids enjoy making. Start by pouring out a few of your dried items onto the area where you are working so you can get a hold of the individual pieces.
I decided to make some flowers. Here’s how I arranged the lentils to start a flower.
Then I made 4 flowers, switching the colors of lentils for some of them.
Next I added some stems and a few leaves.
Finally I added some rice at the bottom to be grass.
After everything has been glued down and the glue has had time to dry, you can write some words on your picture if you would like to. These would make adorable gifts for the kids to make and give at Christmas time. Putting it in a frame would make it even nicer. I hope you’ll have fun creating pictures! 🙂
Sometimes kids (and grownups) wake up on the “wrong side of the bed”. In other words, they wake up and for one reason or another, they aren’t in a very good mood. And sometimes that bad mood comes later in the day from things that have happened during the day. But sometimes all it takes is a little bit of kindness or a little bit of fun to turn that frown upside down. 🙂 Those little things I like to call smile starters. Maybe its a hug that lasts more than a few seconds. Or maybe its seeing a funny smiley face that was made just for them. Here are a few smile starter ideas for you to try.
Draw a smiley face on an orange. Who can resist that sweet face?
Draw several smiley faces on a bunch of bananas. Maybe they are even looking at each other.
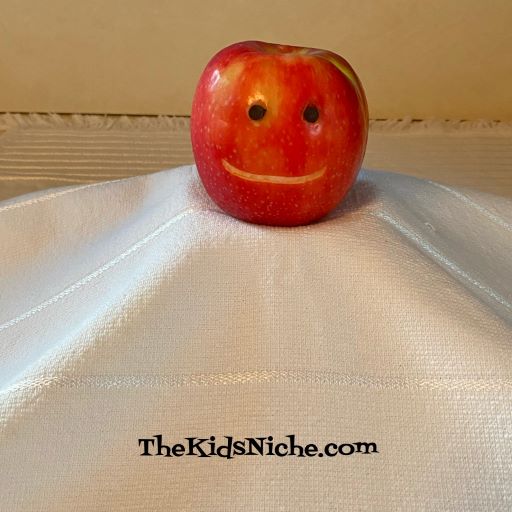
Carve a face into an apple and add a couple of chocolate chips for the eyes.
Use ketchup and mustard to make a funny face on a hamburger.
Draw a smiley face on the top of the lid on a bottle of juice.
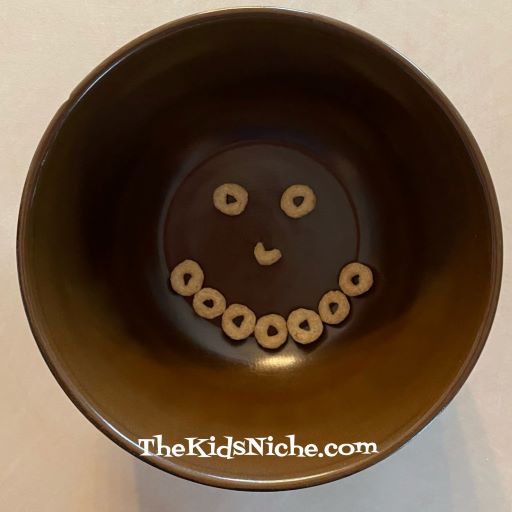
I’m guessing you would get a smile out of someone who looks into their bowl at breakfast time and sees this looking back at them!
None of these things take very long to do, but I’m betting they will work great to get some smiles started at your house! Or sneak one of these into a lunchbox for a fun surprise. I’m sure you will be able to think of other simple things like this that you can do to encourage someone to be happy. After all, smiling is contagious so start passing some around today! 🙂
Well, we are almost half way through October so I’m guessing you are thinking about Halloween. Do you decorate your house for Halloween? Do you dress up and go trick or treating? Do you have a Halloween party? It seems like Halloween is more popular than ever if you look at all the Halloween items for sale in the stores. I’ll try to add some Halloween ideas here on the blog to help get you in Halloween Mode! Let’s start off with some Halloween riddles for kids! 🙂
#1.) Why do ghosts never lie?
Answer: Because you can see right through them!
#2.) What kind of music do mummies like?
Answer: Wrap music!
#3.) What do you call a skeleton who sleeps all day?
Answer: Lazybones!
#4.) What fruit does Dracula like?
Answer: Neck-tarines!
#5.) What musical instrument do skeletons play?
Answer: A trom-bone!
#6.) What kind of pants do ghosts wear?
Answer: BOO jeans!
#7.) How do you fix a broken jack-o-lantern?
Answer: With a pumpkin patch!
#8.) How are vampires like false teeth?
Answer: They both come out at night!
#9.) What do you call a ghost that gets too close to a fire?
Answer: A toasty ghosty!
#10.) When is it bad luck to see a black cat?
Answer: When you are a mouse!
Haha! I hope these Halloween riddles made you giggle! 🙂
Happy Columbus Day! How many times have you heard the saying, “In 1492, Columbus sailed the ocean blue”? 😉 I know, I know…now there is a lot of disagreement about what Christopher Columbus did or didn’t do, but one thing I think we can safely say is he was an explorer. So to celebrate Columbus Day today, let’s help the kids become explorers!
The first thing an explorer needs is a cool hat, right? 😉 I’m going to show you how to make a cool explorer’s hat out of paper. I am using a piece of construction paper so you can see more clearly how to make it, but you might want to use something bigger like newspaper. Just depends on how big the person’s head is that you are making it for.
To start, I got a piece of green construction paper.
Here’s how to make your hat. Fold it in half the long way.
Open it back up.
Now fold it in half the other way.
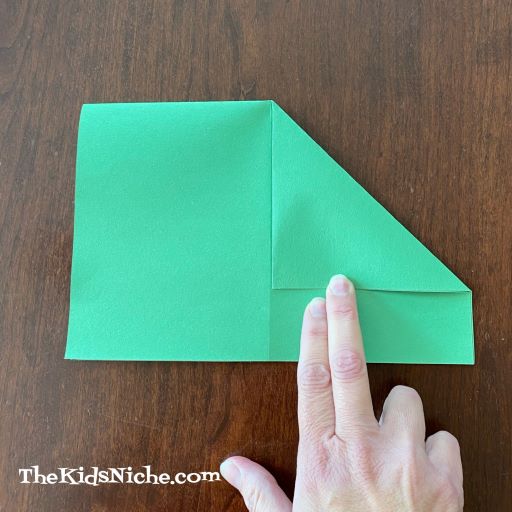
Leaving the paper folded, fold in one top corner of the paper to the middle line so it looks like a triangle.
Now do the same thing on the other side.
Fold one side of the paper’s straight edge up so the fold is at the bottom of the triangles.
Turn the paper over.
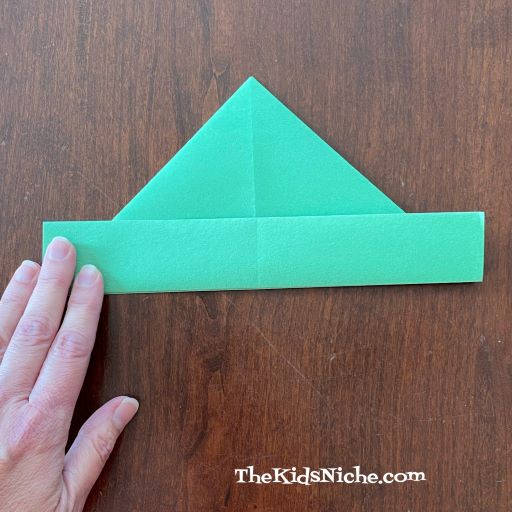
And fold the other side up the same way.
Your hat is done! Pull it open at the bottom folded edge.
This little guy was happy to be a model for your new explorer’s hat. 🙂
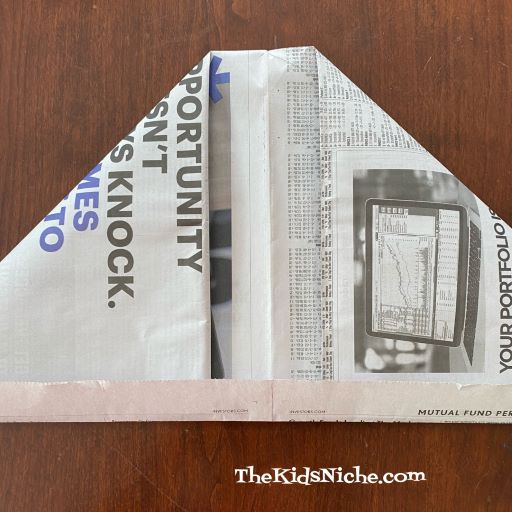
As I already mentioned, you can use different sizes of paper to make different sizes of hats. Here is the one I made with construction paper, one made with a single sheet of newspaper and one made with a full sheet of newspaper.
For the full sheet of newspaper size, you might need to let your triangles not meet in the middle so that you still have paper left over to fold the edges up.
Barbie and Ken thought it would be fun to be explorers too!
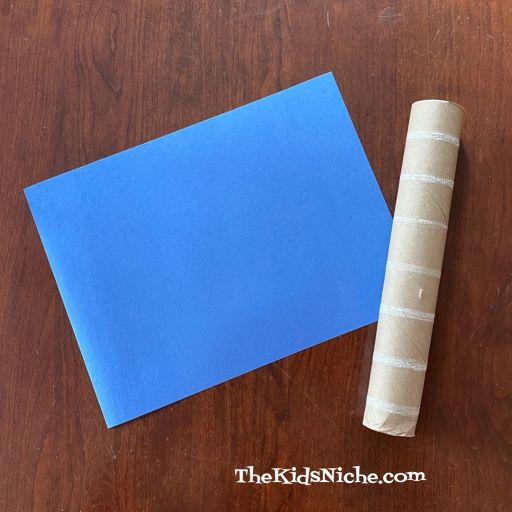
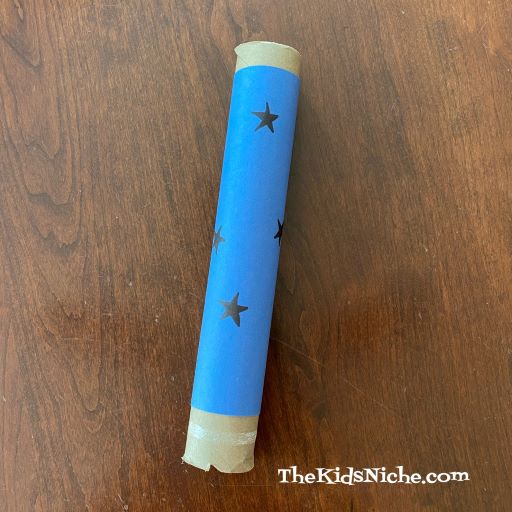
What else does an explorer need to go exploring? Maybe a spyglass? Let’s make one of those too! All you need is an empty paper towel or toilet paper roll, a piece of paper and markers or crayons.
Cover the tube with the construction paper if it has a lot of glue marks on it like this one does. Use glue or tape to hold it in place. (I used tape because it doesn’t need drying time.)
Let your kids decorate their spyglass with markers or crayons.
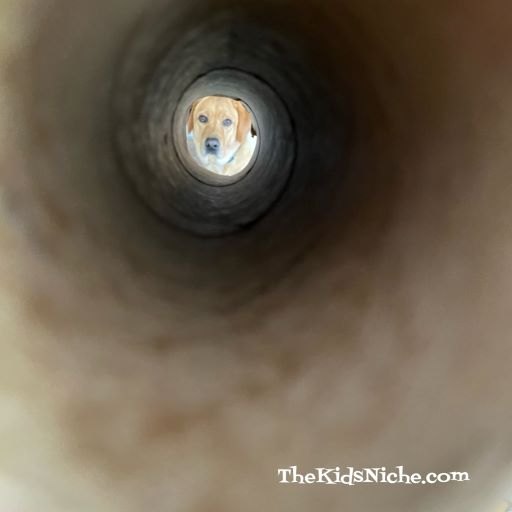
You are now ready to be an explorer!! What does an explorer do? Well, they put their explorer hats on and walk around the house or outside and they look through their spyglass to see what they can spy! They use their imagination to discover a new land. Be careful because you never know what kind of strange animals you might find!
Also watch out for things like carpet that might have quicksand or lava! You might need to jump from rug to rug in order to not get sucked in! 😉 I hope your new hat and spyglass will make exploring a ton of fun!
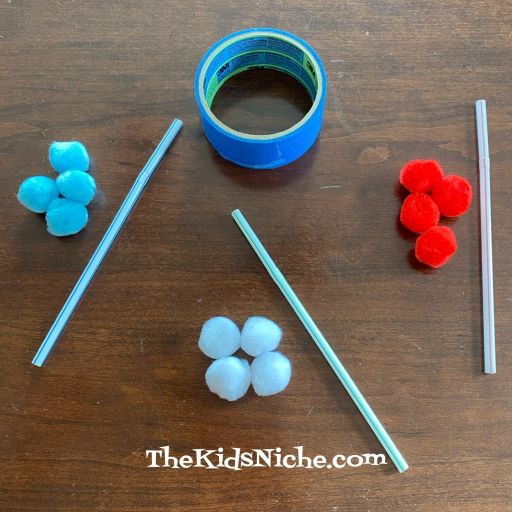
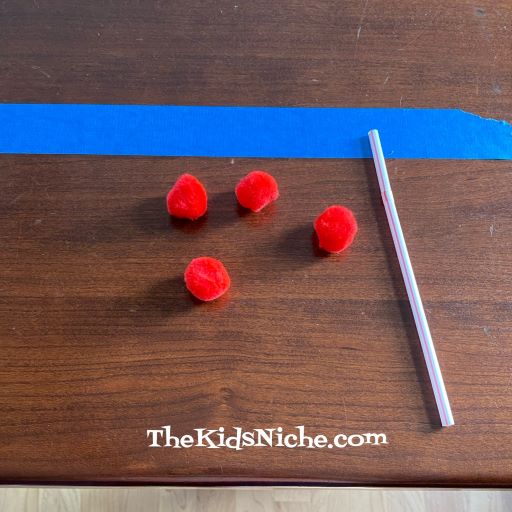
Do you ever wish you had something NEW the kids could do without going out and spending a ton of money? What if there was a game that takes some really simple supplies that you likely have on hand already? This game can be played with just some simple pom poms, drinking straws and either some painters tape or strips of paper and scotch tape. And a table or floor to play on. 😉
The basic idea of this game is to use a straw to blow the pom poms to a certain place. This game can easily be adapted for young kids to adults. I suggest each person has their own straw and 4 differently colored pom poms but the number of pom poms can vary. Let’s start out with the simplest way to play and then move on to harder ways.
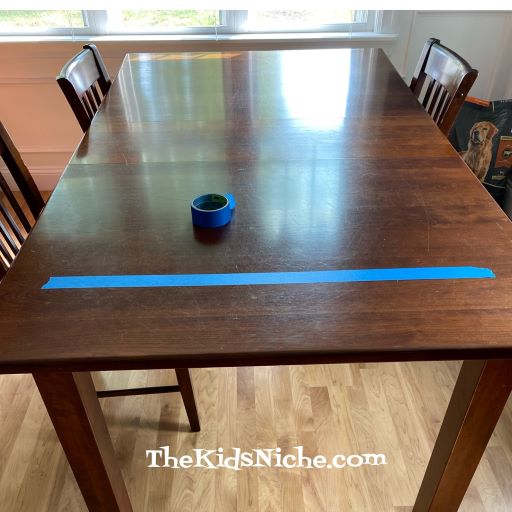
To set up the game, begin by placing a strip of painters tape across the table, close to one end but allowing 6″ or so of the table open on the very end. I suggest painter’s tape because it should come back up easily and not hurt the table. If you don’t have painters tape, you can use a strip of paper and tape it down with scotch tape.
Next place another strip further down the table…maybe 12″-15″ away.
Now you are ready to play the easiest version of the game. Player #1 takes his/her pom poms and puts them on the end of the table by the first piece of tape.
Using their straw, player #1 blows through the straw while aiming the straw at a pom pom.
See how the pom pom has moved past the first line?
Keep blowing each pom pom until all 4 pom poms have crossed the line further down the table. NO HANDS ALLOWED!! 😉
If you want, two players can go at the same time.
You can decide on what rules of the game you want to use. For instance, can the players help each others pom poms across the line or must each player do their own? If the pom pom is blown off the table, does it go back to the starting point or can it be placed back on the table close to where it fell off? The ages of the players can determine how hard you want this game to be.
Now, let’s make it a little bit harder. Put a piece of painter’s tape down the center of the 2 strips already on the table. When each person takes their turn, they must keep all of their pom poms on their side of the tape. Add a third piece of tape even farther down the table for the finish line.
Now I added a piece of tape on the outside edges on both ends. (This is a side view.) At this level the players also cannot blow their pom poms outside the side edge or that pom pom must be placed back at the beginning. Players can race against each other or each player can be timed and the player with the fastest time is the winner. You can make this level be that all 4 pom poms must be together in the first “box” before they are blown on across the table past the finish line.
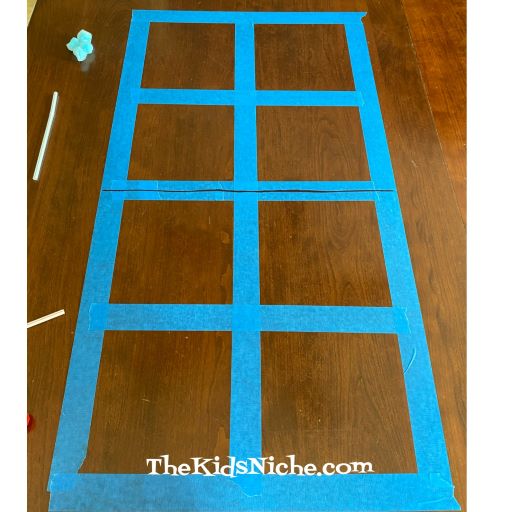
Ok, it’s getting harder now! Place more tape on the table so that each side has 4 small boxes. I drew a line down the center for a reminder to stay on your side. (Another side view)
This level can be that each player must have 1 pom pom in each of their 4 squares at the same time before they can move on toward the finish line. (Side view)
Or you can choose which squares the pom poms must be in to be able to move on. Like in this picture, 2 pom poms in the 2 squares that were picked.
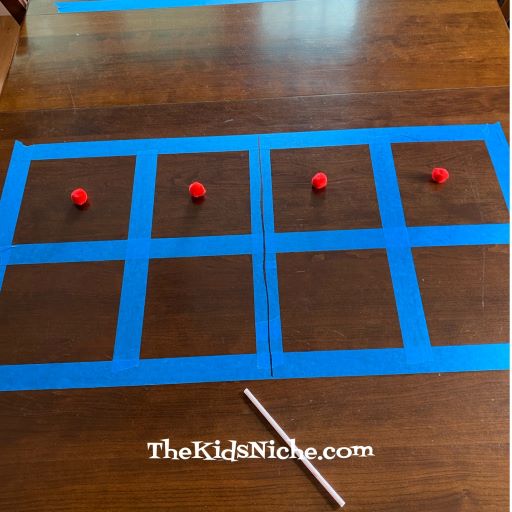
Here is another version where one player plays at a time and you time each player. One pom pom must be inside each square in the first row.
Then each pom pom must be blown into a separate square on the second row.
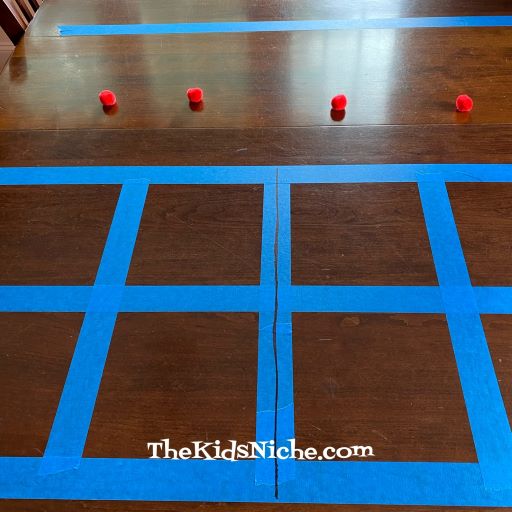
Next, all 4 pom poms must be in the space in front of the finish line before…
…all pom poms are blown past the finish line. An extra rule would be that pom poms cannot be left sitting ON the tape…they must be inside the appropriate area. Again, decide what happens if a pom pom is blown off the table…start over or put it back where it fell off? 😉
Here’s another angle to decide before you play…where do the balls start from? Do they all have to be together in a line?
Or can they be placed more strategically across the starting area?
One more idea for you…give each player 4 pom poms of 3 colors. And make them follow the last game I described but 1 pom pom of each color must be blown into each square before moving on to the next step!
I’m sure you can come up with even more ways to play this game! Start out easy and gradually increase the difficulty. You can also give players a set amount of time to finish. For example, they have 30 seconds to blow the pom poms across the finish line. I hope these ideas will spark some ideas of your own and you will have a ton of fun with just some pom poms and drinking straws! 🙂
We haven’t done any tongue twisters for a while, so let’s try some today. Wiggle your tongues around to get them loosened up and here we GO!!
Trying saying each of these 5 times fast. 🙂
1.) Mixed biscuits
2.) Pirates Private Property
3.) An ape hates grape cakes.
4.) Willy’s real rear wheel. (Oh my, this one is hard!)
5.) A happy hippo hopped and hiccupped.
Wow! Some of those I had trouble saying right just ONE time! Haha! I hope you have fun trying to say these! And be sure to try them out on your family and friends! 🙂