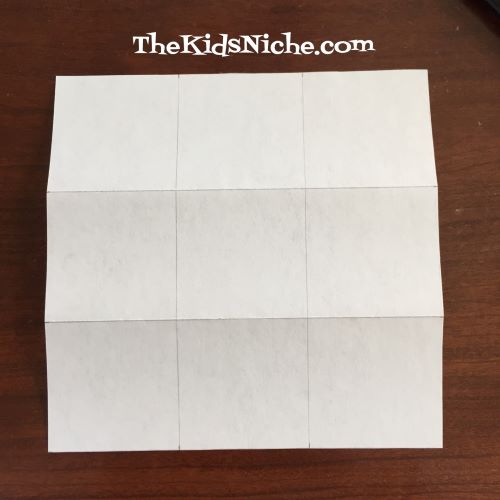
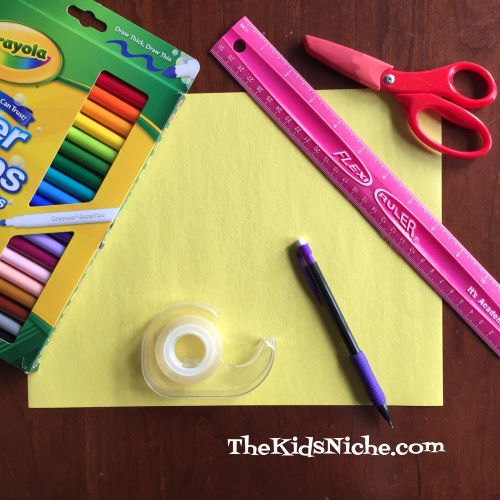
Are you stuck at home and wishing you had some little treat boxes for your kids? You can make some with just a piece of paper and some glue or tape! Let me show you how. If you have card stock paper it will make a sturdier box, but I made one with printer paper, so you don’t need anything fancy. Using a piece of scrapbook paper will mean you don’t even need to color the box. Let’s start by making a 6″ square piece of paper.
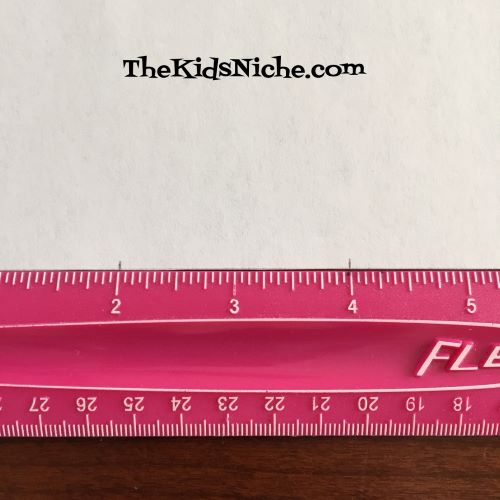
Using a ruler, mark each side of the paper at 2″ intervals.
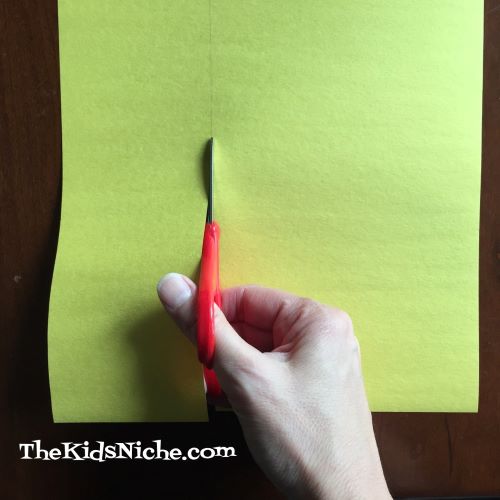
Draw 4 lines – 2 in each direction – across the box at the 2″ and 4″ marks.
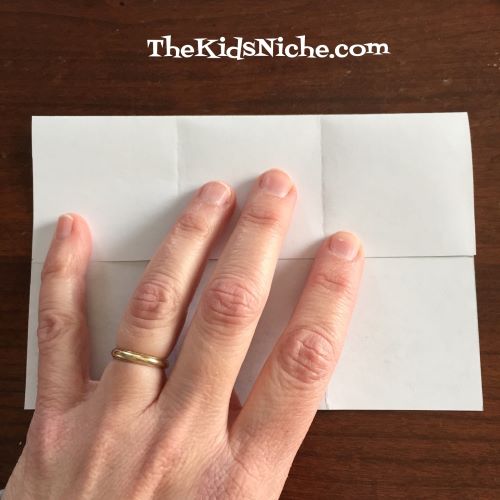
Line your ruler up with each line and bend the paper up and run your finger along the ruler edge to make a crease in the paper.
Remove the ruler and press the paper flat to make a stronger crease.
Make a similar crease along each line for a total of 4 times.
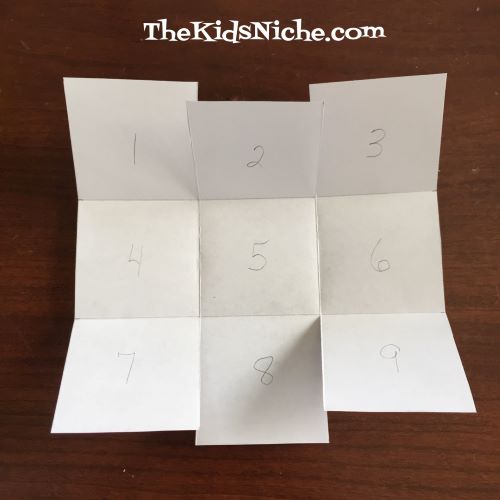
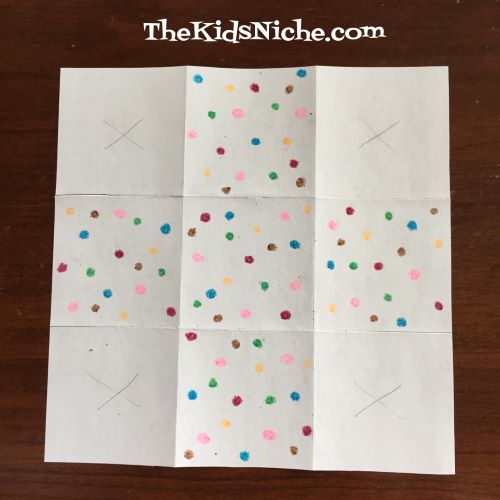
Now we will make 4 small cuts. Using the following picture, cut on the crease between squares 1 & 2, then between 2 & 3, then between 7 & 8 and finally between 8 & 9 – ONLY up to the first crease!
Next turn your paper over. Color or draw on the squares EXCEPT for each corner square. You can make an X on the 4 corner squares so you’ll remember which squares to color.
Here’s an example of what it will look like after the correct squares have been decorated.
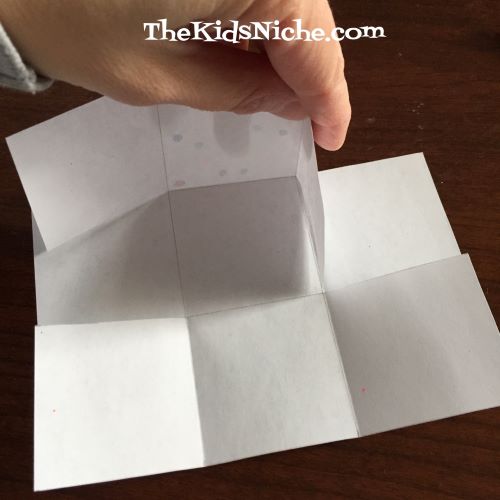
After you are finished decorating your box, it’s time to fold the paper up into a box. Begin by bringing up 2 opposite sides of the paper.
Fold one end square piece in until it matches up with the crease on the bottom.
Fold the end in from the opposite side so the 2 pieces meet and cover each other.
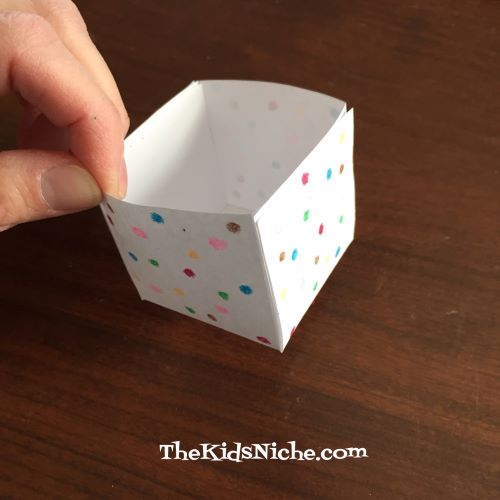
Using tape or glue, fasten the 2 pieces together.
Now fold the bottom square up to meet the box. Glue or tape it together.
Turn your box around and repeat the steps for the other side. And you’ve made a treat box! 🙂
Fill it with whatever special goodies you have on hand and enjoy!
I’m sure it will bring a smile to your children’s faces. Thanks for stopping by!
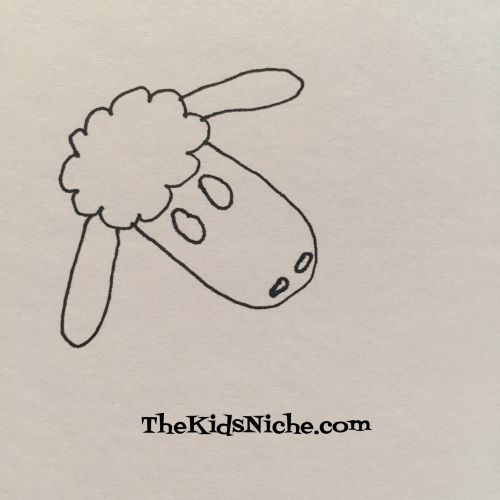
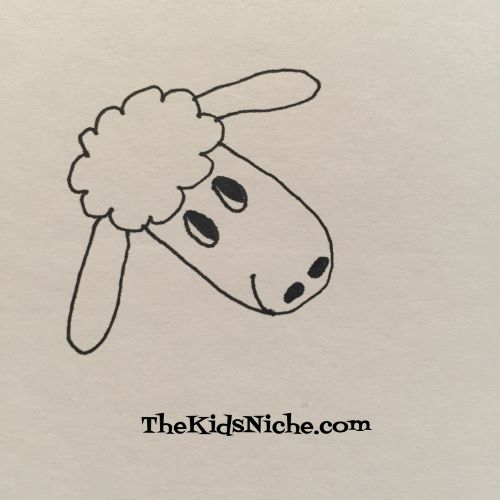
All you need to get started is a pencil or other drawing utensil and a piece of paper. First thing we’ll draw looks like a cloud tipped a little at an angle. This is the top of Sherry’s wooly head.
Next let’s draw the front of her head and nose like we’re drawing most of an oval.
Add an ear on each side of her head.
Now let’s draw 2 ovals that will be her eyes and two tiny ovals that will be her nose.
Color in about half of each eye and all of each nose hole.
Looking good! Now she needs a curved line for her mouth.
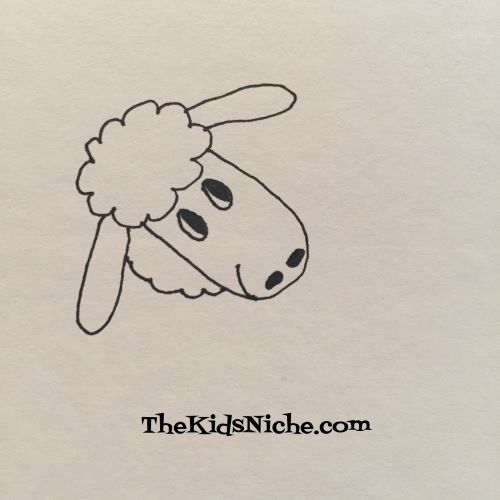
Then draw more of a cloud edge between her ear and under her chin for a wooly neck.
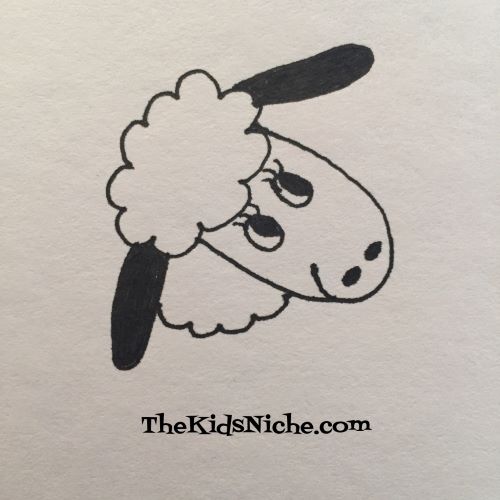
Great job! You can stop here if you like or we can do a couple more things. Since Sherry is often used as a girl’s name, you might like to add some tiny eyelashes to each eye. If your sheep is a boy you don’t need to add eyelashes. And you might want to make his name something different…like Sammy Sheep or something else. Here’s Sherry with eyelashes added.
You can also add 2 little hair bows, one by the top of each ear to make her look more like a girl.
I drew a second sheep because they are so fun to draw and for this one I made the ears black.
You can add any details you like to your sheep. I hope you have had fun learning to draw a sheep today! I’d love to see the pictures you draw! Will you draw one or maybe a whole flock of sheep? Have fun! Thanks for visiting! 🙂
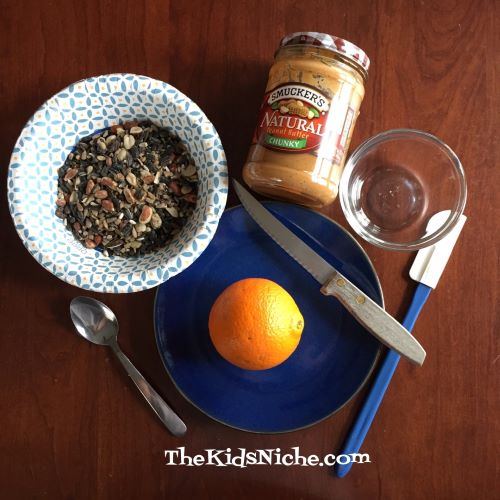
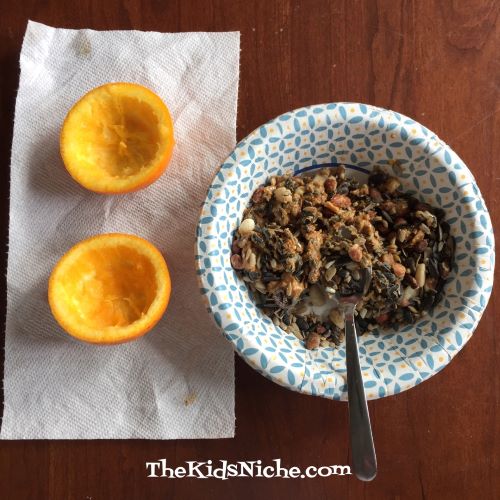
Watching and feeding birds can be a very interesting pastime for people of all ages, but children especially can enjoy learning about the birds that live close to them. We love to put out bird feeders and then keep a record of what birds visit us. Today’s project is making a little bird feeder from an orange! To get started you’ll need an orange, a small bowl for the orange “insides”, some bird seed, a little bit of peanut butter, a knife for cutting the orange and a bowl and a spoon for stirring the seed.
First step is to cut the orange in half.
Remove the edible orange parts from the inside, being careful not to tear the orange peel. Now is a good time to pause and eat a snack of orange goodness! 😉 Yum!
Set the 2 halves of the empty orange peel aside for the moment.
Now put some bird seed in your bowl and add a glob of peanut butter. No need to measure anything. Just put some of each in your bowl with enough peanut butter to hold the seeds together.
Stir the seeds and peanut butter together with a spoon.
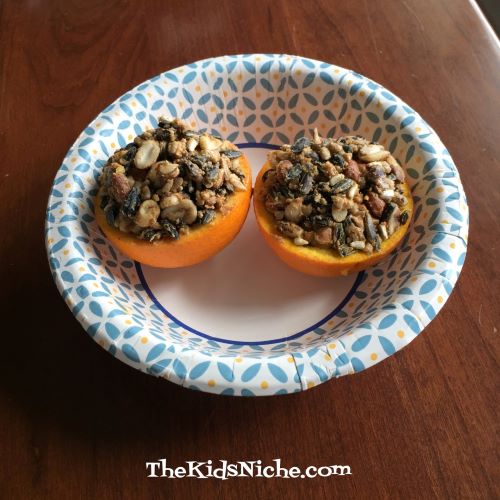
Put the seed and peanut butter mixture into the empty orange peel shells, packing it in to fill the entire shell.
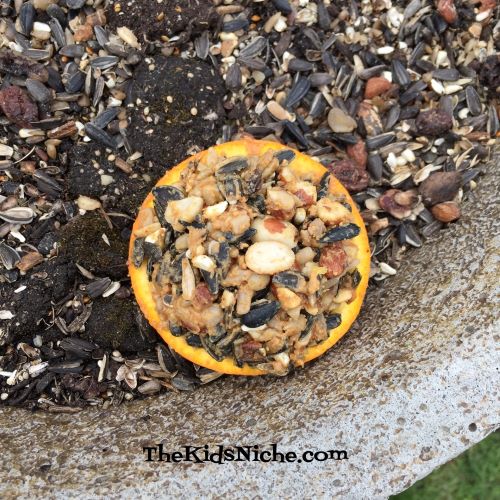
And you’ve done it! Your orange peel bird feeders are ready to go outside and feed some new friends!
It’s nice to find a place to put your little bird feeders close to a window where you can watch the birds come to eat from them. If you prefer to hang them from a tree branch, you can poke 2 holes in the sides of each orange peel half and tie some string through the holes. We have an old flower pot that we have been feeding the birds in so that’s where I placed my 2 bird feeders.
I hope you will try this project and then enjoy some wonderful family time together as you watch the birds find your feeder and you learn more about the birds native to your area. 🙂 Thanks for visiting!
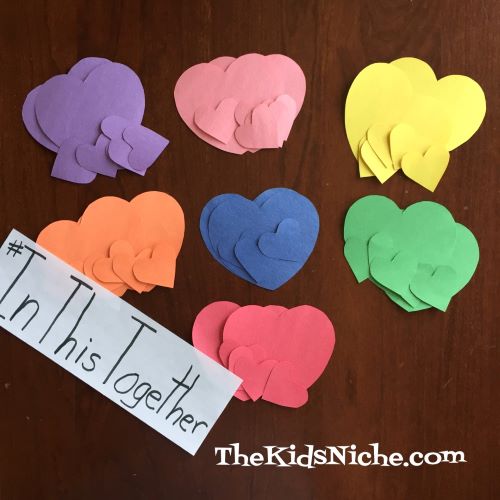
Have you heard about the people that are displaying hearts in their windows as a show of love and support for each other during this pandemic? It’s a nice way for kids when going for a drive in the car or a walk with their parents to have something to look for. I heard about it on Facebook and there is a group you can join to learn more about it. The group is called Heart Hunters. https://www.facebook.com/groups/326431341651785/about/
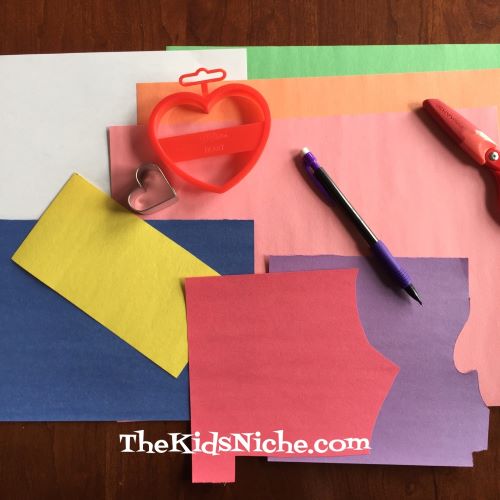
It seems like a fun project to get involved in, so I gathered up some construction paper, heart shaped cookie cutters, a pencil, scissors and tape and got to work!
I used several different colors of paper to make my display bright and colorful. I made 2 sizes of hearts by tracing around the heart shaped cookie cutters and then cut each one out with my scissors.
I put my design in a window facing the road. I had trouble getting a clear picture because of the sunshine and the overhang on our roof. But now its going to rain so I’ll have to go with this picture.
I kept my design pretty simple but there are some AMAZING and complicated displays on the Heart Hunters Facebook page so be sure to go join and check it out. You can also add a photo of your heart display too. 🙂 Have fun making hearts!! We’re #InThisTogether!
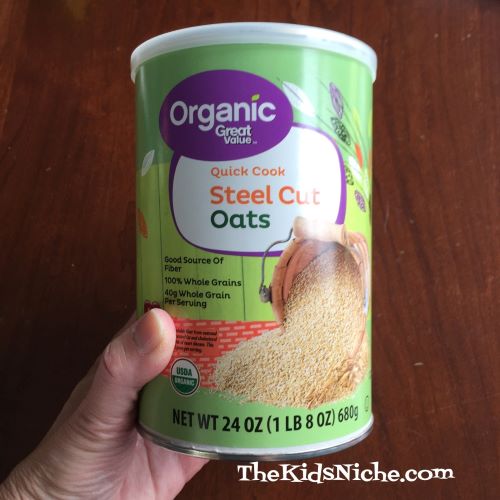
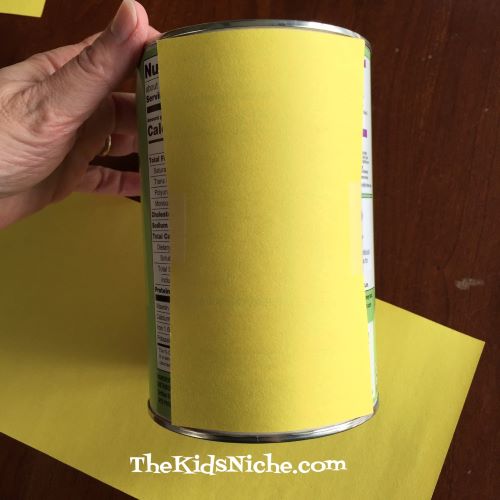
When you were a child, did you ever have a place where you stored your special treasures? A box or a can that was just yours and you kept important little things hidden in it? Maybe it was a special picture that you colored or a keepsake from a vacation trip or a picture of you and your best friend or a really cool seashell or stone that you found or any number of other things. Today let’s make such a spot for your kids to hide their special mementos! You can use a box if you have one, but I used an empty oatmeal container.
First remove the lid and take a slightly damp paper towel and wipe out any tiny bits of oatmeal that might be left behind. Keep the lid off for a while so the container will dry completely inside. Now collect the other items we’ll need for this project such as a piece of construction paper, markers, a ruler, scissors, a pencil and tape.
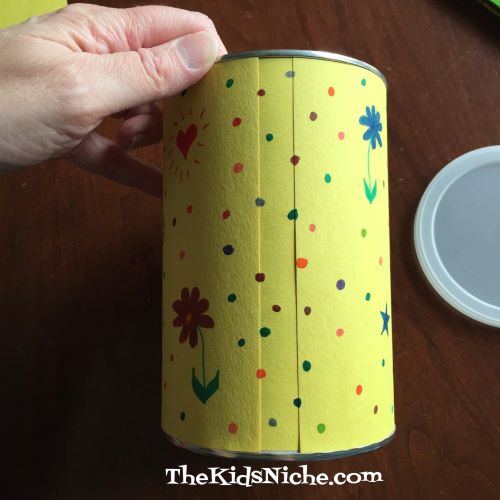
Using the ruler, measure to see how long the side of the can is. We will be wrapping a piece of construction paper around it, but first we’ll need to cut the paper to the right size to fit top to bottom.
My container measured 5 3/4″ long in between the top and bottom rims. The size of my construction paper was 9″ x 12″. Take your piece of construction paper and mark a spot on each end whatever the length of your container is. Draw a line between those 2 dots and then cut along the line. For example, since my container was 5 3/4″ long, I cut my construction paper to a piece that was 5 3/4″ x 12″.
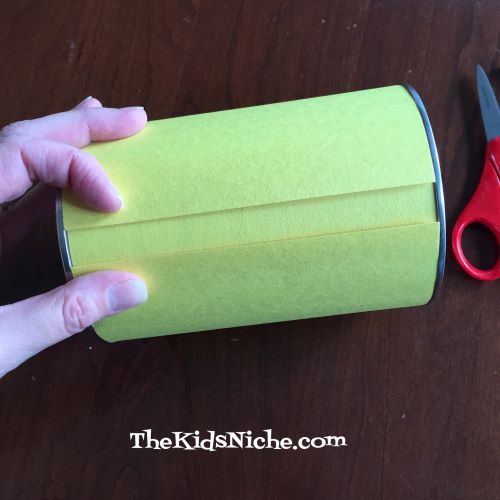
Take the piece of paper that you cut and wrap it around your container to see if it will wrap all the way around. Mine was a bit short and the edges didn’t meet.
I used the leftover piece of construction paper to cut another piece that was 5 3/4″ long and the width of the paper that was left.
I taped it on to the backside of my oatmeal container.
Now wrap the first piece of paper you cut around the container to make sure it will fit…but don’t tape it down just yet.
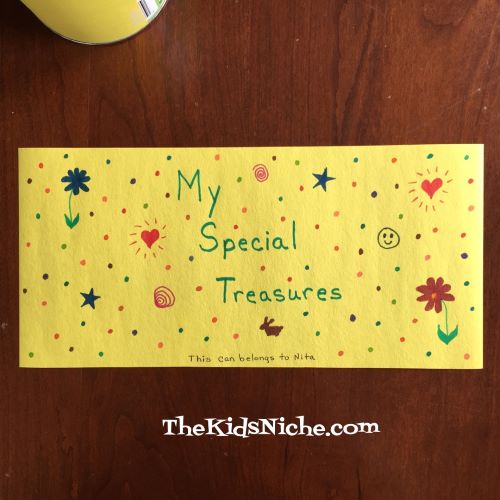
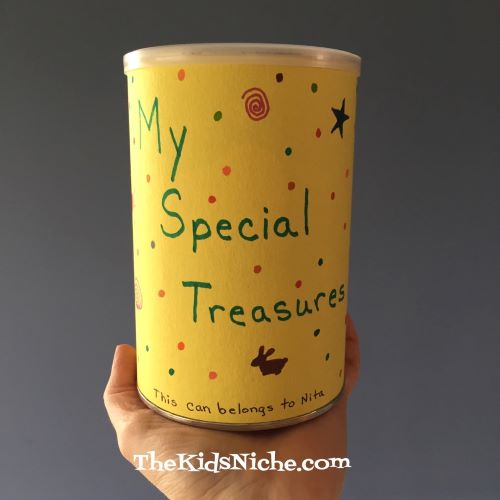
Mine fit just fine so then I was ready for the next step. Lay the first piece of paper you cut down on your table and write, draw and color whatever words and designs you would like to have on your special treasures container. I chose to write “My Special Treasures” in large letters and then in tiny letters at the bottom I wrote “This can belongs to Nita”. You can decorate your container in your own way. I drew some flowers, a bunny, a couple hearts, some designs and lots and lots of polka dots.
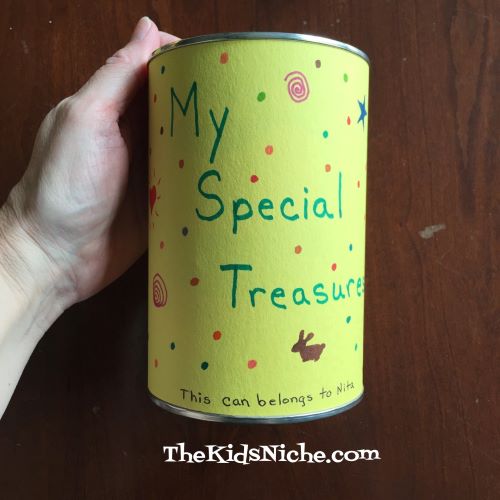
Once you have decorated your paper, its time to tape it onto the container. I used double-sided tape so that I could tape on the back side of my design. You could also tape it from the front side or use glue to hold it in place. I like the idea of using tape because later you can remove this cover and put on a new one.
On the back side of the container where I added the extra bit of paper so the container would be completely covered, it looked like this.
You can leave it like this or you can add a few more tiny designs to make that part blend in with the rest of your design. Since I had drawn so many polka dots, I just added a few more on this part.
And that’s it! Place the lid back on the top and go find some treasures to store inside!
I hope you’ve enjoyed our fun craft for today! May you find lots of wonderful things to store in your special treasures container! Thanks for stopping by! 🙂
Well, it’s Easter weekend and many things are different this year because of the Covid-19 pandemic and the “stay-at-home”and quarantine orders. We can choose to be miserable and dwell on what we can’t do or we can pick ourselves up and make our own fun things to do. Here is one suggestion that will bring giggles and smiles to the kids’ faces. Let’s race paper caterpillars! 🙂 All that’s needed is some construction paper, something to color with, a pair of scissors and a drinking straw. The Crayola company has beautiful directions for this project on their website and here is the link to get you there:
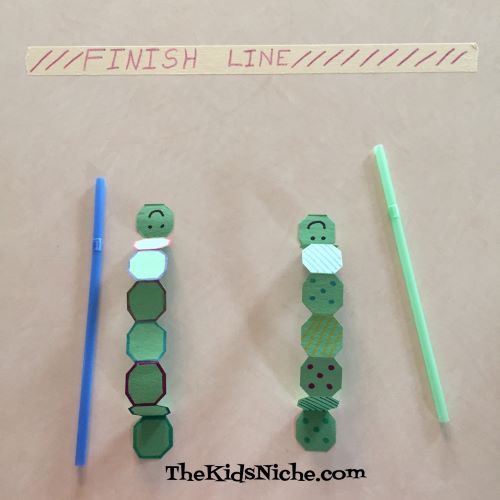
We tried this project at our house so I want to share our paper caterpillar fun with you. Here are our caterpillars…let’s see…they need names…how about Carl and Cathy?
Carl is the one on the left and Cathy has the dots and stripes. They are ready for the race! Let’s set up the Finish Line!
The way you make them race is to blow on their backs through the straw. It will make them hop up and down and move forward. Here we go! Ready….Set…GO!! And the caterpillars are off! They’re inching their way down the racetrack…steady there, guys…oh, my, this is going to be a close race! Who will cross the finish line first?! Aaaaaand the winner IS…….
Cathy Caterpillar!! YAAAAY!! But look at that! Carl was very close behind! I think he might win the next race, don’t you? Everyone in the family can make a caterpillar and you can have a competition. I hope you at least have fun making and racing your caterpillars! Happy Good Friday to you! 🙂
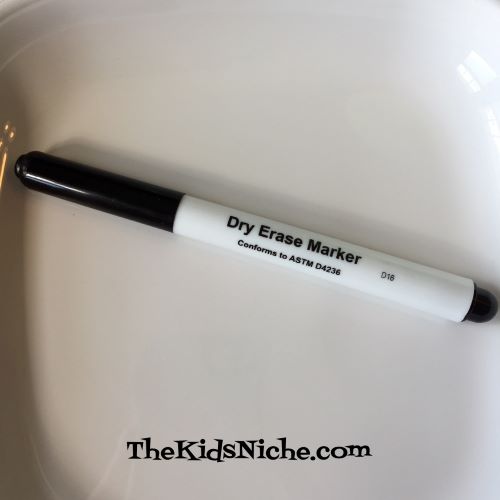
Here is a kid-tested-really-awesome experiment that you’ll have fun trying out with your kids! Making water tattoos is something I had never heard of until last night when 2 of our grandkids sent us some videos of their experiment making them. I’m so glad they shared this experiment with us because it looked so cool that I had to try it myself and now I want to share it with you! Here’s what you need: a white plate or dish, a dry erase marker and some water.
Make sure you have a dry erase marker for this experiment.
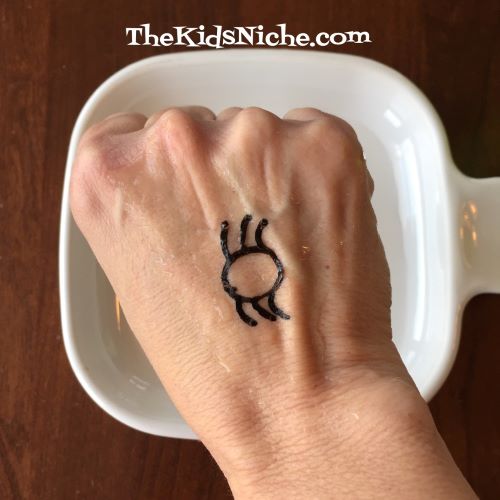
Using the dry erase marker, draw some small simple pictures on the plate. The less complicated the better. I drew a heart and a spider.
Pour water very slowly onto the plate and watch your drawings. If it works, they will come loose from the plate and start floating! The heart I drew didn’t work, but the spider did! Notice how its in a different position floating on the water in the following picture.
Isn’t that cool??! 🙂 Now, if you lay the back of your hand on top of the floating picture and press your hand down a bit, when you lift your hand you should have a tattoo on the back of your hand! The spider picture worked for me.
How fun is that?! 🙂 Don’t worry if it doesn’t work the first time. Dry your plate off and try again. Make sure to pour the water slowly and beside the pictures you drew, not directly on it. Here are 2 videos our grandchildren sent us that show even better how to make water tattoos. 🙂 Thanks, kiddos, for sharing this fun idea with us! 🙂
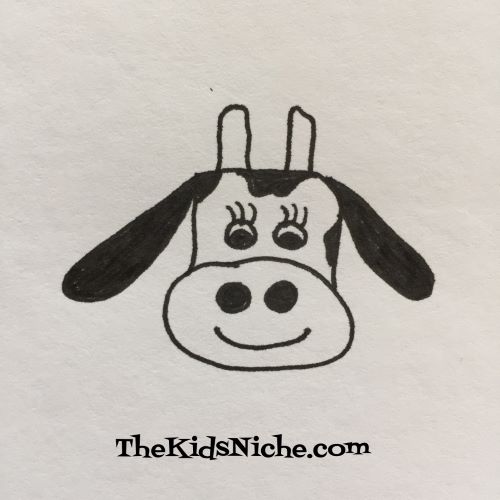
It’s time to get your paper and drawing utensils out again! Today let’s create Bart the Bull. A bull is a male or boy cow. About 2 weeks ago we drew Bessie the cow. If you missed that post, you can go back to it here and have fun drawing Bessie. https://thekidsniche.com/2020/03/26/lets-draw-a-cow/
Here’s Bessie:
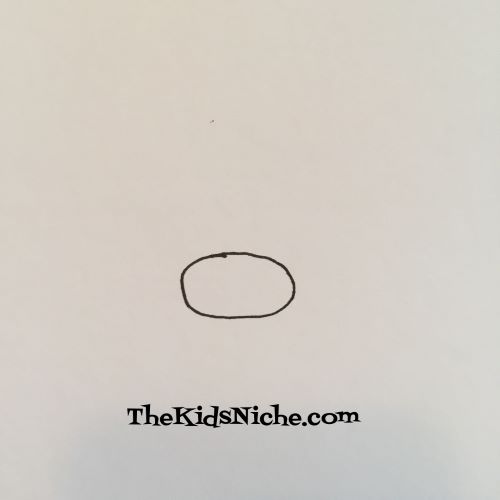
Ok, back to drawing Bart! We’ll start the same way we did when we drew Bessie, with an oval shape laying on its side.
Next we’ll draw part of a rounded rectangle for his head on top of the oval. Like this:
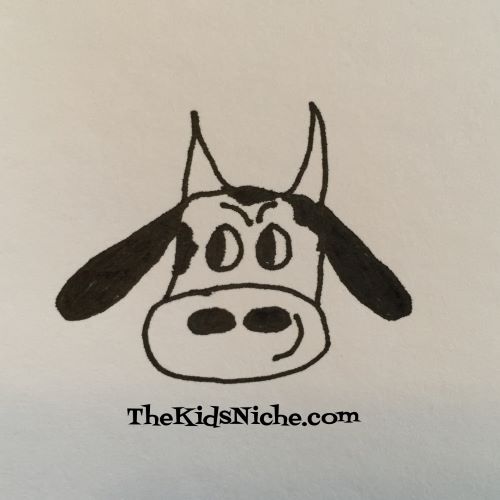
My rounded rectangle didn’t come out even, but that’s ok, it will still look fine when we are finished drawing. So if yours isn’t perfect either, don’t worry about it! It will still be great! 🙂 Now let’s add 2 small ovals for Bart’s eyes and 2 ovals for his nose. Here’s where to place them:
The next step is to color only half of the eyes in. Bart will be looking to the right or to the left or up or down depending on which half you color in. Also color in the 2 ovals inside the larger oval for his nose holes. Then draw 2 eyebrows above his eyes and a curve for his mouth smiling. I drew his mouth on the side and his eyebrows coming close together to make him look ornery. 😉
Now draw his 2 ears.
And now he needs you to give him 2 horns.
It’s up to you to decide if Bart is a black and white cow like Bessie or some other color. Here’s one way he might look if he is a black and white cow.
This is Bart if you’d like to make him a brown cow.
And there you have it! All done and a great job you did! Now you can draw as many cows as you like. I hope you had fun drawing with me today!
Easter is this coming Sunday, April 12th! Have you made your plans? Things will be different this year, won’t they? Lots of events have been canceled due to the Coronavirus pandemic but you can still have Easter fun even if you are stuck at home or stuck inside! Let me tell you what we did a couple years ago for Easter and maybe you can tweak it a bit to fit your situation. I was staying with our daughter and her hubby and kids while my hubby was gone on a business trip to China. It was cold and even snowing that week so I made up an Easter Egg Treasure Hunt for the kids. I started out with 96 plastic colored eggs and a 100 piece puzzle. I put the puzzle together, slid it carefully off the table onto a cookie sheet, put another cookie sheet on top of the puzzle so I could turn it over, then slid it back onto the table. I grabbed a pen and wrote the following rhyme on the back:
“Good job! You did it!
You stuck it out!
So now let’s see what
This hunt is about!
Could there be diamonds?
Or a brand new car?
Alas, no – we DO love you
But we can’t go THAT far!
So hidden close to where
I now reside
You’ll find the box
That holds your surprise!”
I then broke the puzzle up and put 1 piece of the puzzle in each plastic colored Easter egg. Four eggs needed to have 2 pieces inside in order to make the puzzle pieces fit in the number of eggs I had. I then hid the eggs around the inside of the house. When it came time to have the Easter egg hunt, the kids were off to find them in a hurry!
After they searched for eggs, they gathered together to count the eggs and make sure they had found all of them.
Once we made sure they had all the eggs, they took them to the dining room table and opened them and removed all the puzzle pieces. Then the whole family gathered around to work on putting the puzzle together.
When the puzzle was finished, they used the cookie sheet method again to turn the puzzle over so they could read the back and see what to do next. The part of the rhyme that says “So hidden close to where I now reside…” referred to the bedroom that I was staying in while I was visiting their family. The race was on once they deduced where the box with the surprise might be! They found it beside my bed. Inside the box was a new Tangle puzzle and a small Nerf gun for each kiddo, wrapped in tissue paper. They each got 6 “bullets”. In the bottom of the box was a piece of folded paper that read “Read this after opening gifts.” This message said…
“Oh, hey, wait! You’re not done yet!
There’s still another prize to get!
To reach your prize you must take out
Any bad guys hanging about.
But you must be careful with your aim
Because a wrong shot will end the game.
Teamwork is what you will need
To finish this task with all due speed.
3 minutes to shoot all the bad
But not 1 good guy can be had.
20 bad guys must go down
In order for you to reach the crown!”
There was a room set up with lots of small pieces of paper with stickers on them. 20 pieces of paper had dinosaurs on them which were the “bad guys”. And there were 20 pieces of paper that had puppy and kitty stickers on them which, of course, were the “good guys”. The pieces of paper were folded in half so they would stand up. The idea was for the kids to shoot and knock over all the dinosaurs within 3 minutes, but none of the puppies and kitties could be hit. If they knocked over a puppy or kitty, then they had to start all over with all the papers being set up again.
After the kids “shot” all the dinosaurs, they reached their prize – a new book for each one. I got too involved and forgot to take many pictures but here are some from after they finished their treasure hunt. This one is Grandma (me) trying to shoot a “bullet” through the Tangle puzzle hoop. Ha! (Grimacing always helps your aim…lol)
We had fun with our Easter Egg Treasure Hunt! I hope you can take the ideas that we used and tweak it to have a fun Easter at your house too! 🙂
A friend of mine shared this really cute idea on her Facebook page today and I thought it looked so fun that I want to share it with all of you! What a great idea for something fun to do while staying home! Thank you, tiphero.com, for sharing this awesome project!